1. Úvod
This manual provides essential instructions for the installation, operation, and maintenance of your Renogy Rover 20A MPPT Charge Controller. Please read this manual thoroughly before installation and use to ensure optimal performance and safety. Keep this manual for future reference.

Figure 1.1: Renogy Rover 20A MPPT Charge Controller
The Renogy Rover 20A MPPT Charge Controller is designed to optimize the charging process from your solar panels to your battery bank. It features Maximum Power Point Tracking (MPPT) technology, ensuring high efficiency even under varying light conditions. This controller is compatible with 12V and 24V battery systems and supports various battery types, including Gel, Sealed, Flooded, and Lithium.
2. Bezpečnostní informace
Během instalace a provozu dodržujte následující bezpečnostní opatření:
- Vždy nejprve připojte baterii k regulátoru nabíjení, poté k solárnímu panelu a nakonec k zátěži. Odpojení provádějte v opačném pořadí.
- Ensure all wiring is correctly sized and connections are secure to prevent loose connections that can cause excessive heating.
- Install the charge controller in a well-ventilated area, away from flammable materials and direct sunlight.
- Do not disassemble or attempt to repair the charge controller. Contact Renogy support for assistance.
- Wear appropriate personal protective equipment, including eye protection, when working with batteries and electrical systems.
- Zajistěte, aby systém voltage nepřekračuje maximální vstupní objemtage of the controller (100V).
3. Obsah balení
Ověřte, zda je v balení obsaženo vše:
- Renogy Rover 20A MPPT Solar Charge Controller
- Kabel snímače teploty
- Uživatelská příručka (tento dokument)
4. Vlastnosti produktu
The Renogy Rover 20A MPPT Charge Controller offers advanced features for efficient solar power management:
- Dual-Peak MPPT Technology: Achieves up to 99.9% tracking efficiency and 98% conversion efficiency, optimizing solar harvest even in partial shading or cloudy conditions.
- Široká kompatibilita baterií: Supports Gel, Sealed, Flooded, and Lithium battery types.
- Teplotní kompenzace: Operates effectively across a wide temperature range (-40°F to 149°F) with automatic charging adjustments to protect batteries.
- Komplexní ochrana: Includes TVS surge protection against lightning strikes, reverse polarity, overcharging, over-discharging, overload, and short-circuit protection.
- 4-Stage Nabíjení: Provides precise Bulk, Absorption, Float, and Equalization charging for lead-acid batteries, extending their lifespan.
- Lithium Battery Reactivation: Safely revives deeply discharged lithium batteries.
- LCD Display & Data Logging: Backlit LCD displays real-time voltage, current, and error information. Stores up to one year of performance data.
- Modbus Support: Integrates Modbus protocol for smart home solar kits and remote monitoring.
- Direct DC Load Output: Can directly power DC appliances and handle capacitive load surges. Features load scheduling via timer.
- App Monitoring (Optional): Compatible with the BT-2 module (sold separately) for monitoring via the Renogy DC Home App.
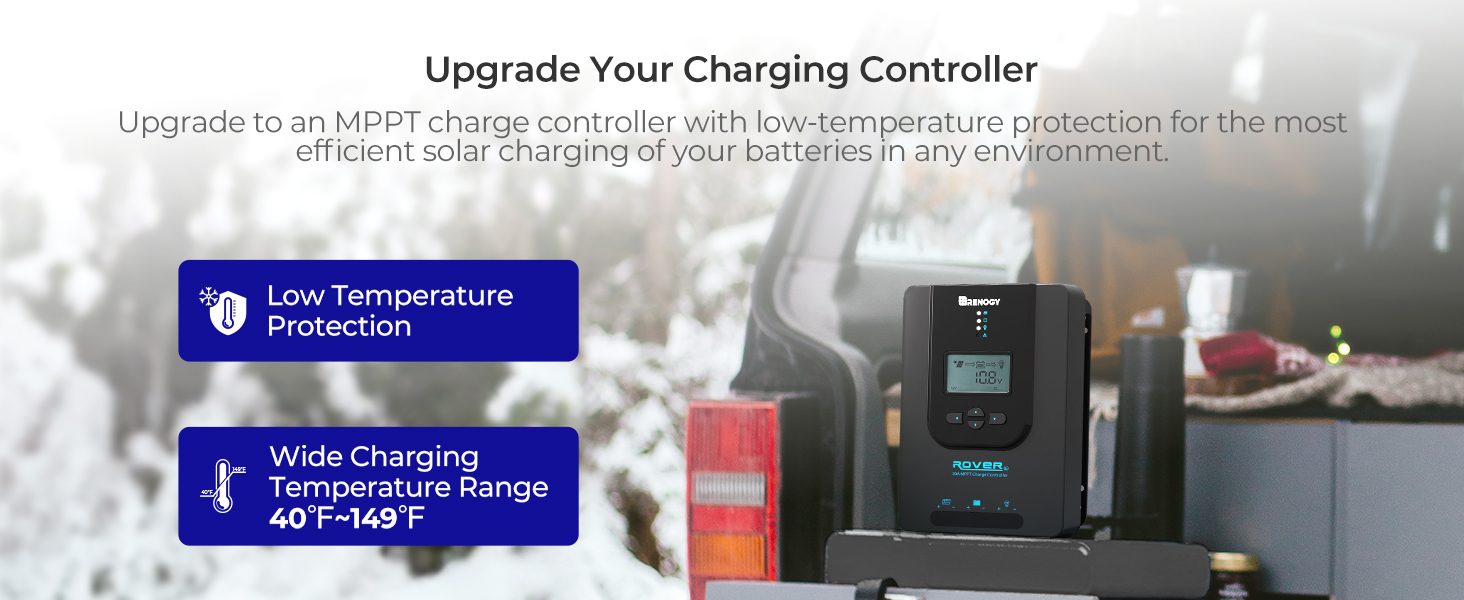
Figure 4.1: Maximizing Solar Harvest with 99% Tracking Efficiency

Figure 4.2: Charge Controller with Wide Temperature Adaptability (-40°F to 149°F)
5. Nastavení a instalace
Follow these steps for proper installation of your charge controller:
- Montáž: Choose a dry, well-ventilated location for mounting the controller. Ensure there is sufficient clearance around the unit for heat dissipation. Mount vertically on a non-flammable surface.
- Sekvence zapojení:
- Connect the battery cables to the battery terminals on the charge controller. Ensure correct polarity (+ to + and - to -).
- Connect the solar panel cables to the PV terminals on the charge controller. Ensure correct polarity.
- Connect the load cables to the load terminals on the charge controller (optional). Ensure correct polarity.
- Teplotní senzor: Connect the included temperature sensor cable to the designated port on the controller. Place the sensor near the battery to enable accurate temperature compensation for charging.
- Počáteční zapnutí: Once all connections are secure, the controller will power on and display system information on the LCD.
Important: Always connect the battery first and disconnect the battery last to prevent damage to the controller.
6. Návod k obsluze
The LCD display and buttons allow you to monitor and configure the charge controller.
6.1. Navigace na LCD displeji
Use the buttons on the front panel to navigate through the display screens and adjust settings. Refer to the on-screen prompts for specific actions like 'Select' or 'Enter'.
6.2. Výběr typu baterie
The controller automatically detects 12V/24V system voltages for non-lithium batteries. For lithium batteries, you must manually adjust the battery voltage setting through the controller's menu to ensure proper charging parameters.
6.3. Lithium Battery Activation
The controller includes a lithium battery activation function. This feature allows charging of deeply discharged lithium batteries that might otherwise be unresponsive.

Figure 6.1: Lithium Activation ON
To prevent over-activation and unnecessary activation, you can turn OFF the lithium activation function. This helps avoid potential damage to the battery if it is not intended for activation.

Figure 6.2: Lithium Activation OFF
6.4. Monitoring and Load Control
The LCD provides real-time data on solar input, battery status, and load output. You can also configure load settings, including timers for scheduled operation of connected DC appliances.
7. Údržba
Pravidelná údržba zajišťuje dlouhou životnost a optimální výkon vašeho regulátoru nabíjení:
- Kontrola připojení: Periodically check all wiring connections for tightness and corrosion. Ensure no wires are frayed or damaged.
- Vyčistěte ovladač: Udržujte ovladač čistý a bez prachu a nečistot. K otření povrchu používejte suchý hadřík. Nepoužívejte kapaliny ani rozpouštědla.
- Větrání: Ensure the installation area remains well-ventilated to prevent overheating.
- Kontrola baterie: Regularly inspect your batteries for any signs of damage, swelling, or leaks.
8. Řešení problémů
Pokud narazíte na problémy s regulátorem nabíjení, podívejte se na následující běžné problémy a jejich řešení:
| Problém | Možná příčina | Řešení |
|---|---|---|
| Ovladač se nezapíná | Loose battery connection, battery voltage příliš nízké | Check battery wiring and voltage. Ensure battery is connected first. |
| Žádné solární nabíjení | Solar panel not connected, insufficient sunlight, incorrect polarity | Verify solar panel connections and polarity. Check for shading. |
| Zatížení nefunguje | Load disconnected, overload, load timer active | Check load connections. Reduce load. Adjust load timer settings. |
| Nesprávný svtage čtení | Loose connections, faulty sensor | Check all wiring. Ensure temperature sensor is properly connected. |
For persistent issues or error codes not listed, please contact Renogy customer support.
9. Specifikace
| Specifikace | Hodnota |
|---|---|
| Značka | Renogy |
| Model | Rover 20A MPPT |
| Maximální nabíjecí proud | 20A |
| System Voltage | 12V/24V Auto-Detect (DC) |
| Max PV Input Voltage | 100V |
| Efektivita sledování | 99.9 % |
| Účinnost konverze | 98 % |
| Typ zobrazení | LCD |
| Rozsah provozních teplot | -40 °F až 149 °F (-40 °C až 65 °C) |
| Materiál | Akrylonitrilbutadienstyren (ABS), plast |
| Hmotnost položky | 1.59 kg |
| UPC / GTIN | 840315237445 |
10. Záruka a podpora
The Renogy Rover 20A MPPT Charge Controller comes with a 3letá záruka na materiál a zpracování. This warranty covers defects in materials and manufacturing under normal use.

Figure 10.1: 3-Year Material and Workmanship Warranty
For warranty claims, technical assistance, or any questions regarding your product, please contact Renogy customer support. Keep your purchase receipt as proof of purchase for warranty services.
You can find more information and contact details on the official Renogy webmísto: www.renogy.com