1. Úvod
This manual provides detailed instructions for the installation, operation, and maintenance of your ANNKE AU-DT81DX200-V1 4K 8-Channel Digital Video Recorder (DVR). This DVR is designed for security surveillance systems, offering 4K (8MP) high-definition live viewing and recording capabilities. It features advanced H.265+ video compression, AI human/vehicle detection, and supports various camera types for flexible integration.

Image 1.1: The ANNKE 4K 8CH DVR connected to a display, illustrating its 4K Ultra HD video capability.
2. Obsah balení
Verify that all items listed below are included in your package. If any items are missing or damaged, contact ANNKE customer support.
- 1x ANNKE 4K 8CH DVR with 2TB Hard Drive
- 1x HDMI kabel o délce 1.8 m
- 1x ethernetový kabel o délce 1 m
- 1x napájecí adaptér
- 1x USB myš
- 1x Uživatelská příručka (tento dokument)
- 1x Samolepka na zeď

Image 2.1: Visual representation of all components included in the ANNKE 4K 8CH DVR package.
3. Konec systémuview
The ANNKE AU-DT81DX200-V1 DVR is a hybrid 5-in-1 system, supporting various camera technologies. It can operate in two primary modes:
- Režim DVR: Supports up to 8 BNC (TVI/AHD/CVI/CVBS) cameras and an additional 4 IP cameras.
- Režim NVR: Can be configured to support up to 12 IP cameras exclusively.
This flexibility allows for integration with existing analog systems while providing options for future IP camera expansion.
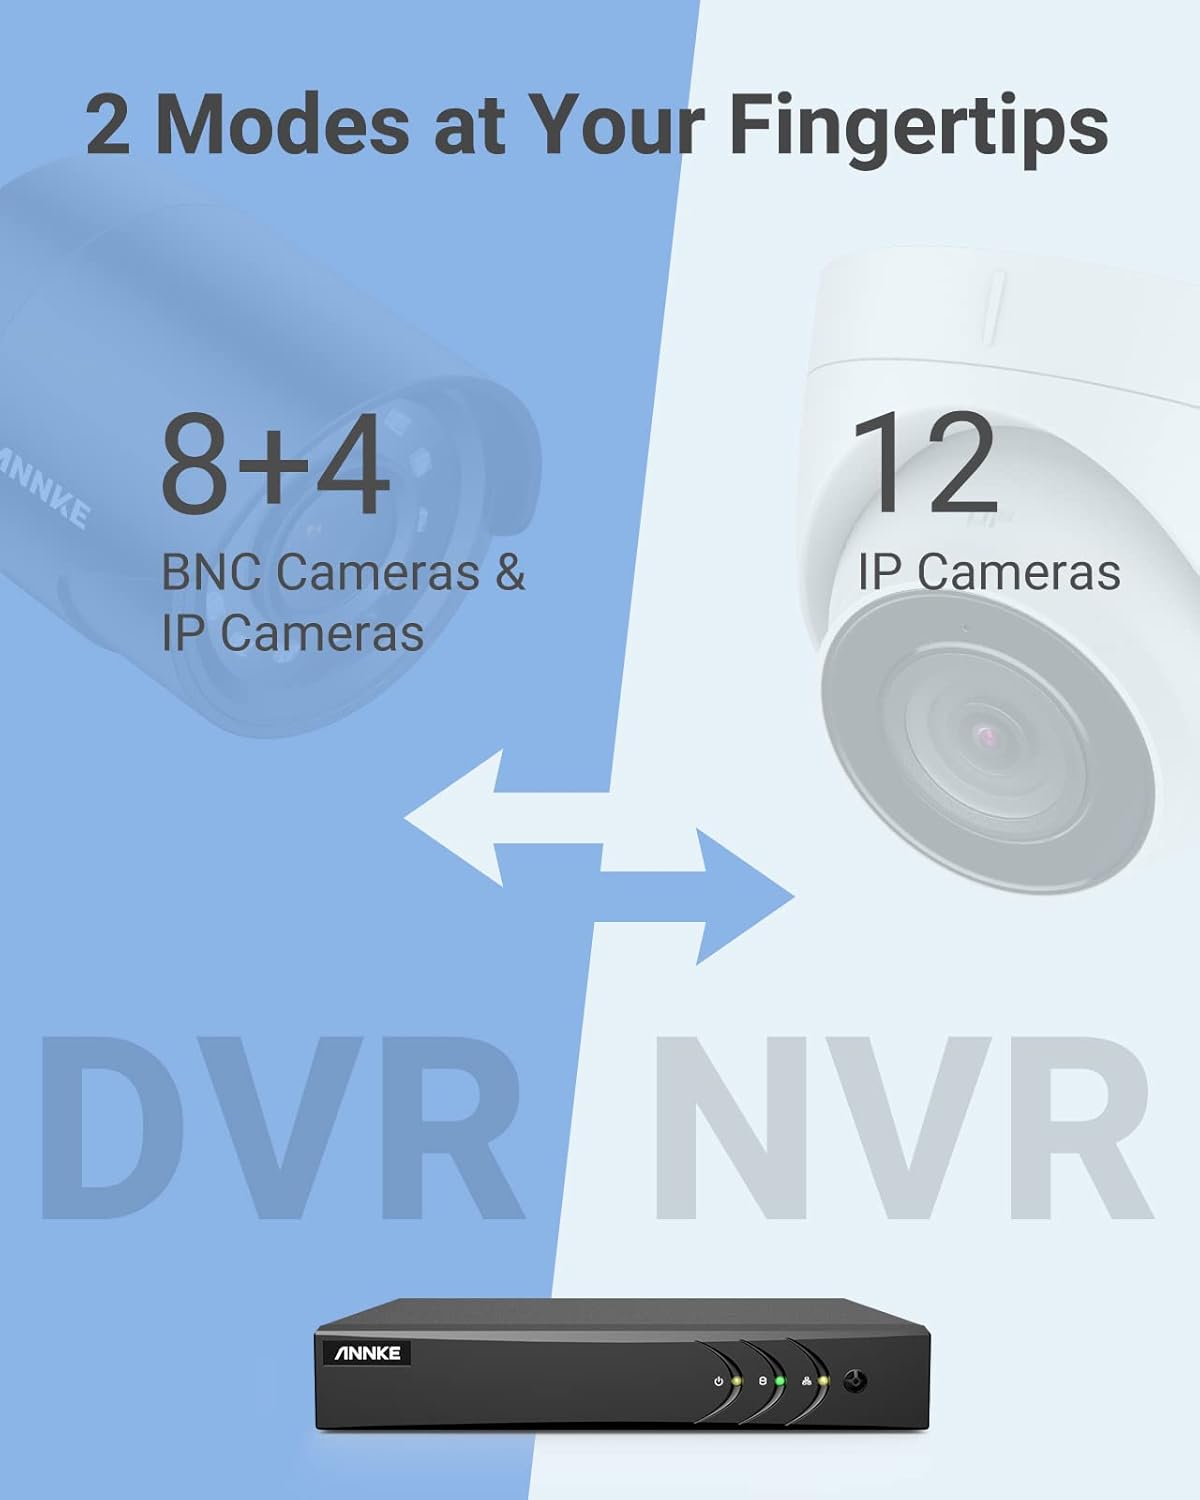
Image 3.1: Illustration of the DVR's dual operational modes, supporting both BNC and IP cameras or IP cameras exclusively.
4. Instalační příručka
4.1 Fyzické nastavení
- Připojení kamer: Connect your security cameras to the BNC video input ports on the back of the DVR. For IP cameras, connect them to your network switch/router, and ensure the DVR is also connected to the same network via the Ethernet cable.
- Připojení monitoru: Připojte monitor k výstupnímu portu HDMI nebo VGA DVR pomocí dodaného kabelu HDMI nebo kabelu VGA (není součástí balení).
- Připojení USB myši: Zapojte USB myš do jednoho z USB portů na DVR.
- Připojte napájení: Connect the power adapter to the DVR's power input and then plug it into a power outlet. The DVR will power on automatically.
4.2 Počáteční konfigurace
Upon first boot, the DVR will guide you through an initial setup wizard. Follow the on-screen prompts to:
- Nastavte silné heslo pro účet správce.
- Nakonfigurujte síťová nastavení (pro většinu uživatelů se doporučuje DHCP).
- Nastavte datum a čas.
- Scan and add IP cameras if applicable.
5. Obsluha DVR
5.1 Živě View
Po počátečním nastavení bude DVR zobrazovat živý obraz view from connected cameras. Use the USB mouse to navigate the interface. Right-click to access the main menu.
5.2 Nahrávání
The DVR is pre-configured for continuous recording. You can customize recording schedules, motion-triggered recording, or alarm-triggered recording via the main menu under Nahrát > Plán.
5.3 Přehrávání
Na review zaznamenané footage:
- Z živého vysílání view, klikněte pravým tlačítkem myši a vyberte Přehrávání.
- Vyberte požadovanou kameru (kamery) a datum.
- Use the timeline to navigate through recordings. Events (like motion detection) are often marked on the timeline for quick access.

Image 5.1: The DVR's playback interface, demonstrating how to locate and review recorded events on a timeline.
6. Pokročilé funkce
6.1 Detekce lidí/vozidel pomocí umělé inteligence
The DVR incorporates deep learning-based motion detection 2.0, which can differentiate between human and vehicle movements. This significantly reduces false alarms caused by environmental factors such as leaves or light changes.
- Konfigurace: Enable and configure AI detection for each analog channel via the main menu under AI > Motion Detection 2.0.
- Smart Events: Supports line crossing and intrusion detection for specific areas.
- Upozornění: Configure the DVR to send app push notifications, email alerts, or trigger a buzzer when human or vehicle motion is detected.
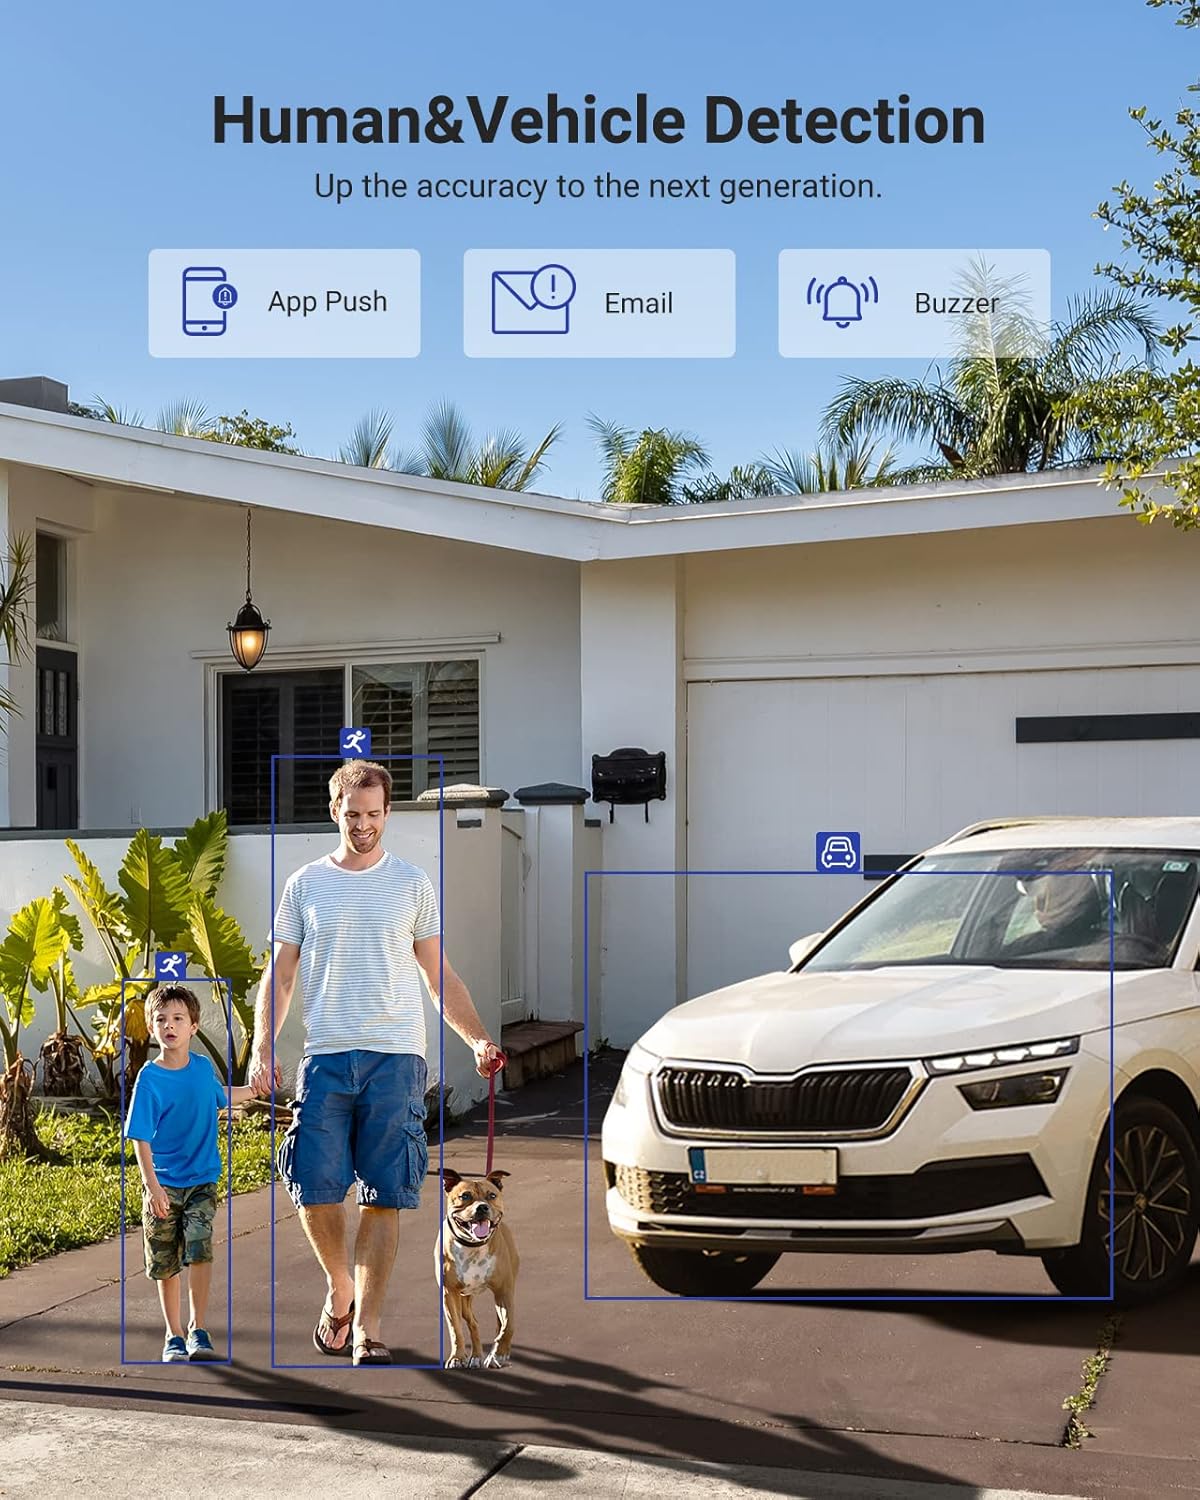
Image 6.1: Visual demonstration of the AI human and vehicle detection capability, showing how the system identifies and distinguishes between people and vehicles.
6.2 Vzdálený přístup
Access your DVR remotely from anywhere using the ANNKE Vision App or a web prohlížeč.
- Aplikace ANNKE Vision: Download the app from the App Store (iOS) or Google Play Store (Android). Register an account and add your DVR by scanning the QR code or entering its serial number.
- Web prohlížeč: Access the DVR's web rozhraní zadáním jeho IP adresy do a web prohlížeč na vašem počítači.
- Kompatibilita: The system is compatible with various devices including smartphones, tablets, laptops, and personal computers. It also supports integration with Alexa for voice control.

Image 6.2: Remote access via the ANNKE Vision App, showing compatibility with mobile devices and Alexa.
7. Správa videa
7.1 Komprese videa H.265+
The DVR utilizes advanced H.265+ video compression technology. This technology significantly reduces file sizes, saving up to 80% of storage space compared to H.264 compression, while maintaining video quality. This allows for longer recording durations on the same 2TB hard drive.

Image 7.1: Comparison illustrating the storage efficiency of H.265+ compression versus H.264.
8. Kompatibilita
The ANNKE AU-DT81DX200-V1 is a versatile 5-in-1 hybrid DVR, designed to be compatible with a wide range of security cameras:
- HD TVI Input: Supports 8 MP@15 fps, 5 MP@20 fps, 3K@20 fps, 4 MP@30 fps.
- AHD Input: Supports 5 MP@20 fps, 4 MP@30 fps, 1080p@25 fps, 1080p@30 fps.
- HD CVI Input: Supports 4 MP@30 fps, 4 MP@25 fps, 1080p@25 fps, 1080p@30 fps.
- Vstup CVBS: Supports PAL/NTSC standards.
- IPC Input: Supports up to 8MP IP cameras.
This broad compatibility ensures that the DVR can integrate with both older analog cameras and modern IP cameras, providing a flexible upgrade path for existing surveillance systems.

Image 8.1: The DVR's compatibility with various camera technologies, including TVI, CVI, AHD, and IP cameras.
9. Specifikace
| Funkce | Specifikace |
|---|---|
| Značka | ANNKE |
| Číslo modelu | AU-DT81DX200-V1 |
| Technologie připojení | Kabelové |
| Rozlišení záznamu videa | 4K (8MP) |
| Počet kanálů | 8 (Analog) + 4 (IP) or 12 (IP) |
| Komprese videa | H.265 Pro+/H.265 Pro/H.265/H.264+/H.264 |
| Supported Camera Types | TVI, AHD, CVI, CVBS, IPC |
| Funkce AI | Human Detection, Vehicle Detection, Line Crossing, Intrusion Detection |
| Kapacita paměti | 2 TB HDD (Up to 10 TB supported) |
| Vzdálený přístup | ANNKE Vision App, Web Prohlížeč |
| Kompatibilní zařízení | Fotoaparáty, notebooky, osobní počítače, chytré telefony, tablety |
| Zdroj napájení | Elektrický kabel |
| Barva | Černý |
| Rozměry položky | 17.13 x 12.4 x 3.86 palce |
10. Údržba
Pravidelná údržba zajišťuje optimální výkon a dlouhou životnost vašeho DVR systému.
- Čištění: Udržujte DVR bez prachu. K čištění vnějšího povrchu používejte měkký, suchý hadřík. Nepoužívejte tekuté čisticí prostředky.
- Větrání: Ujistěte se, že je DVR umístěn v dobře větraném prostoru, aby nedošlo k přehřátí. Neblokujte větrací otvory.
- Aktualizace firmwaru: Pravidelně kontrolujte oficiální informace společnosti ANNKE. website for firmware updates. Keeping your DVR's firmware updated can improve performance, add new features, and enhance security.
- Záloha dat: Pravidelně zálohujte důležitá videatage na externí paměťové zařízení.
- Stav pevného disku: The DVR's menu may offer options to check the health status of the installed hard drive. Monitor this periodically.
11. Řešení problémů
This section addresses common issues you might encounter with your DVR.
- Žádný video výstup:
- Zkontrolujte připojení kabelu HDMI/VGA k DVR i monitoru.
- Ujistěte se, že je monitor nastaven na správný vstupní zdroj.
- Verify the DVR is powered on (power indicator light should be active).
- Bez zobrazení kamery:
- Check camera power supply and video cable connections.
- For IP cameras, ensure they are on the same network as the DVR and properly added in the DVR's camera management settings.
- Verify camera compatibility with the DVR (refer to Section 8).
- Vzdálený přístup nefunguje:
- Ujistěte se, že je DVR připojen k internetu.
- Check network settings on the DVR (e.g., DHCP enabled, correct IP address).
- Ověřte, zda je aplikace ANNKE Vision aktualizována na nejnovější verzi.
- Ensure the DVR is properly added to your ANNKE Vision account.
- Falešné poplachy při pohybu:
- Adjust the sensitivity of motion detection in the DVR settings.
- Utilize the AI Human/Vehicle Detection feature (Section 6.1) to filter out irrelevant movements.
- Define specific detection zones to exclude areas with frequent non-threatening movement.
If you continue to experience issues, please contact ANNKE customer support.
12. Záruka a podpora
Výrobky ANNKE se obvykle dodávají s omezenou zárukou. Prostudujte si prosím záruční list, který je součástí balení, nebo navštivte oficiální webové stránky ANNKE. webPodrobné záruční podmínky platné pro váš region naleznete na webových stránkách.
Pro technickou podporu, dotazy k produktům nebo reklamace v záruce kontaktujte zákaznický servis ANNKE prostřednictvím jejich oficiálních website or the contact information provided in your product documentation. Have your model number (AU-DT81DX200-V1) and purchase details ready when contacting support.
Oficiální web ANNKE Webmísto: www.annke.com