
HITBOX HBT250P (Welder), HT-111 (Welding Helmet)
HITBOX HBT250P AC/DC TIG Welder and HT-111 Welding Helmet User Manual
Model: HBT250P (Welder), HT-111 (Welding Helmet)
1. Úvod
This manual provides essential information for the safe and effective operation, setup, maintenance, and troubleshooting of your HITBOX HBT250P AC/DC TIG Welder and HT-111 Welding Helmet. Please read this manual thoroughly before using the equipment to ensure proper function and safety.

Figure 1.1: The HITBOX HBT250P AC/DC TIG Welder and HT-111 Welding Helmet. This image displays the complete welding setup, including the orange and black TIG welder unit, the TIG torch, ground clamp, and the black auto-darkening welding helmet.
2. Bezpečnostní informace
VAROVÁNÍ: Svařování může být nebezpečné. Vždy dodržujte bezpečnostní opatření, abyste předešli zranění nebo smrti.
- Elektrický šok: Can kill. Do not touch live electrical parts. Wear dry gloves and protective clothing. Insulate yourself from work and ground.
- Výpary a plyny: Může být nebezpečné pro vaše zdraví. Chraňte hlavu před výpary. K odstranění výparů z dýchací zóny použijte větrání nebo odsávání.
- Obloukové paprsky: Can burn eyes and skin. Wear a welding helmet with a proper shade filter to protect your eyes and face. Wear appropriate clothing to protect your skin.
- Požár a výbuch: Jiskry při svařování mohou způsobit požár nebo výbuch. Udržujte hořlavé materiály mimo dosah svařovacího prostoru. Mějte po ruce hasicí přístroj.
- Horké díly: Může způsobit těžké popáleniny. Před manipulací nechte horké části vychladnout.
- Hluk: Nadměrný hluk může poškodit sluch. Používejte ochranu sluchu.
3. Konec produktuview
3.1. HITBOX HBT250P AC/DC TIG Welder
The HBT250P is an inverter-based arc welding power source designed for AC/DC TIG welding and Stick (MMA) welding. It features advanced waveforms, 2T/4T mode, and pulse controls, allowing for precise customization of welding parameters.

Obrázek 3.1: Přední strana view of the HITBOX HBT250P AC/DC TIG Welder. This image shows the welder's front panel with various connectors for the TIG torch, ground clamp, and gas input, along with the main control panel.
Vlastnosti ovládacího panelu:

Obrázek 3.2: Detailní view of the HBT250P Welder control panel. This image highlights the digital display, mode selection buttons (MMA, TIG, AC, DC, Pulse), and the mechanical gear knob for parameter adjustment, along with a diagram illustrating TIG welding waveform settings.
- Digitální displej: Zobrazuje aktuální parametry svařování.
- Mechanical Gear Knob: For precise adjustment of settings.
- Tlačítka pro výběr režimu:
- MMA (Stick Welding)
- TIG (Tungsten Inert Gas Welding)
- AC (Alternating Current for Aluminum)
- DC (Direct Current for Steel, Stainless Steel)
- Pulse (Pulsed TIG welding)
- Režim 2T/4T: Torch trigger control options.
- Parameter Adjustments: Up Slope, Peak Amps, Base Amps, Down Slope, AC Frequency, AC Balance, Pulse Frequency, Pulse Duty Cycle.
3.2. HT-111 Welding Helmet
The HT-111 Welding Helmet is designed for comfort and protection during welding operations. It features auto-darkening technology, real color view, and is ultra-lightweight.

Figure 3.3: The HT-111 Welding Helmet highlighting its lightweight design and wide vision area. This image shows the helmet from a side profile, emphasizing its minimal weight (0.86 lbs) and the 150-degree rotation capability of the visor.
Vlastnosti helmy:

Figure 3.4: Lens specifications of the HT-111 Welding Helmet. This image details the internal components and controls of the helmet's auto-darkening lens, including the TEST button, Low Battery Light, Sensitivity Knob, Delay Time Knob, Lithium Battery, Solar Cell, and Arc Sensors.
- Auto-Darkening Lens: Automatically adjusts shade level upon arc strike.
- Real Color Technology: Provides higher clarity and a more natural view.
- Nastavitelná citlivost: Controls how quickly the lens reacts to light.
- Nastavitelná doba zpoždění: Controls how long the lens stays dark after welding stops.
- Shade Control Knob: DIN 4/9-13 for various welding processes.
- Zdroj napájení: Solar cell with lithium battery backup.
- Optická třída: 1/1/1/2 for superior optical clarity.
4. Nastavení
4.1. Welder Setup (HBT250P)
- Umístění: Place the welder on a stable, level surface with adequate ventilation. Ensure clear space around the machine for airflow.
- Připojení napájení: Connect the welder to a suitable power supply according to the specifications. Ensure the power outlet is properly grounded.
- Připojení plynu: Connect your inert gas cylinder (e.g., Argon for TIG welding) to the gas inlet on the welder using a gas hose and regulator. Ensure all connections are tight to prevent leaks.
- Připojení hořáku TIG: Connect the TIG torch to the appropriate port on the front panel. Ensure the gas line and power cable are securely attached.
- Pozemní Clamp Spojení: Připojte zem třamp cable to the ground terminal on the welder. Attach the ground clamp bezpečně k obrobku nebo svařovacímu stolu a zajišťují dobrý elektrický kontakt.
- Instalace elektrody: Insert the appropriate tungsten electrode into the TIG torch collet and tighten.
4.2. Welding Helmet Setup (HT-111)
- Headgear Adjustment: Adjust the headgear straps to ensure a comfortable and secure fit. The helmet should sit firmly on your head without being too tight or loose.
- Lens Protection Film: Remove any protective films from the inside and outside of the auto-darkening lens.
- Funkční test: Press the 'TEST' button on the lens cartridge to verify the auto-darkening function. The lens should momentarily darken and then return to its clear state. If it does not, check the battery or expose the solar cells to light.
5. Návod k obsluze
5.1. Welder Operation (HBT250P)
- Zapnutí: Turn on the main power switch on the welder. The digital display will illuminate.
- Vyberte režim svařování: Use the mode selection buttons to choose between MMA (Stick) or TIG welding.
- Select Current Type (TIG): For TIG welding, select AC for aluminum or DC for steel, stainless steel, and other metals.
- Upravit parametry: Use the mechanical gear knob and corresponding buttons to set welding parameters such as:
- Amperage: Set the desired welding current based on material thickness and type.
- Pulse (Optional): If using pulse, adjust Peak Amps, Base Amps, Pulse Frequency, and Pulse Duty Cycle. Pulse helps control heat input and improve bead appearance.
- AC Frequency (AC TIG): Adjust for arc cone width and penetration. Higher frequency narrows the arc.
- AC Balance (AC TIG): Adjust for cleaning action on aluminum. Higher balance provides more cleaning.
- Up Slope/Down Slope: Ovládejte ramp-up a ramp-down of current at the start and end of the weld.
- Režim 2T/4T:
- 2T (dvoudotykový): Stiskněte a podržte spoušť hořáku pro spuštění oblouku; uvolněním jej zastavíte.
- 4T (čtyřdotykový): Press and release to start; press and release again to stop. Useful for long welds.
- Průtok plynu: Open the gas cylinder valve and adjust the regulator to the recommended gas flow rate for your welding application.
- Začněte svařovat: With all safety precautions in place and helmet on, initiate the arc according to your selected mode and torch trigger setting.

Obrázek 5.1: Přesview of the HBT250P's 6-in-1 TIG Welder capabilities. This image illustrates the various welding modes supported, including AC Pulsed TIG, DC Pulsed TIG, AC HF TIG, DC HF TIG, MMA (Stick), and AC Square Waveform, demonstrating its versatility.
5.2. Welding Helmet Operation (HT-111)
- Nastavení odstínu: Rotate the external shade control knob to select the appropriate shade level (DIN 4/9-13) for your welding process. Refer to welding safety standards for recommended shades.
- Nastavení citlivosti: Use the internal sensitivity dial to adjust how sensitive the lens is to the welding arc. Higher sensitivity means it will darken with less light.
- Delay Time Adjustment: Use the internal delay time dial to set how long the lens remains dark after the arc extinguishes. A longer delay is useful for high amperage welding or tack welding to prevent eye fatigue.
- Režim broušení: Some helmets have a 'Grind' mode (often a fixed shade 4). If available, switch to this mode for grinding operations to prevent the lens from darkening. Ensure you switch back to a welding shade before striking an arc.
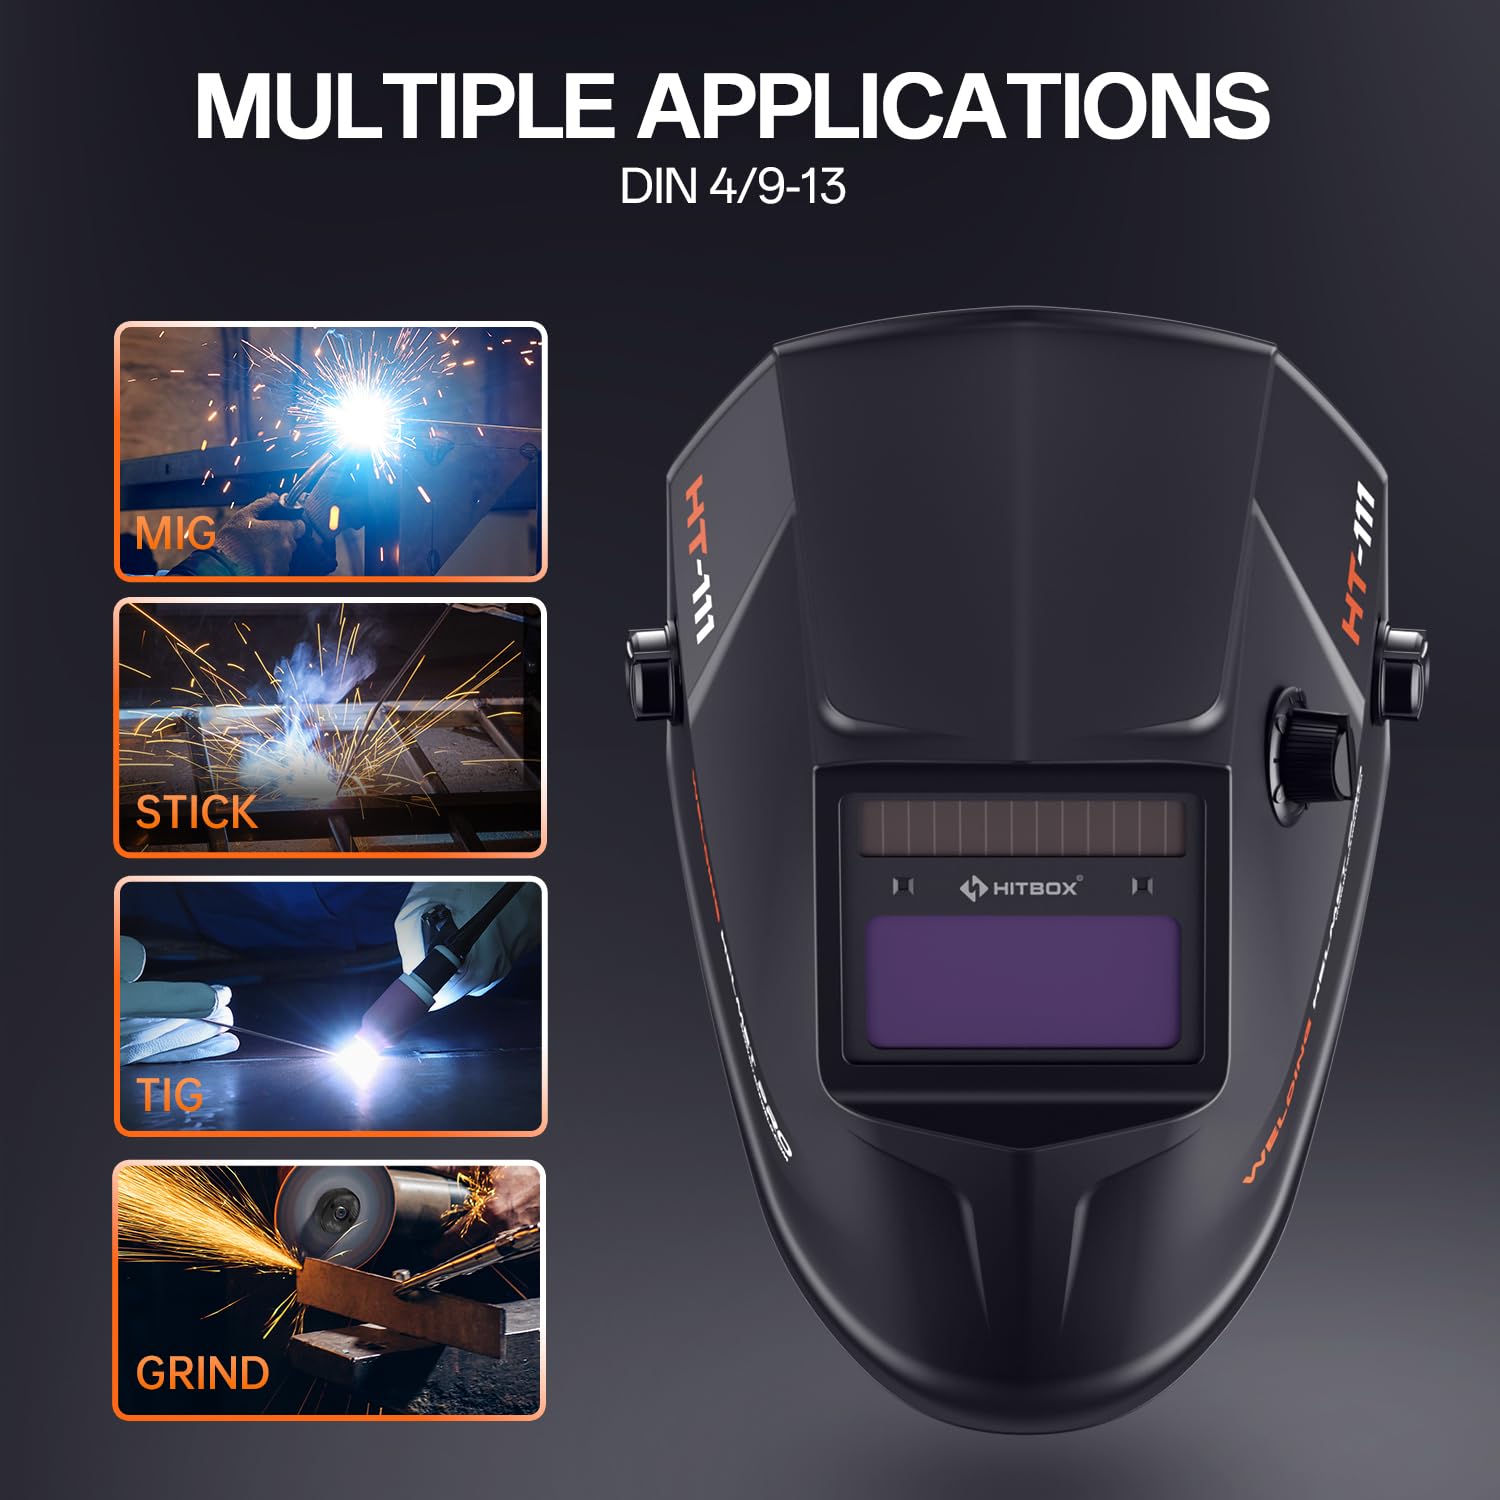
Figure 5.2: The HT-111 Welding Helmet's multiple application capabilities. This image shows the helmet alongside icons representing MIG, Stick, TIG welding, and Grinding, indicating its suitability for various tasks.
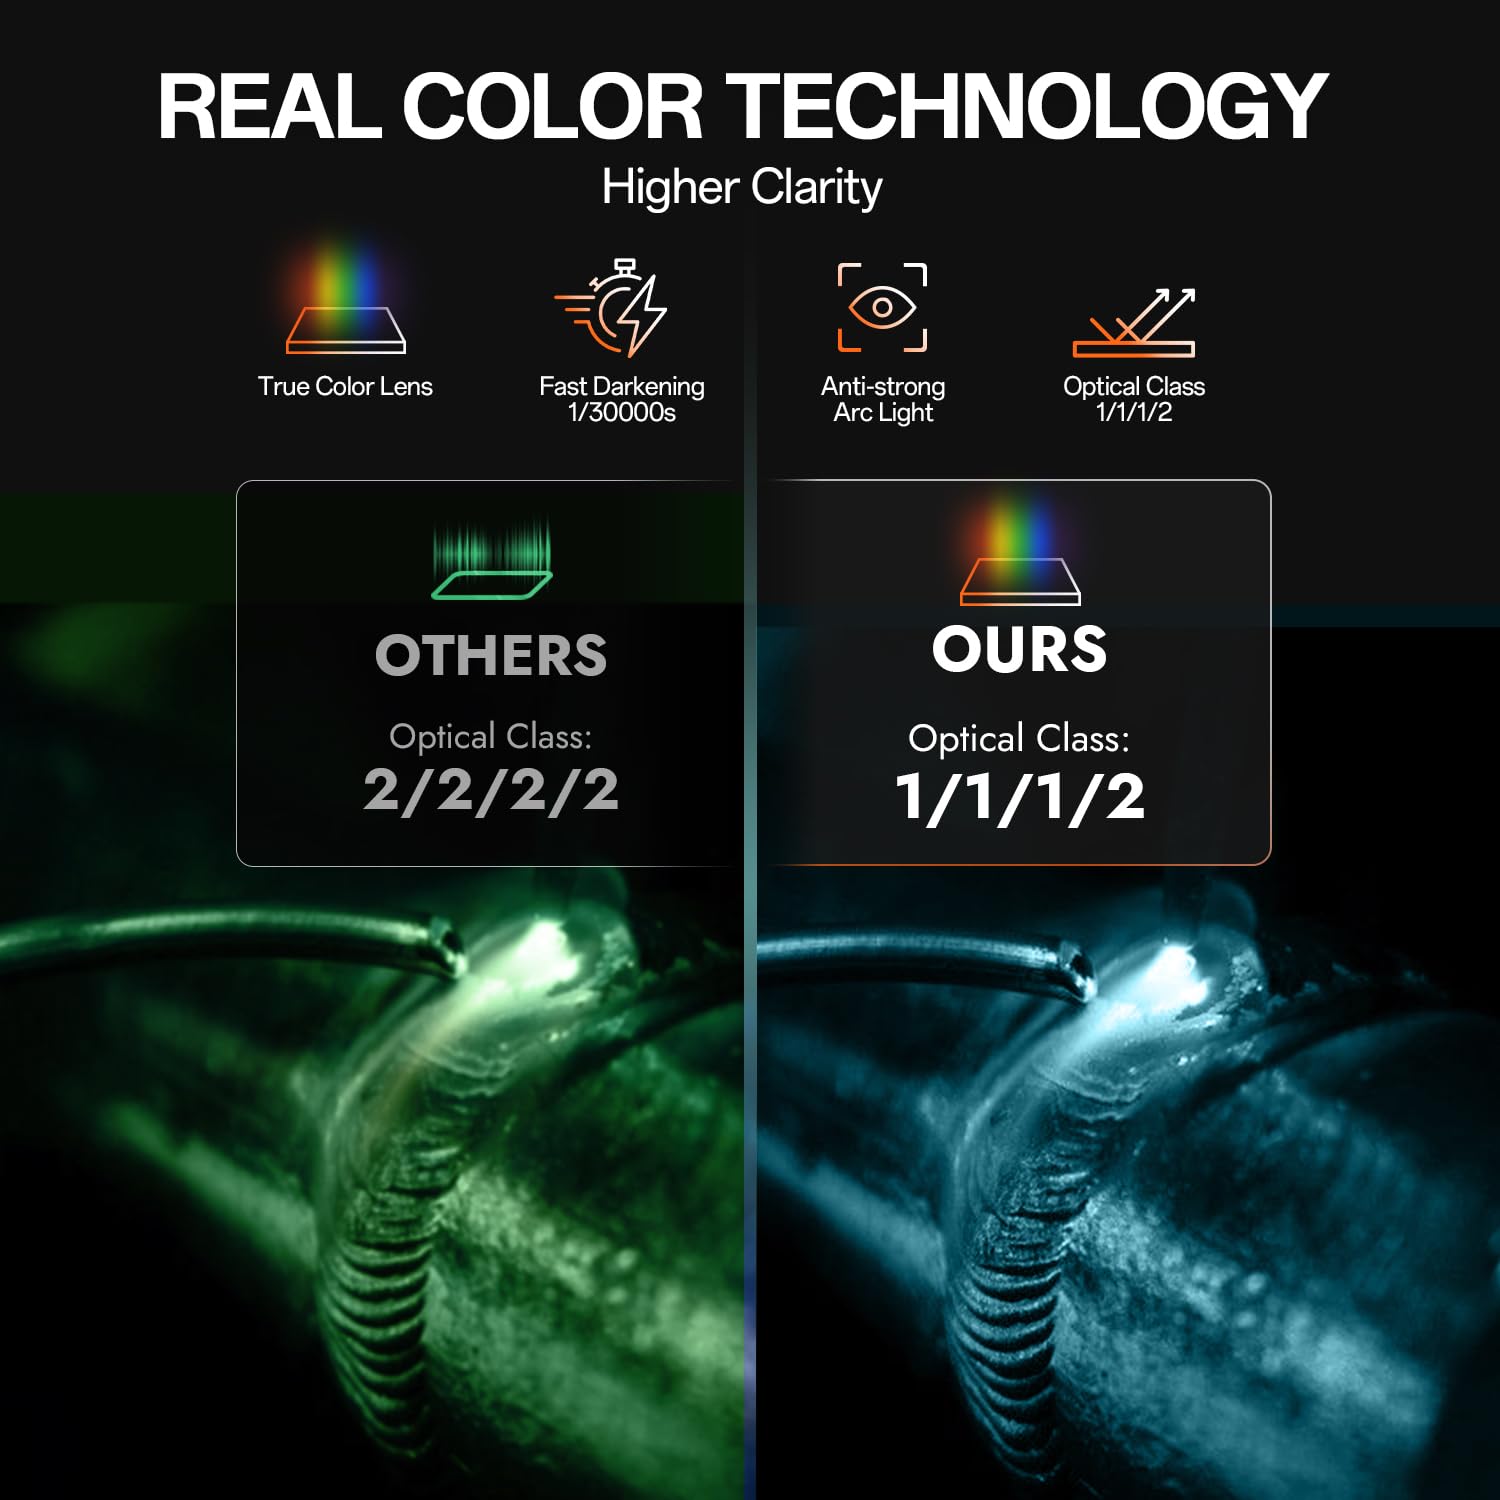
Figure 5.3: Comparison of Real Color Technology in the HT-111 Welding Helmet. This image visually contrasts the view through a standard welding lens (green tint) versus the HT-111's real color lens, demonstrating improved clarity and natural color perception.
6. Údržba
6.1. Welder Maintenance
- Čištění: Regularly clean the exterior of the welder with a dry, soft cloth. Keep the ventilation openings free from dust and debris. Use compressed air to blow out internal dust periodically, ensuring the machine is unplugged.
- Kontrola kabelů: Inspect all welding cables, torch, and ground clamp for cuts, cracks, or loose connections before each use. Replace damaged cables immediately.
- Plynové přípojky: Check gas hoses and fittings for leaks regularly.
- Skladování: Store the welder in a dry, clean environment, away from excessive dust, moisture, and extreme temperatures.
6.2. Welding Helmet Maintenance
- Čištění objektivu: Clean the auto-darkening lens and outer/inner protective plates with a soft, clean cloth and a mild soap solution. Do not use abrasive cleaners or solvents.
- Protective Plates: Replace scratched or damaged outer and inner protective plates immediately to maintain clear vision and protect the auto-darkening filter.
- Kontrola baterie: Periodically check the battery status (if applicable) or ensure the solar cells are exposed to light to keep the internal battery charged.
- Pokrývka hlavy: Inspect the headgear for wear and tear. Replace if damaged to ensure proper fit and protection.
- Skladování: Store the helmet in a protective bag or case to prevent scratches and damage to the lens.
7. Řešení problémů
| Problém | Možná příčina | Řešení |
|---|---|---|
| Svářečka se nezapne. | Žádné napájení; hlavní vypínač vypnutý; jistič se vypnul. | Check power cord connection; turn on main switch; reset circuit breaker. |
| Žádný svařovací oblouk. | Loose connections; wrong mode selected; insufficient amperage; faulty torch/ground. | Check all cable connections; ensure correct mode (TIG/MMA); increase amperage; inspect/replace torch or ground clamp. |
| Poor weld quality (e.g., porosity, poor penetration). | Incorrect gas flow; contaminated tungsten/material; wrong parameters; improper technique. | Adjust gas flow; clean tungsten/material; optimize welding parameters (amperage, AC balance, frequency); refine welding technique. |
| Welding helmet lens does not darken. | Low battery; arc sensors blocked; sensitivity too low; lens damaged. | Ensure solar cells are exposed to light; check/replace battery (if applicable); clean arc sensors; increase sensitivity; replace lens if damaged. |
| Welding helmet lens flickers or stays dark. | Sensitivity too high; delay time too short; external light interference. | Decrease sensitivity; increase delay time; ensure no strong ambient light interferes with sensors. |
8. Specifikace
8.1. HITBOX HBT250P AC/DC TIG Welder
- Model: HBT250P
- Svařovací procesy: AC TIG, DC TIG, MMA (Stick)
- Vstupní objemtage: (Typically 110V/220V or 220V, refer to product label for exact range)
- Rozsah výstupního proudu: (Specific range, e.g., 10-250A, refer to product label)
- Pracovní cyklus: (Specific percentage at max amps, refer to product label)
- Chlazení: Chlazeno ventilátorem
- Vlastnosti: Pulse Control, 2T/4T Mode, AC Frequency Control, AC Balance Control
8.2. HT-111 Welding Helmet
- Model: HT-111
- Optická třída: 1/1/1/2
- Viewoblast: Approximately 3.66" x 1.69" (9.3cm x 4.3cm)
- Světelný stav: DIN 4
- Temný stav: DIN 9-13 (nastavitelné)
- Spínací čas: 1/30000s (from light to dark)
- Doba zpoždění: Nastavitelný
- Citlivost: Nastavitelný
- Napájení: Solar Cell + Lithium Battery
- Hmotnost: Přibližně 0.86 libry
9. Záruka a podpora
HITBOX provides reliable welding products and is committed to customer satisfaction. If you encounter any quality problems with your product, please contact HITBOX customer service. They promise to arrange an immediate replacement or a 100% refund for quality-related issues.
For support, please refer to the contact information provided with your purchase or visit the official HITBOX webmísto.
Ask a question about this manual
Ask about setup, troubleshooting, compatibility, parts, safety, or missing instructions. Manuals+ will review the question and use this page’s manual context to help answer it.