Redkey MGC500
Uživatelská příručka robotické sekačky Redkey MGC500
Model: MGC500
1. Úvod
Thank you for choosing the Redkey MGC500 Robotic Lawn Mower. This manual provides essential information for the safe and efficient operation, installation, and maintenance of your new robotic lawn mower. Please read this manual thoroughly before first use and keep it for future reference.

Figure 1.1: Redkey MGC500 Robotic Lawn Mower
2. Konec produktuview
2.1 Klíčové vlastnosti
- 300% Increase in Mowing Efficiency: Utilizes C-TOF decimeter-level navigation for precise grid path planning, achieving 99.7% coverage and significantly faster mowing.
- Automatic Height Adjustment & APP Remote Control: Blade height can be adjusted automatically or remotely via the app, eliminating manual adjustments.
- 45° Slope Mowing & IPX6 Waterproof: Capable of handling slopes up to 45 degrees with anti-skid tires. IPX6 water resistance allows for high-pressure hose cleaning and automatic pause in rain.
- Boundary Wire Break Detection: Automatically detects cable breaks and identifies the damage location via the app for easy repair.
- Automatické nabíjení: Returns to the charging station when battery is low (below 15%) and resumes mowing after reaching 90% charge. Automatically returns to station on rainy days.
- APP Real-time Tracking: Monitor mowing progress, schedule times, receive alerts, and view real-time position and coverage area through the user-friendly app.
2.2 Komponenty
The Redkey MGC500 package includes the following components:

Figure 2.1: MGC500 Package Contents
- MGC500 Robotic Lawn Mower
- Napájecí jednotka
- Nízký objemtage Cable (10m)
- Boundary Wire (120m)
- Dokovací stanice
- Screws for Docking Station (4)
- Nails for Docking Station (2)
- Drátové konektory (2)
- Extra Blades (6)
- Screws for Blades (6)
- Pravítko
- Pegs (160)
- Wire Connector Tool
- Uživatelská příručka
3. Nastavení a instalace
3.1 Instalace ohraničujícího vodiče
The boundary wire defines the mowing area for your Redkey MGC500. Proper installation is crucial for optimal performance.
- Lay the boundary wire around the perimeter of your lawn.
- Ensure the wire is taut and secured with the provided pegs at regular intervals (recommended every 75 cm).
- Dodržujte specifické vzdálenosti od překážek:
- From walls/fences: >30cm
- From obstacles (trees, large rocks): >5cm
- For parallel wires (e.g., around flower beds): >20cm apart.
- For narrow passageways, ensure a minimum width of >60cm.
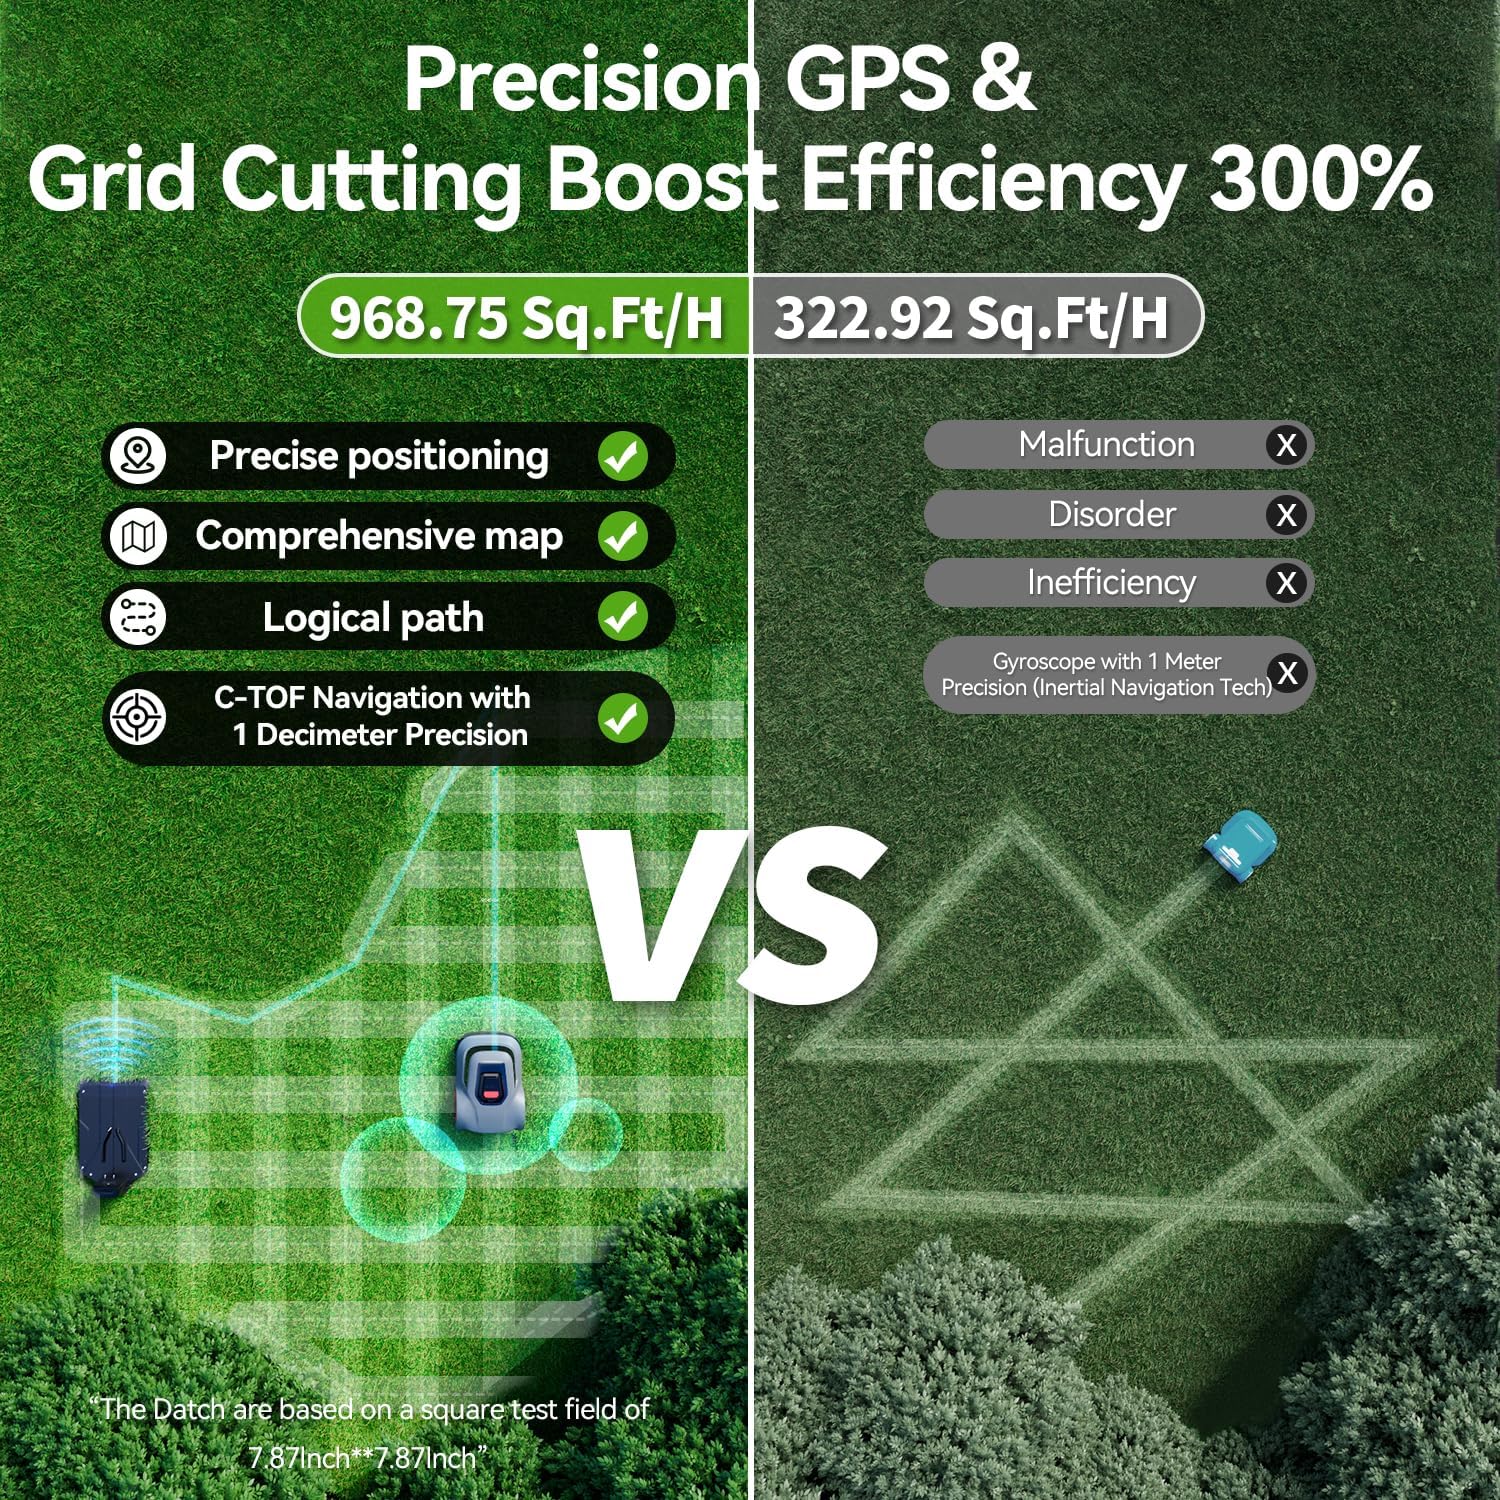
Figure 3.1: Boundary Wire Placement Guidelines
3.2 Nastavení nabíjecí stanice
Place the docking station on a flat, level surface with at least 1.5 meters of straight wire entry on both sides. Connect the low-voltage cable and power supply unit. Ensure the charging station is within Wi-Fi range for app connectivity.
Video 3.1: Robotic Lawn Mower Installation Instruction Video. This video provides a step-by-step guide on how to install the robotic lawn mower, including boundary wire setup and charging station placement.
4. Operating Your MGC500
4.1 Režimy sečení a účinnost
The MGC500 uses advanced C-TOF navigation for efficient mowing patterns, including grid path planning to ensure no spots are missed.

Figure 4.1: C-TOF Navigation for Enhanced Efficiency
The mower can also perform spot mowing for small, concentrated areas (approx. 7m²).

Figure 4.2: Spot Mowing Functionality
4.2 Řízení a plánování aplikací
Manage your MGC500 conveniently through the dedicated mobile application. The app allows for:
- Real-time tracking of mowing progress and location.
- Scheduling mowing times and frequency.
- Receiving start and end-of-mowing alerts.
- Adjusting cutting height remotely.

Figure 4.3: Real-time Mowing Status in App

Figure 4.4: Customized Mowing Plan with App
Video 4.1: Intelligent Blade with Adjustable Height. This video demonstrates the robotic lawn mower's ability to adjust its cutting height from 1.8 to 2.76 inches.
4.3 Automatické nabíjení a obnovení
When the battery level drops below 15%, the mower automatically returns to its charging station. Once charged to 90%, it will resume mowing from where it left off, ensuring complete lawn coverage.
Figure 4.5: Automatic Recharging and Mowing Resume
The mower is also designed to return to the charging station automatically on rainy days.

Figure 4.6: Automatic Return to Station in Rain
4.4 Obstacle Avoidance and Slope Handling
The MGC500 features intelligent obstacle avoidance, navigating around objects seamlessly. Its robust design allows it to handle slopes up to 45 degrees (24°).

Obrázek 4.7: Inteligentní vyhýbání se překážkám

Figure 4.8: 45° Slope Crawling Capability
5. Údržba
5.1 Čištění
The MGC500 is IPX6 waterproof, allowing for easy cleaning with a high-pressure hose. Regularly clean the underside of the mower to prevent grass buildup and ensure optimal cutting performance.

Figure 5.1: Easy Cleaning with IPX6 Waterproofing
5.2 Výměna čepele
For best cutting results, regularly inspect and replace the blades. Extra blades are included in your package. Refer to the user manual for detailed instructions on blade replacement.
6. Řešení problémů
6.1 Boundary Wire Break Detection
If the boundary wire is accidentally cut or damaged, the MGC500 can detect the break. Return the mower to the charging station, and the app will display the exact location of the damage, making repairs simple with the supplied cable connectors.

Figure 6.1: Precise Display of Border Breakpoints in the App
Video 6.1: Robotic Lawnmower Wire Break Detection Function. This video demonstrates how the mower detects and reports boundary wire breaks.
6.2 Běžné chybové kódy
For specific error codes displayed on the mower or in the app, refer to the detailed troubleshooting guide available within the app or the comprehensive user guide PDF. For example, error code E604 indicates a specific issue that can be resolved by following the app's instructions.
Video 6.2: Redkey Lawn Mower - E604 Troubleshooting. This video provides guidance on resolving the E604 error code.
7. Specifikace
| Značka | Červený klíč |
| Zdroj napájení | Napájení z baterie |
| Materiál | Hliník |
| Barva | Popelavě šedá |
| Styl | angličtina |
| Hmotnost položky | 42 libry |
| Šířka řezu | 23.6 palce |
| Počet pozic | 16 |
| Provozní režim | Automatický |
| Rozměry produktu | 4.9"H x 16.5"Š x 4.9"V |
8. Záruka a podpora
Redkey offers a comprehensive service with a 2-year warranty on the robotic lawn mowers. We are committed to providing excellent customer support.

Figure 8.1: Redkey After-sales Services
For any concerns about your product, please reach out to us through the following channels:
- Online podpora: Access 24/7 support through the app or by navigating to your order details on the purchase platform.
- Professional Repair Department: We have a dedicated team for repairs.

Figure 8.2: Redkey Customer Support Information
Ask a question about this manual
Ask about setup, troubleshooting, compatibility, parts, safety, or missing instructions. Manuals+ will review the question and use this page’s manual context to help answer it.