
1. Úvod
The VECHLINE REGULADOR MPPT 10 is an advanced Maximum Power Point Tracking (MPPT) solar charge controller designed to optimize the power output from your solar panels to efficiently charge your battery bank. This manual provides essential information for the safe installation, operation, and maintenance of your MPPT 10 controller, ensuring optimal performance and longevity.
2. Bezpečnostní pokyny
Před instalací a provozem si prosím přečtěte a pochopte všechny bezpečnostní pokyny. Nedodržení těchto pokynů může vést k úrazu elektrickým proudem, požáru nebo vážnému zranění.
- Ensure all connections are tight and correct to avoid excessive heat buildup.
- Vždy nejprve připojte k regulátoru baterii, poté solární panel a nakonec zátěž. Odpojení provádějte v opačném pořadí.
- Do not attempt to disassemble or repair the controller. Contact qualified service personnel.
- Regulátor instalujte v dobře větraném prostoru, mimo dosah hořlavých materiálů a přímého slunečního záření.
- Při práci s bateriemi používejte ochranu očí.
- Zajistěte, aby systém voltage (12V/24V) matches the controller's specifications.
3. Obsah balení
Ověřte, zda jsou v balení přítomny všechny položky:
- VECHLINE REGULADOR MPPT 10 Solar Charge Controller
- Uživatelská příručka (tento dokument)
4. Konec produktuview
The VECHLINE REGULADOR MPPT 10 features a robust design for efficient solar power management. Below is an image of the device with key components highlighted.
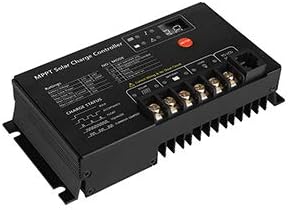
Figure 1: VECHLINE REGULADOR MPPT 10 Solar Charge Controller. Tento obrázek zobrazuje přední a horní část view of the black MPPT solar charge controller. It features an LCD screen on the top left for displaying system information, three control buttons to the right of the screen, and clearly labeled terminal blocks on the right side for connecting solar panels (PV), batteries (BATTERY), and DC loads (LOAD). The bottom of the unit shows heat sink fins for thermal management. Important safety warnings regarding connection order are also visible on the device's casing.
Klíčové komponenty:
- LCD displej: Shows real-time system status, including battery voltage, charging current, load status, and error codes.
- Ovládací tlačítka: Used for navigating menus, adjusting settings, and viewing different parameters.
- FV terminály: Připojte se k vašemu solárnímu panelu.
- Svorky baterie: Connect to your battery bank.
- Zatěžovací svorky: Connect to your DC loads (e.g., lights, fans).
- Chladič: Dissipates heat generated during operation to maintain optimal performance.
5. Nastavení a instalace
Proper installation is crucial for the safe and efficient operation of your solar charge controller.
5.1 Místo montáže:
- Namontujte regulátor svisle na nehořlavý povrch.
- Ensure adequate air circulation around the controller for cooling.
- Avoid direct sunlight, high temperatures, and moisture.
5.2 Wiring Sequence:
Always follow this connection order to prevent damage to the controller or other components:
- Připojte baterii: Connect the positive and negative terminals of your battery bank to the corresponding battery terminals on the controller. Ensure correct polarity. The controller should power on.
- Připojte solární panel: Connect the positive and negative leads from your solar panel array to the corresponding PV terminals on the controller. Ensure correct polarity.
- Připojení stejnosměrné zátěže (volitelné): Connect your DC loads to the load terminals on the controller. Ensure correct polarity.
To disconnect the system, follow the reverse order: Disconnect load, then solar panel, then battery.
6. Návod k obsluze
Once installed, the controller will automatically begin operating. The LCD display provides real-time information about your solar system.
6.1 LCD Display:
The display cycles through various parameters such as:
- Baterie Voltage
- Solární panel svtage
- Nabíjecí proud
- Zatěžovací proud
- Stav nabití baterie (SOC)
- Chybové kódy (pokud existují)
6.2 Funkce tlačítek:
The three buttons typically allow you to:
- Tlačítko Menu/Set: Enter/exit menu, confirm settings.
- Tlačítka nahoru/dolů: Navigate through display screens, adjust values in settings.
Refer to the on-screen prompts for specific button operations related to setting battery types, load control modes, and other configurable parameters.
7. Údržba
Regular maintenance ensures the longevity and optimal performance of your VECHLINE REGULADOR MPPT 10.
- Zkontrolujte připojení: Pravidelně kontrolujte veškeré kabelové spoje, zda nejsou pevně utažené a zda nejsou zkorodované. Uvolněné spoje mohou způsobit přehřátí a poškození.
- Vyčistěte ovladač: Keep the controller clean and free of dust and debris. Use a dry cloth to wipe the casing. Ujistěte se, že větrací otvory nejsou zablokované.
- Zkontrolujte kabeláž: Check all cables for signs of wear, fraying, or damage. Replace any damaged cables immediately.
- Stav baterie: Sledujte stav a objem baterietage regularly. Ensure it is properly maintained according to its manufacturer's guidelines.
8. Řešení problémů
Pokud narazíte na problémy s ovladačem, podívejte se na následující běžné problémy a jejich řešení:
| Problém | Možná příčina | Řešení |
|---|---|---|
| Displej ovladače je vypnutý | Baterie není připojena nebo je nízkátage; obrácená polarita. | Zkontrolujte připojení baterie a objtage. Zajistěte správnou polaritu. |
| Žádné nabíjení ze solárního panelu | Solar panel not connected; low sunlight; reverse polarity; faulty panel. | Check solar panel connections and polarity. Verify sunlight intensity. Test panel output. |
| Zatížení nefunguje | Load not connected; battery low; overload protection; load output disabled. | Check load connections. Charge battery. Reduce load. Check controller settings for load output. |
| Baterie není plně nabitá | Insufficient solar input; incorrect battery type setting; battery degradation. | Ensure adequate solar panel size and sunlight. Verify battery type setting. Test battery health. |
Pokud problém přetrvává i po vyzkoušení těchto řešení, kontaktujte zákaznickou podporu.
9. Specifikace
The following are typical specifications for the VECHLINE REGULADOR MPPT 10. Please refer to your product packaging or the manufacturer's official website for the most accurate and up-to-date specifications.
| Parametr | Hodnota |
|---|---|
| Model | MPPT 10 |
| System Voltage | 12V/24V Auto-recognition |
| Maximální nabíjecí proud | 10A |
| Max PV Input Voltage | Typically 50V-100V (Varies by model) |
| Maximální FV příkon | 12V System: 130W; 24V System: 260W (Approximate) |
| Zatěžovací proud | 10A |
| Vlastní spotřeba | <10 mA |
| Provozní teplota | -20°C až +55°C |
| Ochrana | Overload, Short Circuit, Reverse Polarity, Over-discharge, Overcharge |
10. Záruka a podpora
Specific warranty information for the VECHLINE REGULADOR MPPT 10 is not available in this document. Please refer to the warranty card included with your product, the product packaging, or the official VECHLINE webpodrobné záruční podmínky naleznete na webu.
For technical support, troubleshooting assistance beyond this manual, or warranty claims, please contact your retailer or the VECHLINE customer service department.