
1. Úvod
This manual provides detailed instructions for the safe and proper installation, operation, and maintenance of your USX MOUNT Full Motion TV Wall Mount, model XML925. This mount is designed to securely hold televisions ranging from 42 to 97 inches and weighing up to 150 lbs (68 kg). It offers full motion capabilities including tilt, swivel, and extension for optimal viewing úhly.
2. Bezpečnostní informace
WARNING: Failure to read and follow all instructions may result in personal injury, property damage, or voiding of your warranty. If you have any questions, please contact USX MOUNT customer service.
- Ujistěte se, že montážní povrch bezpečně unese celkovou hmotnost držáku a televizoru.
- This product is designed for installation on wood studs (12"/16"/18"/24"), solid concrete walls, or brick walls. DO NOT mount on drywall alone.
- Always use a stud finder to locate the center of wood studs.
- For concrete or brick walls, use appropriate concrete anchors (if not included, contact USX MOUNT for assistance).
- Nepřekračujte maximální nosnost 68 kg (150 liber).
- Ujistěte se, že všechny šrouby jsou bezpečně utažené, ale nepřetahujte je.
- Professional installation is recommended if you are unsure about any steps.
3. Parts Included Overview
Before installation, verify that all components are present and undamaged. Refer to the image below for a visual guide to the included parts.

Obrázek: Overview of USX MOUNT XML925 TV Wall Mount components.
- Jednotka nástěnných desek
- Držáky na televizi (2 kusy)
- Hardware Bag (various screws, washers, spacers, concrete anchors, Allen key, open-end wrench)
- Montážní šablona
- Úroveň bublin
- Stahovací pásky (3 kusy)
- Návod k použití
4. Instalace
Krok 1: Připevněte držáky k TV
Ensure your TV's VESA pattern is compatible with the mount (Min: 200x100mm, Max: 600x400mm). Select the appropriate screws, washers, and spacers from the hardware bag. Attach the TV brackets to the back of your television. Ensure all four screws enter the VESA hole before tightening. Do not overtighten.
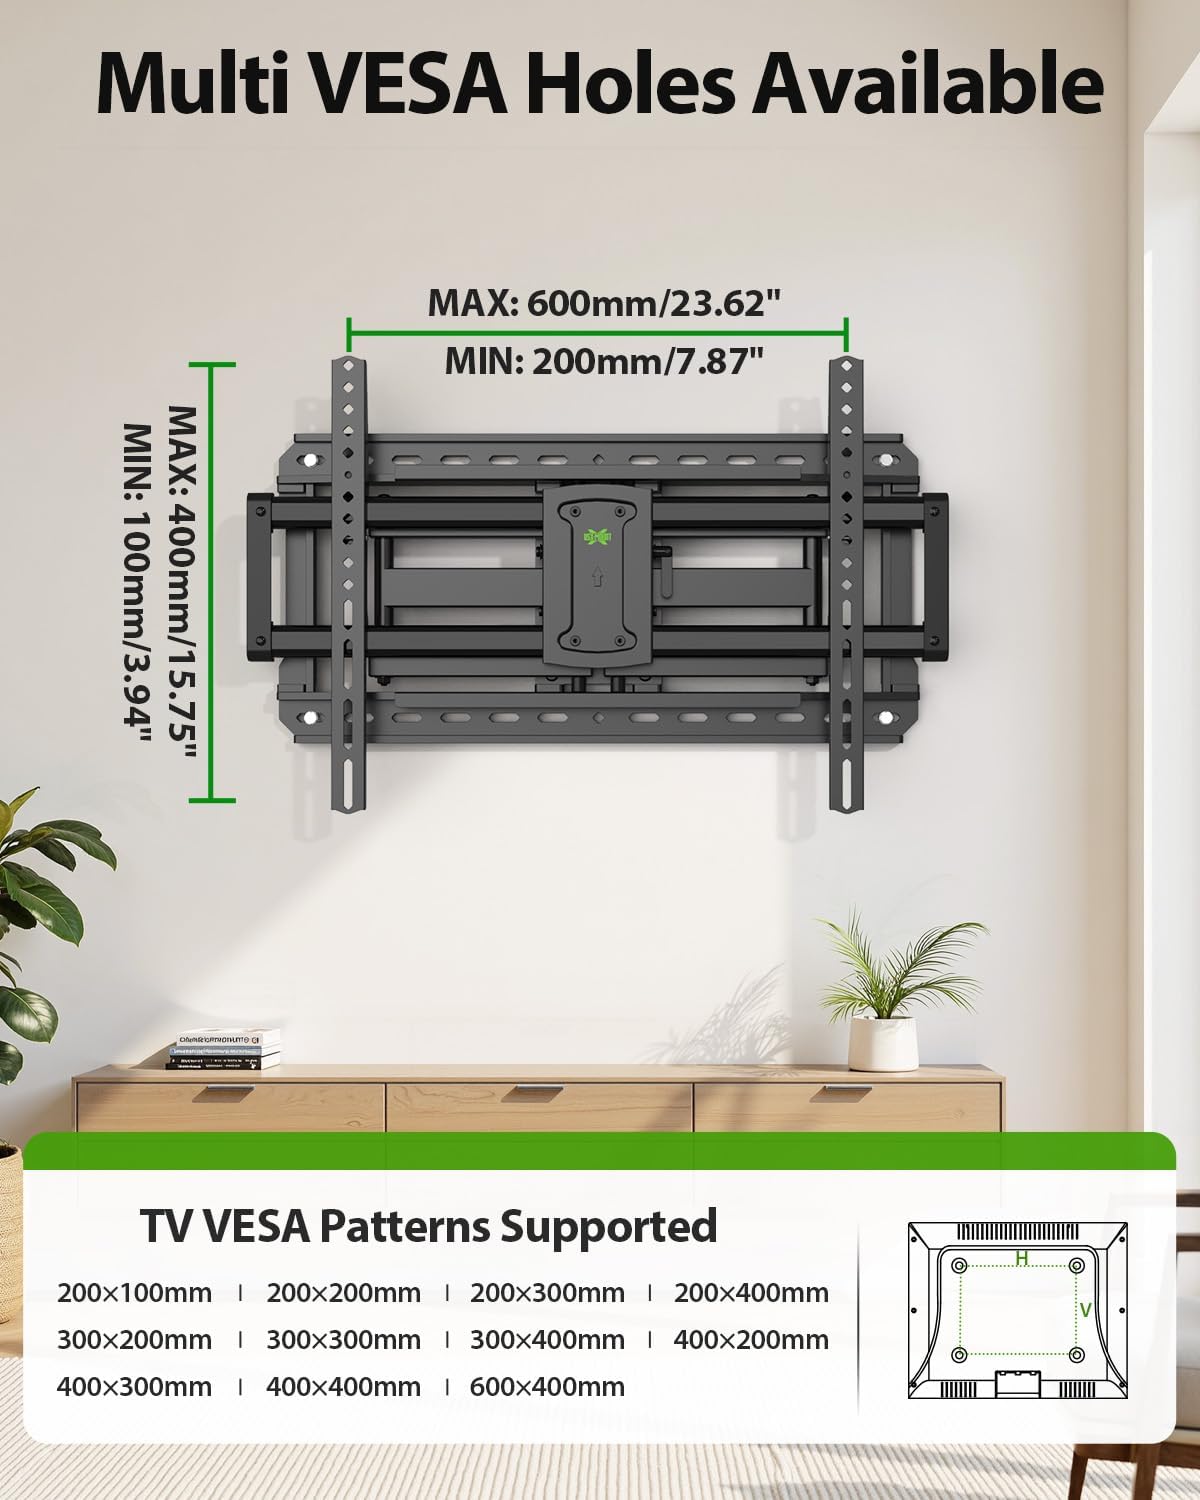
Image: Supported VESA patterns for TV attachment.
Video: This official product installation video demonstrates how to attach the brackets to your TV, ensuring proper screw selection and tightening.
Krok 2: Připevněte nástěnnou desku ke stěně
Determine your wall type (wood stud, solid concrete, or brick) and follow the corresponding instructions. Use the provided mounting template and bubble level to mark pilot hole locations accurately.
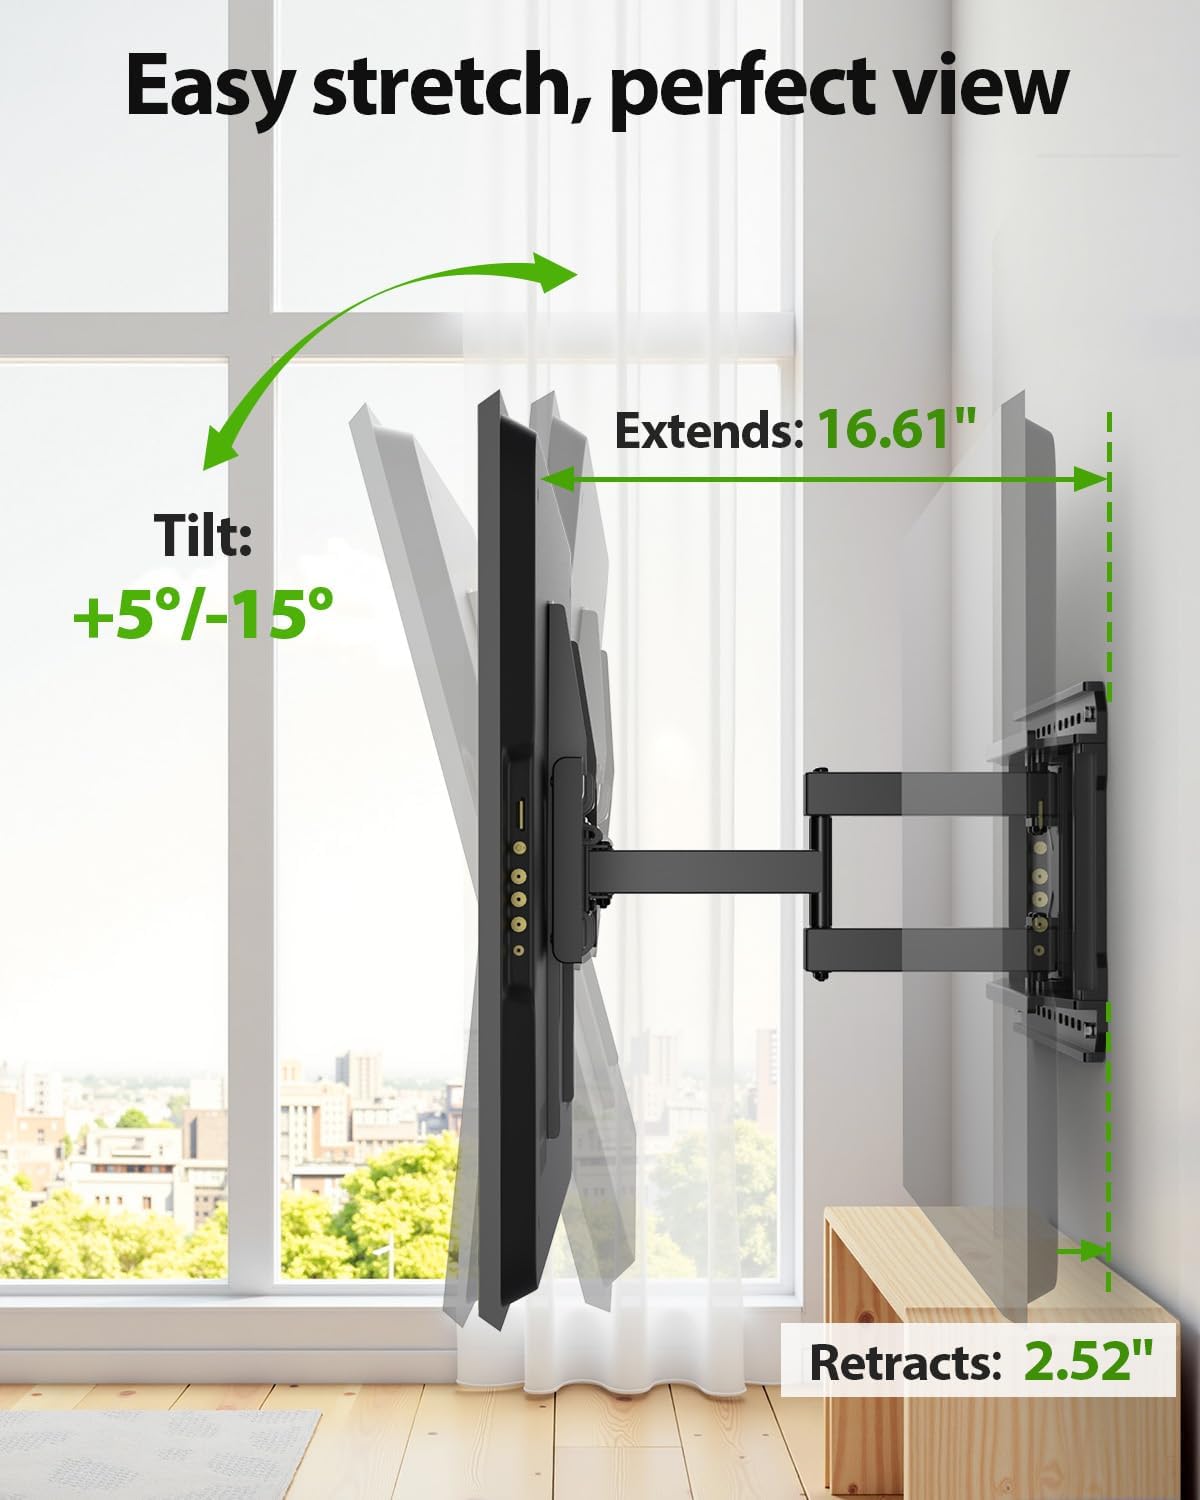
Image: Mounting options for different wall types (concrete, wood studs, brick).
2A. Wood Stud Installation
- Use a stud finder to locate the edges and center of your wood studs.
- Position the mounting template at your desired height, aligning the holes with your stud center line.
- Drill pilot holes using a 7/32 inch (5.5mm) diameter drill bit to a depth of 2.5 inches (64mm).
- Install the wall plate using four lag bolts. Tighten the lag bolts only until they are pulled firmly against the wall plate. Do not overtighten.
2B. Solid Concrete or Brick Wall Installation
- Position the mounting template at your desired height and mark the hole locations.
- Drill four pilot holes using a 3/8 inch (10mm) diameter masonry drill bit to a depth of 2.5 inches (64mm).
- Insert concrete anchors into the pilot holes.
- Install the wall plate using four lag bolts. Tighten the lag bolts only until they are pulled firmly against the wall plate. Do not overtighten.
Video: This official product installation video provides a visual guide for attaching the wall plate to both wood studs and concrete walls.
Step 3: Wall Plate Installation Integrity Test
After securing the wall plate, firmly pull on the mount to ensure it is tightly and securely fastened to the wall. This test helps confirm the stability of your installation.
Video: This official product installation video includes a demonstration of how to perform an integrity test on the installed wall plate.
Krok 4: Zavěste a připevněte televizi k nástěnné desce
Carefully lift the TV (with brackets attached) and hook it onto the wall plate. Ensure the TV is properly seated. Secure the TV to the wall plate by wrapping clips around the extension arms and tightening them using bolts.
Video: This official product installation video illustrates the process of hanging and securing your TV to the wall plate.
5. Provoz
Your USX MOUNT Full Motion TV Wall Mount offers versatile adjustments for optimal viewIng.
Úpravy
- Úhel náklonu: Adjust the TV tilt from +5° to -15° to reduce glare and find the perfect vertical viewing angle. Loosen the tilting bolts, adjust, and then re-tighten.
- Úhel otočení: Swivel the TV up to ±45° left or right to view from different seating positions.
- Nastavení nivelace: Correct any slight misalignments after installation with a ±4° leveling adjustment. This is typically done via screws on the TV plate.
- Prodloužení a zatažení: Extend the TV up to 16.61 inches (422mm) from the wall or retract it to a low profile of 2.52 inches (64mm).
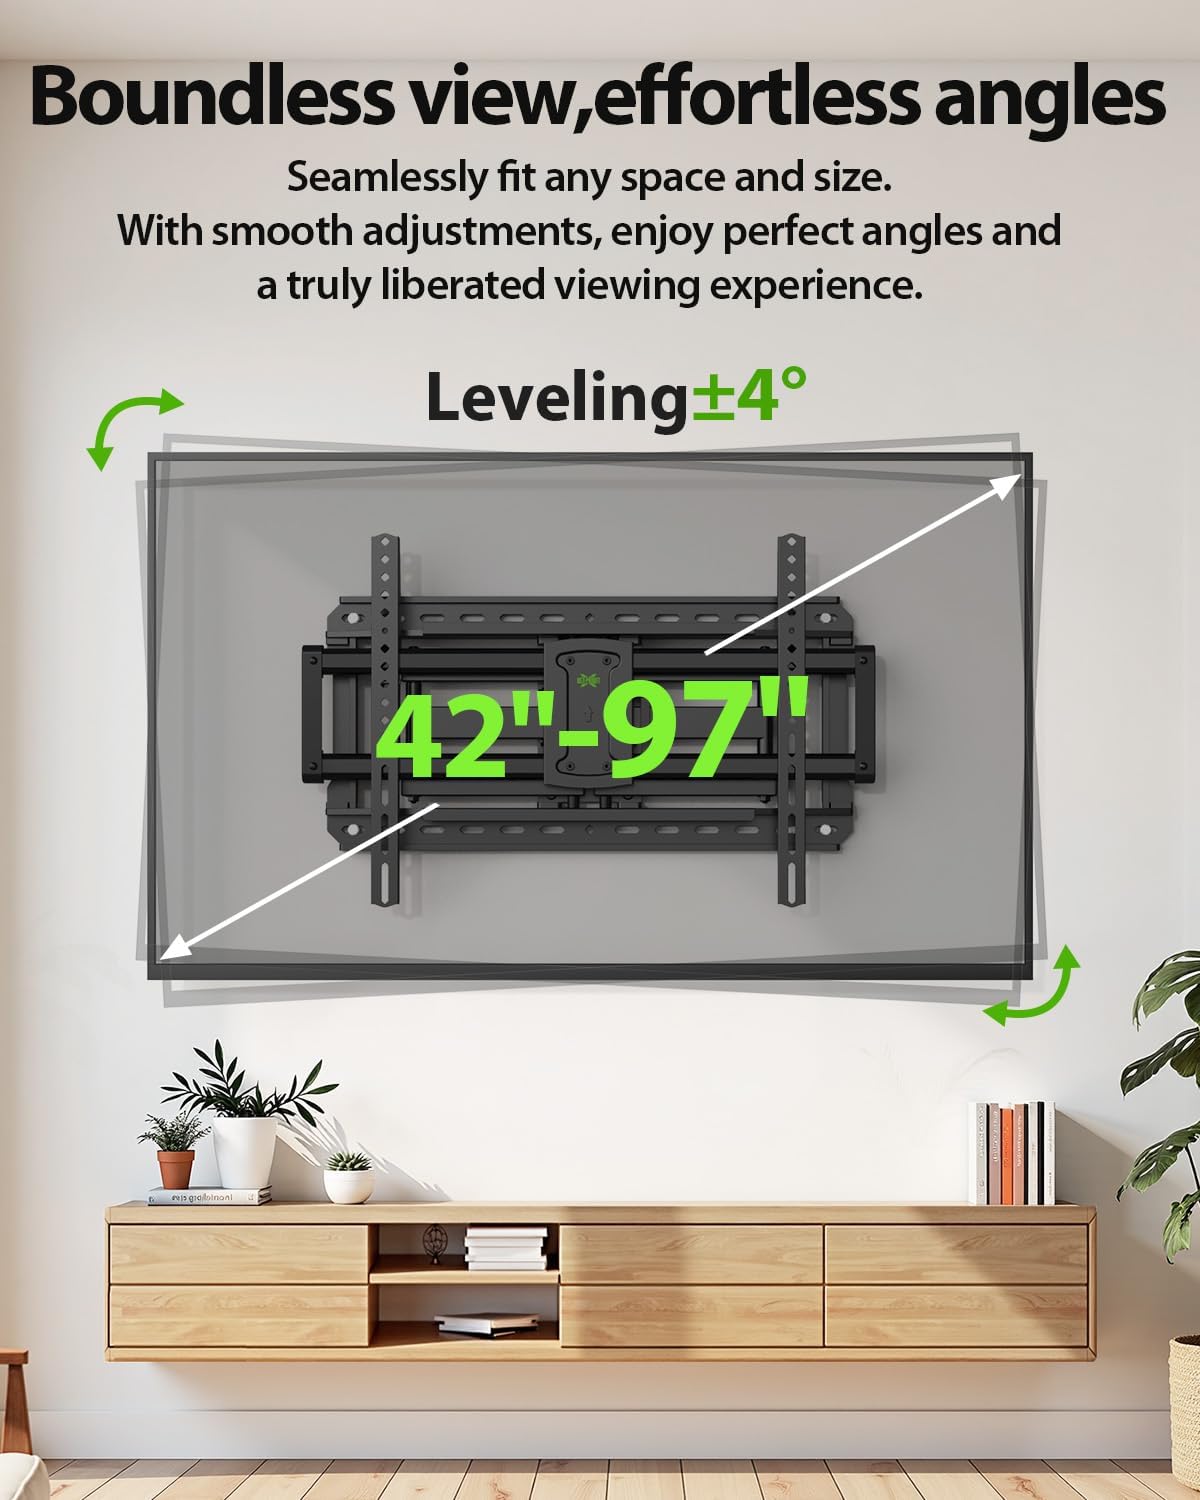
Image: Demonstrates the mount's extension, retraction, and tilt capabilities.
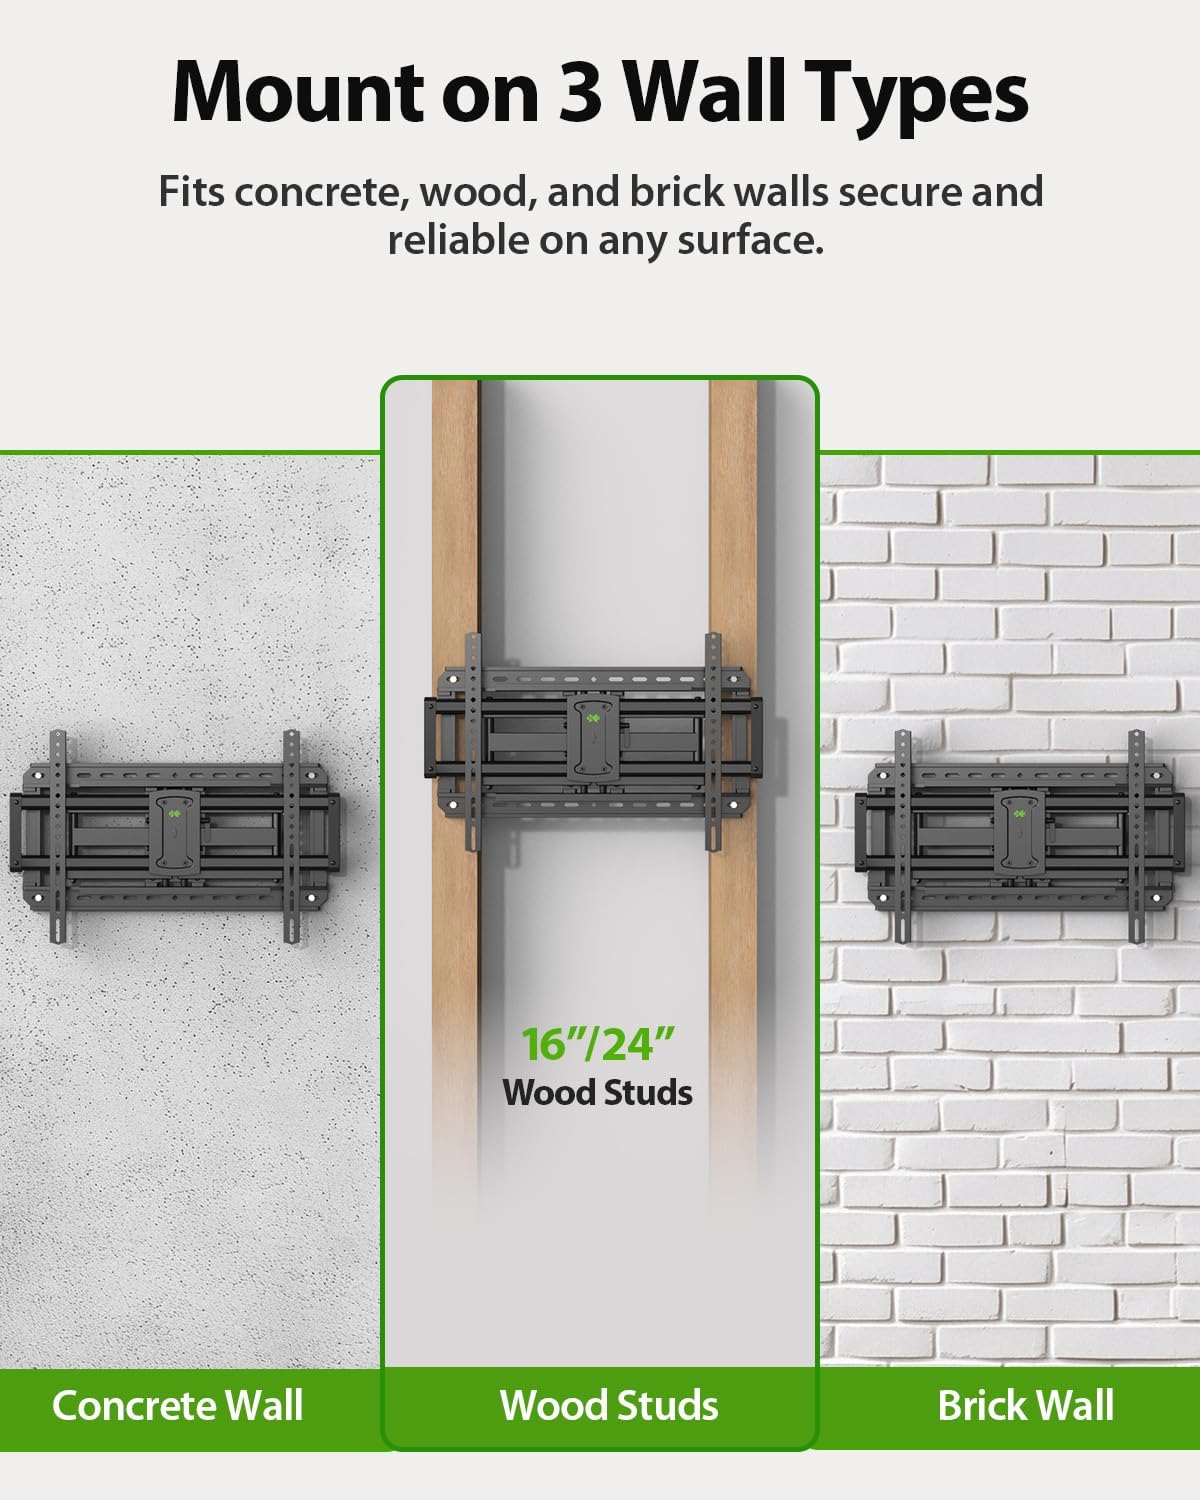
Image: Illustrates the TV mount's swivel function for flexible viewIng.
Video: This seller-provided video offers a full explanation of the wall mount's motion capabilities, including tilt, swivel, and extension.
Video: A brief seller video tour demonstrating the wall mount's setup and various adjustments.
6. Údržba
- Pravidelně kontrolujte všechny šrouby a spoje, abyste se ujistili, že jsou pevně utažené a bezpečné.
- Držák čistěte měkkým, suchým hadříkem. Nepoužívejte abrazivní čisticí prostředky ani rozpouštědla.
- If the mount's movement becomes stiff, apply a small amount of silicone-based lubricant to the pivot points.
- Use the included cable ties to manage TV cables neatly along the mount arms, preventing tangles and damage.
7. Řešení problémů
- Televizor není vodorovně umístěn: Use the leveling adjustment screws on the TV plate to correct the horizontal alignment (±4°).
- Držák se zdá být uvolněný: Re-check all lag bolts securing the wall plate to the wall and all screws attaching the TV brackets to the TV. Ensure they are tightened firmly.
- Obtíže s přemisťováním televizoru: Ensure no cables are obstructing the movement. Check pivot points for any debris or stiffness; apply lubricant if necessary.
- Chybějící části: Refer to the parts list. If any parts are missing, contact USX MOUNT customer service.
8. Specifikace
| Funkce | Specifikace |
|---|---|
| Číslo modelu | XML925 |
| Kompatibilita velikosti TV | 42-97 palců |
| Hmotnostní kapacita | Až 150 liber (68 kg) |
| Kompatibilita VESA | Min.: 200x100mm, Max.: 600x400mm |
| Úhel náklonu | +5° / -15° |
| Úhel otočení | ±45° |
| Nastavení vyrovnání | ±4° |
| Prodloužení od zdi | 2.52 palce (64 mm) až 16.61 palce (422 mm) |
| Kompatibilita nástěnných nosníků | Dřevěné sloupky 12", 16", 18", 24" |
| Materiál | Legovaná ocel |
| Barva | Černý |

Image: The mount's robust design supports TVs up to 150 lbs.
9. Záruka a podpora
USX MOUNT products are manufactured with quality and customer satisfaction in mind. For specific warranty details, please refer to the product packaging or contact USX MOUNT customer service. If you encounter any issues or have questions regarding your TV mount, please reach out to our support team for assistance.
Contact information can typically be found on the product packaging or the official USX MOUNT webmísto.