
1. Úvod
Thank you for choosing the Tesvor S8Pro Robot Vacuum Cleaner. This manual provides essential information for setting up, operating, and maintaining your robot vacuum to ensure optimal performance and longevity. Please read this manual thoroughly before using the product and keep it for future reference.
2. Bezpečnostní pokyny
To reduce the risk of injury or damage, read these safety instructions carefully. This appliance is for indoor household use only.
- Nepoužívejte robota ve vlhkém prostředí ani na površích se stojatou vodou.
- Keep the robot away from open flames or fragile objects.
- Ensure the charging dock is placed against a wall on a level surface, with no obstacles within 1 meter (3 feet) in front and 0.5 meters (1.5 feet) on either side.
- Nedovolte dětem obsluhovat robota. Dohlížejte na děti a domácí zvířata, když je robot v provozu.
- Before cleaning, remove power cords, small objects, and any items that could entangle the brushes.
- Nepoužívejte robota k vysávání velkých nečistot, kapalin nebo hořících předmětů.
- Only use the original power adapter and charging dock provided by Tesvor.
- Pokud je napájecí kabel poškozen, musí jej vyměnit výrobce nebo kvalifikovaný servisní technik, aby se předešlo nebezpečí.
3. Obsah balení
Ověřte, zda jsou v balení přítomny všechny komponenty:
- Robotický vysavač
- Napájecí adaptér
- Mop Pad
- Nabíjecí stanice
- 2-in-1 Water Tank and Dustbin
- Boční kartáče (2 páry)
- HEPA filtr (předinstalovaný)
- Uživatelská příručka
- Čisticí nástroje
- Dálkové ovládání
- Válcový kartáč (předinstalovaný)

Obrázek 3.1: Obsah balení. The package includes the robot vacuum, power adapter, mop pad, charging station, 2-in-1 water tank and dustbin, side brushes, HEPA filter, user manual, cleaning tools, remote control, and roller brush.
4. Konec produktuview
The Tesvor S8Pro is a 2-in-1 robot vacuum cleaner featuring powerful suction and intelligent navigation for efficient home cleaning.
Klíčové vlastnosti:
- Výkonné sání: Up to 6000 Pa (adjustable up to 8000 Pa) for deep cleaning.
- 2v1 vysavač a mop: Simultaneous vacuuming and mopping with a 350 ml electronic water tank and 250 ml dustbin.
- Navigace LiDARem: Precise mapping and optimal route planning for comprehensive coverage.
- Dlouhá výdrž baterie: 5200 mAh lithium-ion battery, providing up to 180 minutes of runtime at low suction.
- Automatic Charging & Resume: Returns to the charging dock when battery is low and resumes cleaning.
- Sensor-Controlled Obstacle Avoidance: Detects and avoids obstacles to prevent collisions.
- Zvýšení koberce: Automaticky zvyšuje sací výkon na kobercích.
- Inteligentní ovládání: Control via smartphone app, compatible with Amazon Alexa and Google Home.

Image 4.1: 2-in-1 Water Tank and Dustbin. The Tesvor S8Pro features a versatile 2-in-1 design, allowing it to vacuum and mop simultaneously. It includes a 350 ml water tank and a 250 ml dustbin.

Image 4.2: Powerful Suction. The Tesvor S8Pro offers powerful suction, adjustable up to 8000Pa, to effectively clean various types of debris from hard floors and carpets. The image shows different suction levels from quiet to max.
5. Nastavení
5.1 Umístění nabíjecí stanice
Place the charging dock against a wall on a hard, level surface. Ensure there are no obstacles within 1 meter (3 feet) in front and 0.5 meters (1.5 feet) on either side of the dock to allow the robot to return and charge successfully.
5.2 Počáteční nabíjení
Connect the power adapter to the charging dock and plug it into a wall outlet. Place the robot on the charging dock. The robot will automatically begin charging. For first-time use, fully charge the robot (approximately 5-6 hours).

Image 5.1: Automatic Charging. The robot vacuum automatically returns to its charging dock when the battery is low (below 20%) and resumes cleaning from where it left off once charged (above 80%).
5.3 Instalace bočních kartáčů
Snap the side brushes onto the corresponding posts on the bottom of the robot until they click into place.
5.4 Installing 2-in-1 Water Tank/Dustbin
Fill the water tank with clean water (for mopping) and ensure the dustbin is empty. Slide the 2-in-1 module into the back of the robot until it locks securely.
5.5 Připojení k aplikaci
Download the Tesvor app from your smartphone's app store. Follow the in-app instructions to connect your robot vacuum to your home Wi-Fi network. This enables advanced features like scheduling, cleaning mode selection, and real-time mapping.
6. Provoz
6.1 Spuštění/pozastavení čištění
- Start: Press the power button on the robot or the 'Clean' button in the app/remote control to start automatic cleaning.
- Pauza: Press the power button or 'Clean' button again to pause cleaning.
6.2 Režimy čištění
Select cleaning modes via the Tesvor app or remote control:
- Automatické čištění: The robot intelligently plans an S-shaped path for comprehensive coverage.
- Bodové čištění: Cleans a specific area intensively.
- Čištění hran: Čistí podél stěn a hran nábytku.
- Režim mopování: For wet cleaning, ensure the water tank is filled and the mop pad is attached.

Image 6.1: Smart Cleaning Features. This intelligent robot vacuum supports various cleaning modes including S-shaped path, specific area cleaning, and scheduled cleaning. It generates real-time room maps and can be controlled via Amazon Alexa or Google Home.
6.3 Zvýšení výkonu koberce
The robot automatically detects carpets and increases its suction power for a more thorough clean. It can also navigate over obstacles up to 20mm high.

Image 6.2: Carpet Boost. The robot vacuum automatically detects carpets and increases suction power for a deeper clean. It can climb obstacles up to 20mm.
6.4 Hlasové ovládání
The Tesvor S8Pro is compatible with Amazon Alexa and Google Home. Follow the instructions in the Tesvor app to link your robot with your voice assistant for convenient control.

Image 6.3: LDS LiDAR Navigation. The robot vacuum uses advanced LDS LiDAR navigation to efficiently map its surroundings, ensuring comprehensive coverage and optimized cleaning paths.
7. Údržba
Regular maintenance ensures your Tesvor S8Pro operates efficiently. Always turn off the robot before performing any maintenance.
7.1 Emptying Dustbin & Cleaning Water Tank
- Press the release button to remove the 2-in-1 module.
- Otevřete přihrádku na prach a vysypte nečistoty.
- Opláchněte nádobu na prach a nádržku na vodu čistou vodou. Před opětovným vložením je nechte zcela vyschnout na vzduchu.
- Remove and clean the mop pad after each use.
7.2 Čištění hlavního kartáče
Open the main brush cover on the bottom of the robot. Remove the main brush and use the cleaning tool to cut and remove any hair or debris tangled around it. Reinstall the brush.
7.3 Čištění bočních kartáčů
Periodically check the side brushes for tangled hair or debris. Pull them off their posts, clean them, and reattach. Replace worn brushes as needed.
7.4 Čištění filtrů
Remove the HEPA filter from the dustbin. Tap it gently to remove dust. Do not wash the HEPA filter with water. Replace the HEPA filter every 3-6 months, depending on usage.
7.5 Čištění senzorů a nabíjecích kontaktů
Otřete senzory srázu, senzory zdi a nabíjecí kontakty na robotu i nabíjecí stanici čistým a suchým hadříkem, aby byla zajištěna správná funkce.
8. Řešení problémů
Pokud se s robotickým vysavačem setkáte s problémy, podívejte se na následující běžné problémy a jejich řešení:
| Problém | Možná příčina | Řešení |
|---|---|---|
| Robot se nezapne | Slabá baterie; Není stisknuto tlačítko napájení | Nabijte robota; Stiskněte a podržte tlačítko napájení po dobu 3 sekund |
| Robot se nemůže nabíjet | Znečištěné nabíjecí kontakty; Nabíjecí dok je odpojený | Očistěte nabíjecí kontakty; Ujistěte se, že je nabíjecí dok zapojen do zásuvky. |
| Robot se často zasekává | Příliš mnoho překážek; znečištěné senzory pro schody | Clear the cleaning area; Clean cliff sensors |
| Špatný čisticí výkon | Plný odpadkový koš; Zamotané kartáče; Ucpaný filtr | Vyprázdněte nádobu na prach; Vyčistěte hlavní/boční kartáče; Vyčistěte/vyměňte filtr |
| Funkce mopování nefunguje | Water tank empty; Mop pad not attached | Fill water tank; Attach mop pad correctly |
Pro další pomoc se prosím obraťte na zákaznickou podporu Tesvor.
9. Specifikace
| Funkce | Detail |
|---|---|
| Značka | Tesvor |
| Název modelu | YC-S8 Pro |
| Číslo modelu | M2-NLT |
| Sací výkon | 6000 Pa (adjustable up to 8000 Pa) |
| Typ navigace | Navigace LiDAR |
| Typ baterie | Lithium-iontová |
| Kapacita baterie | 5200 XNUMX mAh |
| Maximální doba běhu | 180 minutes (at lowest suction) |
| Kapacita vodní nádrže | 350 ml |
| Kapacita popelnice | 250 ml |
| Typ filtru | HEPA |
| Kontrolní metoda | Aplikace, Dálkové ovládání |
| Kompatibilní zařízení | Amazon Echo, Google Home, Smartphone, Tablet |
| Rozměry produktu (robot) | 33L x 33W x 10H cm |
| Charging Dock Dimensions | 17.5L x 9W x 11.5H cm |
| Barva | Bílý |
| Doporučená použití | Home cleaning, floors, carpets, pet hair removal |
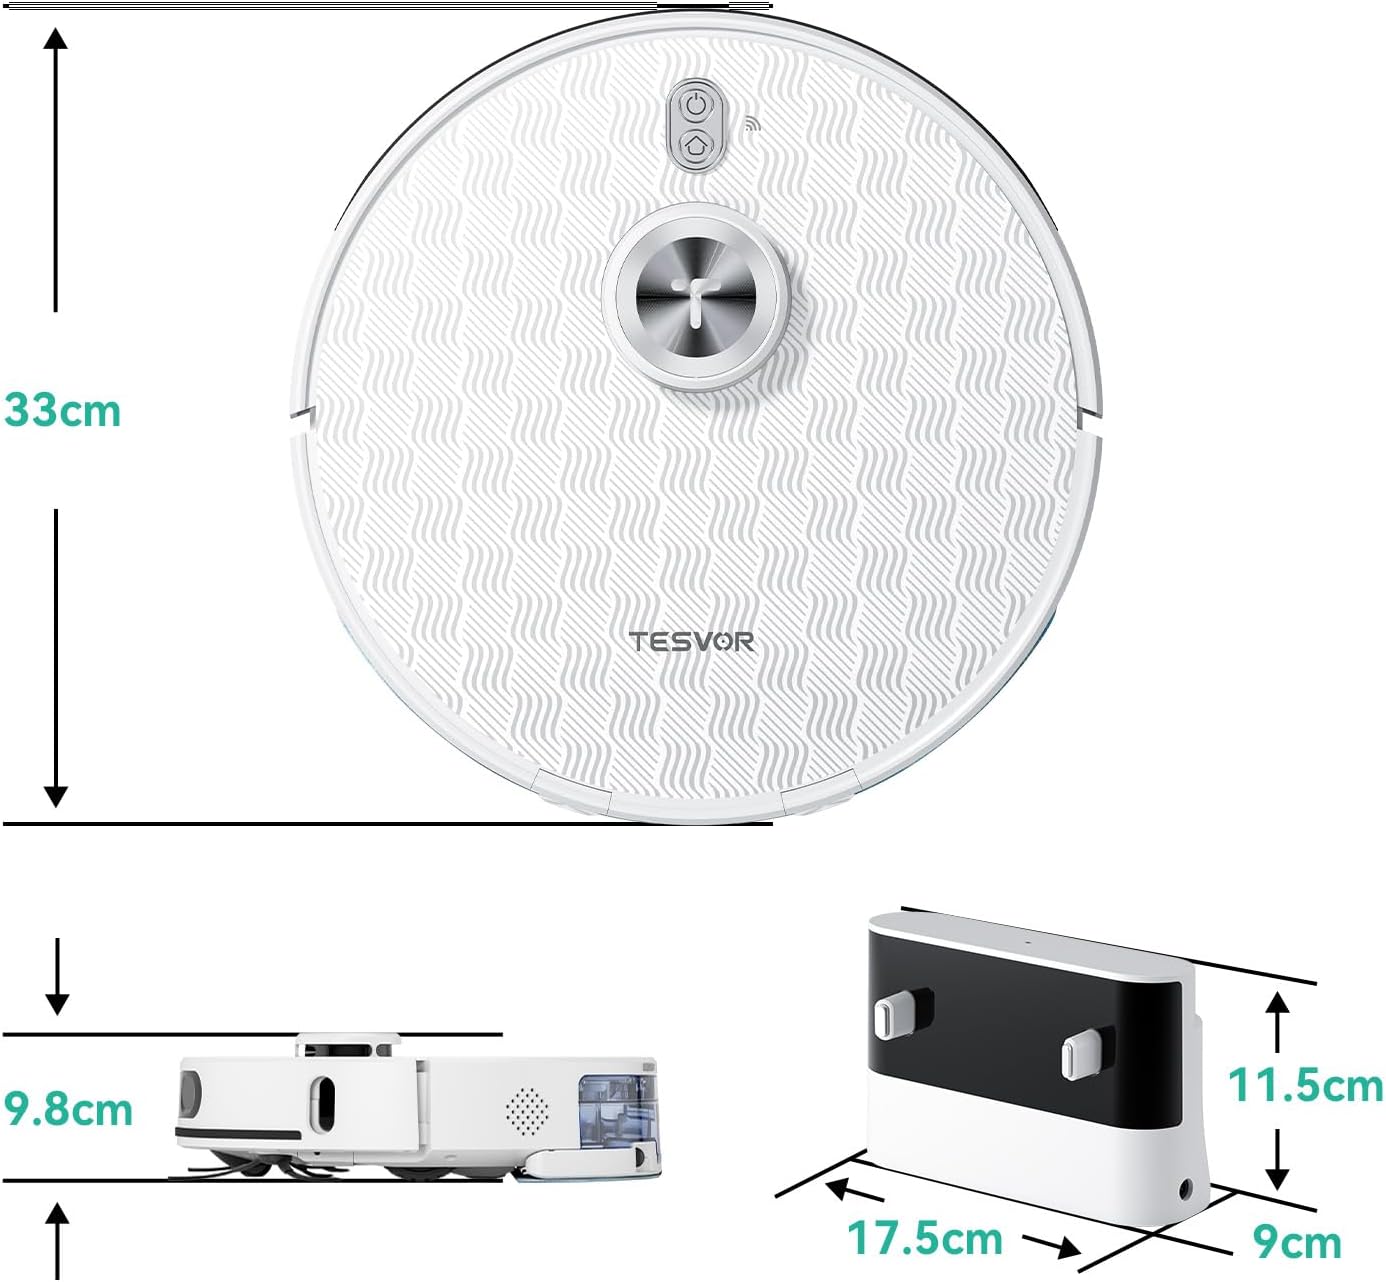
Obrázek 9.1: Rozměry produktu. The robot vacuum measures 33cm in diameter and 9.8cm in height. The charging dock measures 17.5cm in width, 9cm in depth, and 11.5cm in height.
10. Záruka a podpora
The Tesvor S8Pro Robot Vacuum Cleaner comes with a 2-letá záruka. For warranty claims, technical support, or any questions regarding your product, please contact Tesvor customer service through the official website or your purchase platform. Please have your model number (M2-NLT) and proof of purchase ready.