
1. Úvod
This manual provides detailed instructions for the setup, operation, maintenance, and troubleshooting of your Maxtang MTN-6900HX Mini PC. Please read this manual thoroughly before using the device to ensure proper functionality and safety. The Maxtang MTN-6900HX is a compact, high-performance mini PC featuring an AMD Ryzen 9 6900HX processor, designed for various applications including everyday computing, photo editing, video editing, and gaming.

Obrázek 1.1: Přední strana view of the Maxtang MTN-6900HX Mini PC. This image shows the compact design of the device.
2. Bezpečnostní informace
- Před čištěním nebo prováděním jakékoli údržby vždy odpojte napájecí adaptér.
- Nevystavujte zařízení vodě, vlhkosti ani extrémním teplotám.
- Zajistěte správné větrání, aby nedošlo k přehřátí. Neblokujte větrací otvory.
- Používejte pouze dodaný napájecí adaptér nebo kompatibilní náhradní.
- Zabraňte pádu zařízení nebo jeho vystavení silným nárazům.
- Nepokoušejte se zařízení sami otevírat ani opravovat. Obraťte se na kvalifikovaný servisní personál.
3. Obsah balení
Ověřte, zda jsou v balení přítomny všechny položky:
- 1x Maxtang MTN-6900HX Mini PC (No RAM, No SSD, No OS)
- 1x HDMI kabel
- 1x napájecí adaptér
- 1x napájecí kabel
- 1x držák VESA
- 4x montážní šrouby
- 1x Manuál k produktu (tento dokument)
4. Konec produktuview
The Maxtang MTN-6900HX Mini PC features a comprehensive set of ports and internal expansion options. Familiarize yourself with the device's layout before proceeding with installation.
4.1 Externí porty

Image 4.1: Detailed diagram of the Maxtang MTN-6900HX Mini PC's front and rear ports.
Přední panel:
- USB 3.2: Two USB 3.2 Gen2 ports (10Gbps) for high-speed data transfer.
- USB-C (USB 3.2 10Gb): One USB-C port for data transfer.
- Zvuk: 3.5mm audio jack pro sluchátka nebo reproduktory.
- RESETOVÁNÍ: Tlačítko reset.
- Vypínač: Pro zapnutí/vypnutí zařízení.
Zadní panel:
- DC-in (Power input): Zde připojte napájecí adaptér.
- HDMI: One HDMI port for video output (up to 4K@60Hz).
- Větrací otvory: Pro odvod tepla.
- DP: One DisplayPort for video output (up to 8K@60Hz).
- USB 4.0: Two USB4 ports (40Gbps, 100W PD, 8K video output).
- USB 2.0: Jeden port USB 2.0.
- LAN RJ45 2.5G: One 2.5 Gigabit Ethernet port for wired network connection.
- Kensingtonský zámek: Bezpečnostní slot.
4.2 Vnitřní komponenty

Obrázek 4.2: Vnitřní view of the Mini PC, highlighting the M.2 2280 NVMe SSD slots and DDR5 SO-DIMM slots.
The Mini PC supports:
- M.2 2280 NVMe SSD: Two PCIe Gen4 2280 slots for NVMe SSDs, supporting up to 4TB each (total 8TB).
- DDR5 SO-DIMM: Two dual-channel DDR5 SO-DIMM slots, supporting up to 64GB RAM.
- WiFi/Bluetooth Module: One M.2 slot for a WiFi and Bluetooth module (pre-installed or user-installable depending on configuration).
5. Hardware Installation (RAM & SSD)
This Mini PC is shipped without RAM, SSD, or an operating system. Follow these steps to install the necessary components.
5.1 Installing RAM (DDR5 SO-DIMM)

Image 5.1: Illustration of installing DDR5 SO-DIMM modules into the memory slots.
- Vypnout: Ensure the Mini PC is powered off and disconnected from the power source.
- Otevřený případ: Carefully open the Mini PC case. Refer to the specific model's instructions for case removal.
- Vyhledejte sloty: Identify the two DDR5 SO-DIMM slots on the motherboard.
- Vložení RAM: Align the notch on the DDR5 SO-DIMM module with the key in the slot. Insert the module at a 45-degree angle and push down firmly until the side clips snap into place, securing the module.
- Opakovat: If installing two modules for dual-channel operation, repeat for the second slot.
5.2 Installing NVMe SSD (M.2 2280)
Obrázek 5.2: View of the M.2 2280 NVMe SSD slots, indicating where to install storage.
- Vyhledejte sloty: Identify the M.2 2280 NVMe SSD slots on the motherboard.
- Vložení SSD disku: Gently slide the M.2 SSD into the slot, ensuring the gold contacts are fully engaged.
- Bezpečný SSD disk: Once inserted, push down the end of the SSD and secure it with the provided screw.
- Zavřít případ: After installing all components, carefully close the Mini PC case.
6. Initial Setup and Operating Instructions
6.1 Připojení periferních zařízení
- Zobrazit: Connect your monitor(s) to the HDMI, DisplayPort, or USB4 ports using the appropriate cables.
- Klávesnice/myš: Připojte klávesnici a myš USB k dostupným portům USB.
- Síť: For a wired connection, connect an Ethernet cable to the 2.5GbE LAN port. For wireless, ensure your WiFi module is installed.
- Moc: Connect the power adapter to the DC-in port on the Mini PC, then plug the power cord into an electrical outlet.
6.2 Powering On and OS Installation
- Zapnutí: Press the power button on the front panel. The power indicator should illuminate.
- BIOS/UEFI: Upon first boot, you may need to enter the BIOS/UEFI settings (usually by pressing Del or F2 during startup) to configure boot options or verify hardware detection.
- Instalace operačního systému: Since the device comes without an OS, you will need to install one. Prepare a bootable USB drive with your preferred operating system (e.g., Windows 11 Pro 64-bit or Linux 64-bit). Insert the USB drive and follow the on-screen instructions to install the OS onto your NVMe SSD.
6.3 Konfigurace displeje
The Mini PC supports multiple displays, including triple screen output via HDMI, DisplayPort, and USB4.

Obrázek 6.1: Příkladample setup showing the Mini PC connected to three external displays.
- Connect up to three monitors using the HDMI (4K@60Hz), DisplayPort (8K@60Hz), and USB4 (4K@60Hz) ports.
- After OS installation, you can configure display settings (resolution, orientation, extended/duplicate desktop) within your operating system's display settings.
6.4 Síťové připojení
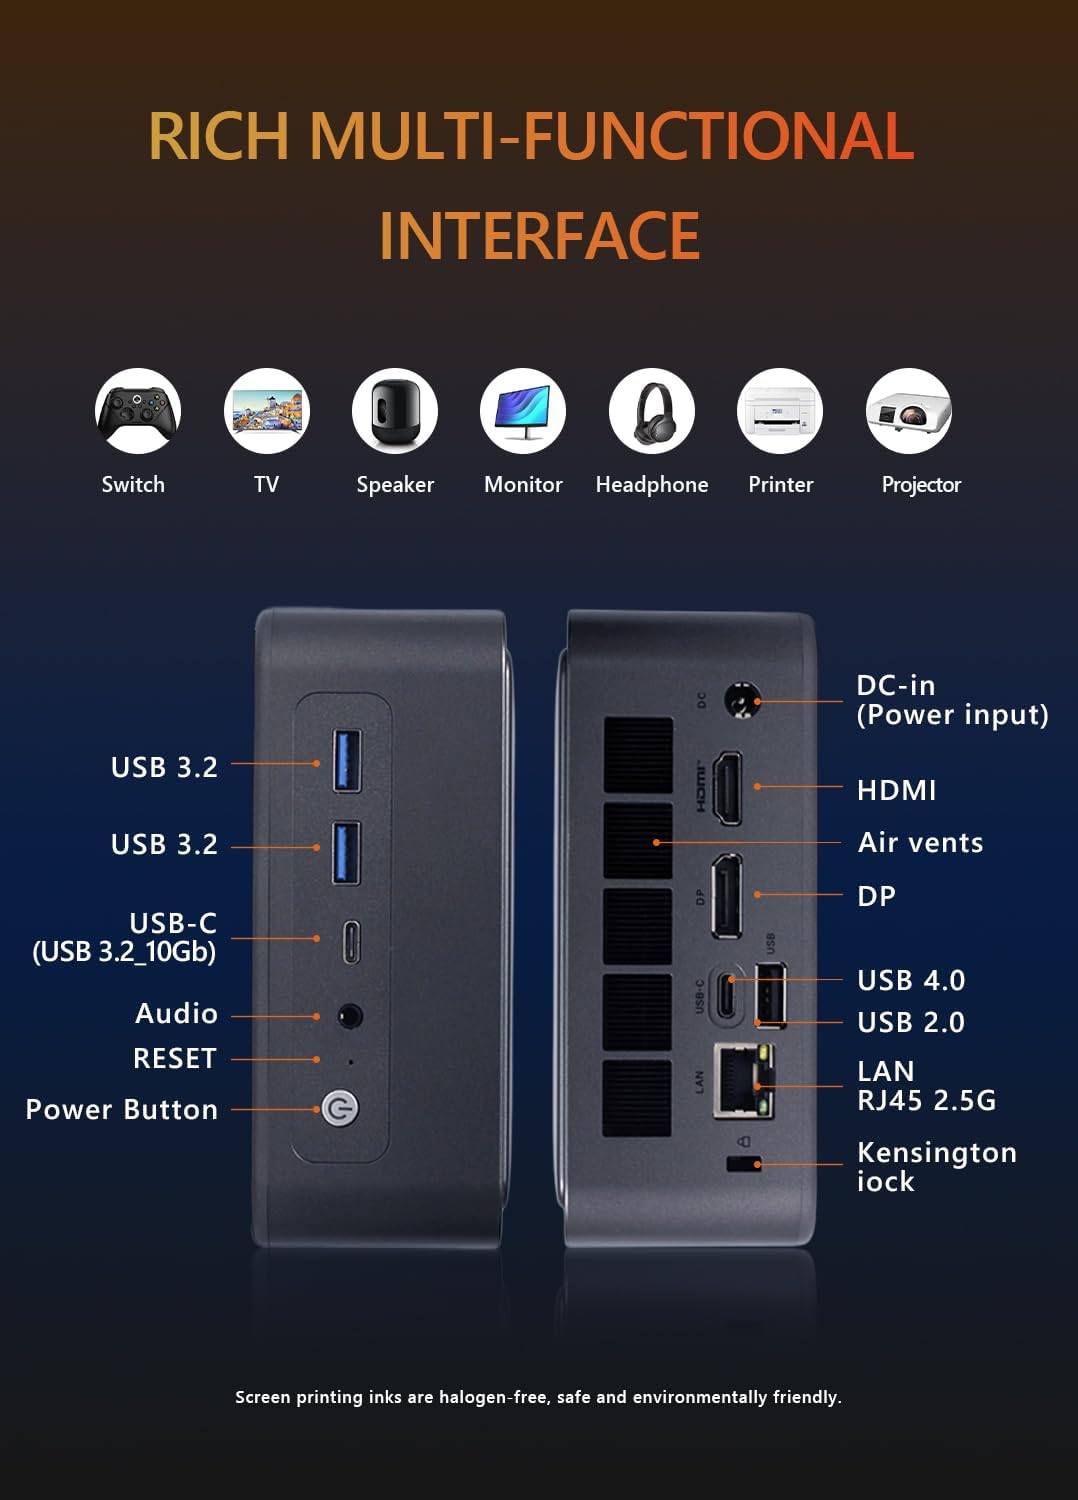
Image 6.2: Visual representation of the Mini PC's network capabilities, including 2.5GbE LAN, WiFi 6, and Bluetooth 5.2.
- Kabelová LAN: Connect an Ethernet cable to the 2.5GbE RJ45 port for a stable and high-speed wired network connection.
- Wi-Fi: If a Wi-Fi module is installed, connect to your wireless network through the operating system's network settings. The device supports Wi-Fi 6.
- Bluetooth: If a Bluetooth module is installed, pair Bluetooth devices (e.g., headphones, keyboards) through the operating system's Bluetooth settings. The device supports Bluetooth 5.2.
7. Údržba
- Čištění: K čištění vnější strany Mini PC použijte měkký, suchý hadřík. Pro odstranění prachu z větracích otvorů použijte stlačený vzduch. Nepoužívejte tekuté čisticí prostředky přímo na zařízení.
- Aktualizace softwaru: Regularly update your operating system, drivers, and applications to ensure optimal performance and security.
- Větrání: Ensure the Mini PC is placed in a well-ventilated area and that its air vents are not obstructed to prevent overheating.
- Záloha dat: Pravidelně zálohujte důležitá data na externí úložné zařízení nebo do cloudové služby.
8. Řešení problémů
Pokud narazíte na problémy s Mini PC, postupujte podle následujících běžných kroků pro řešení problémů:
- Bez napájení:
- Check if the power adapter is securely connected to both the Mini PC and the electrical outlet.
- Ujistěte se, že zásuvka je funkční.
- Zkuste jinou zásuvku.
- Bez displeje:
- Verify that the monitor is powered on and the correct input source is selected.
- Ensure the video cable (HDMI, DP, USB4) is securely connected to both the Mini PC and the monitor.
- Zkuste jiný video kabel nebo monitor, pokud je k dispozici.
- Operační systém se nespustí:
- Confirm that RAM and SSD are correctly installed as per Section 5.
- Check BIOS/UEFI settings to ensure the boot order is correct and the SSD is detected.
- If installing a new OS, ensure the bootable USB drive is properly created and selected as the boot device.
- Žádné síťové připojení:
- V případě kabelového připojení zkontrolujte stav ethernetového kabelu a routeru/modemu.
- For Wi-Fi, ensure the Wi-Fi module is installed and drivers are updated. Check your Wi-Fi network settings in the OS.
- Přehřívání:
- Ensure the Mini PC's vents are clear and not obstructed.
- Place the device in a location with good airflow.
- Clean dust from the vents regularly.
9. Specifikace
Detailed technical specifications for the Maxtang MTN-6900HX Mini PC:
| Funkce | Specifikace |
|---|---|
| Název modelu | MTN-6900HX |
| Procesor | AMD Ryzen 9 6900HX (8 Cores/16 Threads, up to 4.9GHz) |
| Grafika | AMD Radeon Graphics (Radeon 680M) |
| Paměť (RAM) | Dual Channel DDR5 SO-DIMM, Max 64GB (User-installed) |
| Skladování | 2x M.2 2280 NVMe PCIe Gen4 SSD slots, Max 4TB each (User-installed) |
| Operační systém | No OS pre-installed (Supports Windows 10/11 64-bit, Linux 64-bit) |
| Video výstup | 1x HDMI (4K@60Hz), 1x DisplayPort (8K@60Hz), 2x USB4 (4K@60Hz) |
| USB porty | 2x USB4 (40Gbps), 2x USB 3.2 Gen2 (10Gbps), 1x USB 2.0 |
| Síť | 1x 2.5GbE RJ45 LAN, Wi-Fi 6, Bluetooth 5.2 |
| Zvuk | 1x 3.5mm audio jack |
| Vstup napájení | 19V/20V DC-in |
| Rozměry | 127 mm x 135 mm x 55 mm |
| Další funkce | Kensington Lock slot, VESA Mount support |
9.1 Processor Details

Image 9.1: Details of the AMD Ryzen 9 6900HX processor, including core count, threads, boost clock, and L3 cache.
9.2 Graphics Details
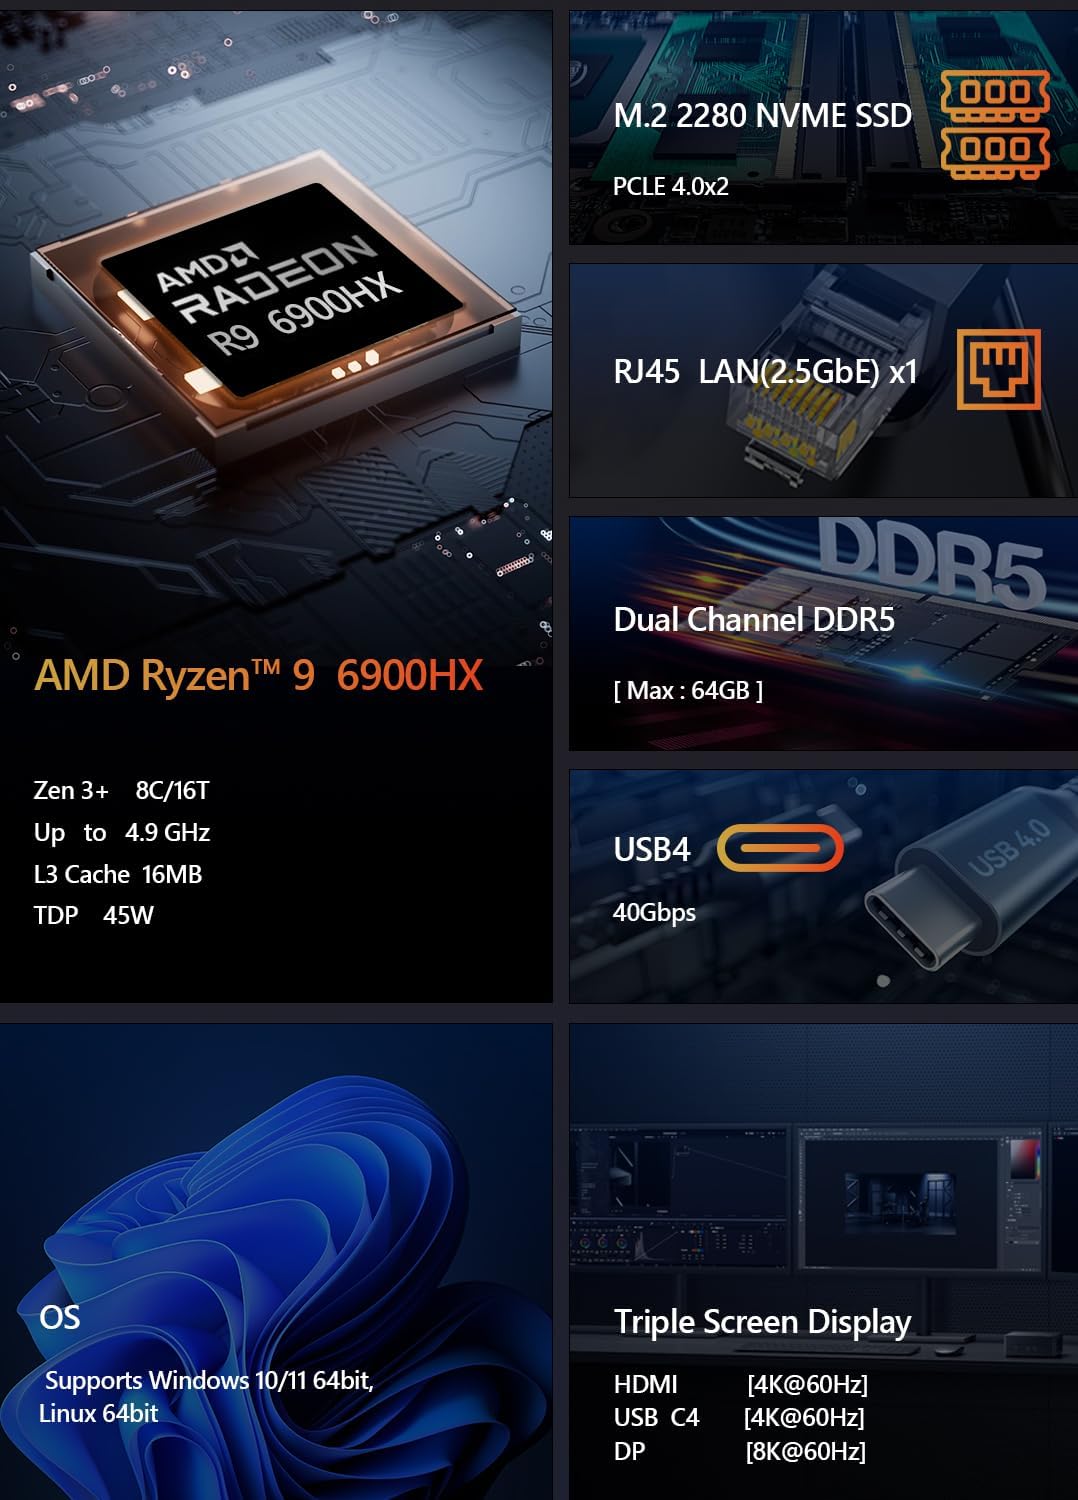
Image 9.2: Specifications for the integrated AMD Radeon 680M graphics, including shader count and GPU memory.
10. Záruka a podpora
Záruka: This product comes with a 12-month product warranty from the date of order. Please retain your proof of purchase for warranty claims.
Služby zákazníkům: For technical support or warranty inquiries, please contact Maxtang customer service. Refer to your purchase platform or the Maxtang official webstránky pro kontaktní údaje.
Kontaktní údaje výrobce: 6/F, Bldg 3, Honghui Industrial Park, Liuxian 2nd Road, Bao'an Dist, Shenzhen, China 518101