
Zavedení
This manual provides essential information for the proper installation, operation, and maintenance of your Hertz HRC 02 Remote Sub Level Control. Please read this manual thoroughly before using the product to ensure optimal performance and safety.
Bezpečnostní informace
- Před prováděním jakýchkoli elektrických prací vždy odpojte baterii vozidla.
- Ujistěte se, že veškeré kabely jsou správně vedeny a zajištěny, aby nedošlo k jejich poškození nebo rušení.
- Do not install the control in a location that obstructs the driver's view nebo narušuje provoz vozidla.
- Pokud si nejste jisti některými kroky instalace, poraďte se s profesionálním instalatérem.
Obsah balení
Ověřte, zda jsou v balení přítomny všechny položky:
- Hertz HRC 02 Remote Sub Level Control Unit
- Montážní konzola
- Montážní šrouby
- Adhesive Tape (for surface mounting)
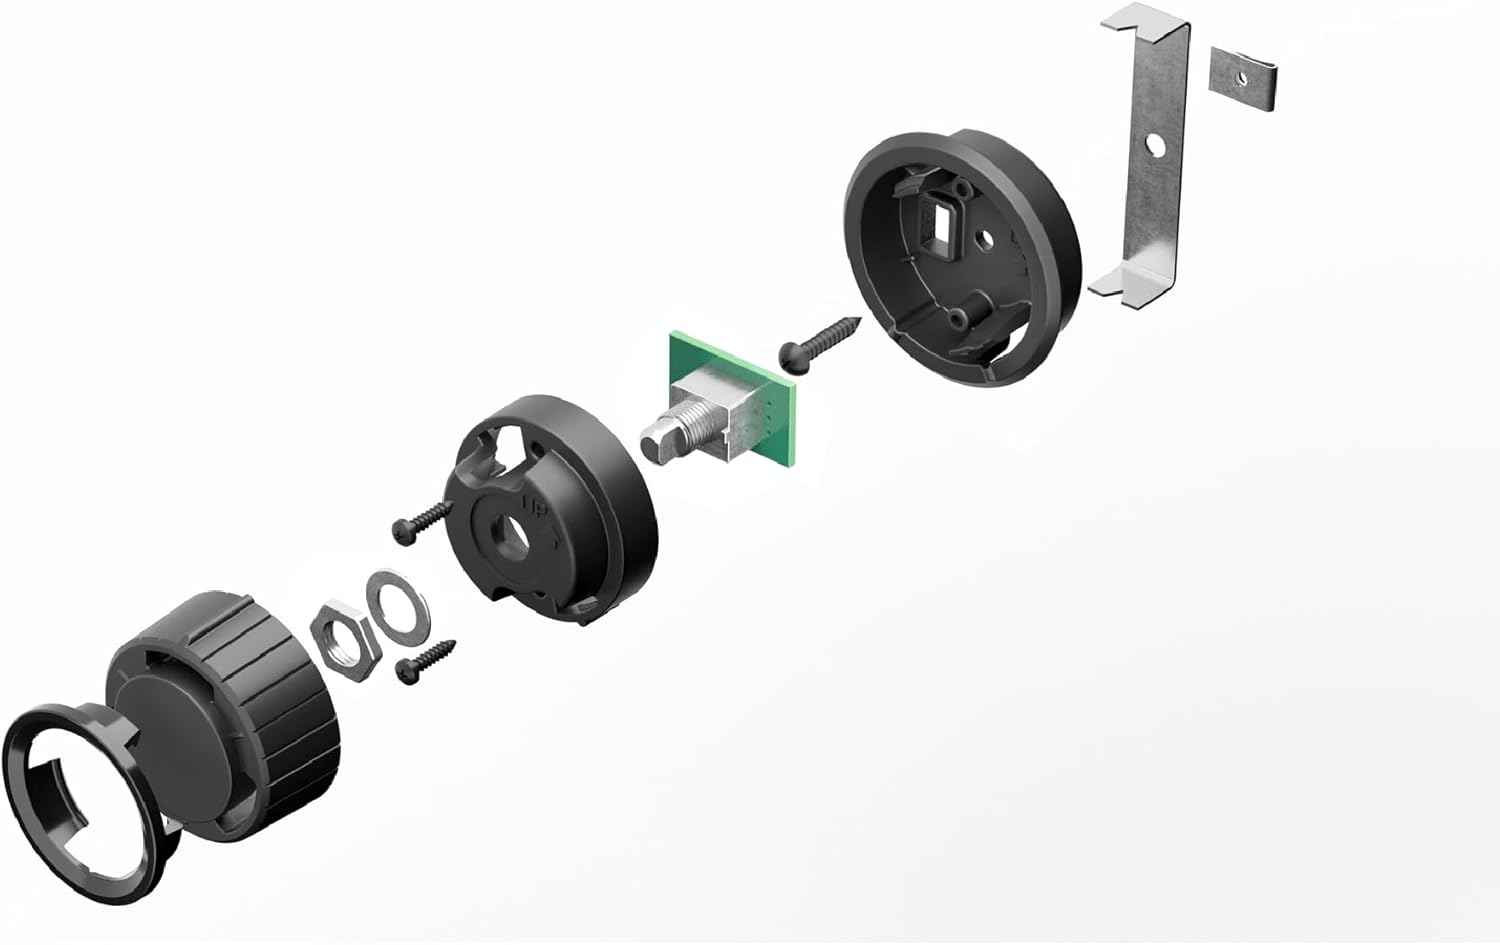
Nastavení a instalace
The Hertz HRC 02 offers versatile mounting options:
- Připojení k Ampživější:
Locate the remote level control input on your compatible Hertz Deici Power Amplifier. Connect the cable from the HRC 02 control unit to this input. Ensure the connector is fully seated.

Obrázek 2: The HRC 02 control unit with its integrated connection cable, ready to be plugged into a compatible ampživější. - Surface Mounting with Tape:
Clean the desired mounting surface thoroughly. Apply the provided adhesive tape to the back of the HRC 02 control unit or its mounting bracket. Press firmly onto the surface for secure adhesion.
- Surface Mounting with Screws:
Position the mounting bracket in the desired location. Mark the screw holes. Drill pilot holes if necessary, then secure the bracket using the provided screws. Attach the HRC 02 control unit to the secured bracket.
- Zapuštěná montáž:
For a clean, integrated look, the HRC 02 can be flush mounted. This requires cutting an appropriate-sized hole in the mounting surface. Insert the control unit into the hole and secure it from behind using the provided hardware (e.g., retaining ring, screws, or bracket as shown in Figure 1).

Obrázek 3: An illustration demonstrating the flush mounting method for the HRC 02, where the control knob sits neatly within the mounting surface.
Návod k obsluze
The Hertz HRC 02 is designed for simple operation:
- Adjusting Subwoofer Level: Rotate the knob clockwise to increase the subwoofer output level (bass).
- Rotate the knob counter-clockwise to decrease the subwoofer output level (bass).

Údržba
To ensure the longevity and proper function of your HRC 02:
- Clean the control unit periodically with a soft, dry cloth.
- Vyhněte se používání agresivních chemikálií nebo abrazivních čisticích prostředků.
- Ensure the control is not exposed to excessive moisture or extreme temperatures.
Odstraňování problémů
- Bez výstupu pro subwoofer:
- Check the connection cable between the HRC 02 and the ampživější.
- Zajistěte amplifier je zapnutý a funguje správně.
- Verify the HRC 02 knob is not turned completely down.
- Přerušovaná regulace:
- Inspect the connection cable for any damage or loose connections.
- Ensure the control unit is securely mounted and not experiencing excessive vibration.
Specifikace
| Funkce | Specifikace |
|---|---|
| Číslo modelu položky | 02 HRC |
| Rozměry produktu | 4.33 x 3.15 x 2.17 palce |
| Hmotnost položky | 4.6 unce |
| Výrobce | Hertz |
Záruka a podpora
The Hertz HRC 02 comes with a 1-Year Manufacturer Warranty. For warranty claims or technical support, please contact your authorized Hertz dealer or visit the official Hertz webstránky pro další pomoc.