
1. Úvod
This instruction manual provides detailed guidance for the installation, operation, and maintenance of your BETOWEY TK-X2 Motorcycle Intercom Microphone and Speaker Kit. This kit is designed exclusively for seamless integration with BETOWEY TK-X2 motorcycle intercom systems and cannot be used independently. It enhances your riding communication experience with clear audio and versatile setup options.

Image 1: The accessory kit is suitable for the TK-X2 Helmet Intercom, showing the main unit and various components.
2. Obsah balení
Zkontrolujte prosím, zda jsou ve vašem balení obsaženy všechny následující komponenty:
- Kabelový mikrofon
- Drátový boom mikrofon
- Speakers (pair)
- Clamp pro hlavní jednotku
- Hook-and-Loop Fasteners for Main Unit
- Hook-and-Loop Fasteners for Speakers and Microphones
3. Nastavení a instalace
This kit offers versatile options for microphone types and installation methods to suit various helmet designs and user preferences.
3.1. Microphone Types
The kit includes two types of microphones:
- Kabelový mikrofon: Ideal for full-face helmets where the microphone can be discreetly placed inside the helmet.
- Drátový mikrofon s ramenem: Suitable for open-face or modular helmets, allowing the microphone to be positioned closer to the mouth.
3.2. Instalace reproduktoru
- Najděte si kapsy na uši uvnitř helmy.
- Attach the hook-and-loop fasteners to the back of each speaker.
- Securely place the speakers into the helmet's ear pockets. Ensure they are positioned comfortably over your ears.
3.3. Instalace mikrofonu
- Choose the appropriate microphone type for your helmet.
- For the wired microphone, attach its hook-and-loop fastener to a suitable flat surface inside the helmet, near your mouth.
- For the wired boom microphone, attach its hook-and-loop fastener to the inside of the helmet's chin bar or cheek pad, positioning the boom arm towards your mouth.
- Route the microphone cable discreetly along the helmet's interior to the location where the main intercom unit will be mounted.
3.4. Main Unit Mounting
Two methods are available for mounting the main intercom unit:
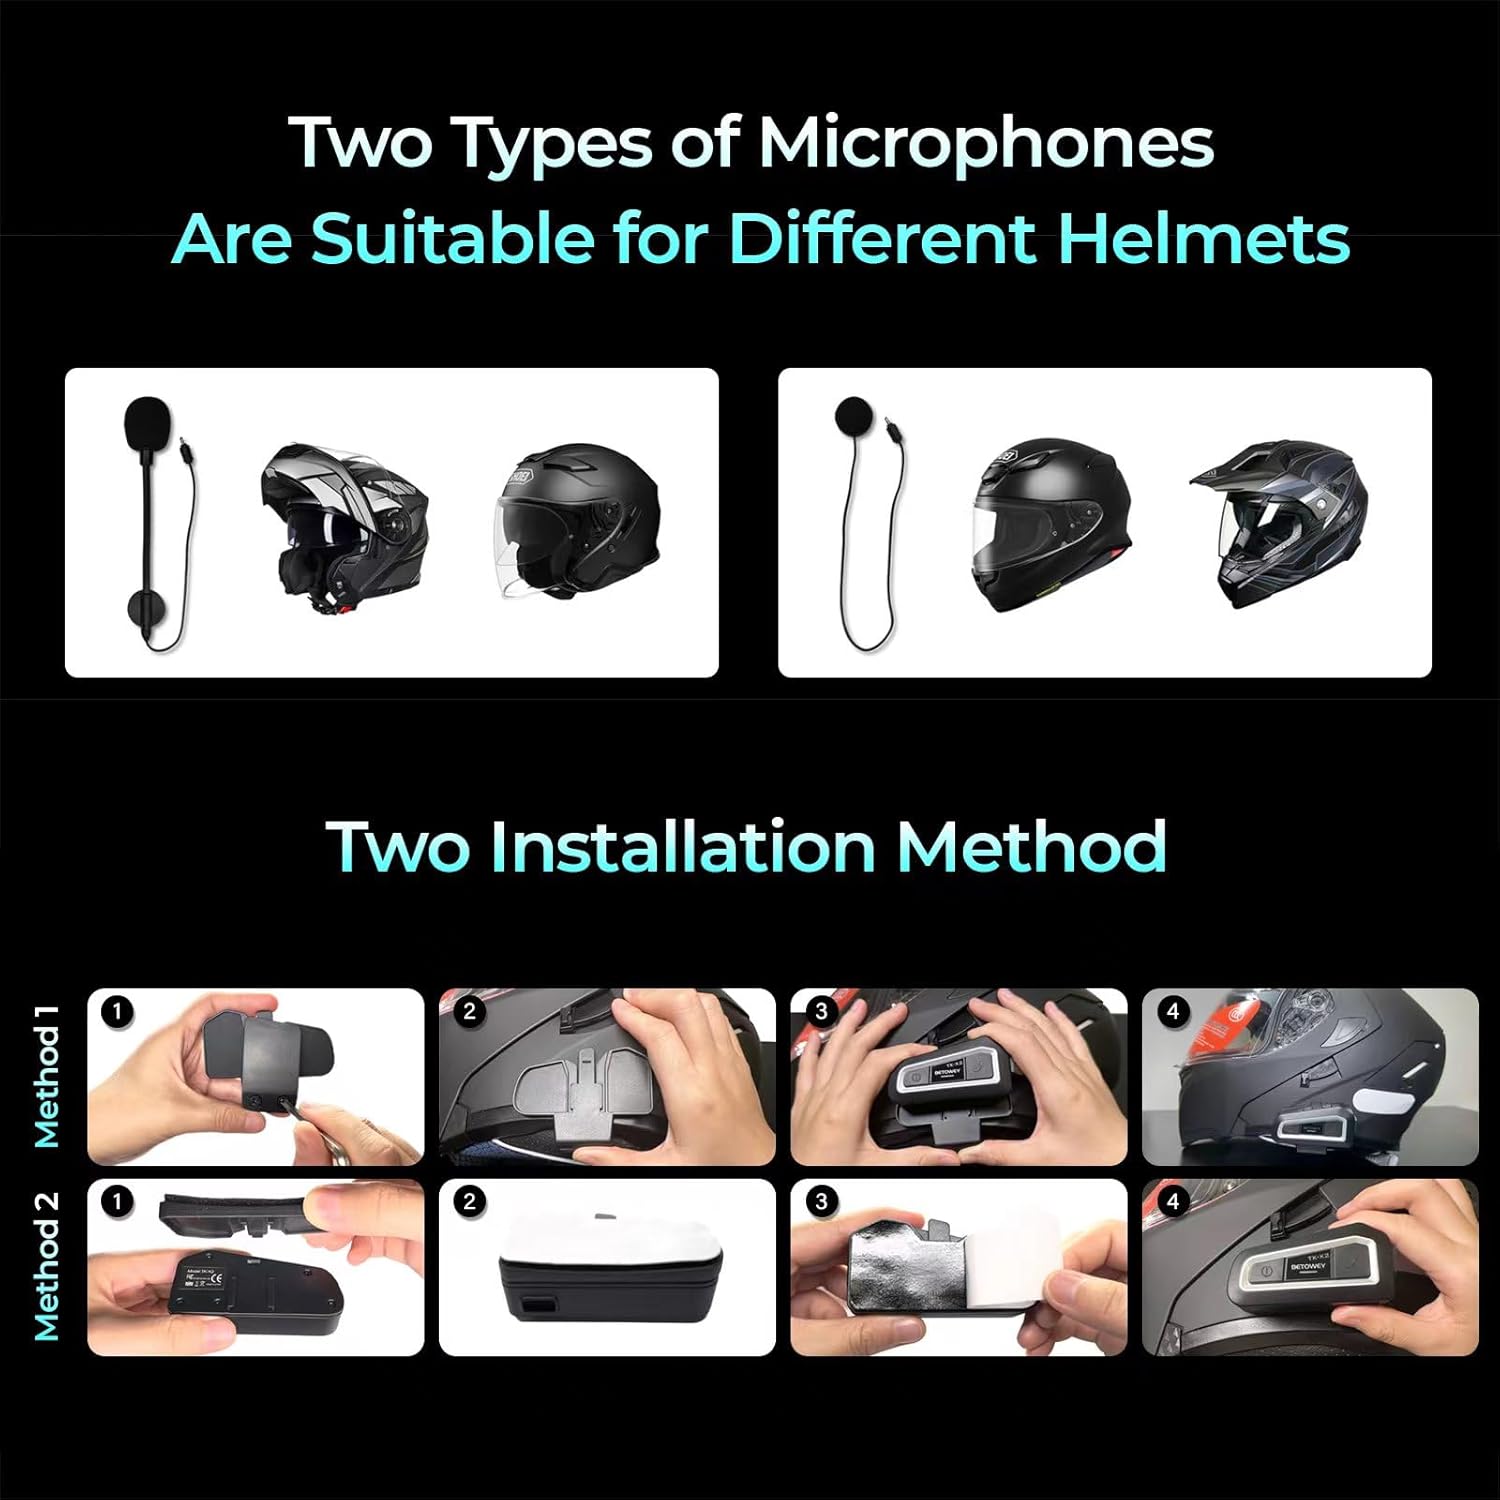
Image 2: Illustrates two types of microphones suitable for different helmets and two installation methods for the main unit.
Metoda 1: Clamp Instalace
- Povolte šrouby na třamp.
- Posuňte třamp onto the edge of your helmet, typically on the left side.
- Utáhněte šrouby pro zajištění clamp pevně k helmě.
- Slide the main intercom unit onto the clamp dokud nezapadne na místo.
Method 2: Hook-and-Loop Fastener Installation
- Clean the desired mounting surface on the helmet (e.g., side of the helmet).
- Peel off the protective backing from one side of the hook-and-loop fastener.
- Firmly press the adhesive side onto the helmet surface.
- Attach the corresponding hook-and-loop fastener to the back of the main intercom unit.
- Align and press the main unit onto the fastener on the helmet until it is securely attached.
3.5. Connecting to the TK-X2 Intercom
- Once the speakers, microphone, and main unit are installed, connect the speaker/microphone cable from the kit into the designated port on your BETOWEY TK-X2 intercom unit.
- Ujistěte se, že je připojení bezpečné, abyste předešli přerušení zvuku.
4. Návod k obsluze
This kit provides the audio input (microphone) and output (speakers) for your BETOWEY TK-X2 intercom system. Refer to your BETOWEY TK-X2 intercom's main instruction manual for detailed operating procedures, including power on/off, pairing, volume control, and communication functions. This accessory kit does not have independent operational controls.
The advanced noise reduction technology integrated into the microphone ensures clear audio transmission even in noisy riding environments.
5. Údržba
To ensure the longevity and optimal performance of your microphone and speaker kit, follow these maintenance guidelines:
- Čištění: Gently wipe the speakers and microphone with a soft, dry cloth. Avoid using harsh chemicals or abrasive materials.
- Skladování: When not in use for extended periods, store the kit in a cool, dry place away from direct sunlight and extreme temperatures.
- Péče o kabely: Vyhněte se ostrým ohybům nebo nadměrnému tahání za kabely, abyste předešli jejich poškození.
6. Řešení problémů
If you encounter issues with your microphone and speaker kit, consider the following:
- Z reproduktorů není slyšet žádný zvuk:
- Ensure the speaker cable is fully plugged into the intercom unit.
- Check the volume settings on your TK-X2 intercom.
- Ověřte, zda jsou reproduktory správně umístěny a nejsou nijak zakryty.
- Mikrofon nesnímá hlas:
- Ensure the microphone cable is securely connected to the intercom unit.
- Check the microphone's position; it should be close to your mouth.
- Confirm that the correct microphone type is selected or compatible with your intercom's settings (if applicable).
- Špatná kvalita zvuku/statický šum:
- Zkontrolujte všechna kabelová spojení, zda nejsou uvolněná.
- Ujistěte se, že kabely nejsou skřípnuté ani poškozené.
- Verify that the microphone is not obstructed by helmet padding or clothing.
For further assistance, please refer to your BETOWEY TK-X2 intercom's main manual or contact BETOWEY customer support.
7. Specifikace
| Funkce | Popis |
|---|---|
| Značka | BETOWEY |
| Název modelu | For TK-X2 |
| Technologie připojení | Kabelové |
| Speciální funkce | Mikrofon v ceně |
| Kompatibilní zařízení | Motorcycle intercom |
| Barva | Černý |
| Zahrnuté komponenty | Speakers, Hook-and-Loop Fasteners for Main Unit, Wired Microphone, Wired Boom Microphone, Clamp |
| Polární vzor | Superkardioid |
| Tvarový faktor mikrofonu | Plug-on |
| Doporučená použití | Motorcycle Communication, Riding |
8. Záruka a podpora
For information regarding warranty coverage and customer support, please refer to the documentation provided with your original BETOWEY TK-X2 intercom system or visit the official BETOWEY webUschovejte si účtenku jako doklad o koupi pro případné reklamace.