
FLASHFORGE Camera Kit for Adventurer 5M/Pro/AD5X
FLASHFORGE Camera Kit User Manual
For Adventurer 5M, Adventurer 5M Pro, and AD5X 3D Printers
1. Úvod
This user manual provides detailed instructions for the installation, operation, and maintenance of your FLASHFORGE Camera Kit. Designed for seamless integration with FLASHFORGE Adventurer 5M, Adventurer 5M Pro, and AD5X 3D printers, this camera enables real-time and remote monitoring of your printing process, enhancing convenience and control.
2. Obsah balení
Ověřte, zda jsou v balení přítomny všechny komponenty:
- Modul kamery
- Kabel kamery
- Šroub M3.5*8
- 2.5mm imbusový klíč
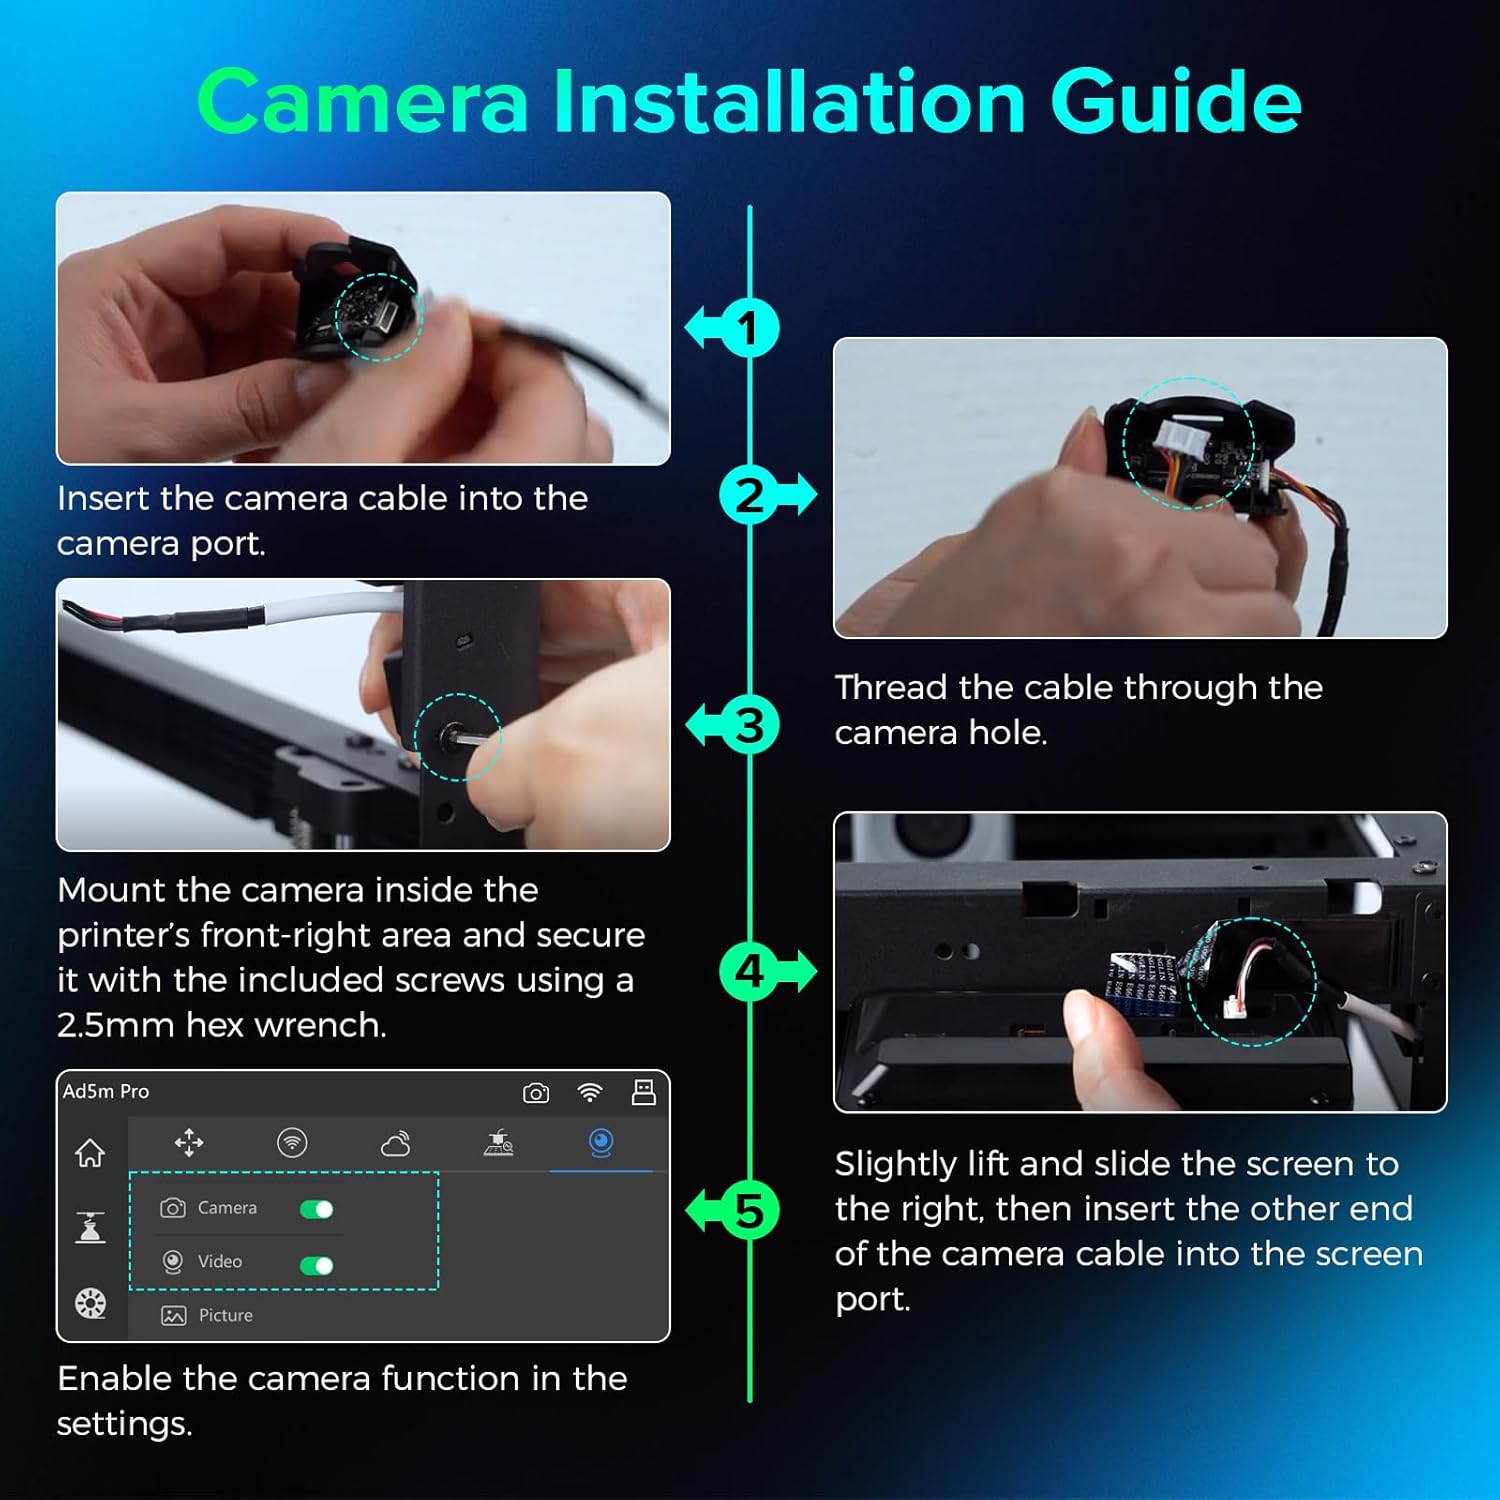
Image: Components of the FLASHFORGE Camera Kit.
3. Nastavení a instalace
Follow these steps to install the camera module on your 3D printer.
3.1 Instalace hardwaru
- Prepare the Camera Module: Insert the smaller end of the camera cable into the camera port. Thread the camera cable out through the hole of the camera module.

Image: Detailed steps for camera cable insertion and threading.
- Montáž kamery: Install the camera on the inner side of the printer's front-right area. Ensure the protrusions on both sides of the camera fit into the locating holes.
- Zabezpečte kameru: Use the provided 2.5mm Allen wrench to tighten the M3.5*8 screw into the hole, securing the camera in place.
- Connect to Screen: Gently lift and slide the printer's screen to the right to detach it. Remove the upper port cover on the screen. Insert the other end of the camera cable into the designated port on the screen.
- Reattach Screen: Carefully reattach the screen to the printer, ensuring all connections are secure.
Video: Official guide on how to install the camera module on your Adventurer 5M 3D printer.
3.2 Aktivace softwaru
- Nastavení přístupu: On the printer's touchscreen, navigate to the settings menu (gear icon).
- Povolit fotoaparát: Within the settings, locate the camera icon. Turn on both the "Camera" and "Video" functions to enable the camera.
4. Návod k obsluze
4.1 Real-time and Remote Monitoring
The FLASHFORGE Camera Kit allows you to monitor your 3D prints in real-time from anywhere using the compatible Flash Maker App or Orca-Flashforge slicing software.
- Flash Maker App: Download and install the Flash Maker App on your mobile device. Connect the app to your 3D printer to view a live stream of your print progress and control basic printer functions remotely.
- Orca-Flashforge Slicing Software: For desktop monitoring, use the Orca-Flashforge slicing software. After sending a print job to your printer, you can access a live camera feed within the software interface.

Image: Remote monitoring of a 3D print via a mobile application.

Image: Print monitoring setup with desktop software and mobile app.
4.2 Time-Lapse Video Recording
The camera module supports time-lapse video recording of your entire printing process. These videos are stored on the printer's internal memory and can be downloaded after the print job is complete.
- Access Time-Lapse: After a print job finishes, navigate to the "Device Status" section in the Flash Maker App or Orca-Flashforge software.
- Stáhnout video: Select the completed print job and choose the option to download the time-lapse video.

Image: Camera capturing a time-lapse video of the 3D printing process.
5. Údržba
5.1 aktualizací firmwaru
Regular firmware updates are provided to maintain a reliable and seamless connection for your camera kit. Ensure your printer's firmware is always up-to-date for optimal performance.
- Zkontrolovat aktualizace: Periodically check for new firmware versions through your printer's settings menu or the Flash Maker App.
- Instalovat aktualizace: Follow the on-screen prompts to download and install any available firmware updates.

Image: Firmware update notification on the 3D printer's display.
5.2 Čištění
To ensure clear image quality, regularly clean the camera lens with a soft, dry, lint-free cloth. Avoid using abrasive cleaners or solvents.
6. Řešení problémů
- Žádný přenos z kamery:
- Ensure the camera module is correctly installed and securely connected to the screen.
- Verify that the "Camera" and "Video" functions are enabled in the printer's settings.
- Check your network connection for both the printer and your monitoring device.
- Update the printer's firmware to the latest version.
- Špatná kvalita obrazu:
- Čočku fotoaparátu čistěte měkkým suchým hadříkem.
- Ensure adequate lighting within the printer's build chamber.
- Time-Lapse Not Recording:
- Confirm that the "Video" function is enabled in the printer's settings.
- Ensure there is sufficient internal storage on the printer for time-lapse videos.
7. Specifikace
| Rozměry balení | 3.54 x 2.8 x 2.09 palce |
| Hmotnost položky | 1.44 unce |
| Výrobce | Zhejiang Flashforge 3D Technology Co., Ltd. |
| ASIN | B0D2VSLKTX |
| Datum první dostupnosti | 28. dubna 2024 |
| Kompatibilita | FLASHFORGE Adventurer 5M, Adventurer 5M Pro, AD5X 3D Printers |
8. Záruka a podpora
For warranty information and technical support, please refer to the warranty card included with your product or visit the official FLASHFORGE website. You can also contact FLASHFORGE customer service directly for assistance.
FLASHFORGE Official Store: Navštivte obchod
Ask a question about this manual
Ask about setup, troubleshooting, compatibility, parts, safety, or missing instructions. Manuals+ will review the question and use this page’s manual context to help answer it.