Zavedení
This manual provides detailed instructions for the installation, operation, and maintenance of your Pomya H81 Micro ATX Motherboard. Designed for 4th generation Intel Core processors (LGA 1150 socket), this motherboard supports DDR3 memory, high-speed M.2 NVMe/NGFF storage, and various I/O interfaces, making it suitable for desktop computer builds.
Co je zahrnuto
Upon unboxing, please verify that all components listed below are present and in good condition. If any items are missing or damaged, contact your retailer.
Video: Unboxing the Pomya H81 Motherboard. This video demonstrates the contents of the package, including the motherboard, I/O shield, SATA cable, and driver CD.

Obraz: The Pomya H81 Motherboard with included accessories: I/O shield, SATA data cable, and driver CD.
- Pomya H81 Micro ATX Motherboard
- I / O štít
- Datový kabel SATA
- Driver CD (for system drivers)
Vlastnosti
The Pomya H81 Motherboard offers a robust set of features for building a reliable desktop system:
- Patice LGA 1150: Supports 4th generation Intel Core i3, i5, i7, Xeon E3 V3 series, and G series processors.
- Dvoukanálová paměť DDR3: Two 240-pin DDR3 SDRAM slots supporting unbuffered memory with effective frequencies of 1066, 1333, and 1600MHz, up to a maximum capacity of 16GB.
- High-Speed M.2 Interface: Features an M.2 hard disk interface with a jumper cable, supporting both NVMe and NGFF modes for flexible high-speed storage options.
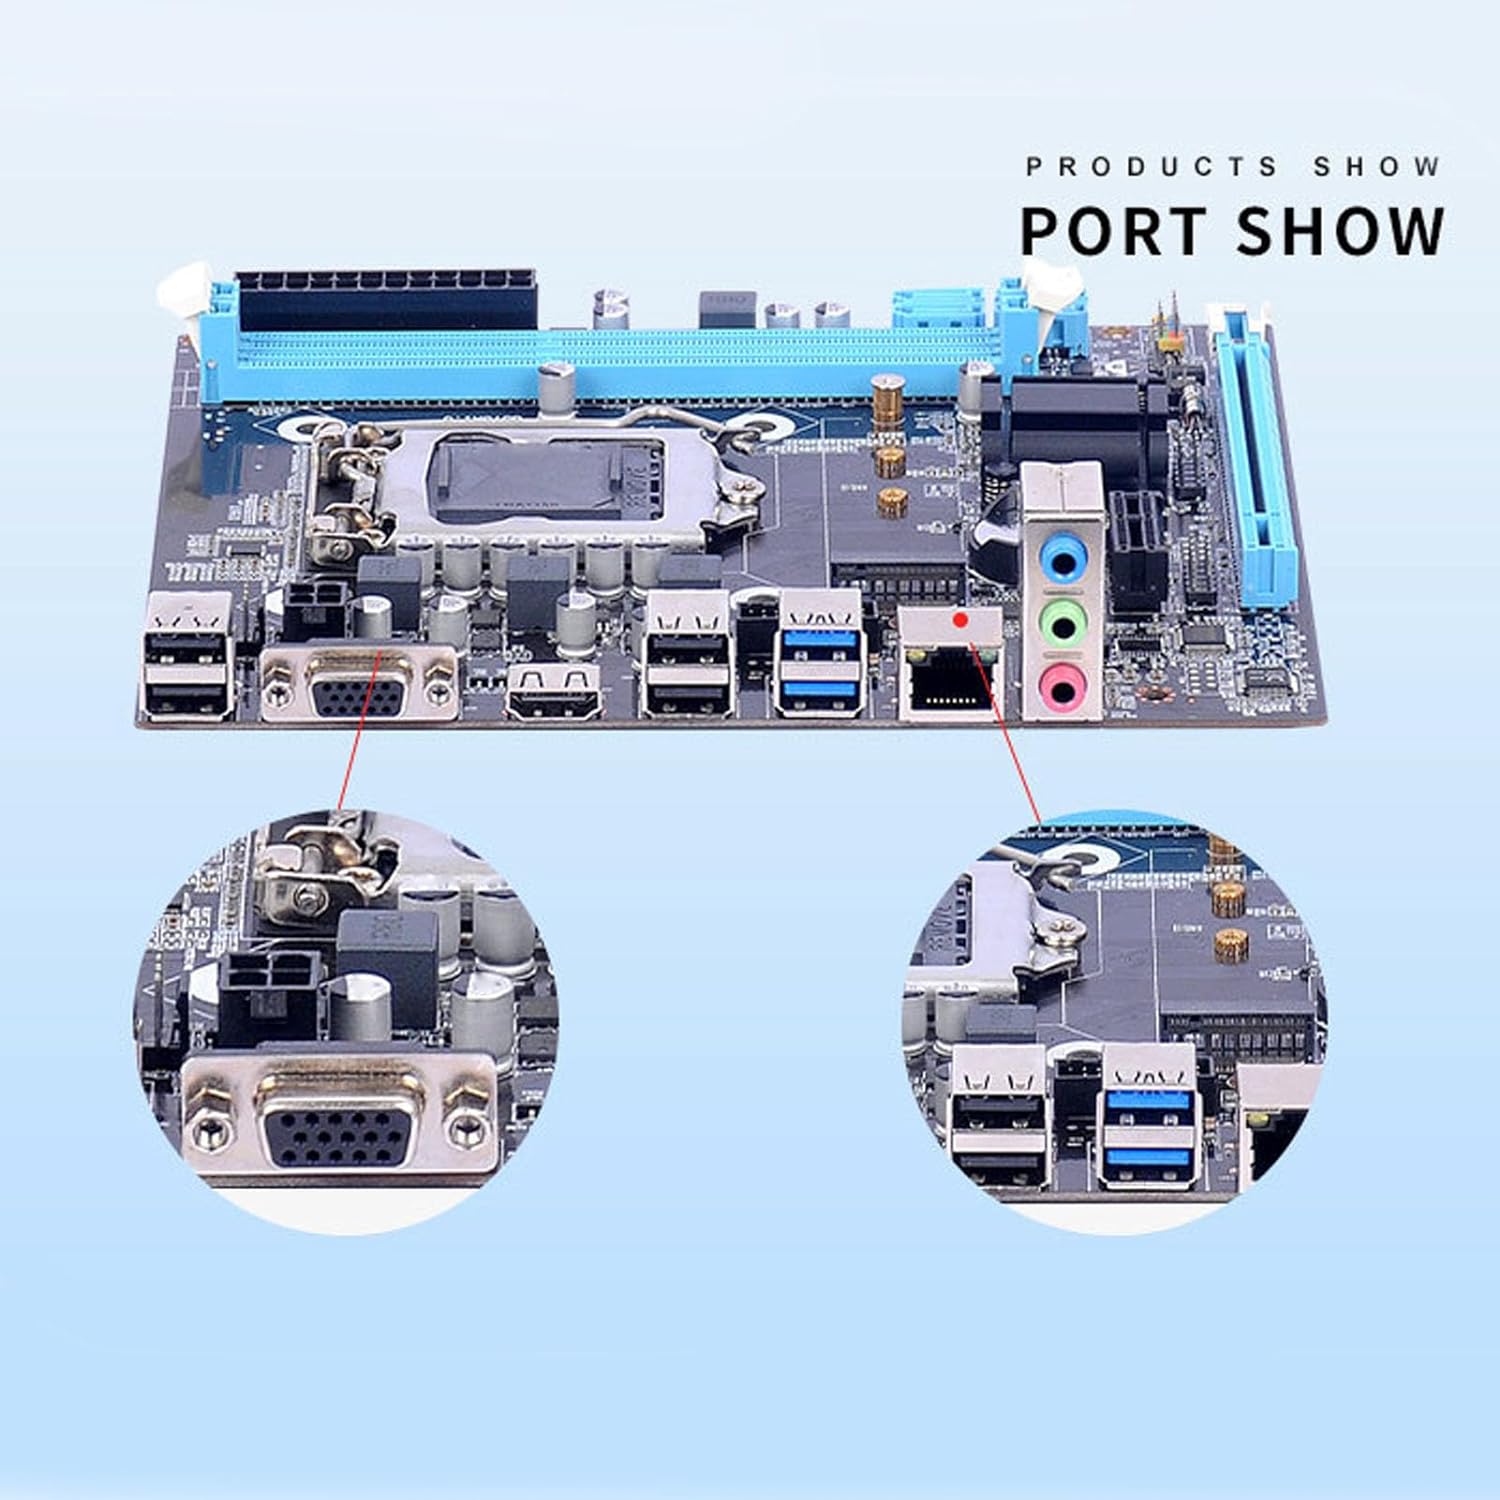
- Comprehensive I/O Interfaces: Includes 4 USB 2.0 ports, 2 USB 3.0 ports, 1 VGA port, 1 HD Multimedia Interface compatible port, 1 RJ45 LAN port, and a 3-in-1 audio interface (line in, line out, microphone).
- Storage and Expansion Slots: Equipped with 2 SATA 2.0 (3GB/s) ports and 1 SATA 3.0 (6GB/s) port for multiple storage devices. Expansion slots include 1 PCI Express x16 slot, 1 PCI Express x1 slot, and 1 M.2 slot.
- Odolný design: Constructed with an 8-layer PCB for enhanced stability and longevity.

Obraz: Detailní záběr view of the LGA 1150 CPU socket, highlighting compatibility with Intel 4th generation processors.

Obraz: Nadview of the motherboard showing the dual DDR3 memory slots and the M.2 NVMe/NGFF connector.
Nastavení
Follow these steps for proper installation of your motherboard into a computer chassis:
- Příprava podvozku: Ensure your computer case is compatible with Micro ATX motherboards. Install the I/O shield into the rear panel opening of the chassis.
- Nainstalujte procesor: Open the CPU socket retention lever. Carefully align your LGA 1150 processor with the socket, ensuring the triangular markers match. Gently place the CPU into the socket without forcing it. Close the retention lever to secure the CPU.
- Instalace chladiče CPU: Naneste teplovodivou pastu na procesor (pokud nebyla předem nanesena na chladič). Namontujte chladič procesoru podle pokynů výrobce a ujistěte se, že je bezpečně upevněn a má dobrý kontakt s procesorem.
- Instalace RAM: Open the clips on the DDR3 memory slots. Align the memory modules with the slots, ensuring the notch on the module matches the key in the slot. Press down firmly on both ends of the module until the clips snap into place.
- Montáž základní desky: Carefully place the motherboard into the chassis, aligning the screw holes with the standoffs in the case. Secure the motherboard with screws.
- Připojte napájení: Připojte 24pinový konektor napájení ATX a 4pinový konektor napájení CPU ze zdroje k základní desce.
- Instalace úložných zařízení: Connect your SATA hard drives or SSDs to the SATA 2.0 or SATA 3.0 ports using the provided SATA cables. If using an M.2 drive, install it into the M.2 slot and secure it with the provided screw. Důležité: You need to turn on the toggle switch on the mainboard and flip it to the NVMe side to enable normal operation for NVMe M.2 drives.
- Connect Expansion Cards: Install any PCI Express x16 or x1 expansion cards (e.g., graphics card) into their respective slots and secure them.
- Připojení kabelů předního panelu: Connect the front panel USB, audio, power switch, reset switch, and LED cables to the corresponding headers on the motherboard. Refer to your chassis manual for specific pin assignments.
- Připojení periferií: Připojte monitor, klávesnici, myš a další periferní zařízení k zadním I/O portům.

Obraz: Detailní view of the rear I/O panel, showing USB 2.0, USB 3.0, VGA, HD Multimedia Interface, RJ45, and audio ports.
Obraz: Close-up of the M.2 slot and SATA 2.0/3.0 ports for connecting storage devices, including the M.2 jumper.
Provozní
Once all components are installed and connected, you can power on your system:
- Počáteční zapnutí: Press the power button on your computer case. The system should boot up and display the BIOS/UEFI screen or begin the operating system installation process.
- Konfigurace BIOSu/UEFI: Access the BIOS/UEFI setup by pressing the designated key (usually Del, F2, or F10) during startup. Configure boot order, system time, and other settings as needed.
- Instalace operačního systému: Nainstalujte si preferovaný operační systém (např. Windows 10) ze spouštěcího USB disku nebo DVD.
- Instalace ovladače: After installing the operating system, install all necessary drivers from the provided driver CD or download the latest versions from the manufacturer's webwebu. To zahrnuje ovladače čipové sady, ovladače zvuku, ovladače LAN a veškeré další ovladače periferních zařízení.
- Optimalizace systému: For optimal performance, ensure your BIOS/UEFI is updated and all drivers are current.
Video: Nadview of the H81 Motherboard's features and interfaces. This video provides a visual guide to the various ports and slots on the motherboard, useful for understanding connectivity.
Údržba
Pravidelná údržba pomáhá zajistit dlouhou životnost a stabilní výkon vaší základní desky:
- Udržujte to čisté: Periodically clean dust from inside your computer case, especially around the motherboard, CPU cooler, and fan vents. Use compressed air and anti-static brushes.
- Zkontrolujte připojení: Ensure all cables (power, SATA, front panel) are securely connected. Loose connections can cause system instability.
- Monitorovat teploty: Use monitoring software to keep an eye on CPU and chipset temperatures. Excessive heat can degrade components over time.
- Update Drivers and BIOS/UEFI: Regularly check for updated drivers and BIOS/UEFI versions from the manufacturer's website to improve compatibility, performance, and security.
- Zabraňte statickému výboji: Always ground yourself before handling internal components to prevent electrostatic discharge (ESD) damage.
Odstraňování problémů
Pokud narazíte na problémy se základní deskou, zvažte následující běžné kroky pro řešení problémů:
- Žádné napájení/žádné spuštění:
- Zkontrolujte všechna napájecí připojení (24pinový ATX, 4pinový CPU).
- Ujistěte se, že je napájení zapnuté a funkční.
- Ověřte, zda je kabel vypínače na předním panelu správně připojen ke konektoru základní desky.
- Bez displeje:
- Ujistěte se, že je monitor připojen ke správnému video výstupu (základní deska nebo grafická karta).
- Znovu vložte grafickou kartu a moduly RAM.
- Test with a different monitor or video cable.
- Nestabilita/pády systému:
- Check CPU and RAM for proper installation.
- Spusťte diagnostické nástroje paměti a zkontrolujte, zda není RAM vadná.
- Ujistěte se, že je chladič procesoru správně nainstalován a je nanesena teplovodivá pasta.
- Update all drivers and BIOS/UEFI.
- Úložné zařízení nebylo detekováno:
- Ověřte, zda jsou datové a napájecí kabely SATA bezpečně připojeny.
- Check BIOS/UEFI settings to ensure SATA ports are enabled and M.2 mode is correctly configured (NVMe/NGFF).
- Ensure the M.2 jumper is set to the correct mode as per the product description.
- Problémy s periferními zařízeními:
- Zkuste připojit periferní zařízení k jinému USB portu.
- Install or update USB drivers.
- Check for conflicts in Device Manager (Windows).
If these steps do not resolve the issue, consult the manufacturer's support resources or a qualified technician.
Specifikace
| Funkce | Detail |
|---|---|
| Model | Pomyawvczfu6179 |
| Zásuvka CPU | LGA 1150 |
| Kompatibilní procesory | 4th Gen Intel Core i3/i5/i7, Xeon E3 V3 series, G series (e.g., i7 4790K, i5 4690K, i3 4160T, E3 1280 v3, G3260T, G1830) |
| Typ čipové sady | Intel H81 |
| Paměťové sloty | 2 x 240-pin DDR3 SDRAM |
| Technologie paměti | DDR3 (Unbuffered) |
| Frekvence paměti | 1066 MHz, 1333 MHz, 1600 MHz |
| Maximální kapacita paměti | 16 GB |
| Úložné porty | 2 x SATA 2.0 (3GB/s), 1 x SATA 3.0 (6GB/s) |
| Slot M.2 | 1 x M.2 slot (supports NVMe and NGFF modes with jumper) |
| Rozšiřující sloty | 1 x PCI Express x16, 1 x PCI Express x1 |
| LAN | 10/100 Mbps (1000Mbps Optional) |
| USB porty (zadní) | 4 2.0 x USB, 2 x USB 3.0 |
| Video výstup | 1 x VGA, 1 x HD Multimedia Interface compatible |
| Zvuk | 3-in-1 audio interface (Line In, Line Out, Microphone) |
| Form Factor | Micro ATX (17cm x 19cm / 6.69in x 7.48in) |
| Vrstvy PCB | 8 vrstvy |
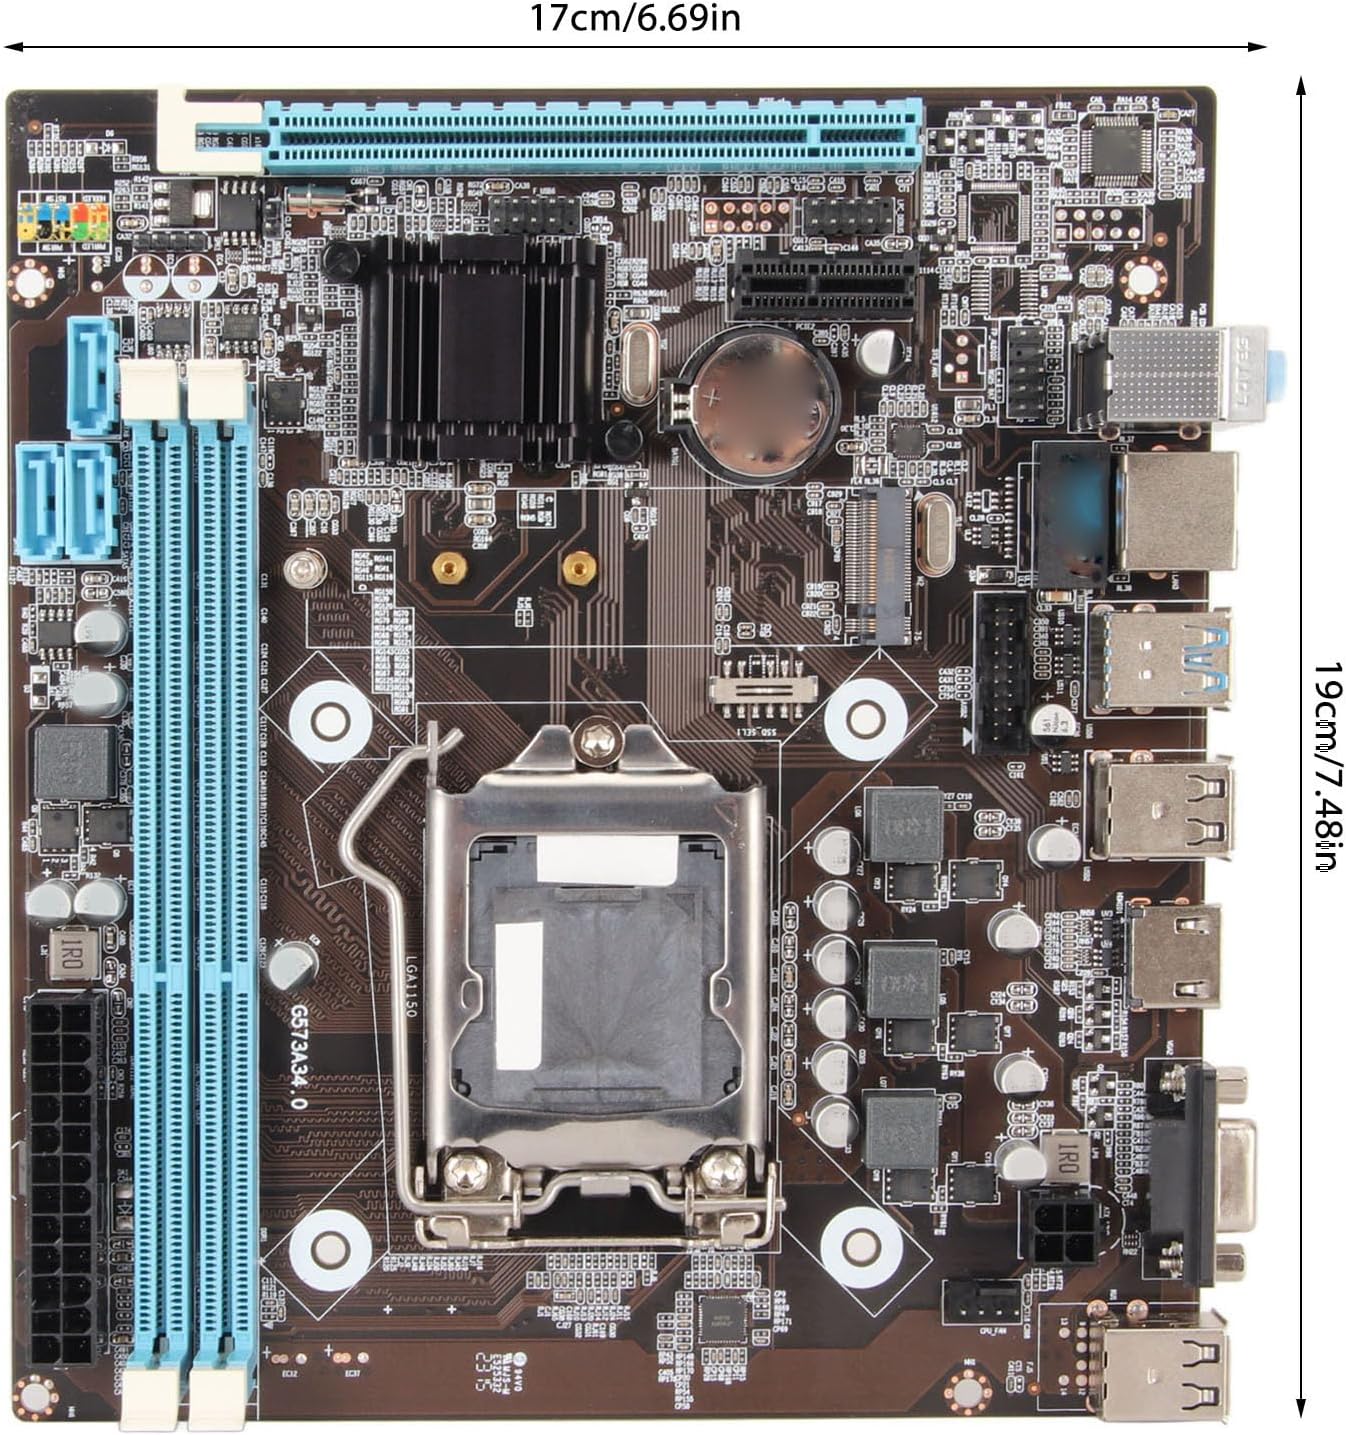
Obraz: Diagram showing the dimensions of the Micro ATX motherboard (17cm x 19cm).

Obraz: Infographic highlighting key components: NVMe connector, CPU socket, audio chipset, and DDR3 memory slots.
Záruka a podpora
For warranty information and technical support, please refer to the documentation included with your purchase or visit the official Pomya website. Standard warranty terms typically cover manufacturing defects for a specified period from the date of purchase. Keep your proof of purchase for warranty claims.
Kontaktní údaje:
- Manufacturer: Pomya
- Pro podporu navštivte Pomya Store on Amazon nebo jejich úředník webmísto.