1. Úvod
This manual provides essential instructions for the installation, operation, and maintenance of your Walfront 100A MPPT Solar Charge Controller. This advanced controller utilizes Maximum Power Point Tracking (MPPT) technology to efficiently manage power from your solar panels to charge various battery types, including Gel, Flooded, and LiFePO4 batteries. It automatically identifies 12V, 24V, 36V, and 48V systems and features dual USB 5V charging ports for added convenience.

Obrázek 1: Přední strana view of the Walfront 100A MPPT Solar Charge Controller.
2. Bezpečnostní informace
Please read all safety instructions carefully before installation and operation to prevent injury or damage to the controller and connected equipment.
- Zajistěte dostatečné větrání kolem regulátoru, aby nedošlo k jeho přehřátí.
- Nejprve připojte baterii, poté solární panel a nakonec zátěž. Odpojte v opačném pořadí.
- Verify correct polarity for all connections. Incorrect polarity can damage the controller.
- The controller includes built-in protections for battery overvoltage, overcurrent, power failure, overcharging, deep discharge, reverse connection, and overheating. However, always exercise caution.
- Nepokoušejte se rozebírat ani opravovat ovladač sami. Pro servis kontaktujte kvalifikovaný personál.
- Udržujte regulátor mimo dosah vody, hořlavých plynů a korozivních látek.
3. Konec produktuview
The Walfront 100A MPPT Solar Charge Controller features a robust design with an intuitive LCD display and multiple connection ports.

Figure 2: Controller dimensions (approximately 195mm x 172mm x 68mm).
3.1. Součásti a ovládací prvky
- LCD displej: Shows real-time operating data such as battery voltage, PV charging current, battery discharge current, operating temperature, and selected working mode.
- Ovládací tlačítka: RESET, MENU, ON/OFF, and navigation buttons for setting parameters and selecting modes.
- Připojovací terminály: Clearly labeled terminals for solar panel input, battery connection, and DC load output.
- Duální USB porty: Dva 5V USB porty pro nabíjení externích zařízení.
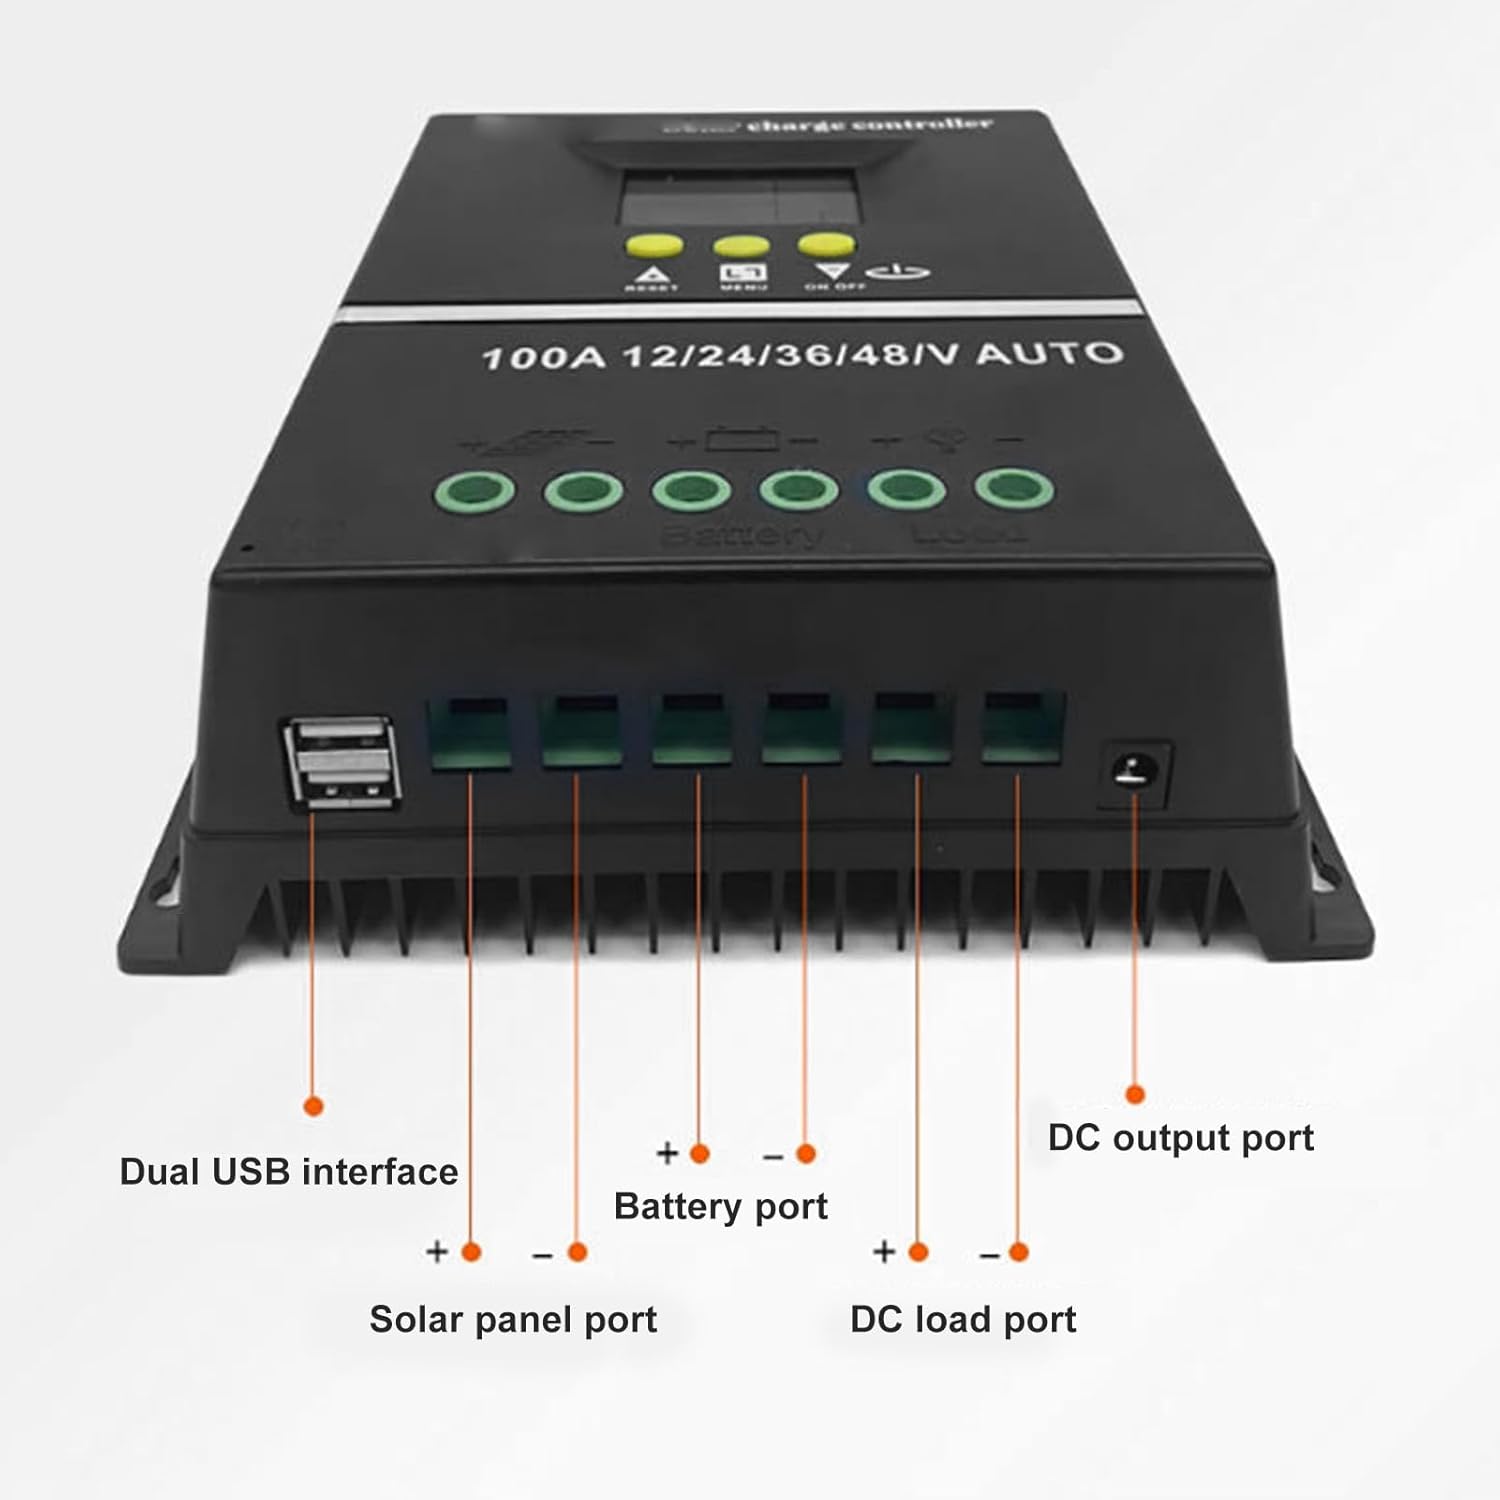
Obrázek 3: Spodní část view showing Dual USB interface, Solar panel port, Battery port, DC load port, and DC output port.

Obrázek 4: Detailní view of the LCD display areas.
4. Nastavení a instalace
Follow these steps for proper installation of the solar charge controller:
- Příprava zapojení: Ujistěte se, že všechny vodiče mají odpovídající průřez pro daný proud a délku a že jsou řádně odizolovány.
- Připojte baterii: Connect the battery to the controller's battery terminals (positive to positive, negative to negative). The controller will automatically detect the system voltage (12V/24V/36V/48V).
- Připojte solární panel: Connect the solar panel to the controller's solar panel terminals (positive to positive, negative to negative).
- Connect DC Load: Connect your DC loads to the controller's load terminals (positive to positive, negative to negative).
- Zabezpečená připojení: Dvakrát zkontrolujte všechna připojení, zda jsou pevná a zda je polarita správná.

Figure 5: Connection diagram for the solar charge controller.
5. Návod k obsluze
The controller features a multifunctional LCD display and several working modes to suit various applications.
5.1. LCD Display and Button Functions
The LCD dynamically displays operating data. Use the MENU button to navigate through display screens and settings. The UP/DOWN buttons (triangle symbols) adjust values or select options. The ON/OFF button controls the load output.
5.2. Pracovní režimy
The controller offers 7 working modes:
- Režim nabíjení: Under no circumstances should discharge be allowed. This mode focuses solely on charging the battery.
- Režim ovládání světla: The controller detects night, delays for ten minutes, and then starts discharging. When it detects daytime, it delays for ten minutes and stops discharging.
- Light and Delay Control Mode: When the controller detects night, it delays for ten minutes before starting to discharge and counts down (if the timer stops at 0), the discharge will stop. The maximum delay time is 23:59.
- Universal Control Mode: Always maintains discharge without any faults.
- Ruční režim ovládání: Use the '▼' button to check whether to discharge.
- Režim řízení časování: Regularly turns on or off the discharge based on set times.
- Testovací mód: Similar to lighting and delay control modes, but with only a ten-minute delay.
5.3. USB nabíjení
The dual USB 5V charging ports can be used to charge compatible electronic devices. Simply connect your device to one of the USB ports.
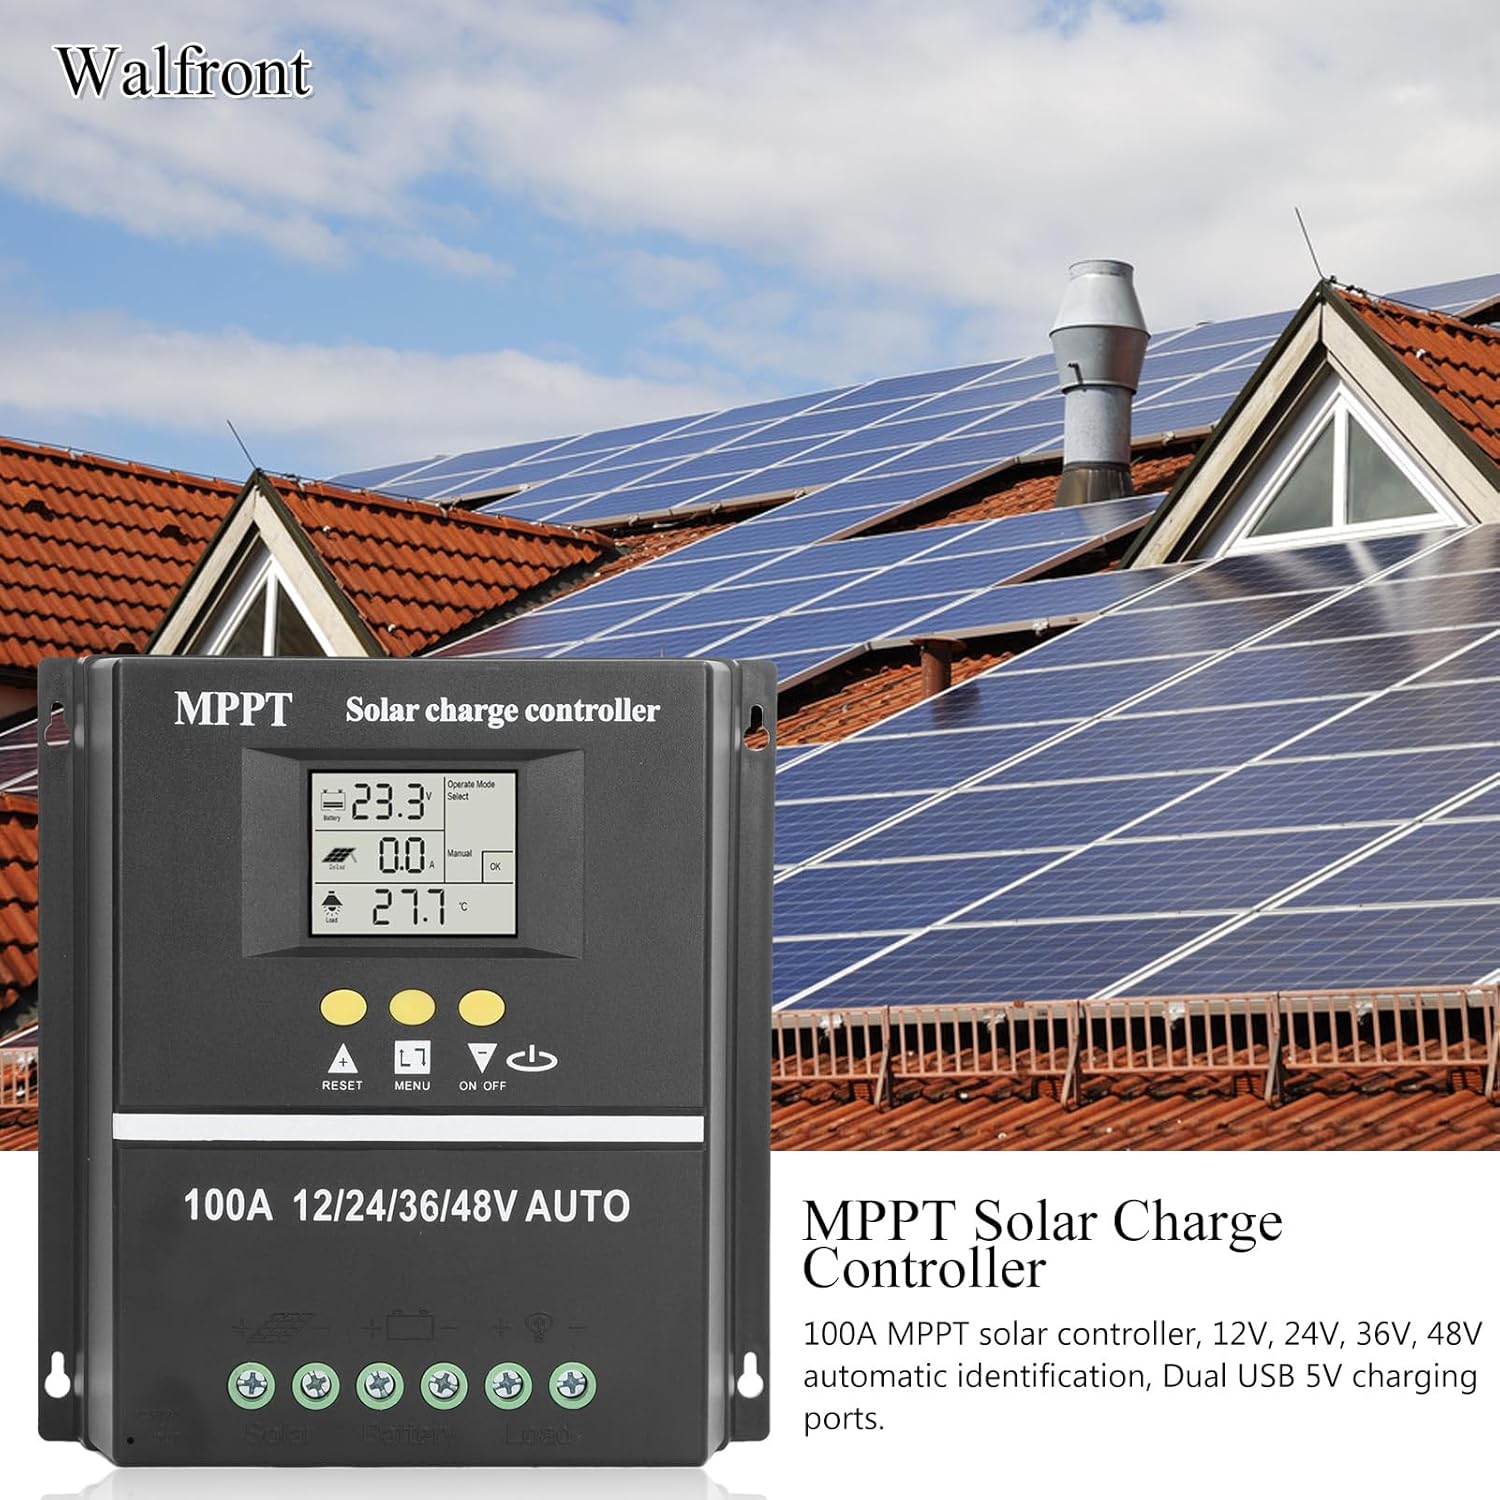
Figure 6: Using the dual USB output for charging.
6. Údržba
Pravidelná údržba zajišťuje optimální výkon a dlouhou životnost vašeho solárního regulátoru nabíjení.
- Čistota: Udržujte ovladač čistý a bez prachu a nečistot. K čištění používejte suchý hadřík.
- Spojení: Pravidelně kontrolujte všechna kabelová připojení, abyste se ujistili, že jsou bezpečná a bez koroze.
- Větrání: Ujistěte se, že větrací otvory nejsou zablokované, aby bylo možné správné odvádění tepla.
- Kontrola baterie: Regularly inspect your battery for any signs of damage or leakage.
7. Řešení problémů
If you encounter issues with your solar charge controller, consider the following common problems and solutions:
- Žádný displej/Žádné napájení: Check battery connections and ensure the battery has sufficient charge. Verify all wiring is correct.
- Baterie se nenabíjí: Check solar panel connections and ensure the panels are receiving adequate sunlight. Verify solar panel voltage je v rozsahu vstupu regulátoru.
- Načtení nefunguje: Check load connections. Ensure the load is within the controller's rated capacity. Check if the load output is enabled (e.g., via ON/OFF button or selected working mode). The controller will stop discharge under low voltage ochrana.
- Chybové kódy na displeji: Refer to the specific error code displayed on the LCD. Consult the manufacturer's support for detailed explanations and solutions for specific codes.
- Přehřívání: Ensure the controller is installed in a well-ventilated area and not exposed to direct sunlight or excessive ambient temperatures.
V případě přetrvávajících problémů se prosím obraťte na zákaznickou podporu.
8. Specifikace
| Funkce | Specifikace |
|---|---|
| Jmenovitý proud | 100A |
| System Voltage | 12V / 24V / 36V / 48V Auto Identification |
| Maximum Solar Input (Voc) | 15-23V (12V battery); 30-45V (24V battery); 45-69V (36V battery); 60-90V (48V battery) |
| Maximum Photovoltaic Input Power | 1200W (12V battery); 2400W (24V battery); 3600W (36V battery); 4800W (48V battery) |
| USB výstup | Dual USB 5V |
| Typ zobrazení | LCD s podsvícením |
| Kompatibilita baterie | GEL, Flooded, LiFePO4 |
| Provozní teplota | Do 60°C |
| Materiál | ABS |
| Hmotnost položky | 1.81 libry |
| Rozměry balení | 8.03 x 7.99 x 2.83 palce |
9. Záruka a podpora
For warranty information, technical support, or service inquiries, please refer to the product packaging or contact Walfront customer service through your purchase platform. Keep your purchase receipt as proof of purchase.