1. Úvod
Thank you for choosing the Mcbazel 2 Zone Water Timer. This device is designed to automate your garden and lawn watering, providing efficient and customizable irrigation for two separate zones. Please read this manual carefully before use to ensure proper installation, operation, and maintenance.
Klíčové vlastnosti:
- Dvouzónové ovládání: Manage two independent watering zones with separate scheduling.
- Flexibilní plánování: Set specific start times, frequencies (hourly, daily, weekly), and durations (1 minute to 4 hours).
- Manual Watering Modes: Provides immediate watering for Zone 1, Zone 2, or both.
- Funkce zpoždění deště: Pause watering for 24, 48, or 72 hours to prevent overwatering.
- Odolný design: IP54 rated high-impact plastic construction with a metal filter for longevity.
- Uživatelsky přívětivé rozhraní: 2.5-inch LED display for clear information and low-battery indicator.

Figure 1: Mcbazel 2 Zone Water Timer overview.
2. Obsah balení
Ověřte, zda jsou všechny níže uvedené položky součástí balení. Pokud některé položky chybí nebo jsou poškozené, kontaktujte zákaznickou podporu.
- 1 x 2 Zone Water Timer
- 1 x Accessory Set (includes additional connectors/washers)
- 1 x Uživatelská příručka (tento dokument)

Figure 2: Package contents of the water timer.
3. Specifikace
| Funkce | Specifikace |
|---|---|
| Pracovní tlak vody | 7.25–116 PSI (0.5–8 barů) |
| Maximální průtok | 35 L/Min (10 Gal/Min) |
| Vodotěsná třída | IP54 |
| Pracovní teplota | 3°C-50°C (37.4°F-122°F) |
| Frekvence zavlažování | 1-12 hours or 1-7 days |
| Doba zavlažování | 1-240 minutes (4 hours) |
| Přívod vody | NH (US) for 3/4" thread, BSP (EU) for 3/4" or 1" thread |
| Vývod vody | For 3/4" standard pipe |
| Baterie | 2 x AA (1.5V) alkalické baterie (nejsou součástí balení) |
4. Nastavení
Follow these steps to set up your Mcbazel 2 Zone Water Timer:
- Nainstalujte baterie: Open the battery compartment on the back of the timer. Insert two (2) new 1.5V AA alkaline batteries, ensuring correct polarity. Close the compartment securely to maintain the IP54 waterproof rating.
- Připojení k vodovodnímu kohoutku: Screw the water timer onto your outdoor water faucet. Ensure a tight fit to prevent leaks. The inlet fits 3/4" or 1" standard faucets.
- Připojte hadice: Screw your garden hoses onto the Zone 1 and Zone 2 outlets at the bottom of the timer. These outlets fit 3/4" standard pipes.
- Turn on Faucet: Once the timer is installed and hoses are connected, fully open your water faucet. The timer will control the water flow.

Obrázek 3: Podrobný návod k instalaci.
5. Návod k obsluze
5.1 Ovládací prvky Overview
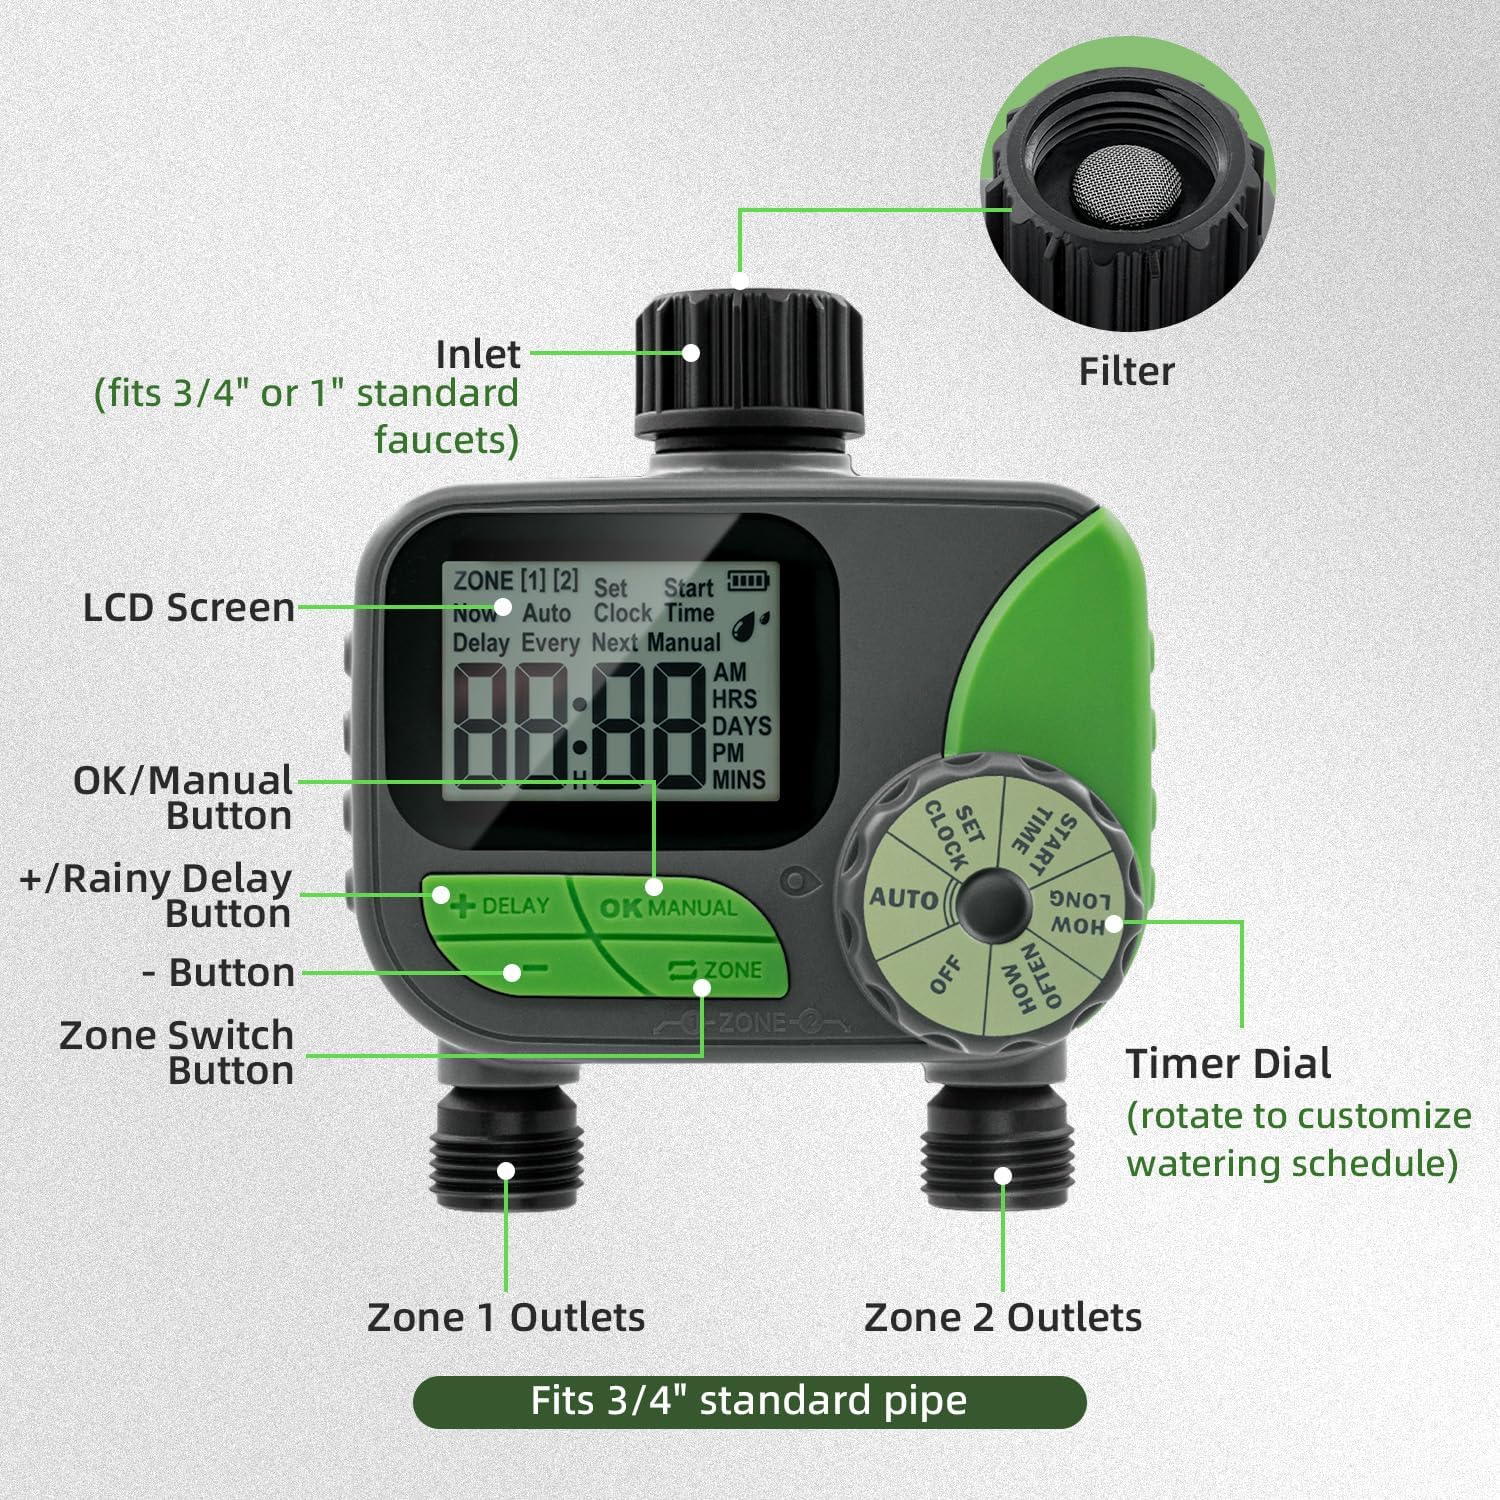
Figure 4: Labeled components of the water timer.
- LCD obrazovka: Displays current time, watering schedule, battery status, and other information.
- Volič časovače: Rotate to select different modes: OFF, AUTO, SET CLOCK, START TIME, HOW LONG, HOW OFTEN.
- +/- tlačítka: Upravte hodnoty (čas, trvání, frekvence).
- Tlačítko OK/MANUAL: Confirm settings or initiate manual watering.
- Tlačítko ZPOŽDĚNÍ: Activates or deactivates the rain delay function.
- ZONE Button: Přepíná mezi zónou 1 a zónou 2 pro programování.
5.2 Nastavení hodin
- Rotate the Timer Dial to NASTAVIT HODINY.
- Použijte +/- buttons to set the current time (AM/PM).
- Stiskněte OK/MANUÁLNĚ to confirm and move to the next setting (e.g., minutes).
- Repeat until the current time is set.
5.3 Programming Automatic Watering (AUTO Mode)
The timer allows independent programming for two zones.
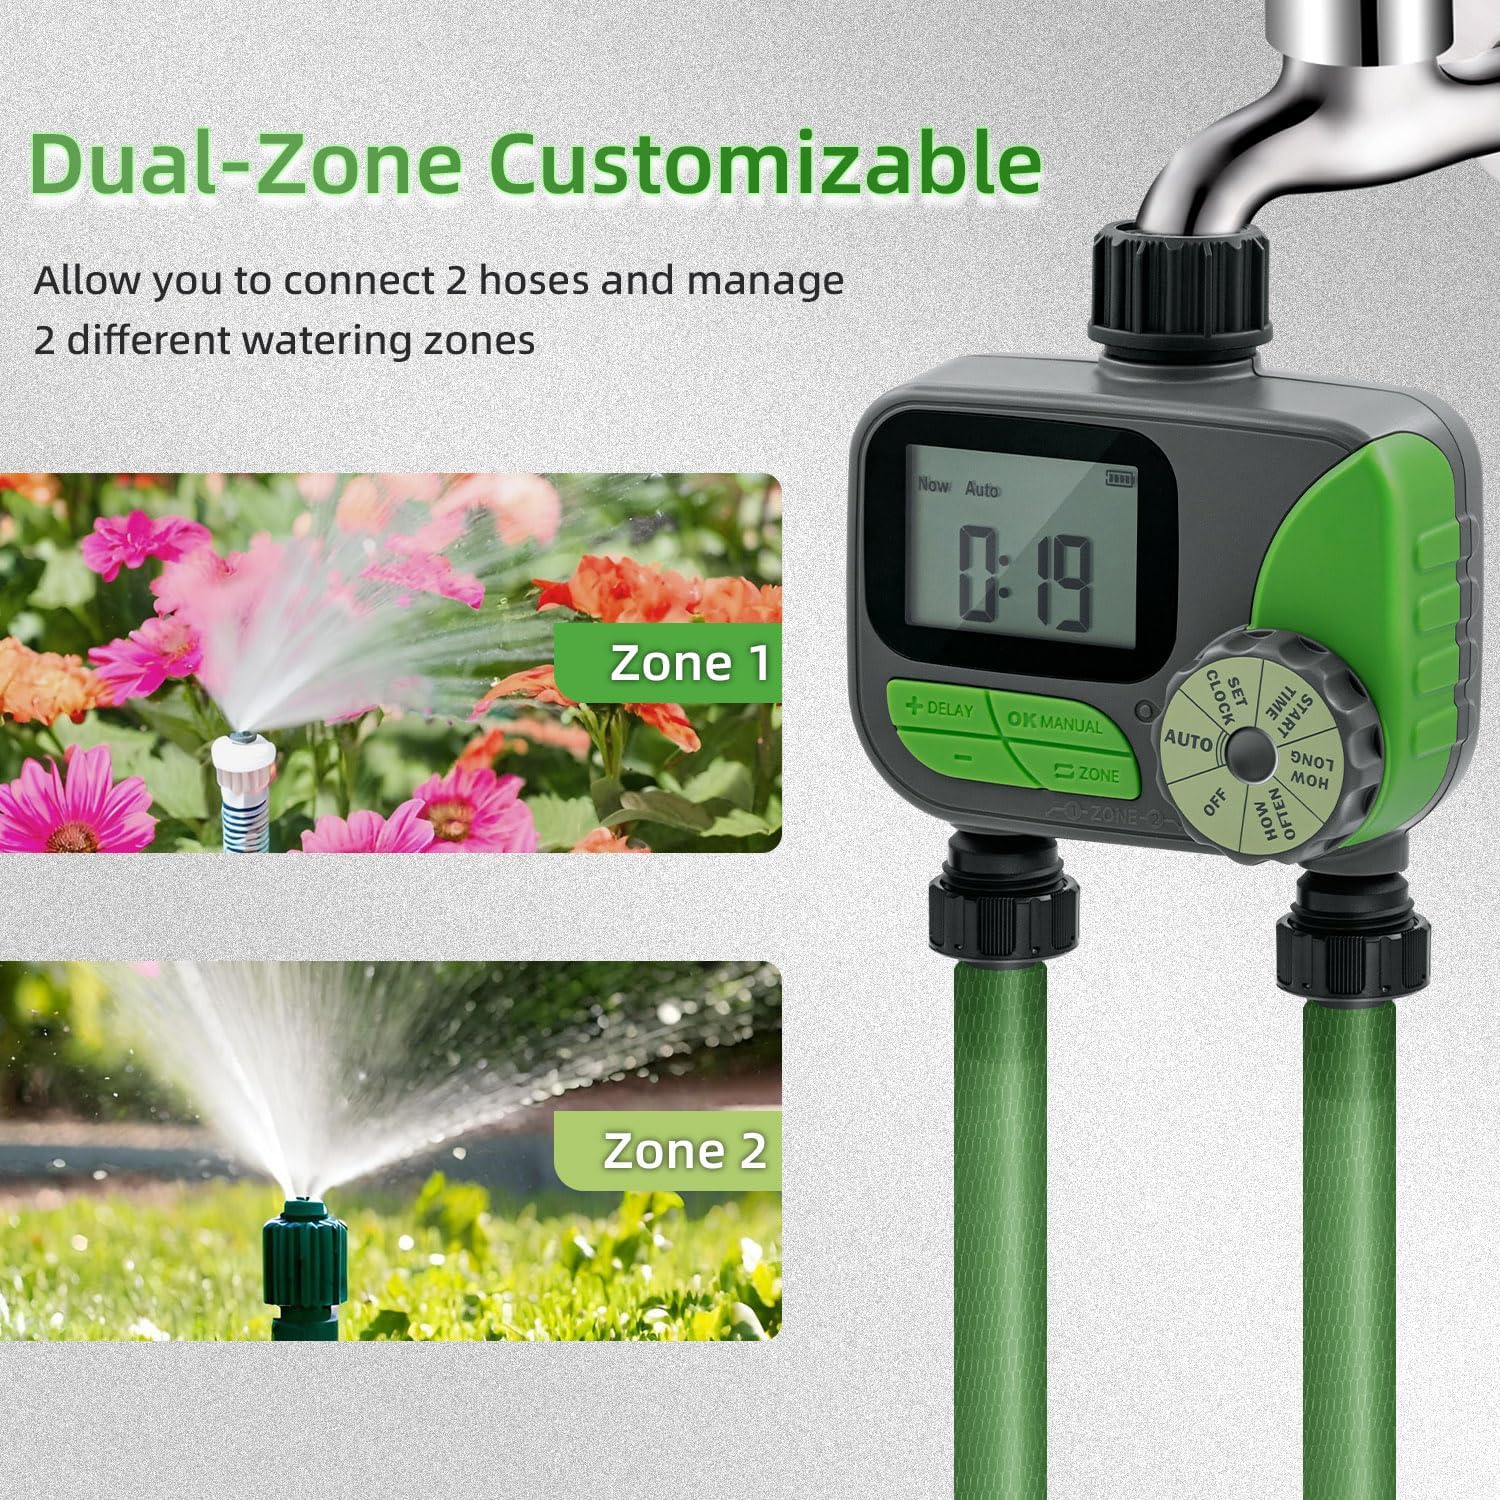
Figure 5: Dual-zone customizable control in action.
- Vyberte zónu: Stiskněte tlačítko ZÓNA button to select either Zone 1 or Zone 2. The selected zone will be indicated on the LCD screen.
- Set START TIME:
- Rotate the Timer Dial to ČAS STARTU.
- Použití +/- buttons to set the desired watering start time.
- Stiskněte OK/MANUÁLNĚ potvrdit.
- Set HOW LONG (Duration):
- Rotate the Timer Dial to JAK DLOUHO.
- Použití +/- buttons to set the watering duration (1 minute to 240 minutes).
- Stiskněte OK/MANUÁLNĚ potvrdit.
- Set HOW OFTEN (Frequency):
- Rotate the Timer Dial to JAK ČASTO.
- Použití +/- buttons to set the watering frequency (e.g., every 12 hours, every day, every 2 days, up to 7 days).
- Stiskněte OK/MANUÁLNĚ potvrdit.
- Aktivace AUTOMATICKÉHO režimu: After setting all parameters for both zones, rotate the Timer Dial to AUTOČasovač nyní bude fungovat podle naprogramovaného plánu.

Obrázek 6: Přample of automatic watering schedules for two zones.
5.4 Ruční zavlažování
Manual watering allows you to water immediately without affecting your programmed schedule.
- Ensure the Timer Dial is in AUTO režimu.
- Stiskněte tlačítko OK/MANUÁLNĚ tlačítko.
- Použijte ZÓNA button to select Zone 1, Zone 2, or both.
- Použijte +/- buttons to set the desired manual watering duration (1 to 240 minutes).
- Stiskněte OK/MANUÁLNĚ znovu spusťte ruční zavlažování.
- Chcete-li zastavit ruční zavlažování, stiskněte OK/MANUÁLNĚ again or rotate the dial to VYPNUTO a pak zpět do AUTO.
5.5 Funkce zpoždění deště
The rain delay function temporarily pauses your watering schedule to prevent overwatering during rainy periods.
- Ensure the Timer Dial is in AUTO režimu.
- Stiskněte a podržte ZPOŽDĚNÍ tlačítko na několik sekund.
- Použijte +/- tlačítky vyberte požadovanou dobu odložení: 24 hodin, 48 hodin nebo 72 hodin.
- Stiskněte OK/MANUÁLNĚ to confirm the rain delay. The display will show the remaining delay time.
- To cancel the rain delay, press and hold the ZPOŽDĚNÍ button again until the delay indicator disappears.

Figure 7: Activating the rain delay mode.
6. Údržba
6.1 Čištění filtru
The water timer includes a built-in metal filter at the inlet to prevent debris from entering and blocking the water pipes. Regularly check and clean this filter to ensure optimal performance.
- Turn off the water faucet and remove the timer.
- Unscrew the inlet connection and carefully remove the metal filter.
- Opláchněte filtr pod tekoucí vodou, abyste odstranili nahromaděné nečistoty.
- Reinsert the clean filter and reattach the timer to the faucet, ensuring a secure fit.

Figure 8: Built-in metal filter and battery compartment.
6.2 Výměna baterie
The timer features a low-battery indicator on the LCD screen. When the battery icon flashes or is low, replace the batteries promptly to avoid interruption of watering schedules. The timer will automatically shut off valves to prevent water wastage if batteries are critically low.
- Vypněte vodovodní kohoutek.
- Otevřete přihrádku na baterie na zadní straně časovače.
- Remove the old AA batteries and insert two new 1.5V AA alkaline batteries, observing correct polarity.
- Bezpečně uzavřete přihrádku na baterie.
6.3 Zimní skladování
To prevent damage from freezing temperatures, remove the water timer from the faucet before the first frost. Drain any remaining water from the timer and store it indoors in a dry, protected location. Remove batteries if storing for extended periods.
7. Řešení problémů
| Problém | Možná příčina | Řešení |
|---|---|---|
| Časovač se nezapne/LCD displej je prázdný. | Vybité nebo nesprávně vložené baterie. | Replace batteries with new 1.5V AA alkaline batteries, ensuring correct polarity. |
| Žádný proud vody. |
|
|
| Z přípojek uniká voda. | Uvolněné spoje nebo opotřebované podložky. | Tighten all connections. Check and replace rubber washers if necessary. |
| Časovač nezavlažuje v naplánovaných časech. |
|
|
8. Záruka a podpora
Mcbazel products are designed for reliability and performance. For specific warranty information, please refer to the warranty card included with your purchase or visit the official Mcbazel website. If you encounter any issues or have questions not covered in this manual, please contact Mcbazel customer support for assistance.
Zákaznická podpora: Please refer to your purchase documentation or the Mcbazel webstránky pro kontaktní údaje.
9. Důležité bezpečnostní informace
- Do not immerse the timer in water. It is IP54 rated for splash resistance, not submersion.
- Use only 1.5V AA alkaline batteries. Do not mix old and new batteries or different types of batteries.
- Remove batteries if the timer will not be used for an extended period.
- Do not expose the timer to extreme temperatures outside its operating range (3°C-50°C / 37.4°F-122°F).
- Uchovávejte mimo dosah dětí.
- Do not attempt to disassemble or repair the unit yourself. This will void the warranty.