
Zavedení
The RunCam Spotter V2 Micro FPV AIO Camera is a compact, all-in-one camera and video transmitter designed for various RC applications, including RC cars, boats, drones, and planes. It features a 700TVL camera with a 170-degree field of view, an integrated microphone, and an On-Screen Display (OSD) for real-time data. The 5.8G video transmitter offers adjustable power output from 20mW to 200mW across 40 channels, ensuring compatibility with standard FPV goggles and monitors.
Obsah balení
- 1x Spotter V2 Micro FPV AIO Camera (with Cloverleaf antenna)
- 1x XT-60 Power Cable
- 1x Double Sided Tape (one side Velcro)
- 1x Spare Whip Antenna
- 1x Uživatelská příručka (tento dokument)
Konec produktuview
The Spotter V2 is designed for minimal impact on device performance due to its lightweight and compact form factor. It provides an expansive field of view pro pohlcující zážitek z FPV.
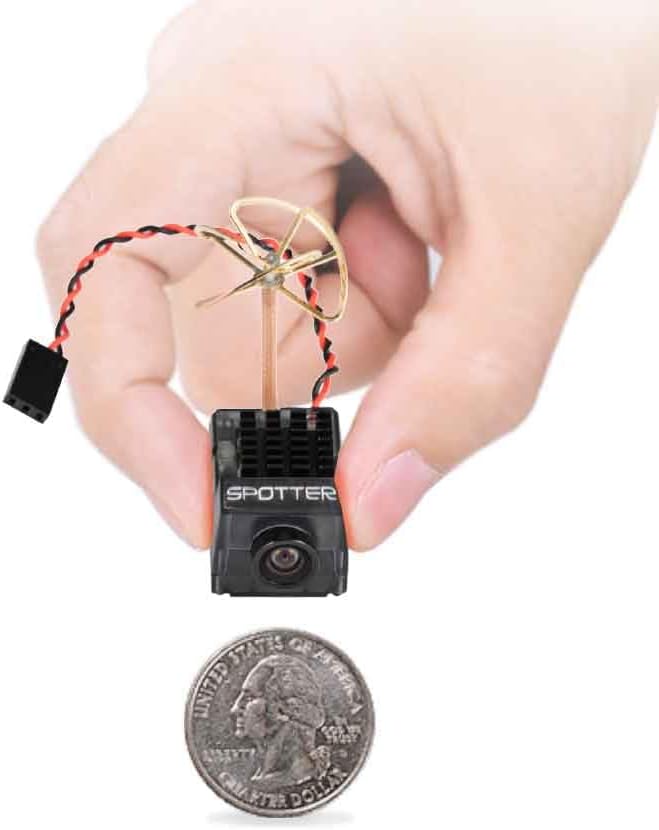
Image: The RunCam Spotter V2 FPV Camera, demonstrating its compact size and lightweight design, weighing only 9g.

Image: Illustration of the 170-degree wide-angle lens, providing an expansive field of view for enhanced detail in FPV applications.

Image: Detailed dimensions of the Spotter V2 camera, measuring 35x20.5x17.8mm (excluding antenna).
Nastavení
- Připojení napájení: Connect the provided XT-60 power cable to the camera and your power source (2S-4S LiPo battery, 7.4V-14.8V). Ensure correct polarity.
- Instalace antény: The camera comes with a pre-installed Cloverleaf antenna. A spare Whip Antenna is included for replacement if needed. Ensure the antenna is securely attached.
- Montáž: Use the double-sided tape (one side Velcro) to securely mount the camera on your RC vehicle. Position the camera to achieve the desired field of view.
- Chlazení: Due to potential heat generation, especially in enclosed spaces, ensure adequate airflow around the camera's heatsink. Consider adding a small cooling fan if mounting inside an RC vehicle without natural ventilation.
- FPV Receiver Connection: The Spotter V2 is compatible with all analog 5.8G FPV goggles and monitors. Refer to your FPV receiver's manual for pairing instructions.

Image: The Spotter V2 camera is broadly compatible with analog FPV goggles and monitors.
Návod k obsluze
- Zapnutí: Connect the camera to a compatible power source. The camera will power on automatically.
- Channel and Band Selection: The camera features 5 bands and 40 channels. Use the button on the camera to cycle through channels and bands. Refer to the detailed frequency table (usually provided in a separate quick start guide or on the product page) to match your FPV receiver.
- Displej na obrazovce (OSD): The integrated OSD provides real-time flight data, such as battery voltage and channel information. This data is overlaid on the video feed.
- Integrovaný mikrofon: The built-in microphone captures audio, enhancing the immersive FPV experience.
- Přenos videa: Once powered on and a channel is selected, the camera will transmit video. Ensure your FPV goggles or monitor are tuned to the same frequency.

Image: The camera's button for frequency adjustment and its heatsink for thermal management.
Údržba
- Čištění: Keep the camera lens clean using a soft, dry cloth. Avoid abrasive materials or harsh chemicals.
- Tepelný management: Regularly inspect the heatsink for dust or debris. Ensure consistent airflow to prevent overheating, which can degrade video quality and shorten component lifespan.
- Péče o anténu: Handle the antenna carefully. If the Cloverleaf antenna is damaged, it can be replaced with the spare Whip Antenna by soldering.
- Skladování: Store the camera in a dry, cool environment away from direct sunlight and extreme temperatures.
Odstraňování problémů
| Problém | Možná příčina | Řešení |
|---|---|---|
| Distorted or No Video Signal |
|
|
| Camera Gets Excessively Hot |
|
|
| Žádný zvuk |
|
|
Specifikace
| Funkce | Detail |
|---|---|
| Fotoaparát | 700 TVL, 170-degree wide-angle lens |
| Rezoluce | 1280*960 |
| Rozlišení výstupu videa | 720 pixelů |
| Default Video Input | KAMARÁD |
| Přenos videa | 5.8G, 40CH, 20mW~200mW adjustable |
| Maximální přenosová vzdálenost | 500 meters / 547 yards |
| Vstupní výkon | 2S-4S (7.4V~14.8V) |
| Anténa | Cloverleaf and Whip antenna (interchangeable) |
| Nastavení frekvence | Stisk tlačítka |
| Vlastnosti | Built-in OSD, Integrated Microphone |
| Minimální osvětlení | 0.5 luxů |
| Provozní proud | 80 mA |
| Rozměry (D*Š*V) | 35*20.5*17.8 mm (anténa není součástí balení) |
| Celková hmotnost | 9g |
| Materiál | Plast |
| Úroveň dovedností | Začátečník |
Záruka
The RunCam Spotter V2 FPV Camera and Transmitter Kit typically comes with a 1-year limited warranty. For specific warranty terms, conditions, and claim procedures, please refer to the official RunCam webwebové stránky nebo se obraťte přímo na jejich zákaznickou podporu. Uschovejte si doklad o koupi pro ověření záruky.
Podpora
For further assistance, technical support, or inquiries regarding the RunCam Spotter V2, please visit the official RunCam website or contact their customer service department. Online resources, FAQs, and firmware updates may also be available on their webmísto.
Official RunCam Store: Visit the RunCam Store on Amazon