
Sharp ES-NIH814BWA-EN
Sharp ES-NIH814BWA-EN Integrated Washing Machine User Manual
Model: ES-NIH814BWA-EN | Capacity: 8kg | Spin Speed: 1400 rpm
1. Úvod
1.1 Konec produktuview
Thank you for choosing the Sharp ES-NIH814BWA-EN Integrated Washing Machine. This appliance is designed to provide efficient and reliable laundry care for your home. With an 8kg capacity and a 1400 rpm spin speed, it offers powerful cleaning performance while integrating seamlessly into your kitchen or utility space.

Obrázek 1.1: Přední strana view of the Sharp ES-NIH814BWA-EN Integrated Washing Machine, showing its sleek design and integrated panel.
1.2 Bezpečnostní informace
Before operating your washing machine, please read all safety instructions carefully. Keep this manual for future reference. Improper installation, maintenance, or use can cause serious injury or damage. Always disconnect the appliance from the power supply before cleaning or maintenance.
- Ujistěte se, že je spotřebič řádně uzemněn.
- Nedovolte dětem, aby si se spotřebičem hrály.
- Do not open the detergent dispenser during the wash cycle.
- Nedotýkejte se spotřebiče mokrýma rukama.
- Obalové materiály uchovávejte mimo dosah dětí.
2. Nastavení a instalace
2.1 Vybalení
Carefully remove all packaging materials. Check for any transport damage. Remove all transit bolts from the rear of the machine before installation. These bolts are essential for safe transport but must be removed for operation to prevent vibration and damage.
2.2 Umístění a nivelace
Place the washing machine on a firm, level floor. Adjust the adjustable feet to ensure the machine is perfectly level and stable. This prevents excessive vibration and noise during operation.
2.3 Připojení vody
Connect the water inlet hose to a cold water tap with a 3/4-inch thread. Ensure all connections are tight to prevent leaks. The drain hose should be securely placed into a standpipe or connected to a suitable drain system, ensuring it is not kinked.

Obrázek 2.1: Zadní view pračky, znázorňující připojení přívodní a vypouštěcí hadice vody.
2.4 Elektrické připojení
Zapojte napájecí kabel do uzemněné elektrické zásuvky. Ujistěte se, že hlasitosttage and frequency match the specifications on the rating plate of the appliance. Do not use extension cords or multiple adapters.
2.5 První použití
Před prvním praním spusťte prázdný cyklus s malým množstvím pracího prostředku při 60 °C, abyste vyčistili buben a odstranili případné zbytky po výrobě.
3. Návod k obsluze
3.1 Ovládací panel Overview
The control panel consists of a program selection dial, a digital display, and function buttons for customizing your wash cycle.
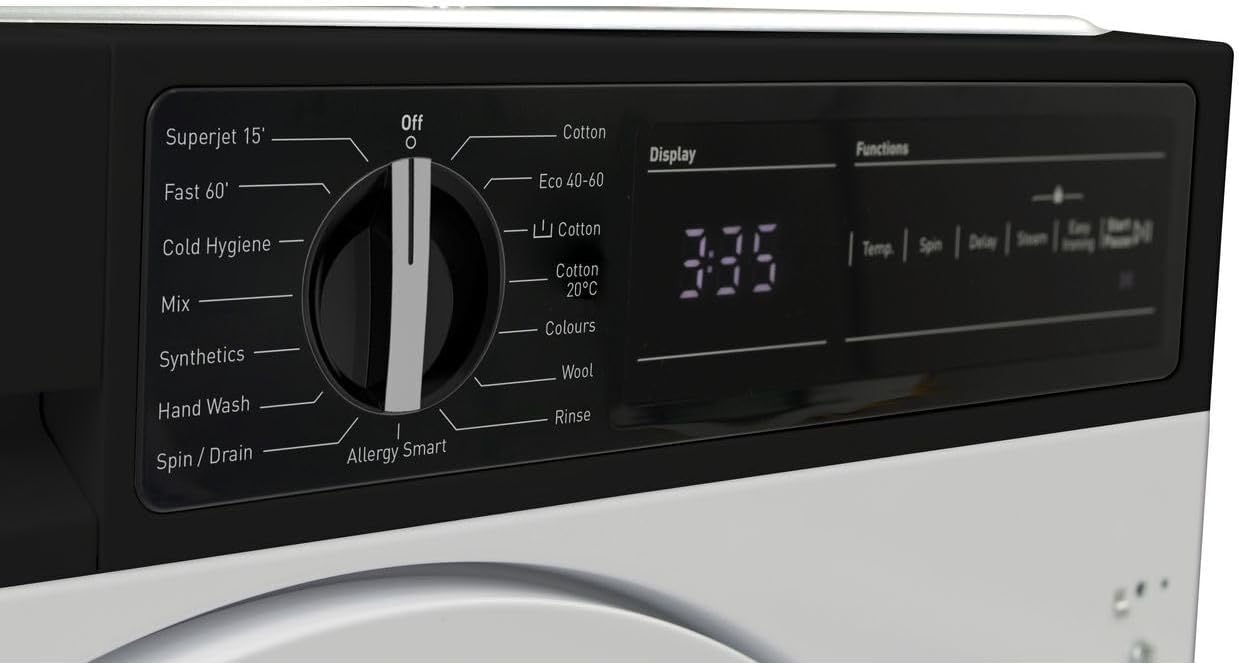
Obrázek 3.1: Detailní view of the program selection dial and digital display.

Figure 3.2: Close-up of the digital display showing time remaining and function buttons for Temp, Spin, Delay, Steam, and Easy Ironing.
3.2 Vkládání prádla
Open the washing machine door and load your laundry. Do not overload the machine; leave enough space for clothes to tumble freely. Close the door firmly until it clicks.

Figure 3.3: The washing machine door open, revealing the drum for loading laundry.

Figure 3.4: An inside view nerezového bubnu, určeného pro efektivní praní.
3.3 Přidávání pracího prostředku a přísad
Pull out the detergent dispenser drawer. Add the appropriate amount of detergent to the main wash compartment and fabric softener to its designated compartment. Refer to your detergent packaging for dosage recommendations.

Obrázek 3.5: Zásuvka dávkovače pracího prostředku s přihrádkami na prací prostředek a aviváž.
3.4 Výběr pracího programu
Turn the program selection dial to choose your desired wash program. Available programs include:
- Superjet 15': Quick wash for lightly soiled items.
- Fast 60': A faster cycle for everyday loads.
- Cold Hygiene: For hygienic washing at lower temperatures.
- Směs: For mixed fabric loads.
- Syntetika: For synthetic fabrics.
- Ruční mytí: Gentle cycle for delicate items.
- Odstřeďte / Vypusťte: To spin and drain water from laundry.
- Alergie Inteligentní: Designed to remove allergens.
- Bavlna: Standard program for cotton items.
- Eko 40-60: Energy-efficient program for cottons and mixed items at 40-60°C.
- Bavlna 20°C: Low-temperature cotton wash.
- Barvy: For colored garments to preserve vibrancy.
- Vlna: Gentle program for woolens.
- Opláchněte: To rinse laundry without washing.
3.5 Úprava nastavení
After selecting a program, you can customize settings using the function buttons:
- Temp: Adjust wash temperature.
- Roztočit: Change spin speed.
- Zpoždění: Set a delayed start time.
- Pára: Add a steam function for better hygiene or wrinkle reduction.
- Snadné žehlení: Reduces creasinpro snadnější žehlení.
3.6 Spuštění mycího cyklu
Stiskněte tlačítko Start/Pauza button to begin the selected wash cycle. The display will show the remaining time.
3.7 Ukončení pracího cyklu
Once the cycle is complete, the machine will signal. The door will unlock after a short delay. Remove your laundry promptly.
4. Údržba a péče
Pravidelná údržba zajišťuje optimální výkon a prodlužuje životnost vaší pračky.
4.1 Čištění dávkovače pracího prostředku
Periodically remove and clean the detergent dispenser drawer under running water to prevent detergent residue buildup.
4.2 Čištění bubnu
Run a maintenance wash (e.g., a hot cycle with a washing machine cleaner or vinegar) monthly to clean the drum and remove any odors or residue.
4.3 Čištění filtru
Locate the drain pump filter, usually at the bottom front of the machine. Open the cover, drain any residual water, and carefully remove and clean the filter. This should be done regularly to prevent blockages.
4.4 Čištění exteriéru
Vnější povrchy otřete měkkým, damp tkanina. Nepoužívejte abrazivní čisticí prostředky nebo rozpouštědla.
5. Řešení problémů
If you encounter issues with your washing machine, refer to the following common problems and solutions before contacting customer service.
| Problém | Možná příčina | Řešení |
|---|---|---|
| Stroj se nespustí | Žádné napájení; Dvířka nejsou zavřená; Není zvolen program; Není stisknuto tlačítko Start/Pauza. | Check power supply; Ensure door is latched; Select a program; Press Start/Pause. |
| Žádný příjem vody | Zavřený vodovodní kohoutek; Zalomená přívodní hadice; Příliš nízký tlak vody. | Otevřete vodovodní kohoutek; narovnejte hadici; zkontrolujte tlak vody v domácnosti. |
| Voda nevytéká | Přehnutá odtoková hadice; ucpaný filtr odtokového čerpadla. | Narovnejte odtokovou hadici; Vyčistěte filtr odtokového čerpadla. |
| Nadměrné vibrace/hluk | Neodstraněné přepravní šrouby; Pračka není v rovině; Nerovnoměrné zatížení. | Remove transit bolts; Adjust feet to level machine; Redistribute laundry. |
| Zbytky pracího prostředku v dávkovači | Too much detergent; Low water pressure; Dispenser blocked. | Reduce detergent amount; Check water pressure; Clean dispenser. |
6. Technické specifikace
| Funkce | Specifikace |
|---|---|
| Značka | Ostrý |
| Model | ES-NIH814BWA-EN |
| Kapacita | 8 kg |
| Maximální rychlost otáčení | 1400 ot./min |
| Typ instalace | Integrovaný |
| Ovládací konzole | Buttons, Dial, Digital Display |
| Přístup k poloze | Přední zatížení |
| Materiál (buben) | Nerez |
| svtage | 2.2E+2 volty (AC) |
| Barva | Bílý |
7. Záruka a zákaznická podpora
Your Sharp ES-NIH814BWA-EN Washing Machine comes with a manufacturer's warranty. Please refer to the separate warranty card provided with your appliance for specific terms and conditions, including warranty period and coverage.
For technical assistance, spare parts, or to schedule a service appointment, please contact Sharp customer support. Contact details can typically be found on the Sharp official webna webu nebo v záruční dokumentaci.
When contacting support, please have your model number (ES-NIH814BWA-EN) and serial number ready. The serial number is usually located on a sticker inside the door frame or on the back of the appliance.
Ask a question about this manual
Ask about setup, troubleshooting, compatibility, parts, safety, or missing instructions. Manuals+ will review the question and use this page’s manual context to help answer it.