
Boxlight P8 WX31NXT
Uživatelská příručka k DLP projektoru Boxlight P8 WX31NXT
Model: P8 WX31NXT
1. Úvod
This manual provides comprehensive instructions for the setup, operation, maintenance, and troubleshooting of your Boxlight P8 WX31NXT DLP Projector. Please read this manual thoroughly before using the projector to ensure proper functionality and to prevent damage.
2. Bezpečnostní informace
- Nezakrývejte ventilační otvory.
- Nedívejte se přímo do objektivu projektoru, když je zapnutýamp je zapnuto.
- Používejte pouze napájecí kabel dodaný s projektorem.
- Veškeré opravy svěřte kvalifikovanému servisnímu personálu.
- Chraňte projektor před vodou a vlhkostí.
3. Obsah balení
Ověřte, zda jsou v balení přítomny všechny položky:
- Boxlight P8 WX31NXT DLP Projector
- Dálkové ovládání
- Napájecí kabel
- HDMI kabel
- Uživatelská příručka (tento dokument)
4. Konec produktuview
Seznamte se s různými částmi a připojeními projektoru.
4.1 Nahoru View a Ovládací panel
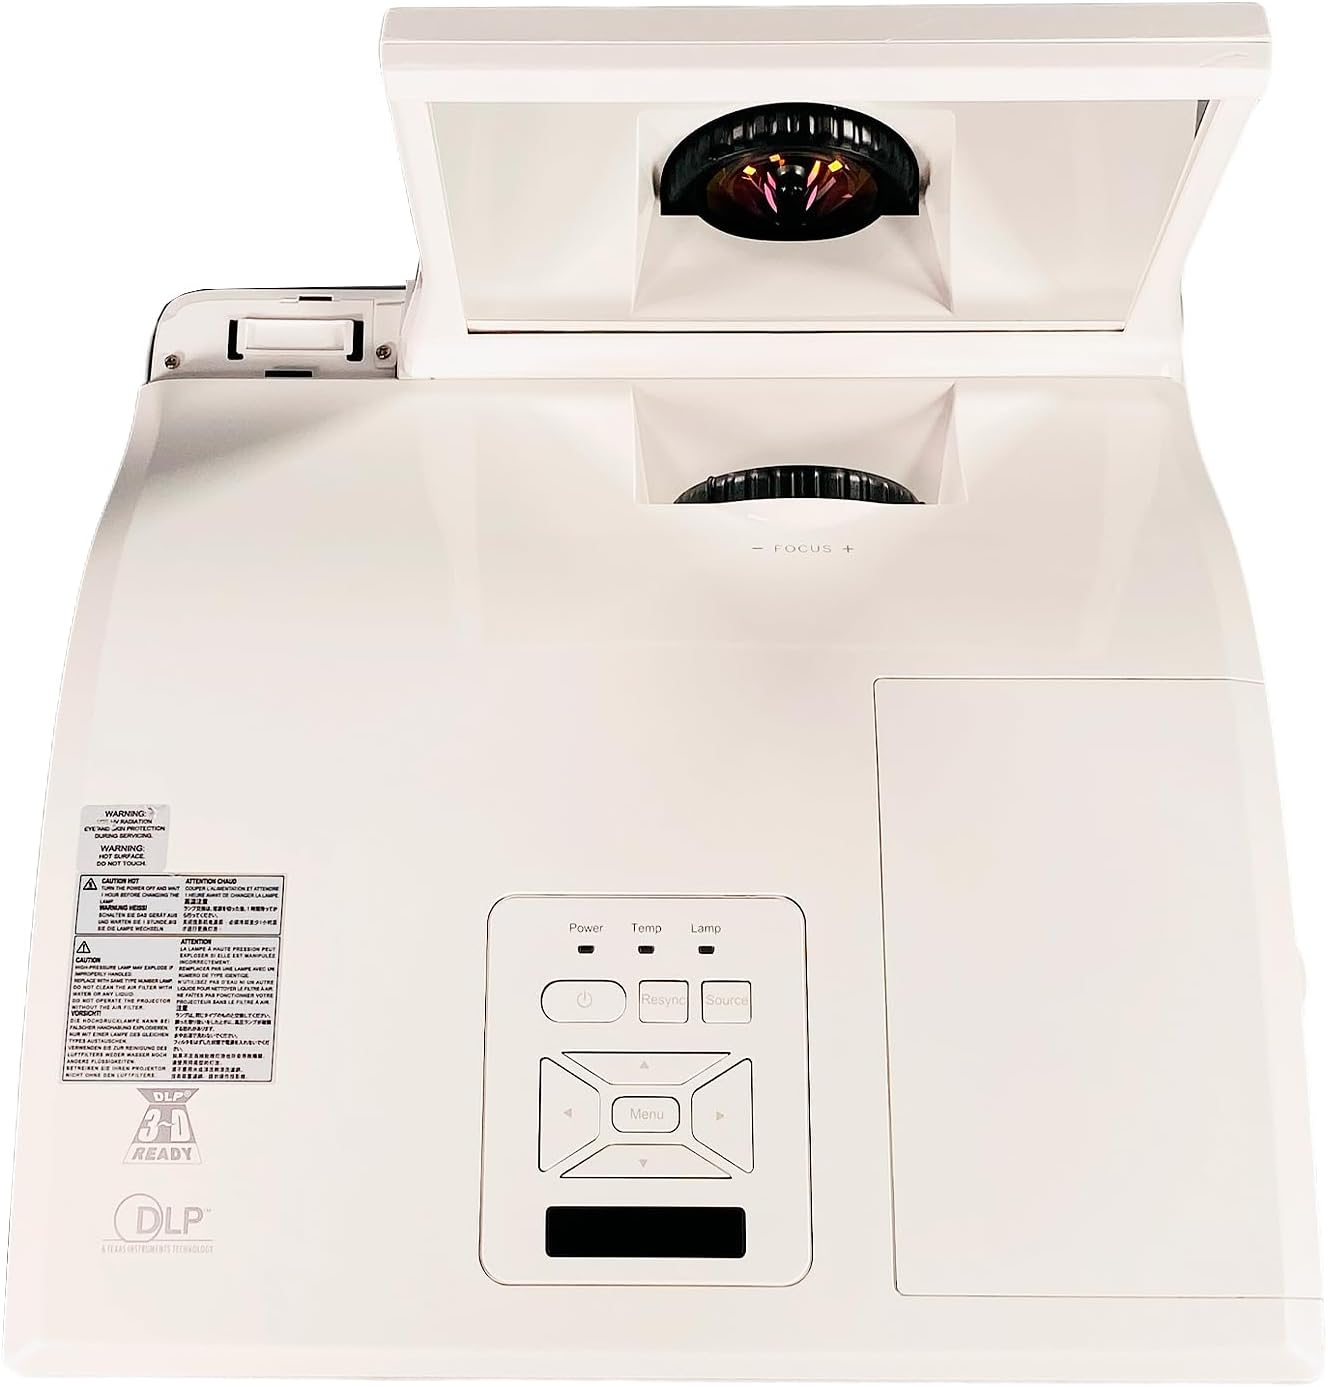
Obrázek 4.1: Nahoru view of the projector, showing the control panel with Power, Temp, Lamp indicators, and navigation buttons. The ultra-short throw lens assembly is visible at the front.
The top of the projector features the main control panel, allowing direct access to power, source selection, and menu navigation. The ultra-short throw lens is located at the front, protected by a movable cover.
4.2 Připojení zadního panelu

Obrázek 4.2: Rear panel of the projector, displaying various connectivity options including HDMI, VGA, S-Video, Composite, Audio In/Out, Mini USB, RS232, and LAN ports.
The rear panel provides a comprehensive array of input and output ports for connecting various devices:
- HDMI: Digital video and audio input.
- VGA In 1 & 2: Analog video inputs for computers.
- VGA výstup: Analog video output for a monitor.
- S-Video: Analogový video vstup.
- Video (kompozitní): Analogový video vstup.
- Audio In (L/R), Audio In 1 & 2, Microphone: Various audio inputs.
- Audio výstup: Audio výstup.
- Mini-USB: For service or control.
- RS232: Sériový ovládací port.
- LAN: Network connectivity.
- DC Out 12V: Výstupní výkon.
4.3 Strana View a Větrání

Obrázek 4.3: Strana view of the projector, highlighting the ventilation grilles essential for heat dissipation. The ultra-short throw lens assembly is also visible.
The sides of the projector feature ventilation grilles to ensure proper airflow and prevent overheating. Do not obstruct these grilles during operation.
4.4 Štítek produktu

Obrázek 4.4: Product label located on the bottom of the projector, displaying model number P8 WX31NXT, serial number (e.g., 330900834210132), input power requirements, and regulatory compliance marks.
The product label contains important information such as the model number, serial number, and electrical specifications. This information is crucial for support and warranty purposes. For technical support, you can contact Boxlight at +1-360-464-2119 (mezinárodní) popř +1-866-972-1649 (USA and Canada), or visit www.boxlight.com.
5. Nastavení
5.1 Umístění projektoru
As an ultra-short throw projector, the P8 WX31NXT is designed to be placed very close to the projection surface. Position the projector on a stable, flat surface directly in front of the screen or wall. Ensure there is adequate space around the ventilation grilles for airflow.
5.2 Připojení napájení
- Connect the supplied power cable to the AC inlet on the projector's rear panel.
- Zapojte druhý konec napájecího kabelu do uzemněné elektrické zásuvky.
5.3 Připojení vstupních zdrojů
Choose the appropriate cable for your source device and connect it to the corresponding port on the projector's rear panel (refer to Figure 4.2).
- HDMI: For digital video and audio from devices like laptops, Blu-ray players, or streaming boxes.
- VGA: For analog video from computers. Use VGA In 1 or VGA In 2.
- S-Video/Composite Video: For older video sources.
- Zvuk: Connect external audio sources to the Audio In ports if not using HDMI for audio.
6. Ovládání projektoru
6.1 Zapnutí/vypnutí
- Zapnutí: Stiskněte tlačítko Moc tlačítko na ovládacím panelu nebo dálkovém ovladači. Rozsvítí se kontrolka napájení.
- Vypnutí: Stiskněte tlačítko Moc button twice. The projector will initiate a shutdown sequence.
6.2 Výběr vstupního zdroje
Stiskněte tlačítko Zdroj button on the control panel or remote control repeatedly to cycle through available input sources (HDMI, VGA 1, VGA 2, S-Video, Video, etc.) until your desired source is displayed.
6.3 Nastavení zaostření
The projector features a manual focus adjustment. Rotate the focus ring near the lens assembly until the projected image is clear and sharp.
6.4 Navigace v nabídce
Stiskněte tlačítko Menu button on the control panel or remote to access the On-Screen Display (OSD) menu. Use the arrow buttons to navigate through options and the Vstupte pro výběr. Stiskněte Menu znovu k výstupu.
Common menu settings include:
- Nastavení obrázku: Brightness, Contrast, Color, Aspect Ratio.
- Nastavení obrazovky: Keystone correction, Position.
- Nastavení systému: Language, Timer, Lamp nastavení.
7. Údržba
7.1 Čištění objektivu
Jemně otřete čočku projektoru měkkým hadříkem bez žmolků, který je speciálně určen pro optické povrchy. Nepoužívejte abrazivní čisticí prostředky ani nadměrnou sílu, mohlo by dojít k poškrábání čočky.
7.2 Čištění vzduchových filtrů
Regularly clean the air filters to maintain optimal performance and prevent overheating. Refer to the projector's specific filter location (usually on the side or bottom) and cleaning instructions. Typically, filters can be cleaned with a soft brush or vacuum cleaner.
7.3 lamp Nahrazení
Projektor lamp má omezenou životnost. Když lamp Pokud se indikátor rozsvítí nebo se jas obrazu výrazně sníží, zobrazí seamp may need replacement. Consult a qualified technician or refer to the detailed lamp replacement guide for your specific model. Always use genuine Boxlight replacement lamps.
8. Řešení problémů
| Problém | Možná příčina | Řešení |
|---|---|---|
| Není zobrazen žádný obrázek | Power cable disconnected; Incorrect input source selected; Source device not powered on. | Check power connections; Select correct input source; Ensure source device is on. |
| Obraz je rozmazaný | Není nastavené zaostření; Projektor je příliš blízko/daleko od promítací plochy. | Upravte zaostřovací kroužek; Změňte polohu projektoru. |
| Projektor se přehřívá a vypíná | Ventilation blocked; Dirty air filter. | Ensure clear airflow around projector; Clean air filters. |
| Dálkové ovládání nefunguje | Batteries depleted; Obstruction between remote and projector. | Vyměňte baterie; Odstraňte překážky; Namiřte dálkový ovladač přímo na IR přijímač. |
9. Specifikace
| Funkce | Detail |
|---|---|
| Model | Boxlight P8 WX31NXT |
| Technologie displeje | DLP |
| Jas | 3100 ANSI Lumens |
| Nativní rozlišení | WXGA (1280 x 800) |
| Poměr stran | 16:10 |
| Kontrastní poměr | 3000:1 |
| Throw Type | Ultra Short Throw |
| Konektivita | HDMI, VGA (x2 In, x1 Out), S-Video, Composite Video, Audio In (x3), Audio Out, Microphone, Mini USB, RS232, LAN, DC Out 12V |
| Rozměry produktu | 14.45 x 14 x 5.32 palce |
| Vstupní výkon | AC 100-240V~ 50/60 Hz 3.6A |
10. Záruka a podpora
For warranty information and technical support, please refer to the official Boxlight website or contact their customer service directly. Keep your purchase receipt and the projector's serial number (found on the product label, e.g., 330900834210132) readily available when contacting support.
Boxlight Contact Information:
- International Technical Support: +1-360-464-2119
- USA and Canada Technical Support: +1-866-972-1649
- Webmísto: www.boxlight.com
Ask a question about this manual
Ask about setup, troubleshooting, compatibility, parts, safety, or missing instructions. Manuals+ will review the question and use this page’s manual context to help answer it.