1. Úvod
Thank you for choosing the Crivit Auriol Radio-Controlled Projection Alarm Clock. This device combines a precise radio-controlled clock with a clear LCD display, dual alarms, and a convenient projection feature. This manual will guide you through the setup, operation, and maintenance of your new alarm clock.

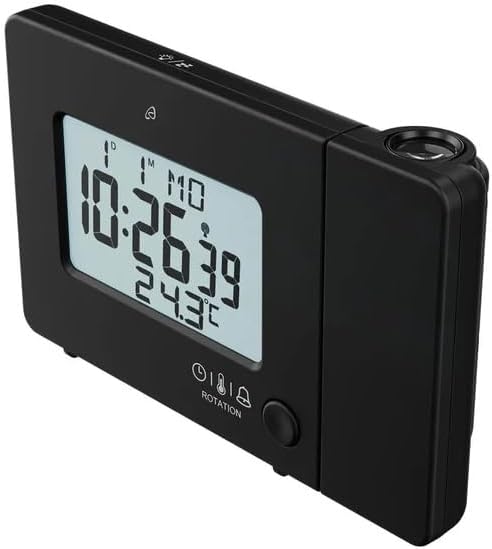
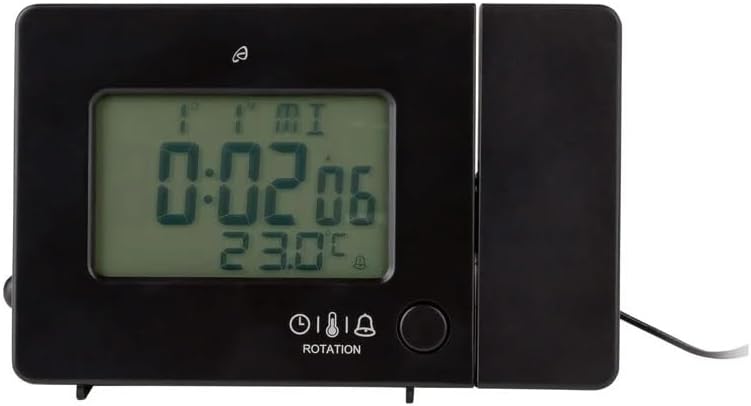
Přední view of the alarm clock displaying time, date, and temperature.
2. Bezpečnostní pokyny
- Před použitím si pečlivě přečtěte všechny pokyny a uschovejte je pro budoucí použití.
- Nevystavujte zařízení extrémním teplotám, přímému slunečnímu záření nebo vysoké vlhkosti.
- Zabraňte pádu zařízení nebo jeho vystavení silným nárazům.
- Nepokoušejte se zařízení rozebírat ani opravovat sami. Kontaktujte kvalifikovaný servisní personál.
- Uchovávejte baterie mimo dosah dětí. Použité baterie zlikvidujte v souladu s místními předpisy.
- Use only the provided AC adapter or one with identical specifications.
3. Obsah balení
Zkontrolujte prosím balení, zda neobsahuje následující položky:
- Crivit Auriol Radio-Controlled Projection Alarm Clock (Model 373928)
- Napájecí adaptér
- Baterie (předinstalované nebo samostatné)
- Uživatelská příručka (tento dokument)

Included AC power adapter.
4. Vlastnosti produktu
- Rádiem řízený čas: Automatic time synchronization for precise timekeeping.
- Funkce projekce: Projects time, alarm times, or ambient temperature onto a wall or ceiling.
- Pivoting Projection Arm: Adjustable projection angle with easy focus adjustment.
- LCD displej: Clear screen showing time, day, month, week number/day of the week, and indoor temperature.
- Duální budíky: Two independent alarm settings with snooze function.
- Dotykový senzor: Activates short-term projection and screen backlight.
- Možnosti napájení: Operates via AC adapter or batteries.
- Nabíjecí port USB-A: Convenient 5V, 800mA output for charging external devices.
- Nastavitelný jas: Customizable display brightness.
5. Identifikace součásti
Přední View:
Přední view s LCD displejem.
- LCD displej: Shows time, date, temperature, alarm status, and radio control signal.
- Touch Sensor Area: Located above the display, for temporary backlight and projection.
- Projection Indicator: Icon indicating projection is active.
- Indikátory alarmu: Ikony pro Budík 1 a Budík 2.
- Tlačítko otáčení: Adjusts projection orientation.
Strana View (Projection Arm):
Strana view with projection arm extended.
- Projekční rameno: Pivots to direct the projection.
- Focus Wheel: Upravuje jasnost promítaného obrazu.
- Projekční čočka: Emits the time/temperature display.
Zadní View:

Zadní view with control buttons and ports.
- -/WEEK Button: Decreases values, sets week display.
- +/ZONE Button: Increases values, sets time zone.
- Tlačítko °C/°F: Toggles temperature unit.
- LANG Button: Selects display language for day of the week.
- Tlačítko 12/24: Toggles 12/24 hour format.
- Tlačítko MODE: Cycles through settings modes (Time, Alarm 1, Alarm 2).
- Tlačítko SET: Enters setting mode for current display.
- Tlačítko reset: Resets the device to factory defaults (use a pointed object).
- Přihrádka na baterie: For backup batteries.
- Port DC IN: Pro připojení síťového adaptéru.
- Výstupní port USB-A: Pro nabíjení externích zařízení.
6. Nastavení
6.1. Zapnutí
The alarm clock can be powered by either the included AC adapter or batteries for backup.
- Instalace baterie: Open the battery compartment on the rear of the unit. Insert the included batteries, observing the correct polarity (+/-). Batteries primarily serve as backup in case of power outage.
- Připojení AC adaptéru: Connect the small plug of the AC adapter into the DC IN port on the back of the alarm clock. Plug the AC adapter into a standard wall outlet. The display will light up.
Alarm clock connected to power.
6.2. Počáteční nastavení a synchronizace rádiového ovládání
Upon first power-up or after a reset, the clock will automatically attempt to synchronize with the radio-controlled time signal (DCF77). This process can take several minutes to an hour, depending on your location and signal strength. During synchronization, a radio tower icon will flash on the display.
- Pro lepší příjem signálu umístěte hodiny blízko okna.
- Neumísťujte jej do blízkosti elektronických zařízení, která by mohla způsobovat rušení.
- Once synchronized, the radio tower icon will appear solid on the display.
If the radio signal is not received, you may need to set the time manually (see Section 7.1).
6.3. Basic Settings (if not automatically set or for adjustment)
Stiskněte tlačítko SOUBOR button to enter setting mode. Use the -/WEEK a +/ZONE tlačítka pro úpravu hodnot a SOUBOR potvrďte a přejděte na další nastavení.
- Časové pásmo: Adjust if you are not in the standard time zone for the radio signal.
- 12/24hodinový formát: Stiskněte tlačítko 12/24 button to toggle between 12-hour (with AM/PM) and 24-hour formats.
- Jednotka teploty: Stiskněte tlačítko ° C / ° F tlačítko pro přepínání mezi stupni Celsia a Fahrenheita.
- Jazyk zobrazení: Stiskněte tlačítko JAZYK button to select the language for the day of the week display (5 languages available).
7. Návod k obsluze
7.1. Manuální nastavení času
If the radio-controlled time signal is weak or unavailable, you can set the time manually:
- Stiskněte a podržte SOUBOR tlačítko, dokud nezačnou blikat číslice hodin.
- Použijte -/WEEK a +/ZONE tlačítka pro nastavení hodiny.
- Stiskněte SOUBOR to confirm and move to minutes, then year, month, and day.
- Stiskněte SOUBOR again to exit manual time setting.
7.2. Nastavení alarmů (Alarm 1 a Alarm 2)
Hodiny mají dva nezávislé budíky.
- Stiskněte tlačítko MODE button once to display Alarm 1 time, or twice for Alarm 2 time. The corresponding alarm icon (e.g., A1) will flash.
- While the alarm time is displayed, press and hold the SOUBOR tlačítko, dokud nezačnou blikat číslice hodin.
- Použijte -/WEEK a +/ZONE tlačítka pro nastavení hodiny.
- Stiskněte SOUBOR to confirm and move to minutes. Adjust minutes using -/WEEK a +/ZONE.
- Stiskněte SOUBOR znovu pro potvrzení a ukončení nastavení budíku.
- Chcete-li aktivovat/deaktivovat budík, stiskněte tlačítko MODE button to display the desired alarm, then press the +/ZONE button. The alarm icon (bell) will appear/disappear on the display.
7.3. Funkce odložení buzení
Když zazní budík, dotkněte se Dotkněte se oblasti senzoru nebo stiskněte SNOOZE / SVĚTLO button (if available, otherwise use the touch sensor) to activate the snooze function. The alarm will pause for approximately 5 minutes and then sound again. To stop the alarm completely, press any other button.
7.4. Projekční funkce
The alarm clock can project the time, alarm times, or ambient temperature onto a wall or ceiling.
- Aktivovat projekci: The projection is continuously active when powered by the AC adapter. If running on batteries, touch the Dotkněte se oblasti senzoru for short-term projection.
- Upravit úhel promítání: Pivot the projection arm to direct the image to your desired location.
- Upravit zaostření: Použijte Zaostřovací kolečko on the projection arm to sharpen the projected image.
- Change Projected Content: Stiskněte tlačítko MODE button repeatedly to cycle through projecting Time, Alarm 1, Alarm 2, or Temperature.
- Otočit projekci: Stiskněte tlačítko OTÁČENÍ button to rotate the projected image by 90-degree increments (4 orientations available).

Time projected onto a surface.
7.5. Podsvícení displeje
When powered by the AC adapter, the display backlight is continuously on. When running on batteries, touch the Dotkněte se oblasti senzoru to activate the backlight for a few seconds.
7.6. USB Charging Output
The USB-A port on the back of the unit provides a 5V, 800mA output for charging small electronic devices like smartphones or tablets. Connect your device's USB charging cable to this port.
8. Údržba
- Čištění: Zařízení otřete měkkým, suchým hadříkem. Nepoužívejte abrazivní čisticí prostředky ani rozpouštědla.
- Výměna baterie: If using batteries for backup, replace them annually or when the display becomes dim during power outages. Ensure correct polarity.
- Skladování: Pokud zařízení skladujete delší dobu, vyjměte baterie, abyste zabránili jejich vytečení.
9. Řešení problémů
| Problém | Možná příčina | Řešení |
|---|---|---|
| Displej je prázdný nebo tmavý. | No power, dead batteries, or AC adapter not connected. | Ensure AC adapter is securely connected. Replace batteries if using for backup. |
| Radio-controlled time not synchronizing. | Slabý signál, rušení nebo nesprávné časové pásmo. | Move the clock to a window or open area. Avoid electronic devices. Manually set time if necessary. Check time zone setting. |
| Projekce je rozmazaná. | Zaostření není upraveno. | Upravte Zaostřovací kolečko on the projection arm. |
| Alarm se nespustí. | Budík není aktivovaný nebo je nesprávně nastavený. | Ensure the alarm icon is visible on the display. Recheck alarm time settings. |
| Nabíjení přes USB nefunguje. | Device not properly connected, or device requires more power than 800mA. | Ensure the USB cable is securely connected. Check if your device's charging requirements exceed 5V/800mA. |
10. Specifikace

Rozměry produktu.
- Číslo modelu: 373928
- Rozměry (D x Š x V): 15 x 3.81 x 9.5 cm (approx. 15l x 9.5H centimeters)
- Materiál: Plast
- Typ displeje: Digitální LCD
- Zdroj napájení: AC Adapter (included) or Batteries (included)
- USB výstup: 5 V, 800 mA
- Speciální vlastnosti: Adjustable brightness, Snooze, Projection, Radio-controlled time
- Typ pohybu: Křemen
- Typ montáže: Stolní deska
- Vnitřní/venkovní použití: Krytý
11. Záruka a podpora
This Crivit Auriol Projection Alarm Clock comes with a standard manufacturer's warranty. Please refer to the warranty card included in your package or contact your retailer for specific warranty terms and conditions.
For technical support or inquiries, please contact the customer service department of your retailer or the Crivit support line as indicated on the product packaging or official webmísto.