
1. Úvod
The DUMBORC X6PM-350 is a lightweight 2.4GHz mini RC transmitter and receiver system designed for various RC models including cars, trucks, crawlers, racing vehicles, boats, and tanks. This compact system offers a transmission distance of 350-400 meters and includes several advanced functions for enhanced control and customization.
Mezi klíčové vlastnosti patří:
- Mixed Mode Functionality: Channels 1-2 and 3-4 can be configured for mixed mode operation, allowing for complex control setups.
- Channel Reversing: Channels 1, 2, 3, 4, and 6 can have their direction reversed.
- Integrovaný gyroskop: The receiver features a gyroscope function to assist with steering and direction stability.
- Nízký objemtage Alarm: A visual indicator on the transmitter flashes when battery voltage is low, providing timely alerts.
- Throttle Speed Limit: A unique throttle speed limit adjustment function is included, beneficial for beginners to practice at a safe speed.
The X6PM-350 is compatible with various DUMBORC receivers, including X6F, X6FG, X6DC, X6DCG, X4FM, X4FMG, X6FP, BL3F, BL3FG, and LZD models.

Figure 1: DUMBORC X6PM-350 Mini RC Transmitter.

Figure 2: The DUMBORC X6PM-350 is suitable for various RC models.
2. Nastavení
2.1. Instalace baterie
The transmitter requires 4 AA batteries (not included). Open the battery compartment cover on the underside of the transmitter and insert the batteries, ensuring correct polarity. Close the cover securely.
2.2. Připojení přijímače
Connect your servo, Electronic Speed Controller (ESC), and motor to the appropriate channels on the receiver. Refer to the receiver's port labels for correct connections.
2.3. Závazný postup
To establish communication between the transmitter and receiver (binding), follow these steps:
- Ujistěte se, že je vysílač vypnutý.
- Connect the receiver to power (e.g., via ESC). The receiver's LED will typically blink, indicating it's in binding mode.
- Stiskněte a podržte tlačítko vazby na přijímači.
- While holding the bind button, power ON the transmitter.
- Release the bind button on the receiver once the LED on the receiver turns solid green, indicating successful binding.
- Otestujte ovládací prvky, abyste se ujistili o správné funkci.
Důležité: Always power on the transmitter first, then the receiver. Power off the receiver first, then the transmitter. This sequence helps prevent unintended control inputs.
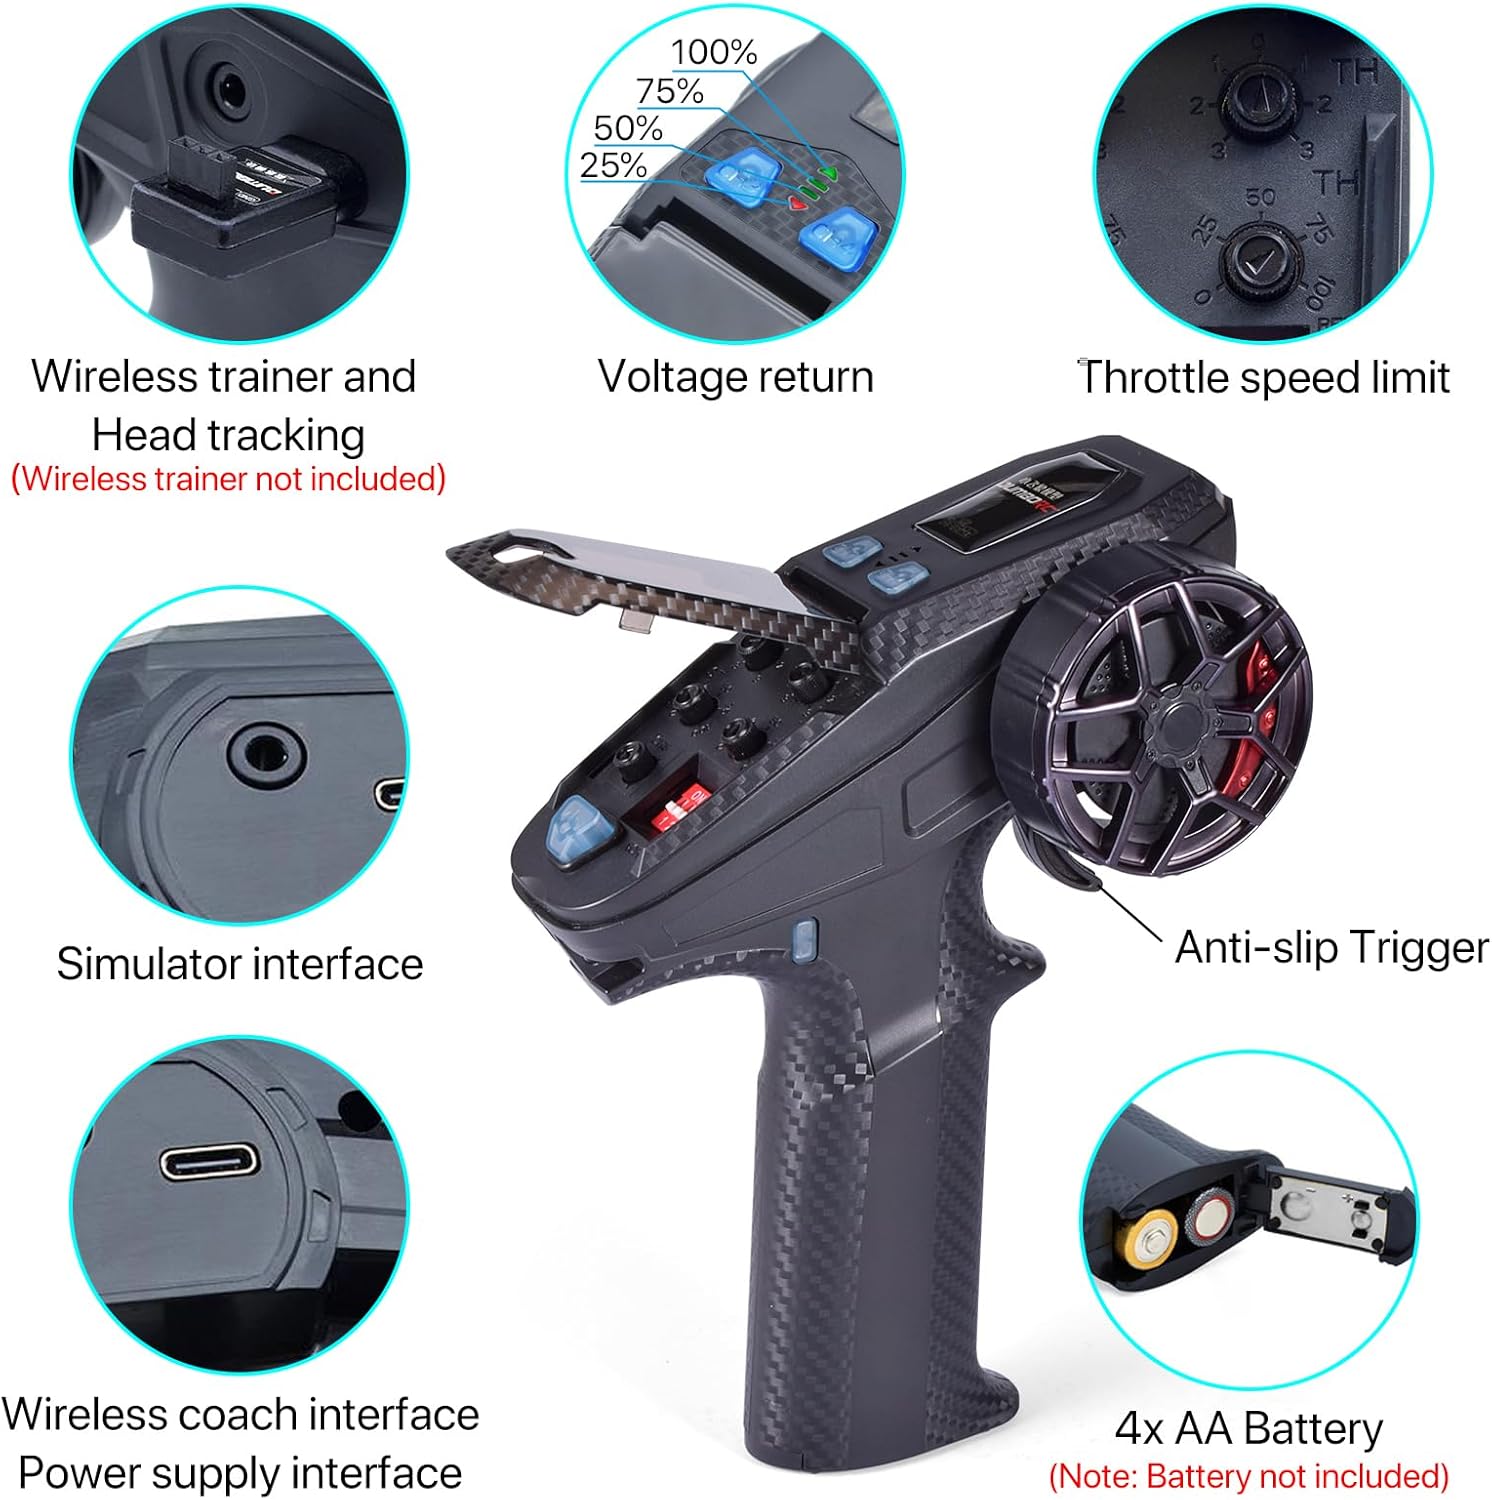
Figure 3: Transmitter features and battery compartment location.
Video 1: Detailed explanation of DUMBORC X6PM transmitter and X6FG receiver functions, including binding and gyroscope setup.
3. Návod k obsluze
3.1. Mixed Control Mode
The transmitter supports mixed control for channels 1-2 and 3-4. This allows for advanced control of dual-motor setups or other complex configurations. For example, in a mixed mode for channels 1 and 2, the trigger controls forward/backward movement, while channel 1's directional wheel adjusts the speed of two motors for differential steering.

Figure 4: Mixed Control Mode setup for dual motors.
3.2. CH3 & CH4 Mixed Control
Channels 3 and 4 can be used for jog signals. Pressing the respective button activates the channel output, and releasing it returns to a neutral signal. This is useful for controlling servos, winches, tank barrels, turrets, and other accessories. The default factory setting for travel and reverse direction in CH3/CH4 mixed mode is 50% range.

Figure 5: CH3 & CH4 Mixed Control operation.
3.3. Funkce gyroskopu
The receiver's gyroscope function helps stabilize steering. To activate or adjust the gyroscope:
- Přepínací režimy: Fast press the binding button on the receiver 3 times to toggle between gyro mode and normal mode.
- Nastavení směru: Fast press the binding button 2 times to adjust the gyroscope direction.
- Nastavení citlivosti: Adjust gyroscope sensitivity using the knob on Channel 5 of the transmitter.
- Indikátor: The green indicator light is always on in normal mode, while the yellow indicator is always on in gyro mode.

Figure 6: LED indicators and gyroscope effect on steering.
3.4. Low-Voltage Indikátor alarmu
The button at the top of the RC remote will flash to indicate low voltage. This visual cue helps you monitor battery levels and prevent unexpected power loss during operation.
3.5. Throttle Speed Limit Adjustment
Utilize the unique throttle speed limit adjustment function to set a maximum speed for your RC model. This is particularly useful for beginners to safely learn control without excessive speed.
4. Údržba
To ensure the longevity and optimal performance of your DUMBORC X6PM-350 system, follow these maintenance guidelines:
- Čištění: Regularly wipe the transmitter and receiver with a soft, dry cloth. Avoid using harsh chemicals or solvents.
- Skladování: Store the system in a cool, dry place away from direct sunlight, moisture, and extreme temperatures. Remove batteries from the transmitter if storing for extended periods.
- Péče o baterie: Always use fresh AA batteries for the transmitter. If the low-voltage alarm activates, replace the batteries promptly.
- Vyhněte se dopadu: Protect the transmitter and receiver from drops and impacts, which can damage internal components.
5. Řešení problémů
- Žádná odpověď od modelu:
- Ujistěte se, že jsou vysílač i přijímač zapnuté.
- Verify successful binding (receiver LED solid green). If not, re-perform the binding procedure.
- Check battery levels in the transmitter.
- Inspect all connections between the receiver, ESC, servo, and motor.
- Gyroscope Not Functioning:
- Ensure the gyroscope mode is activated (receiver LED yellow). Fast press the bind button 3 times to toggle.
- Check the gyroscope sensitivity knob on Channel 5.
- Nízký objemtage Alarm:
- The transmitter's top button flashing indicates low battery. Replace the 4 AA batteries immediately.
6. Specifikace
| Značka | DUMBORC |
| Model | X6PM-350 |
| Rozměry produktu | 5.11 x 2.6 x 7.08 palce |
| Hmotnost položky | 5.9 unce (168 g) |
| Kanály | 6CH |
| Radio Transmitter Distance | 350-400 metry |
| Provozní proud dálkového ovládání | 80-120 mA |
| svtage Alarm | 10.8V | 7.4V | 4.4V |
| Modulační režim | GFSK |
| Dálkové ovládání Voltage Dosah | 4.8-12V |
| Přijímač svtage Dosah | 4.8-10V |
| RF napájení | <20 dbm |
| Product Size (Transmitter) | 180 * 130 * 65 mm |
| Jsou vyžadovány baterie | 4 AA baterie (nejsou součástí balení) |
| Spreading Mode | FHSS 67 channel pseudo-random frequency hopping |
| Doporučený věk | 14 let a více |
| Co je v krabici | Přijímač |

Figure 7: Transmitter dimensions.
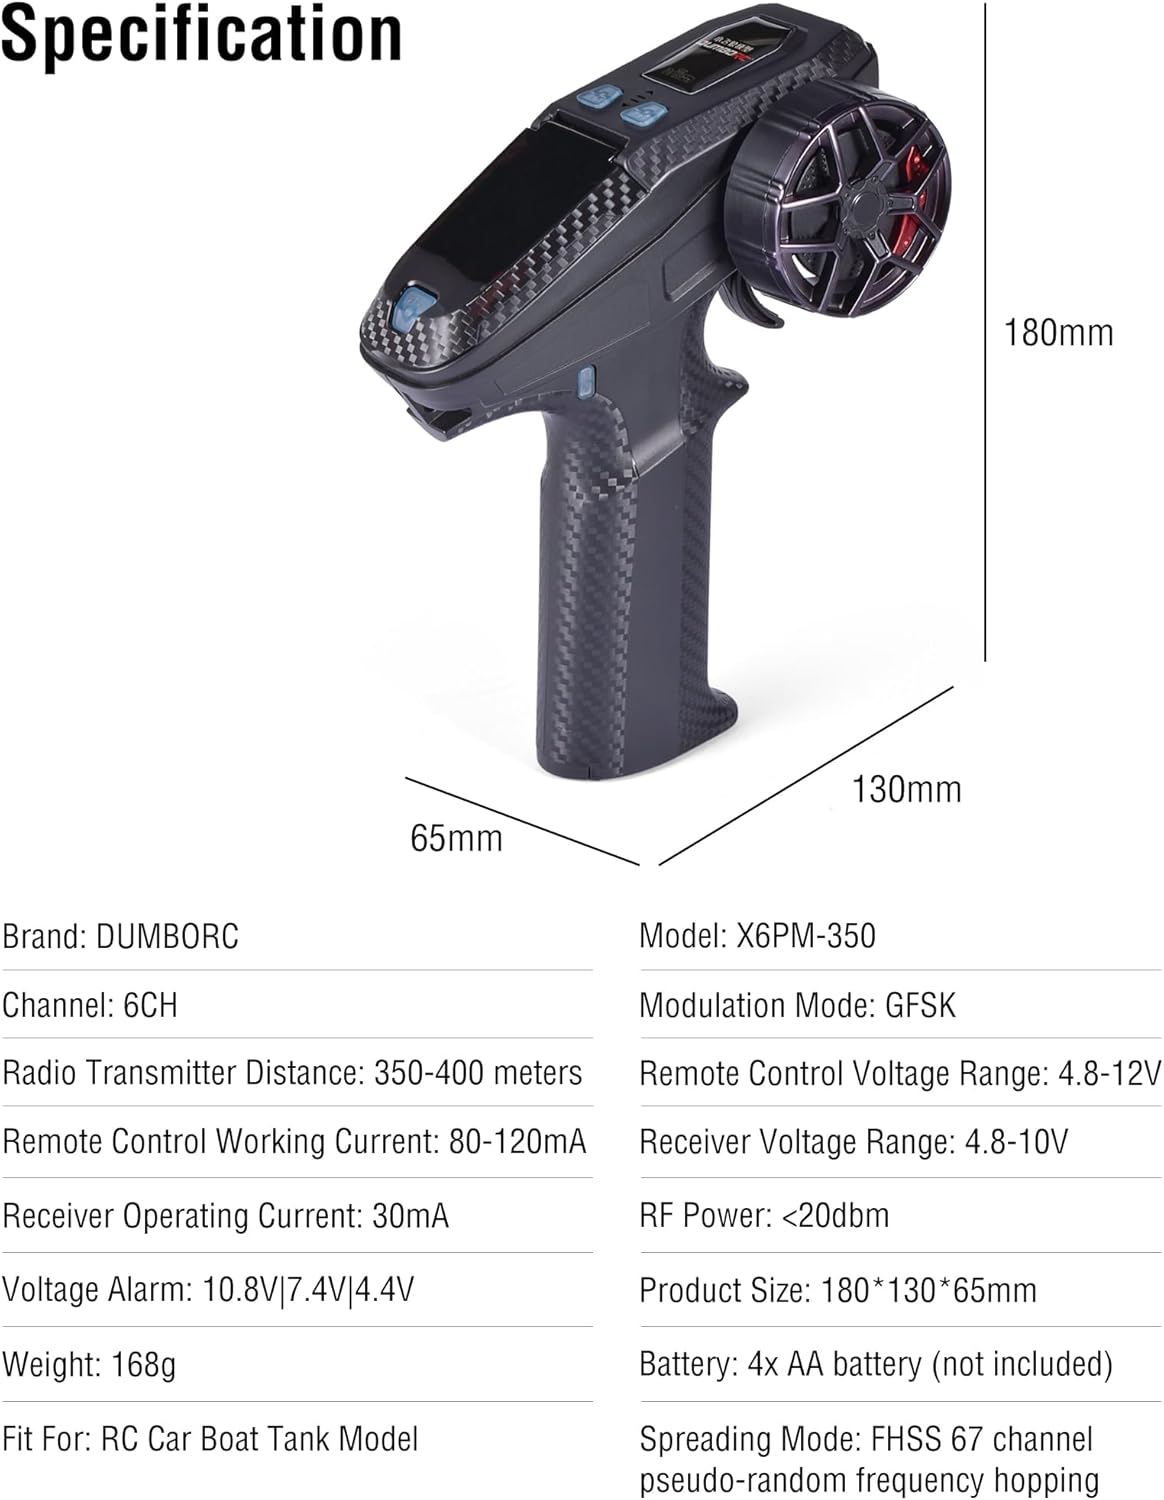
Figure 8: Detailed specifications of the DUMBORC X6PM-350 system.
7. Záruka a podpora
For warranty information, technical support, or service inquiries, please contact DUMBORC customer service through their official channels or the retailer from whom the product was purchased. Please retain your proof of purchase for warranty claims.