1. Úvod
Thank you for choosing the ATTACK SHARK X2 Wireless Gaming Mouse. This manual provides detailed instructions for setting up, operating, and maintaining your mouse to ensure optimal performance. The X2 mouse features a transparent shell, 3-mode connectivity (2.4GHz wireless, Bluetooth 5.0, USB-C wired), adjustable DPI, 3D RGB lighting, and a rechargeable battery.

Image 1.1: The ATTACK SHARK X2 Wireless Gaming Mouse, showcasing its transparent design and vibrant RGB lighting. A USB receiver is also visible.
2. Konec produktuview
2.1 Obsah balení
- ATTACK SHARK X2 Wireless Gaming Mouse
- Nabíjecí kabel USB-C
- 2.4GHz USB přijímač (uložený v myši)
- Uživatelská příručka
2.2 Součásti myši

Obrázek 2.1: Spodní část view of the X2 mouse, highlighting the USB receiver slot, mode switch, and light effect switch.
- Levé tlačítko
- Tlačítko pravého tlačítka
- Rolovací kolečko (also functions as a button)
- Tlačítko DPI (below scroll wheel)
- Tlačítko vpřed (levá strana)
- Tlačítko Zpět (levá strana)
- Přepínač režimů (bottom of mouse: OFF / 2.4G / Bluetooth)
- Přepínač světelných efektů (bottom of mouse)
- Slot pro USB přijímač (bottom of mouse)
- Nabíjecí port USB-C (front of mouse)
3. Nastavení a připojení
3.1 Nabíjení myši
The X2 mouse features an 800mAh rechargeable battery. Before first use, or when the battery is low, connect the mouse using the provided USB-C cable.
- Connect the USB-C end of the cable to the mouse's charging port.
- Připojte konec USB-A ke zdroji napájení (např. k portu USB počítače, adaptéru USB do zásuvky).
- Plné nabití obvykle trvá přibližně 4 hodiny.
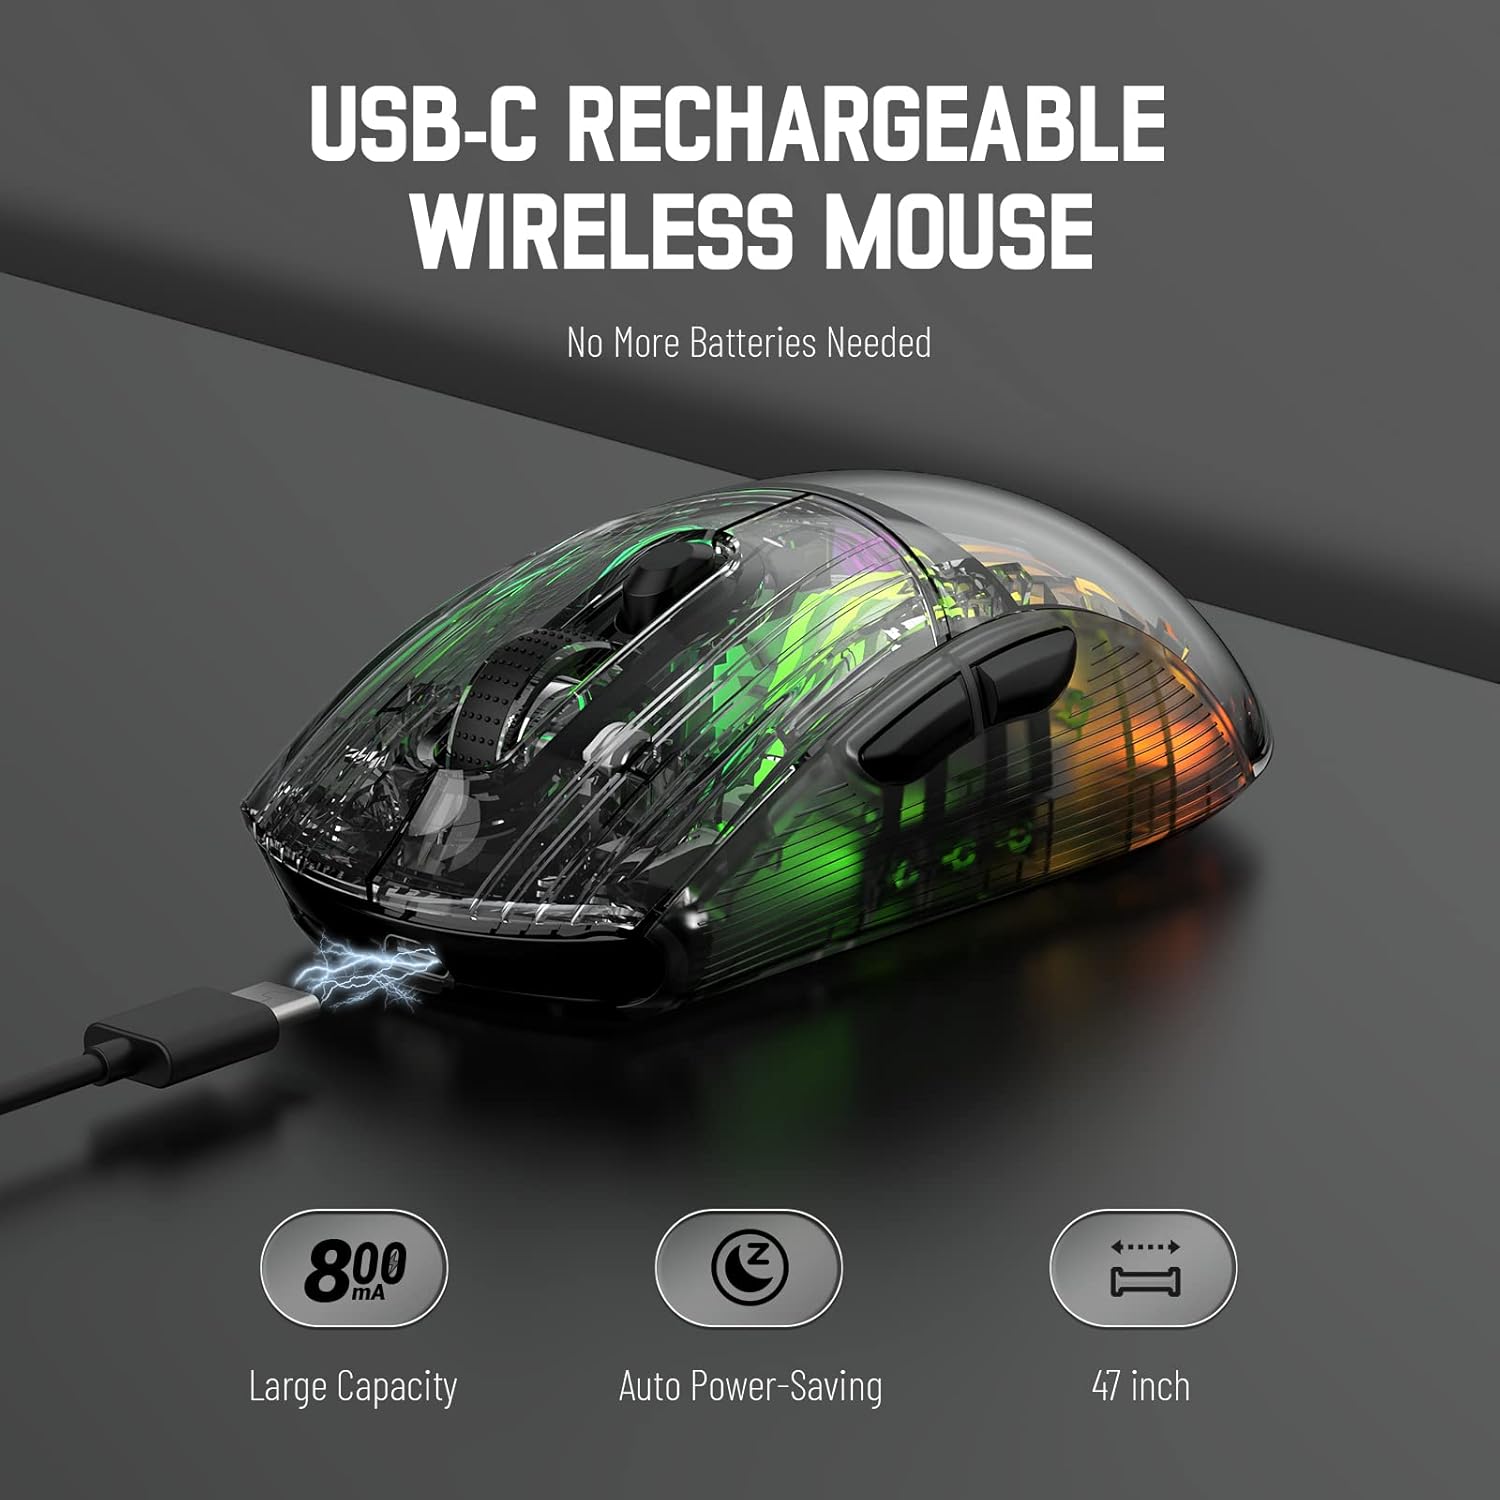
Image 3.1: The X2 mouse connected via its USB-C cable, illustrating the charging process.
3.2 Bezdrátové připojení 2.4 GHz
For a stable and responsive wireless connection, use the 2.4GHz USB receiver.
- Vyhledejte USB přijímač uložený ve slotu na spodní straně myši.
- Push the mode switch on the bottom of the mouse to the "2.4G" position.
- Zapojte USB přijímač do volného USB portu na vašem počítači nebo zařízení.
- The computer should automatically detect and install the necessary drivers. The mouse is ready for use once installation is complete (typically plug-and-play).
- If the mouse is unresponsive, try plugging the receiver into a different USB port.
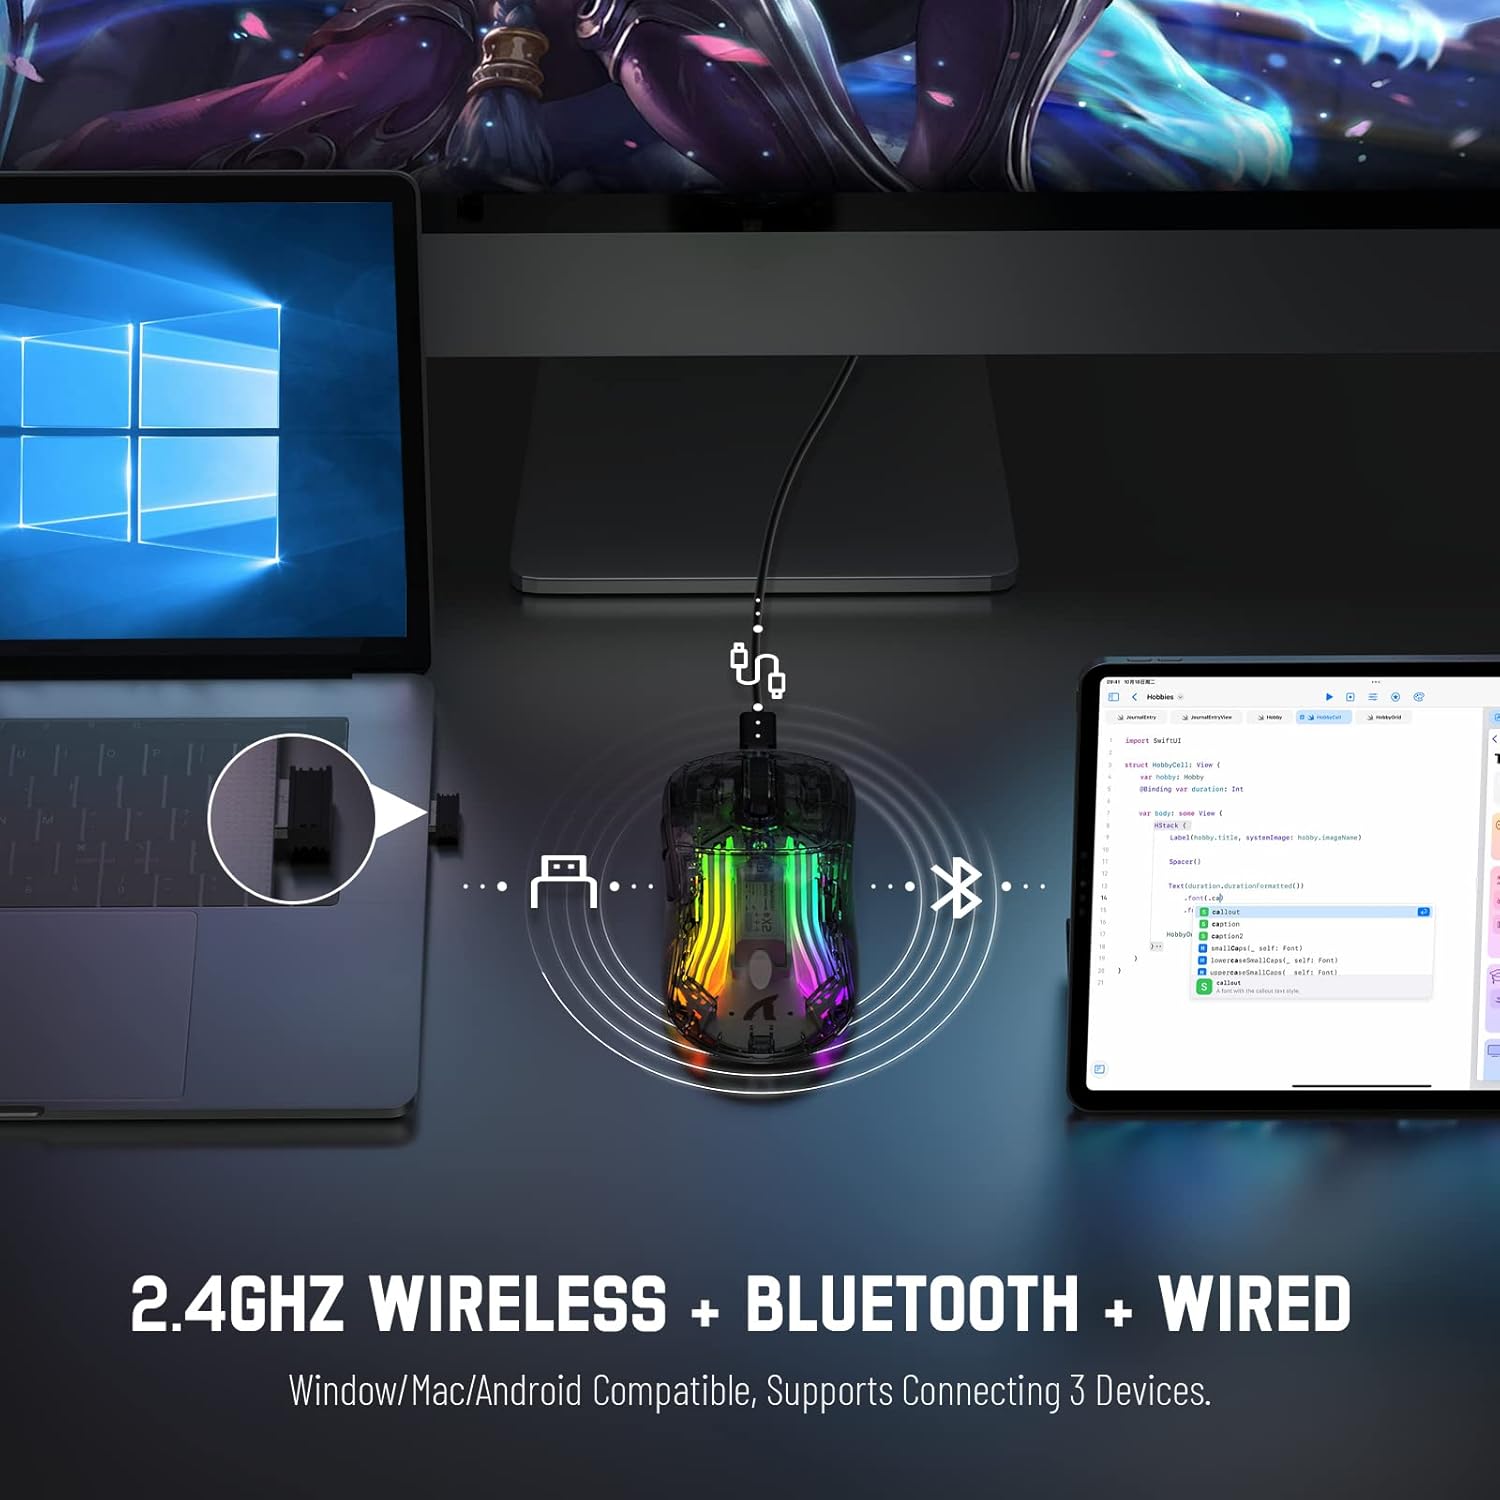
Image 3.2: Illustration of the 2.4GHz wireless connection, showing the USB receiver plugged into a laptop.
3.3 Připojení Bluetooth 5.0
Connect your X2 mouse via Bluetooth for devices that support it, such as laptops, tablets, or smartphones.
- Push the mode switch on the bottom of the mouse to the "Bluetooth" position.
- Stiskněte a podržte Levé tlačítko + Tlačítko rolovacího kolečka + Tlačítko pravého tlačítka simultaneously for approximately 3-4 seconds. The blue light on the mouse will flash rapidly, indicating it is in pairing mode.
- On your device, navigate to Bluetooth settings and enable Bluetooth.
- Hledat available devices. Select "X2 Mouse" from the list to connect.
- Once connected, the blue light will stop flashing and remain solid or turn off, depending on the lighting mode.
3.4 Kabelové připojení USB-C
For a direct and reliable connection, use the USB-C cable in wired mode.
- Connect the USB-C end of the cable to the mouse's charging port.
- Connect the USB-A end to an available USB port on your computer or device.
- The mouse will function immediately as a wired mouse (plug-and-play).
4. Návod k obsluze
4.1 Nastavení DPI
The mouse features 5 adjustable DPI levels to suit various tasks and gaming preferences. The game chip used is PixArt 3212.
- Stiskněte tlačítko Tlačítko DPI (umístěno pod rolovacím kolečkem) pro procházení dostupných nastavení DPI.
- Available DPI levels: 800 / 1200 / 1400 / 2000 / 2400.
4.2 Ovládání RGB osvětlení
The X2 mouse features 3D RGB lighting with 11 different light colors and various effects.
- Stiskněte tlačítko Přepínač světelných efektů (located on the bottom of the mouse) to cycle through the different RGB lighting modes and colors.

Image 4.1: The X2 mouse displaying its 3D RGB lighting, complementing a gaming setup.
4.3 Řízení spotřeby
The mouse is designed with auto power-saving features to conserve battery life.
- The mouse will enter a sleep mode after a period of inactivity.
- Chcete-li myš probudit, jednoduše s ní pohněte nebo klikněte na libovolné tlačítko.
- When the battery is low, the mouse's indicator light may flash red.
4.4 Silent Clicks
The X2 mouse features silent click buttons, reducing noise during use.

Obrázek 4.2: Boční profíkfile of the X2 mouse, emphasizing its ergonomic shape and silent click functionality.
5. Údržba
5.1 Čištění
- Před čištěním odpojte myš od zařízení.
- K otření povrchu myši použijte měkký, suchý hadřík, který nepouští vlákna.
- Pro odolnou špínu lehceampOtřete hadřík vodou nebo jemným čisticím roztokem. Vyhněte se agresivním chemikáliím.
- Nedovolte, aby se do vnitřku myši dostaly tekutiny.
5.2 Skladování
- Myš skladujte na chladném a suchém místě mimo dosah přímého slunečního záření a extrémních teplot.
- When not in use, ensure the mode switch is set to "OFF" to conserve battery life.
- Keep the USB receiver stored in its designated slot on the bottom of the mouse to prevent loss.
6. Řešení problémů
6.1 Myš nereaguje
- Zkontrolujte baterii: Ujistěte se, že je myš nabitá. Připojte ji pomocí kabelu USB-C pro nabití.
- Zkontrolujte přepínač režimu: Verify the mode switch on the bottom of the mouse is set to the correct connection mode (2.4G, Bluetooth, or OFF for wired).
- Připojení 2.4 GHz: Ujistěte se, že je USB přijímač bezpečně zapojený do funkčního USB portu. Zkuste jiný USB port.
- Připojení Bluetooth: Re-enter pairing mode (Left + Scroll + Right buttons for 3-4 seconds) and re-pair with your device. Ensure Bluetooth is enabled on your device.
- Kabelové připojení: Ensure the USB-C cable is securely connected to both the mouse and the device.
6.2 Přerušované připojení
- Vzdálenost: Ensure the mouse is within the effective range (up to 50ft for 2.4GHz).
- Rušení: Move the mouse and receiver away from other wireless devices or large metal objects that may cause interference.
- Úroveň baterie: Low battery can affect connection stability. Charge the mouse.
6.3 RGB světla nefungují
- Check Light Switch: Press the Light Effect Switch on the bottom of the mouse to cycle through modes or turn lights on.
- Úroveň baterie: Ensure the mouse has sufficient charge, as low battery might disable lighting to conserve power.
7. Specifikace
| Funkce | Specifikace |
|---|---|
| Model | X2 |
| Konektivita | Bezdrátové připojení 2.4 GHz, Bluetooth 5.0, kabelové USB-C |
| Úrovně DPI | 800 / 1200 / 1400 / 2000 / 2400 (PixArt 3212 Chip) |
| Tlačítka | 7 (Left, Right, Scroll Wheel, DPI, Forward, Backward, Light Effect Switch) |
| Osvětlení | 3D RGB Lighting (11 light colors) |
| Baterie | Dobíjecí 800mAh |
| Doba nabíjení | Přibl. 4 hodin |
| Provozní rozsah | Up to 50ft (2.4GHz) |
| Kompatibilita | Windows 7/8/10/XP, Vista 7/8, Mac OS, Linux (PC, Laptop, Tablet, PS4, PS5, Xbox One) |
| Hmotnost položky | 6.4 unce |
| Rozměry | 6.89 x 4.61 x 1.81 palce (balení) |
8. Záruka a podpora
ATTACK SHARK products are designed and manufactured to high-quality standards. For warranty information or technical support, please refer to the warranty card included with your product or contact the seller directly through your purchase platform. Please retain your proof of purchase for any warranty claims.
For further assistance, please visit the official ATTACK SHARK store on Amazon: ATTACK SHARK Store