1. Úvod
The Stemedu Capacitive Analog Soil Moisture Sensor Module (V1.2) is designed for detecting soil humidity. Unlike traditional resistive sensors, this module utilizes a capacitive sensing principle, which significantly reduces corrosion issues and extends its operational lifespan. It is suitable for various DIY electronic projects, including those involving Arduino and Raspberry Pi, for applications such as garden plant monitoring, moisture detection, and intelligent agriculture systems.

Image 1.1: The Stemedu Capacitive Analog Soil Moisture Sensor Module (V1.2) shown with its connecting cable. The sensor features a black PCB with a pointed end for soil insertion and a white connector for the cable.
Konec produktuview Video
Video 1.1: An official product video from Stemedu providing an overview of the Capacitive Analog Soil Moisture Sensor Module, including its packaging and general appearance.
2. Klíčové vlastnosti
- Capacitive Sensing: Utilizes capacitive sensing to detect soil moisture, offering improved corrosion resistance compared to resistive sensors.
- Wide Operating Voltage: Operates within a voltage rozsah 3.3V až 5.5V DC.
- Analogový výstup: Provides an analog output voltage from 0V to 3.0V DC, allowing for precise moisture level readings.
- Standardní rozhraní: Features a PH2.54-3P interface for easy connection. Pinout includes Analog signal output, GND, and VCC.
- Robustní výkon: Exhibits good linearity, repeatability, small hysteresis, and fast response.
- Provozní teplota: Can be used in humidity environments ranging from -10°C to 60°C.
- Kompaktní design: Small size for easy integration into various projects.
3. Nastavení a připojení
This section details the steps for connecting the Capacitive Analog Soil Moisture Sensor Module to a microcontroller, such as an Arduino board.
3.1 Schéma zapojení
Connect the sensor to your microcontroller using the provided PH2.54-3P cable according to the following pinout:
- VCC (červený vodič): Connect to the 3.3V or 5V power supply of your microcontroller. The sensor supports 3.3V to 5.5V DC input.
- GND (černý vodič): Connect to the Ground (GND) pin of your microcontroller.
- Analog Output (Yellow Wire): Connect to an Analog Input pin (e.g., A0) on your microcontroller.

Image 3.1: A clear wiring diagram illustrating how to connect the Capacitive Analog Soil Moisture Sensor Module to an Arduino Uno board. The red wire connects to 5V, the black wire to GND, and the yellow wire to Analog Pin A0 on the Arduino.
3.2 Počáteční zapnutí
Once wired, apply power to your microcontroller. The sensor will immediately begin to output an analog voltage corresponding to the detected moisture level. No specific initialization is required for the sensor itself, but your microcontroller will need appropriate code to read the analog input.
4. Provoz
The sensor measures soil moisture by detecting changes in capacitance. As the moisture content in the soil changes, the dielectric constant of the soil also changes, which in turn affects the capacitance of the sensor. This change in capacitance is converted into an analog voltage výstup.
4.1 Umístění snímače
For accurate readings, insert the sensor into the soil up to the recommended depth. Avoid submerging the electronic components (the top part with the white connector) in water, as this can damage the module. The "Warning Line" indicates the maximum safe immersion depth for the sensor probe.
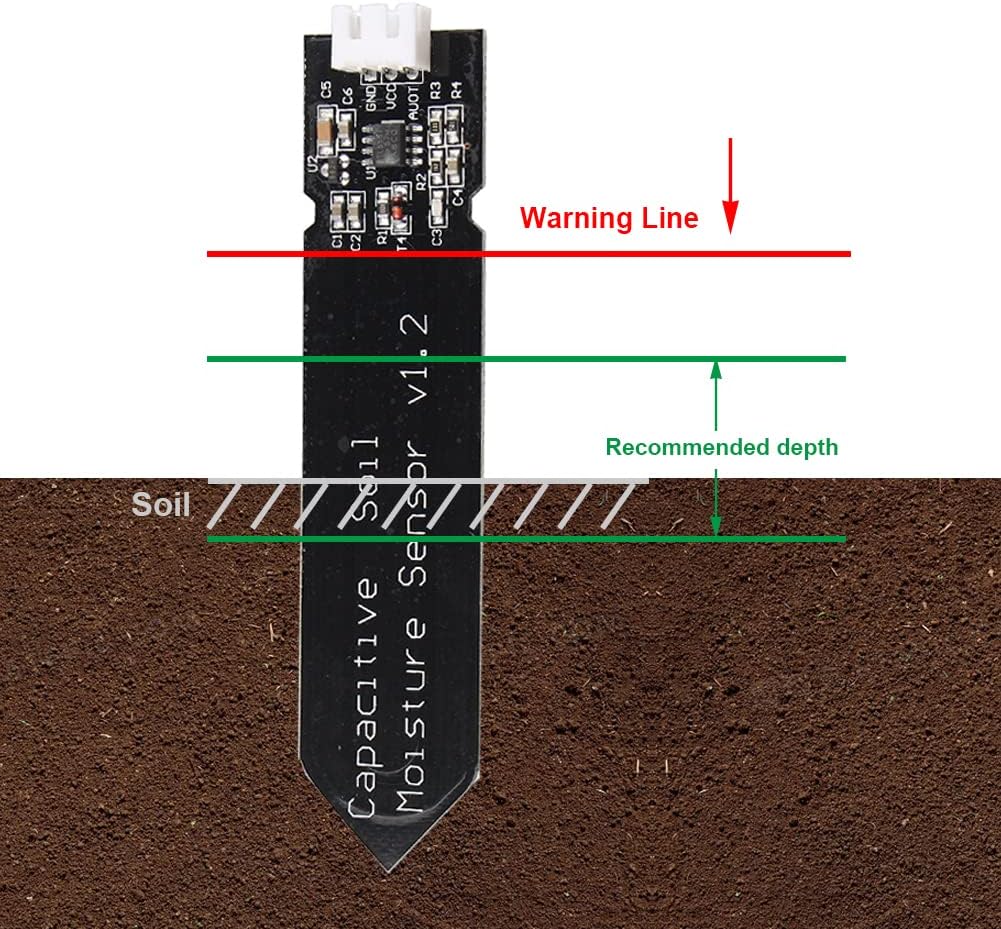
Image 4.1: A diagram illustrating the proper insertion depth for the capacitive soil moisture sensor into the soil. It shows a "Warning Line" above which the electronic components should remain dry, and a "Recommended depth" for optimal moisture detection.
4.2 Reading Analog Output
The sensor provides an analog voltage output (0-3.0V DC) that is inversely proportional to the soil moisture level. A higher voltage typically indicates drier soil, while a lower voltage indicates wetter soil. You will need to read this analog value using your microcontroller's Analog-to-Digital Converter (ADC) and then map it to a meaningful moisture percentage or level.
Example (Arduino):
int sensorPin = A0; // Analog input pin connected to the sensor
int sensorValue = 0; // Variable to store the sensor value

void setup() {
  Serial.begin(9600); // Initialize serial communication
}

void loop() {
  sensorValue = analogRead(sensorPin); // Read the analog value from the sensor
  Serial.print("Raw Sensor Value: ");
  Serial.println(sensorValue);

  // Further processing/calibration can be added here
  delay(1000); // Wait for a second before the next reading
}
5. Údržba
While the capacitive design offers superior corrosion resistance compared to resistive sensors, proper care can further extend the lifespan and accuracy of your sensor module.
- Udržujte elektroniku v suchu: Always ensure that the electronic components (the top part of the PCB with the connector) remain above the soil surface and are not exposed to water or excessive humidity.
- Pravidelný úklid: Periodically remove the sensor from the soil and gently wipe the probe clean of any accumulated soil or debris.
- Kalibrace: For precise applications, it is recommended to calibrate the sensor. This typically involves taking readings in completely dry soil (or air) and in saturated soil (or water) to establish the full range of values for your specific soil type.
- Venkovní použití: If using the sensor outdoors, consider applying a conformal coating or epoxy to the electronic board to protect it from environmental elements and moisture, as the board itself is not waterproof.
6. Řešení problémů
| Problém | Možná příčina | Řešení |
|---|---|---|
| No or erratic analog output. | Incorrect wiring, insufficient power, faulty sensor, or incorrect analog input pin. |
|
| Readings do not seem accurate or consistent. | Lack of calibration, sensor not fully inserted, or varying soil conditions. |
|
| Sensor stops working after exposure to water. | Electronic components were submerged or exposed to moisture. |
|
7. Specifikace
| Funkce | Detail |
|---|---|
| Číslo modelu | ST3107X5 (V1.2) |
| Pracovní svtage | 3.3V ~ 5.5V DC |
| Výstupní objemtage | 0V ~ 3.0V DC |
| Rozhraní | PH2.54-3P (Analog signal output, GND, VCC) |
| Rozměry | 3.9 x 2 x 0.2 palce (přibližně 99 x 51 x 5 mm) |
| Hmotnost položky | 0.317 unce (cca 9 gramů) |
| Provozní teplota | -10 °C až 60 °C |
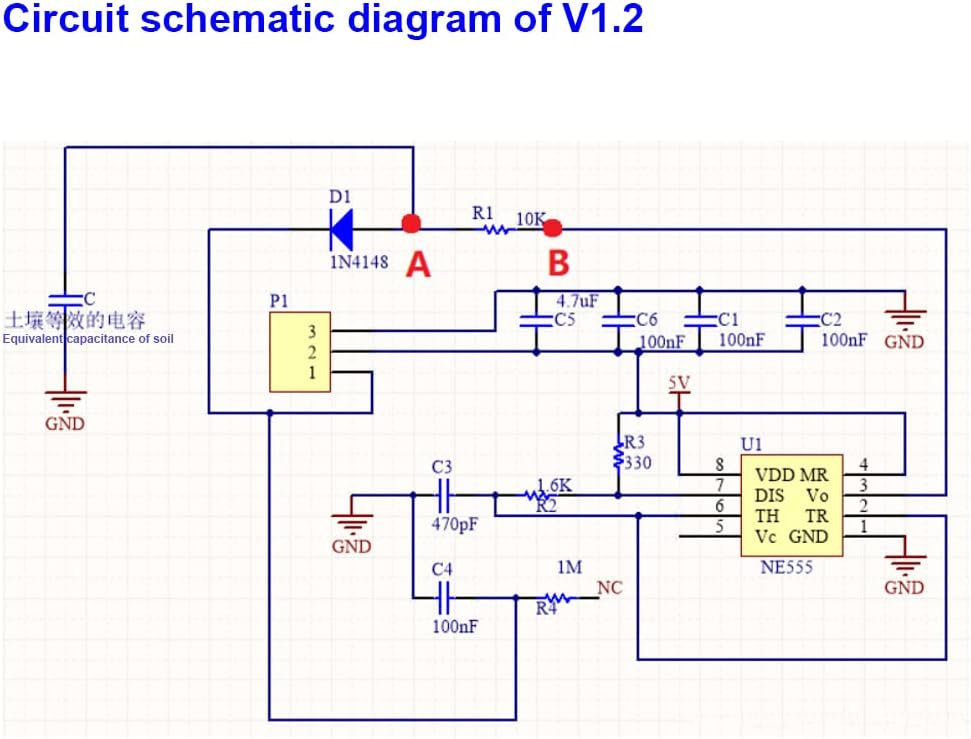
Image 7.1: Circuit schematic diagram for the V1.2 Capacitive Analog Soil Moisture Sensor, showing internal components and connections.
8. Záruka a podpora
Stemedu products are designed for reliability and performance. For specific warranty information, please refer to the product packaging or contact your retailer. For technical support, inquiries, or assistance with your Capacitive Analog Soil Moisture Sensor Module, please visit the official Stemedu webnebo kontaktujte jejich oddělení zákaznických služeb.
Online zdroje: