
1. Úvod
This manual provides essential information for the safe and effective operation of your HITBOX HBT2000 PRO Multi-Process Welder. This versatile machine supports TIG, Cold TIG, Pulse TIG, and MMA/ARC welding, offering a comprehensive solution for various welding applications. Please read this manual thoroughly before use and keep it for future reference.

Image: The HITBOX HBT2000 PRO welder, highlighting its TIG, Cold TIG, Pulse TIG, and ARC/MMA capabilities, along with 100V/200V compatibility.
2. Bezpečnostní informace
Welding can be dangerous. Always follow safety precautions to prevent injury or damage. This section outlines general safety guidelines. Refer to local regulations and safety standards for comprehensive information.
- Elektrický šok: Může usmrcovat. Zajistěte řádné uzemnění. Nedotýkejte se elektrických částí pod napětím. Používejte suché svářečské rukavice a ochranný oděv.
- Výpary a plyny: Může být nebezpečné pro vaše zdraví. Chraňte hlavu před výpary. Používejte dostatečné větrání nebo odsávání v místě oblouku.
- Obloukové paprsky: Může poranit oči a popálit kůži. Používejte svářečskou kuklu s vhodným ochranným filtrem. Noste ochranný oděv k zakrytí veškeré odkryté kůže.
- Požár a výbuch: Jiskry při svařování mohou způsobit požár nebo výbuch. Udržujte hořlavé materiály mimo dosah svařovacího prostoru. Mějte po ruce hasicí přístroj.
- Horké díly: Může způsobit těžké popáleniny. Nedotýkejte se horkých částí holýma rukama. Před manipulací nechte zařízení vychladnout.
3. Vlastnosti produktu
The HITBOX HBT2000 PRO is a versatile welding machine designed for various applications, offering advanced features for precision and efficiency.
- 4-in-1 Multi-functional Welder: Supports TIG, MMA (Arc Welding), Cold TIG, and Pulse TIG functions.
- Dual Voltage Compatibility (100V/200V): Automatically adjusts output based on input voltage, making it suitable for various work environments and on-site jobs.
- Cold TIG Function: Enables ultra-precision welding with shorter welding times and lower surface temperatures compared to traditional TIG. Ideal for thin plates (down to 0.1mm) with precise time control (1-900ms).
- Pulse TIG Function: Provides deep penetration by periodically varying current strength. Pulse frequency adjustable from 0.2-200Hz, suitable for clean welding of thin plates (from 0.5mm) with minimal spatter and deformation.
- Režim 2T/4T: Offers hands-free operation for continuous welding, enhancing ease of use.
- High Rated Duty Cycle: 60% rated duty cycle at maximum current for both 100V and 200V, allowing for extended continuous operation and energy efficiency.

Image: Visual representation of the three TIG welding modes available on the machine.

Image: The compact and portable design of the welder, highlighting its ease of transport.
4. Obsah balení
Verify that all items are present in the package before beginning operation:
- HITBOX HBT2000 PRO Welding Machine
- TIG Torch (4m)
- Země Clamp (2 XNUMX m)
- Electrode Holder Cable (2m)
- Plynová hadice
- Wolframové elektrody
- kleštiny
- Torch Caps
- Trysky (x3)
- Hose Bands
- 100V-200V Conversion Plug (0.3m)

Obrázek: Komplexní view of the HITBOX HBT2000 PRO welding machine and all its included accessories, such as torches, cables, and consumables.
5. Nastavení a instalace
5.1 Připojení napájení
Connect the power cable to a suitable 100V or 200V power outlet. The machine automatically detects and adjusts to the input voltage.
5.2 Electrode/Torch Connection
Ensure the machine is turned off before connecting any cables.
- For MMA/ARC Welding: Connect the electrode holder cable to the positive (+) terminal and the earth clamp na záporný (-) terminál.
- Pro TIG svařování: Připojte hořák TIG k zápornému (-) pólu a uzemňovacímu vodiči.amp ke kladné (+) svorce.
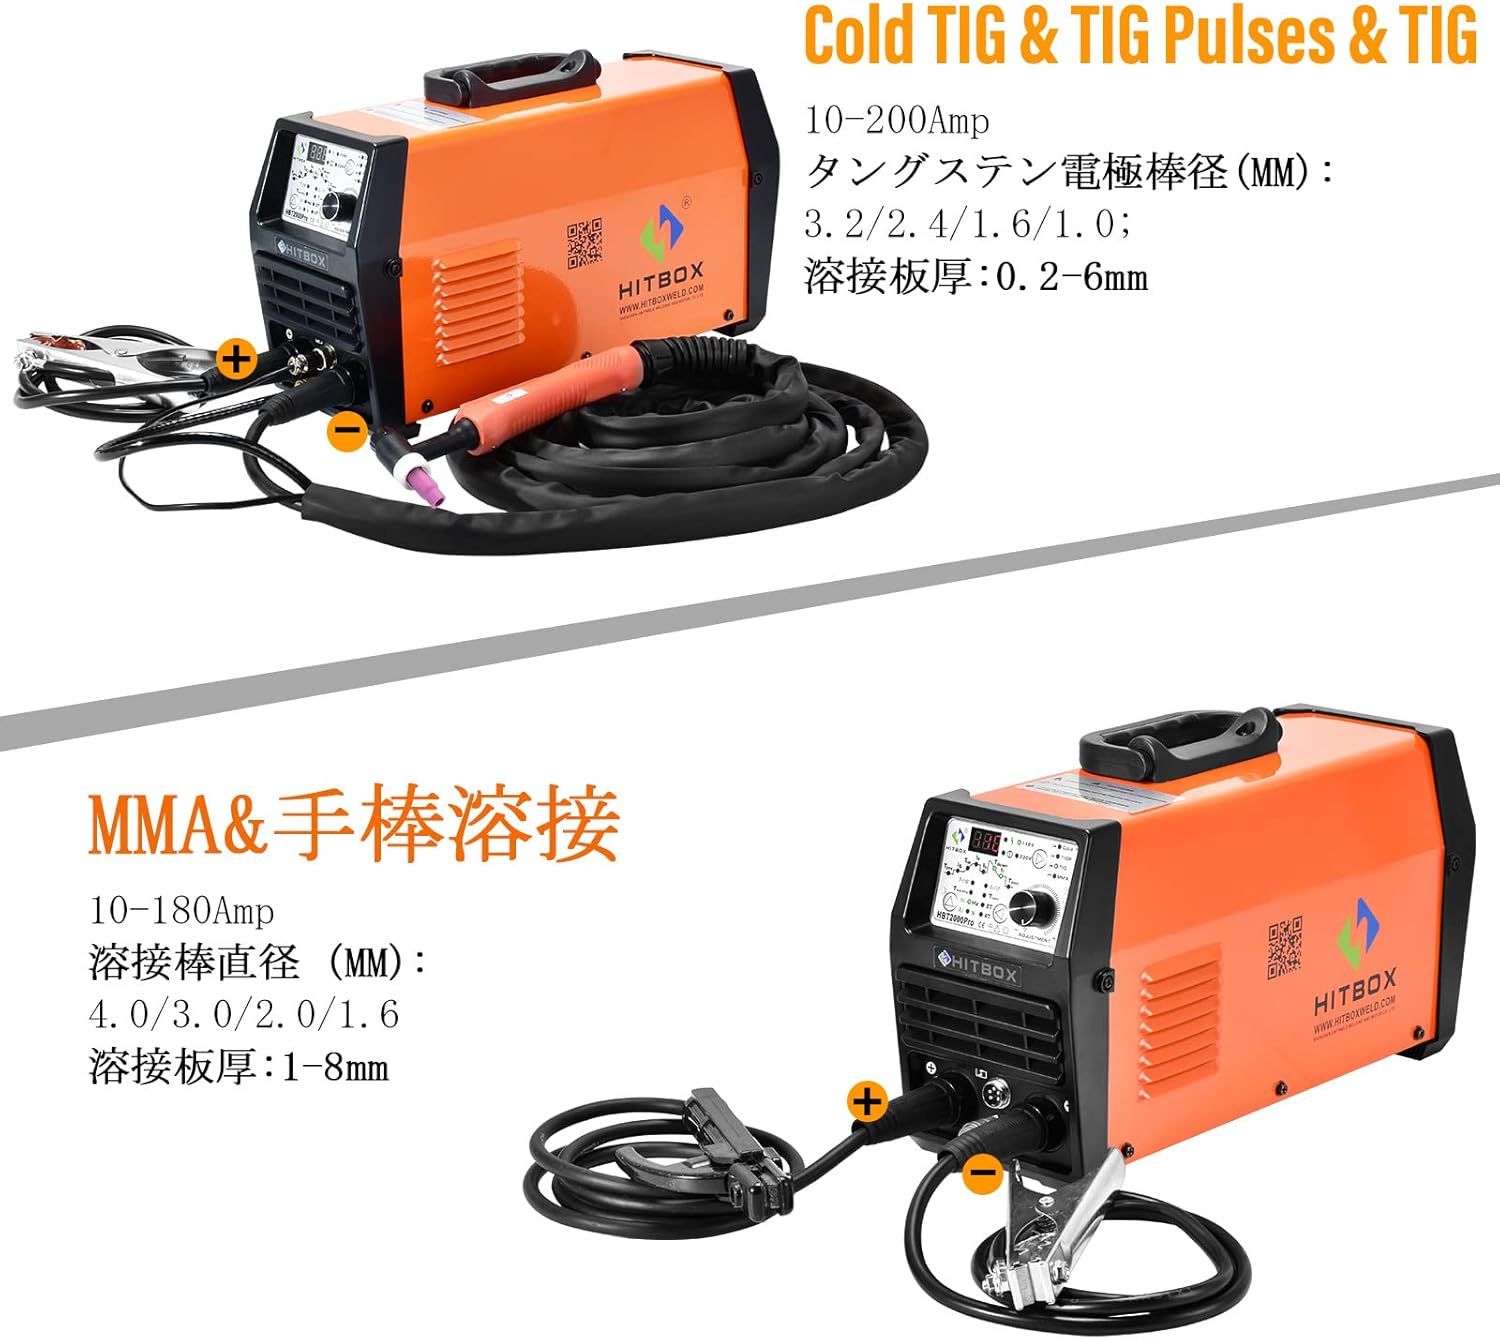
Image: A visual guide illustrating the correct cable connections for both TIG and MMA welding modes on the HITBOX HBT2000 PRO.
5.3 Wire Installation (for wire-fed welding, e.g., MIG)
If your model supports wire-fed welding (e.g., MIG), follow these steps to install the welding wire. Ensure the machine is powered off.
- Press the case button to open the cover.
- Remove the spring and washer from the center pin that holds the wire drum.
- Check the direction of the wire tip fixed in the hole of the wire reel. Ensure the wire tip faces the guide tube from the bottom side of the wire reel, as shown in the video.
- Set the wire reel and attach the snap pin.
- Loosen the tightening knob by turning it counter-clockwise, then push it forward to release the lock.
- Lift the roller presser, insert the wire into the groove of the guide roller, and push it into the tube.
- Cut off the bent tip of the wire with pliers.
- While turning the wire reel counter-clockwise, insert the wire tip into the guide tube.
- Push down the roller presser, pull up the tightening knob, and turn it clockwise to tighten.
Video: This video demonstrates the wire installation process for a HITBOX semi-automatic welding machine. It shows how to open the cover, install the wire spool, thread the wire through the guide roller, and secure it. This process is applicable for wire-fed welding modes like MIG.
5.4 Gas Connection (for TIG and Gas MIG)
For TIG welding and Gas MIG welding, a shielding gas supply is required. Connect the gas hose to the gas inlet on the back of the machine and to your gas cylinder regulator. Ensure all connections are tight to prevent gas leaks.
6. Návod k obsluze
6.1 Ovládací panel Overview
The HBT2000 PRO features an intuitive control panel for easy mode selection and parameter adjustment.
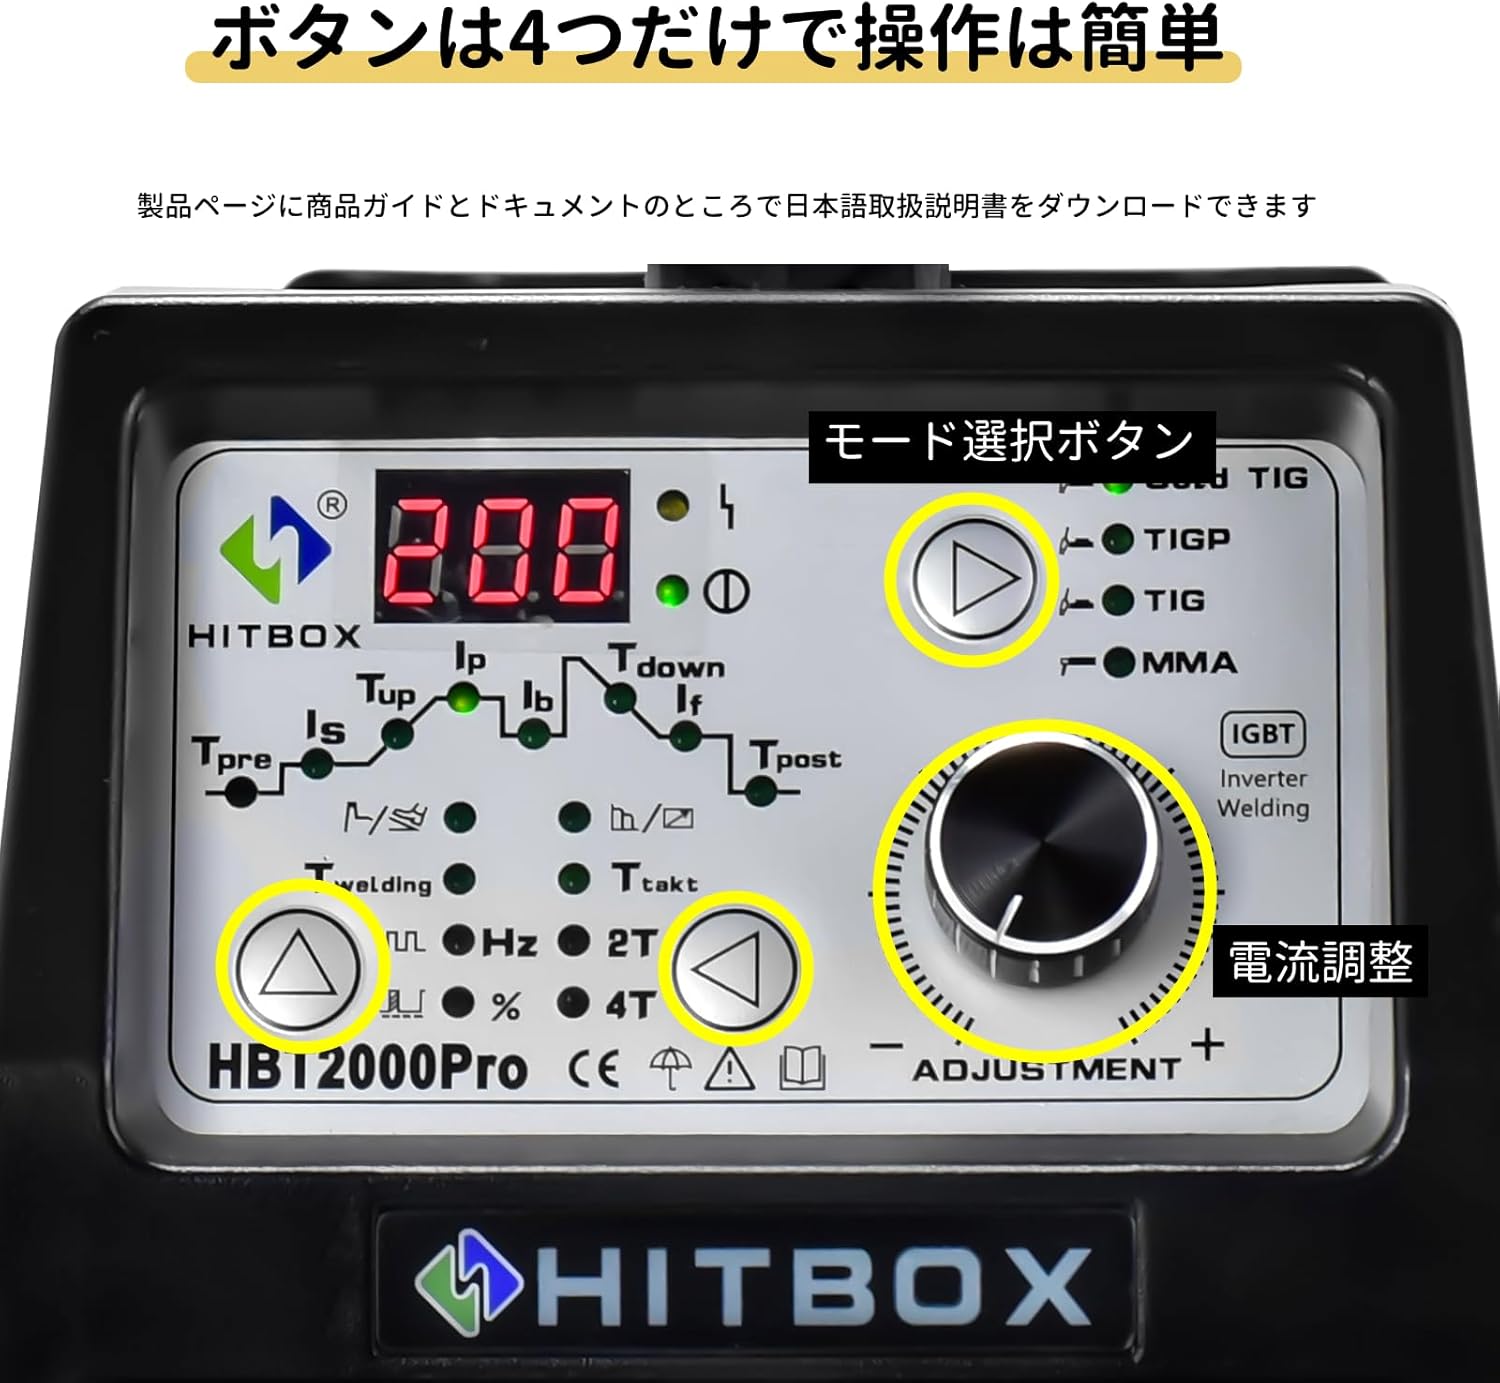
Image: Close-up of the welder's control panel, showing the digital display, mode selection button, and current adjustment knob.

Image: Demonstrates the ease of setting welding conditions via the simple control panel.

Image: A detailed diagram explaining each parameter and control on the HBT2000 PRO control panel, including pre-flow, initial current, up-slope, peak current, base current, after-flow, crater current, and post-flow settings.
6.2 MMA/ARC Welding Operation
For MMA/ARC welding, ensure the electrode holder is connected to the positive (+) terminal and the earth clamp to the negative (-) terminal. Select the MMA mode on the control panel and adjust the current as needed. Use appropriate welding rods for your material and thickness.
Video: This video demonstrates the process of Arc (MMA) welding using a HITBOX welding machine. It shows the setup and execution of a weld, highlighting the arc and molten pool.

Image: A person performing stick welding, illustrating the MMA welding function of the machine.
6.3 TIG Welding Operation (Standard, Cold, Pulse)
For TIG welding, ensure the TIG torch is connected to the negative (-) terminal and the earth clamp to the positive (+) terminal. Connect the gas hose to a suitable shielding gas supply (e.g., Argon).
- Výběr režimu: Use the mode selection button on the control panel to choose between TIG, Cold TIG, or Pulse TIG.
- Aktuální úprava: Use the current adjustment knob to set the desired welding current.
- Cold TIG Settings: For Cold TIG, you can precisely set the welding time from 1 to 900 milliseconds for ultra-precision work on thin materials.
- Pulse TIG Settings: For Pulse TIG, adjust the pulse frequency between 0.2-200Hz to control penetration and bead appearance.

Obrázek: Detailní záběr view of a clean and consistent TIG Pulse weld bead on a metal surface.

Image: The control panel displaying Cold TIG settings, emphasizing precise time control (1-900ms) and benefits like beautiful bead shapes and minimal material damage.

Image: A visual comparison of welding results, demonstrating the benefits of using pulse mode for reduced penetration and improved appearance on thin plates.
6.4 2T/4T Mode Usage
The 2T/4T mode offers flexibility in torch control:
- 2T (Two-Touch) Mode: Press and hold the torch trigger to start welding, release to stop.
- 4T (Four-Touch) Mode: Press and release the torch trigger to start welding, press and release again to stop. This mode allows for continuous welding without holding the trigger, reducing operator fatigue during long welding tasks.
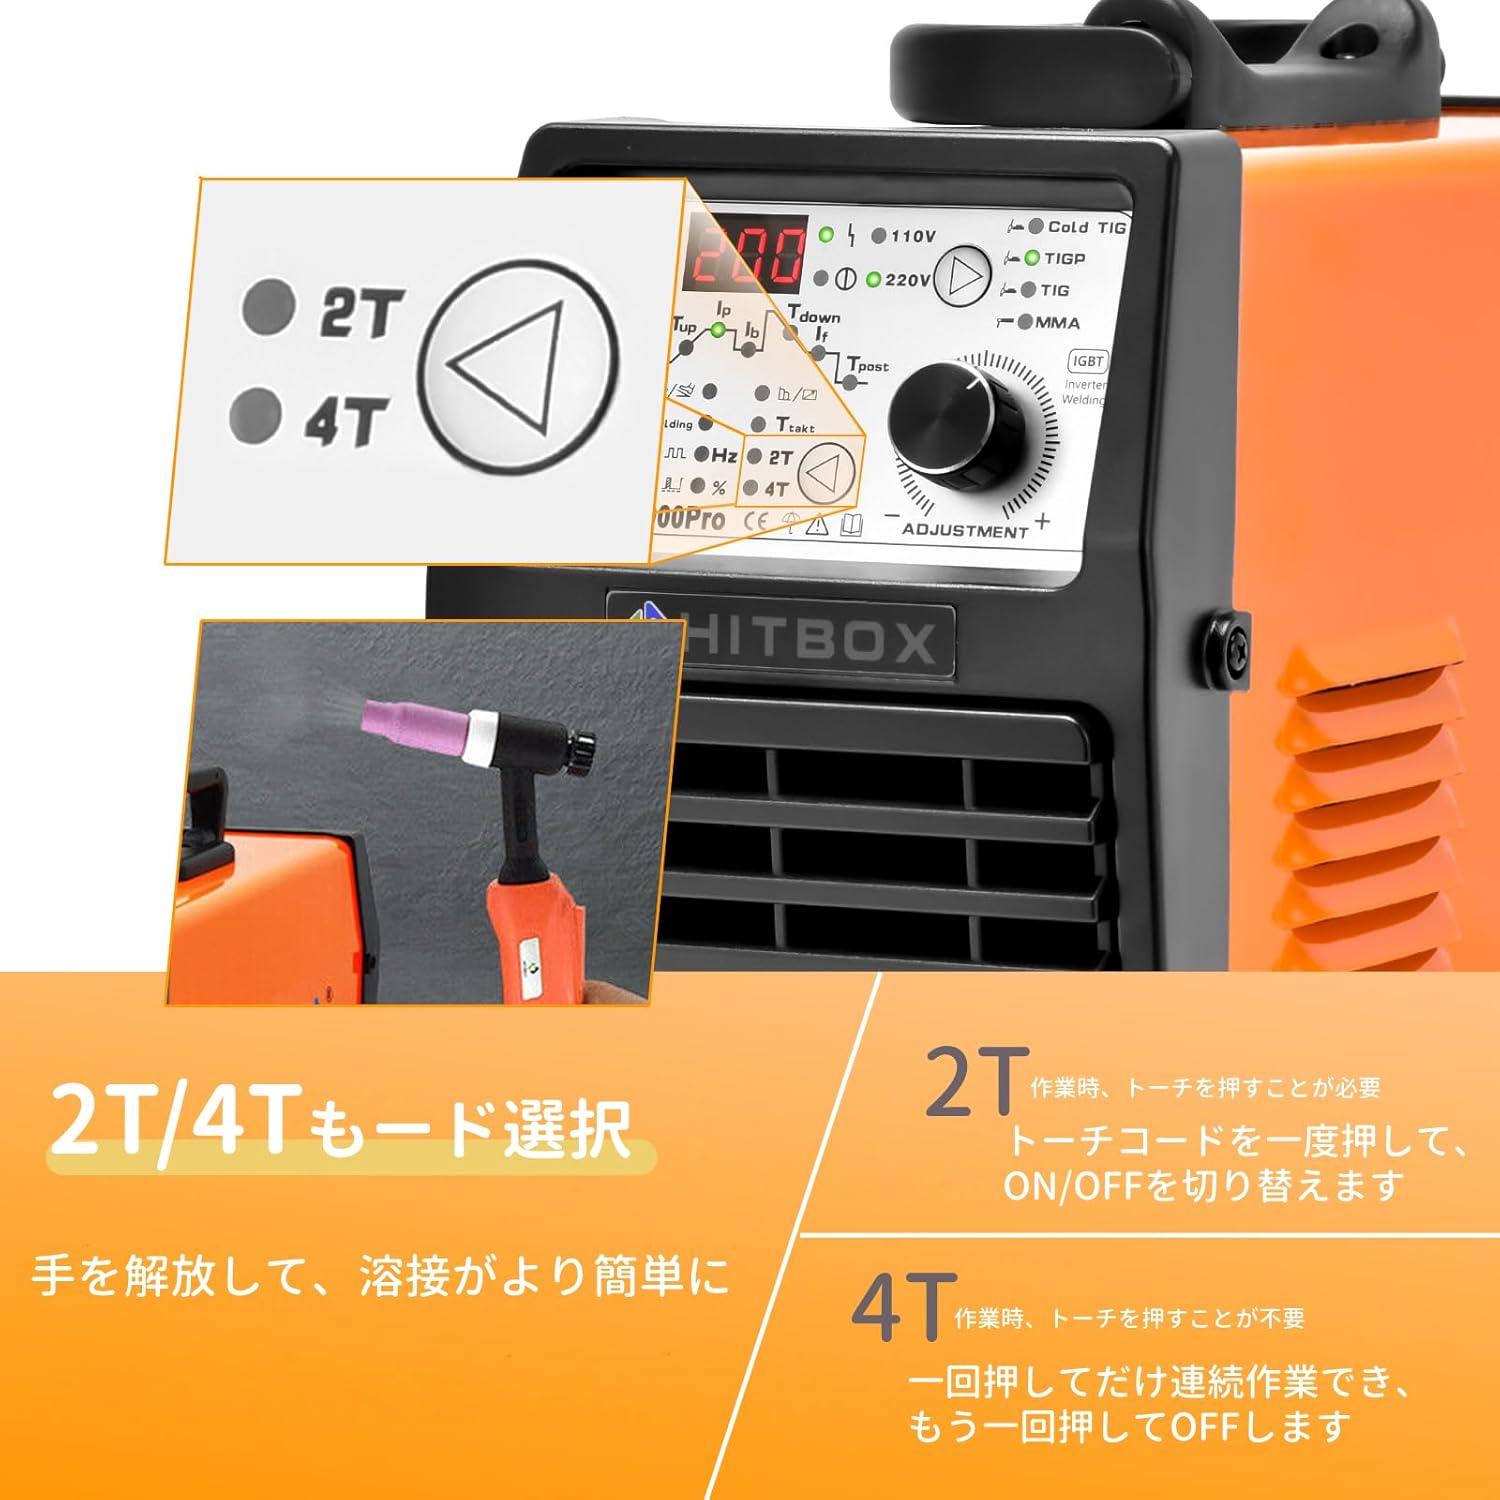
Image: The control panel displaying options for 2T and 4T welding modes, with an illustration of a hand pressing a torch trigger.
7. Údržba
Pravidelná údržba zajistí dlouhou životnost a bezpečný provoz vašeho svářecího stroje.
- Čištění: Pravidelně čistěte vnější povrch stroje suchým hadříkem. Ujistěte se, že větrací otvory jsou bez prachu a nečistot.
- Kontrola kabelů: Periodically inspect all cables (power, torch, earth clamp) for damage, cuts, or loose connections. Replace damaged cables immediately.
- Spotřební materiál: Check and replace TIG torch consumables (tungsten electrodes, collets, gas lenses, nozzles) as they wear out. For wire-fed welding, ensure the wire liner is clean and the contact tip is not worn.
- Skladování: Svářečku skladujte v suchém a čistém prostředí mimo dosah přímého slunečního záření a extrémních teplot.
8. Řešení problémů
If you encounter issues with your HITBOX HBT2000 PRO, refer to the following common problems and solutions:
- Bez napájení: Check the power cable connection, ensure the power switch is ON, and verify the power outlet is functional.
- Žádný oblouk: Ensure all cables are securely connected. Check the electrode/tungsten for proper installation and condition. Verify correct mode selection and current settings. For TIG, ensure gas flow.
- Špatná kvalita svaru: Adjust current, voltage, and wire speed (if applicable) according to material and thickness. Ensure proper shielding gas flow (for TIG/Gas MIG). Clean the workpiece thoroughly.
- Přehřívání: If the overload indicator lights up, the machine may be overheating. Allow it to cool down. Ensure proper ventilation and check the duty cycle.
V případě přetrvávajících problémů kontaktujte zákaznickou podporu.
9. Specifikace
| Atribut | Hodnota |
|---|---|
| Značka | HITBOX |
| Model | HBT2000 PRO |
| Vstupní objemtage | 100V/200V (Auto-sensing) |
| Max. Proud | 200A |
| Jmenovitý pracovní cyklus | 60 % |
| Applicable ARC Welding Rod | 1.6-4.0MM |
| Weldable Plate Thickness (MMA) | 1-8MM |
| Applicable Tungsten Electrode Diameter | 1.0-3.2MM |
| Cold TIG Welding Time Setting | 1-900MS |
| Pulse TIG Frequency Adjustment | 0.2-200Hz |
| Velikost balení | 46.9 x 37.1 x 18.5 cm |
| Hmotnost položky | 9 kg |
| ASIN | B0BN3CXL2L |
| První dostupný termín | 2022. 11. 21 |
10. Záruka a podpora
Your HITBOX HBT2000 PRO welding machine comes with a 2-letá záruka from the date of purchase. If you experience any issues with the product, please do not hesitate to contact our customer support. We are committed to providing responsible assistance and ensuring your satisfaction.
For support, please refer to the contact information provided with your purchase or visit the official HITBOX webmísto.