
1. Úvod
This user manual provides detailed instructions for the installation, operation, and maintenance of your LEDLUX LL0253B Wi-Fi Smart Thermostat. This programmable thermostat is designed for gas boilers and water radiator heating systems, offering smart control via Wi-Fi applications and compatibility with Amazon Alexa and Google Home. Please read this manual thoroughly before installation and use to ensure proper function and safety.
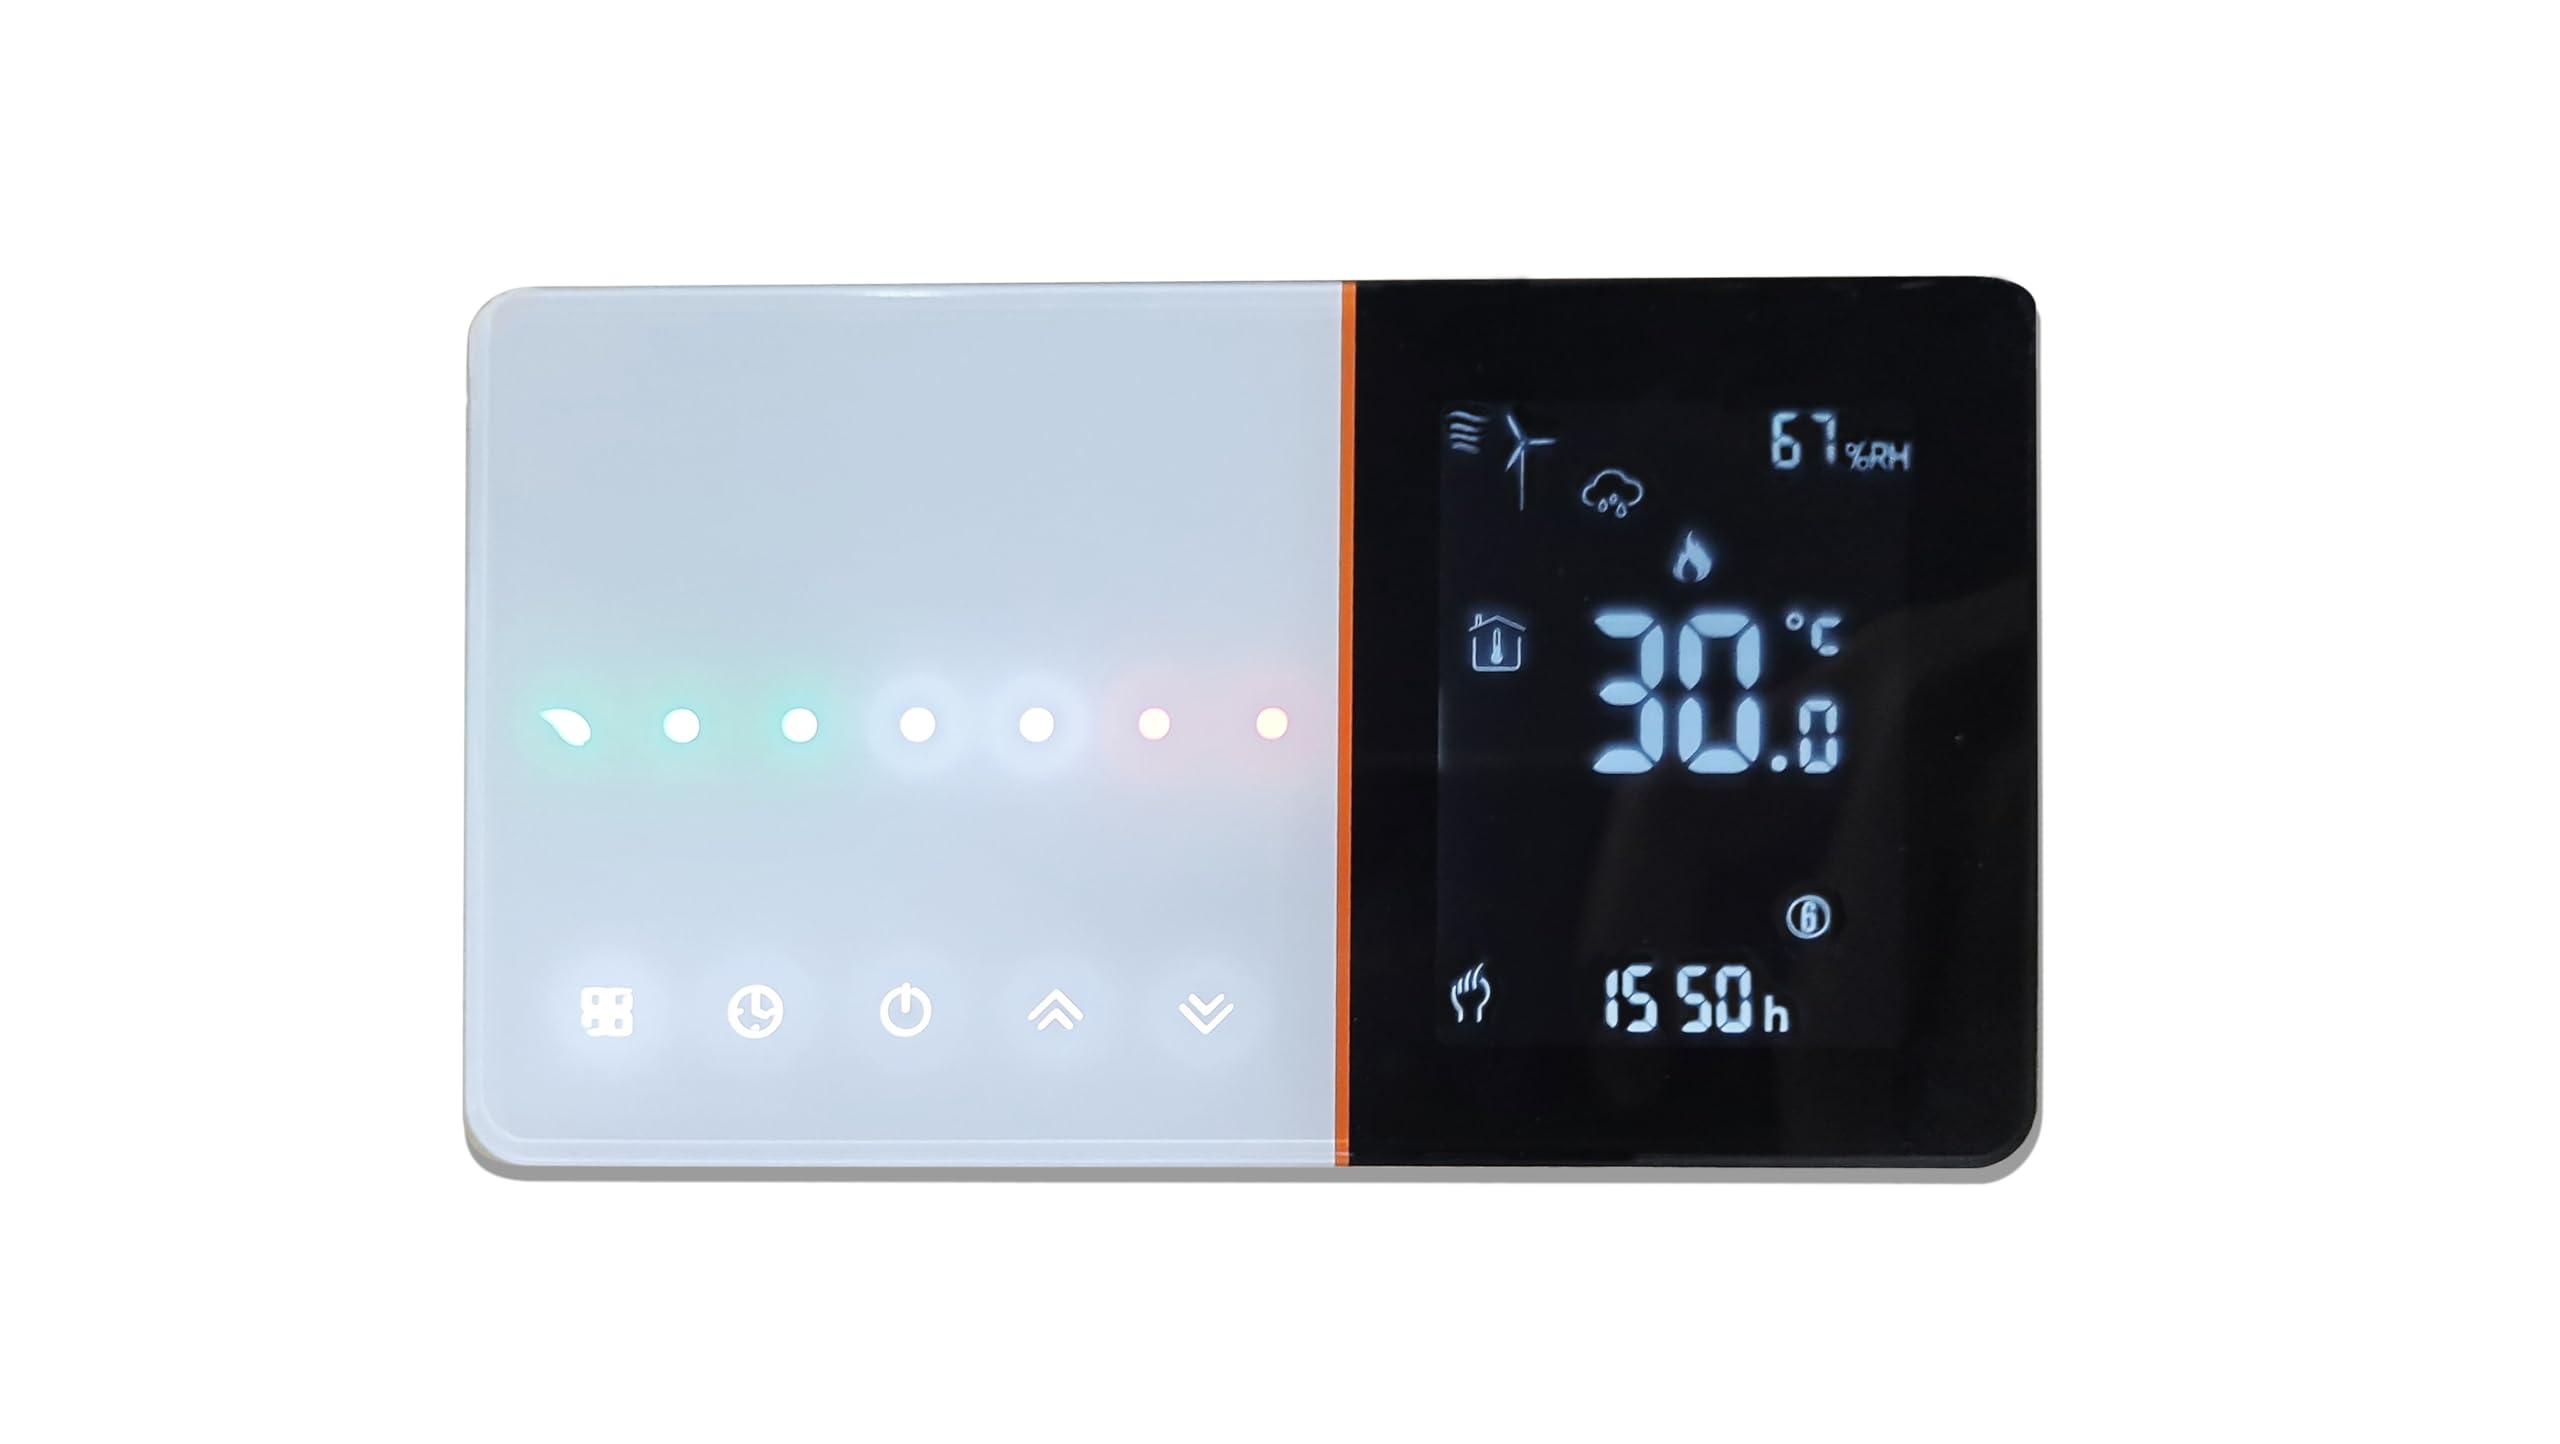
Figure 1: LEDLUX LL0253B Wi-Fi Smart Thermostat system overview.
2. Bezpečnostní informace
VAROVÁNÍ: Electrical installation should only be performed by a qualified electrician. Always disconnect power at the main circuit breaker before installing or servicing the thermostat to prevent electrical shock.
- Ensure the power supply is 220V AC.
- Nevystavujte termostat vodě ani nadměrné vlhkosti.
- Nepokoušejte se jednotku rozebírat ani opravovat sami. Pro servis se obraťte na kvalifikovaný personál.
- Uchovávejte mimo dosah dětí.
3. Obsah balení
Ověřte, zda jsou v balení přítomny všechny položky:
- LEDLUX LL0253B Wi-Fi Smart Thermostat Unit
- Montážní šrouby (obvykle součástí balení)
- Uživatelská příručka (tento dokument)
4. Konec produktuview
The LEDLUX LL0253B features an LCD touch screen for easy interaction and a sleek design. It supports various heating modes and programmable schedules.

Figure 2: Thermostat display elements and dimensions (131mm x 75mm x 23.9mm).

Figure 3: LCD display and soft touch interface.
5. Nastavení a instalace
The thermostat is designed for installation in a standard European 503 flush-mounted box.
5.1 Demontáž
- Odpojit napájení: Before starting, ensure the main electrical power to the heating system is turned off at the circuit breaker.
- Separate Front Panel: Locate the two small slots on the lower part of the thermostat, just below the screen. Carefully insert a flat screwdriver into these slots and gently pry to separate the front panel from the back mounting plate.
5.2 Montáž
- Prepare Mounting Box: If replacing an existing thermostat, remove it and its mounting plate. The LEDLUX LL0253B is compatible with standard 503 flush-mounted boxes.
- Trasa kabelů: Pass the electrical cables through the central opening of the thermostat's back mounting plate.
- Bezpečná montážní deska: Attach the back mounting plate to the 503 box using the provided screws.
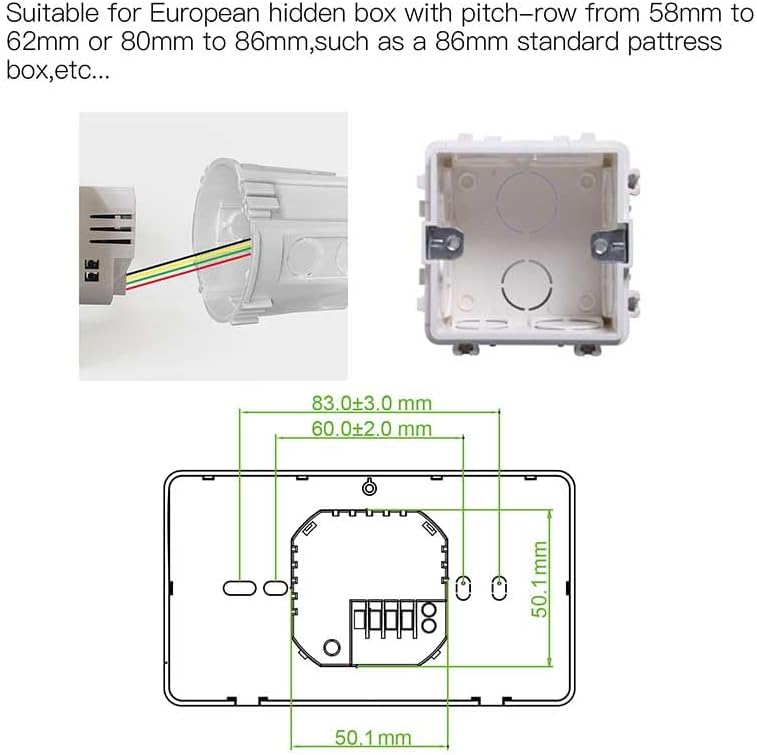
Figure 4: Thermostat back plate and compatible 503 box.
5.3 Zapojení
Connect the electrical cables to the terminal block on the back mounting plate as follows. Ensure power is still disconnected.
- L (živě): Connect the phase cable (typically brown or black).
- N (neutrální): Connect the neutral cable (typically blue).
- COM (běžné): Connect one of the two boiler control cables (often red).
- NO (Normally Open) / NC (Normally Closed): Connect the remaining boiler control cable to either NO or NC, depending on your boiler system. For most gas boilers, ŽÁDNÝ is the correct terminal. Consult your boiler's manual if unsure.

Figure 5: Wiring terminals on the thermostat back plate.
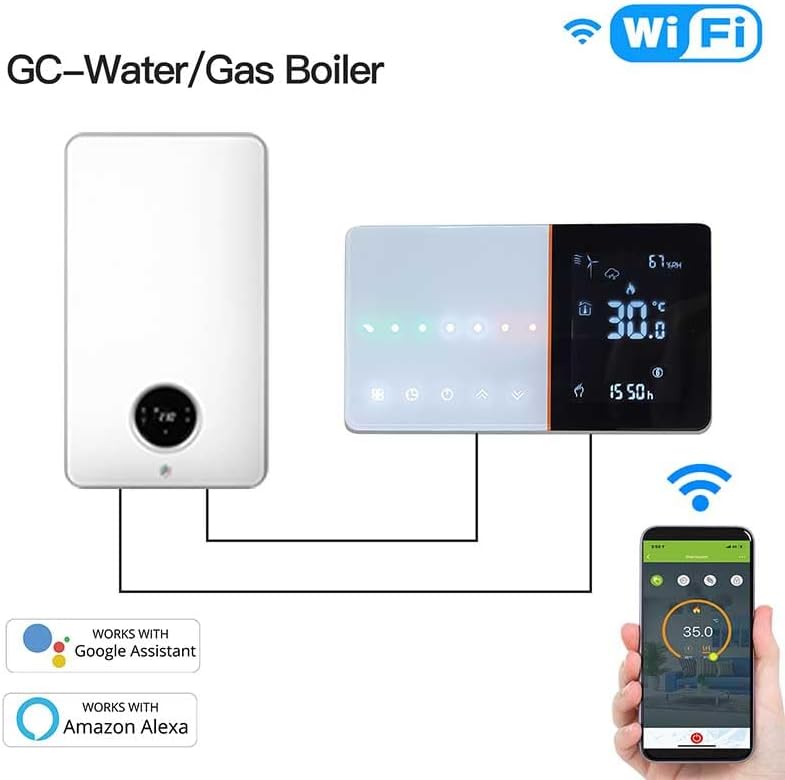
Figure 6: Connection diagram for gas boiler.
5.4 Reassembly & Power On
- Připevněte přední panel: Align the top tabs of the front panel with the slots on the mounting plate, then gently press the lower part until it clicks into place.
- Obnovit napájení: Turn the main electrical power back on at the circuit breaker. The thermostat should power on and be ready for operation.
6. Návod k obsluze
6.1 Základní obsluha
- Zapnutí/vypnutí: Touch the power button (typically the third button from the left) to turn the thermostat completely on or off.
- Nastavit čas: Press and hold the clock button to adjust the current time.
- Nastavení teploty: Use the up and down arrow buttons to manually adjust the desired temperature.
- Výběr režimu: Briefly touch the second button (with the 9-square matrix icon) to switch between manual mode (indicated by a hand icon) and programmed automatic mode.
6.2 Týdenní programování
The thermostat supports 5+1+1 day programming with up to 6 distinct periods per day, allowing for flexible temperature control to maximize comfort and energy savings. To modify the programming, press and hold the second button (9-square matrix icon).

Obrázek 7: Přample of weekly programmable schedule via app.
6.3 Wi-Fi Connection (Tuya / Smart Life App)
To control your thermostat remotely, connect it to your home Wi-Fi network using the Tuya or Smart Life application.
- Stáhnout aplikaci: Stáhněte si a nainstalujte aplikaci „Tuya Smart“ nebo „Smart Life“ z obchodu s aplikacemi ve vašem chytrém telefonu.
- Registrace/Přihlášení: Vytvořte si účet nebo se přihlaste ke svému stávajícímu účtu.
- Přidat zařízení: In the app, tap the '+' icon in the upper right corner to add a new device.
- Vyberte typ zařízení: Choose 'Small Appliance' then scroll to find 'WIFI Thermostat'.
- Postupujte podle pokynů aplikace: The app will guide you through the connection process. When prompted about a flashing LED, proceed as if it is flashing quickly. The thermostat is ready for Wi-Fi connection as soon as it is powered on.
- Požadavky na Wi-Fi: The thermostat requires a Síť Wi-Fi 2.4 GHzNení kompatibilní se sítěmi 5 GHz.

Figure 8: Clear app interface display for thermostat control.
6.4 Smart Home Integration (Amazon Alexa / Google Home)
After successfully connecting your thermostat to the Tuya Smart or Smart Life app, you can integrate it with Amazon Alexa or Google Home for voice control.
- Povolit dovednost: Open your Amazon Alexa or Google Home app. Go to the 'Skills & Games' (Alexa) or 'Works with Google' (Google Home) section and enable the 'Tuya Smart' or 'Smart Life' skill.
- Propojit účty: Follow the prompts to link your Tuya/Smart Life account with your Alexa/Google Home account.
- Objevte zařízení: Ask Alexa or Google Home to discover new devices, or initiate device discovery within their respective apps.
- Hlasové příkazy: Jakmile je objeveno, můžete používat hlasové příkazy, jako například:
- "Alexa, turn on [Thermostat Name]"
- "Google, set [Thermostat Name] to 21 degrees"
- „Alexo, jaká je teplota [název termostatu]?“
7. Údržba
- Čištění: Otřete obrazovku a tělo termostatu měkkým, suchým hadříkem. Nepoužívejte abrazivní čisticí prostředky ani rozpouštědla.
- Žádné díly opravitelné uživatelem: The thermostat contains no user-serviceable parts. Do not attempt to open the unit.
8. Řešení problémů
- Thermostat does not power on: Ensure the 220V power supply is connected correctly and the circuit breaker is on. Recheck wiring connections (L, N).
- Topný systém nereaguje: Verify wiring to COM and NO/NC terminals. Ensure the thermostat is in heating mode and the set temperature is above the current room temperature.
- Wi-Fi connection fails: Ensure your router is broadcasting a 2.4GHz Wi-Fi signal. The thermostat is not compatible with 5GHz networks. If using a Vodafone modem, you may need to open specific ports on your router for connectivity.
- Ovládání aplikací nefunguje: Check your Wi-Fi connection. Ensure the thermostat is online in the Tuya/Smart Life app.
- Alexa/Google Home not responding: Confirm that the Tuya/Smart Life skill is enabled and accounts are linked correctly in the Alexa/Google Home app. Ensure device discovery has been run.
- Settings not saving after power cut: The thermostat is designed to retain personalized settings in case of power failure. If settings are lost, ensure the unit is receiving stable power and contact support if the issue persists.
9. Specifikace
| Funkce | Specifikace |
|---|---|
| Značka | LEDLUX |
| Číslo modelu | LL0253B |
| Barva | Černý |
| Rozměry (D x Š x V) | 12.9 x 8.9 x 2.4 cm |
| svtage | 220 voltů |
| Materiál | Akrylonitrilbutadienstyren (ABS) |
| Technologie připojení | Wi-Fi (pouze 2.4 GHz) |
| Typ řízení teploty | Programovatelné |
| Typ ovladače | Asistent Google, Amazon Alexa |
| Zdroj napájení | Kabelové elektrické |
10. Záruka a podpora
Informace o záruce a technickou podporu naleznete na obalu produktu nebo se obraťte na prodejce. Uschovejte si účtenku jako doklad o koupi.