
1. Úvod
This manual provides detailed instructions for the safe and effective use of your COSMOING Red Laser Light Combo MGL-033SR. This device integrates a high-output LED flashlight with a red laser sight, designed for compatibility with Picatinny rail mounts. It features magnetic charging and a durable aluminum construction.
Obsah balení:
- 1x Laser Flashlight (with built-in rechargeable battery)
- Kabel nabíjení 1x USB
- 1x imbusový klíč
- 1x Návod k použití
2. Bezpečnostní informace
VAROVÁNÍ: Před použitím tohoto výrobku si přečtěte všechna bezpečnostní varování a pokyny. Nedodržení varování a pokynů může vést k vážnému zranění.
Bezpečnost laseru:
- This product contains a Class IIIA laser with an output of <5mW and a wavelength of 650nm (red).
- NE dívejte se přímo do laserového paprsku.
- NE point the laser at people or animals.
- Zabraňte přímému vystavení očí laserovému paprsku.
- Ensure the laser is off or covered when not in use.
Bezpečnost baterie:
- The device contains a built-in rechargeable Lithium Manganese Dioxide battery.
- Používejte pouze dodaný nabíjecí kabel USB.
- NE attempt to disassemble, puncture, or modify the battery.
- Chraňte před extrémními teplotami a přímým slunečním zářením.
- Zlikvidujte baterie v souladu s místními předpisy.
3. Konec produktuview
Familiarize yourself with the components and controls of your laser light combo.

Obrázek 3.1: Přední strana view with labeled components including Flashlight Slide Switch, Laser Switch, USB Charging, and Charging Indicator.
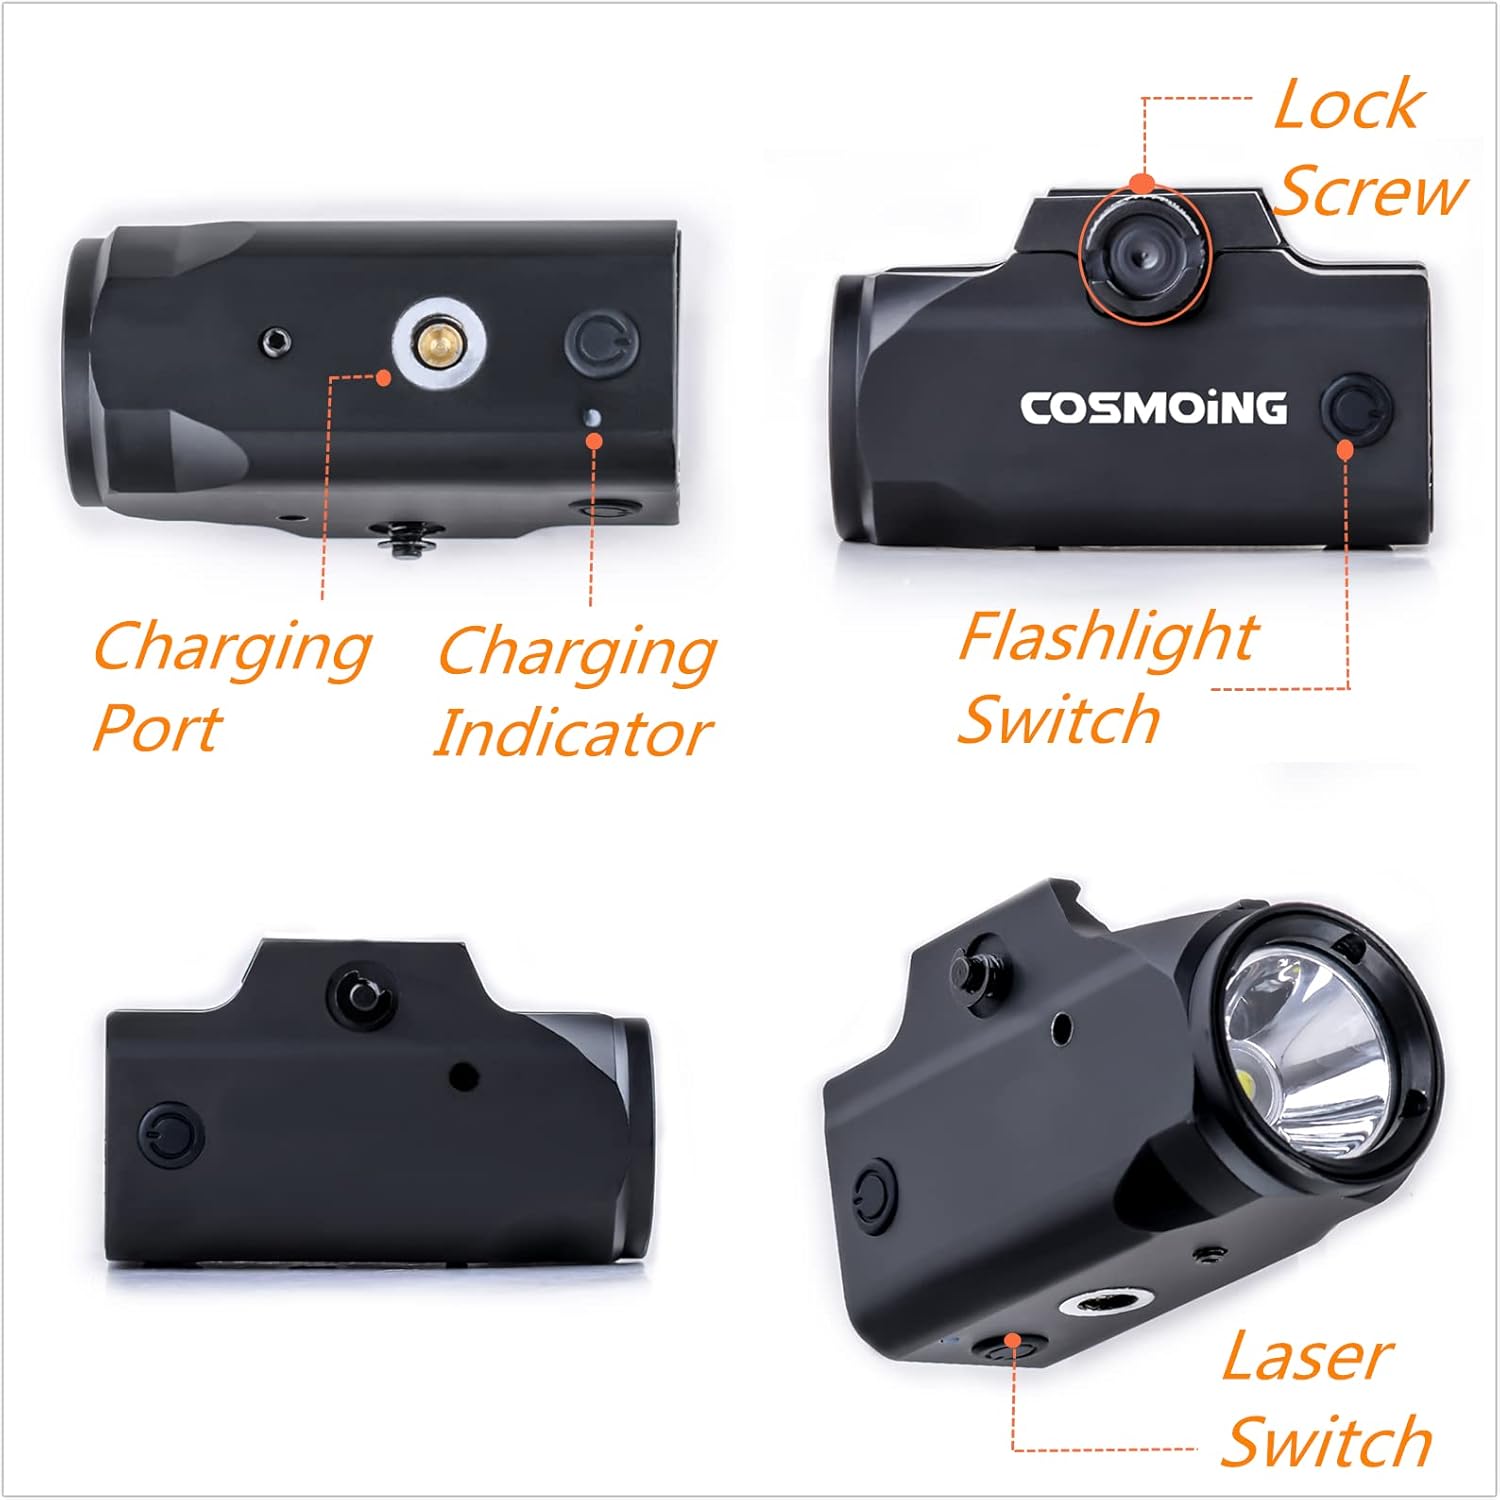
Obrázek 3.2: Vícenásobné views highlighting the Charging Port, Charging Indicator, Lock Screw, Flashlight Switch, and Laser Switch.
Klíčové komponenty:
- Svítilna: High-output LED (900 Lumens).
- Laser: Red laser sight (Class IIIA, <5mW, 650nm).
- Přepínač svítilny: Activates flashlight modes (steady/strobe).
- Laserový spínač: Activates the red laser.
- Nabíjecí port: Magnetic USB port for recharging.
- Indikátor nabíjení: Zobrazuje stav nabíjení.
- Lock Screw: Secures the device to the rail.
- Windage/Elevation Adjustment Screws: Used for laser calibration (located on the side/bottom, accessible with Allen wrench).
4. Nastavení
4.1 Nabíjení zařízení
- Vyhledejte magnetický nabíjecí port na zařízení.
- Connect the provided USB charging cable to the magnetic port.
- Connect the other end of the USB cable to a standard USB power source (e.g., wall adapter, computer USB port).
- The charging indicator light will illuminate to show charging status. Once fully charged, the indicator light will change (refer to indicator behavior in specifications).
4.2 Mounting to a Picatinny Rail
This device is designed for standard 21mm Picatinny or Weaver rails. Ensure your rail space from slot to guard is less than 1.18 inches for proper fitment.

Figure 4.1: Rail compatibility guide. Ensure your rail meets the specified dimensions.
- Loosen the lock screw on the side of the laser light combo.
- Align the device's rail clamp with the Picatinny rail on your firearm.
- Slide the device onto the rail until it is in the desired position.
- Tighten the lock screw firmly to secure the device to the rail. Do not overtighten.
5. Návod k obsluze
5.1 Provoz svítilny
The flashlight features steady and strobe modes.
- Stiskněte tlačítko Přepínač svítilny once for steady light mode.
- Stiskněte tlačítko Přepínač svítilny again to cycle to strobe mode.
- Stiskněte tlačítko Přepínač svítilny a third time to turn off the flashlight.

Figure 5.1: The 900 lumen flashlight in operation, mounted on a pistol.
5.2 Provoz laseru
- Stiskněte tlačítko Laserový spínač once to turn on the red laser.
- Stiskněte tlačítko Laserový spínač again to turn off the red laser.
5.3 Adjusting Windage and Elevation
The red laser can be adjusted for both windage (horizontal) and elevation (vertical) to zero-in with your firearm's point of impact.
- Using the provided Allen wrench, locate the small adjustment screws on the device. Typically, one screw controls windage and the other controls elevation.
- Turn the screws incrementally to move the laser dot.
- Nastavení větru: Turning the screw clockwise or counter-clockwise will move the laser dot left or right.
- Nastavení výšky: Turning the screw clockwise or counter-clockwise will move the laser dot up or down.
- Perform adjustments carefully and test after each adjustment until the laser is accurately aligned. The precise positioning ensures the laser will not loosen after calibration.
6. Údržba
6.1 Čištění
- Před čištěním se ujistěte, že je zařízení vypnuté.
- Vnější povrch zařízení otřete měkkým, suchým hadříkem.
- Pro čištění čočky a laserové clony použijte hadřík na čištění čoček nebo vatový tampon s malým množstvím čisticího roztoku na čočky. Nepoužívejte abrazivní materiály.
- NE immerse the device in water or use harsh chemicals.
6.2 Péče o baterii a její skladování
- Recharge the battery regularly, even if the device is not frequently used, to maintain battery health.
- Před nabíjením se vyhněte úplnému vybití baterie.
- Přístroj skladujte na chladném a suchém místě mimo dosah přímého slunečního záření a extrémních teplot.
- Pokud baterii skladujete delší dobu, ujistěte se, že je částečně nabitá (kolem 50 %), abyste prodloužili její životnost.
7. Řešení problémů
Běžné problémy a řešení:
- Zařízení se nezapne:
- Ensure the battery is fully charged. Connect to the USB charger and check the charging indicator.
- Verify that the switches are being pressed correctly.
- Flashlight is dim or laser is weak:
- Baterie může být vybitá. Dobijte zařízení.
- Check for any obstructions on the flashlight lens or laser aperture and clean if necessary.
- Laser dot is not stable or moves after adjustment:
- Ensure the device is securely mounted to the Picatinny rail and the lock screw is tightened.
- Re-adjust windage and elevation carefully.
- Zařízení se nenabíjí:
- Check if the USB cable is properly connected to both the device and the power source.
- Zkuste jiný zdroj napájení USB nebo kabel.
- Ensure the magnetic connection is clean and free of debris.
8. Specifikace

Figure 8.1: Key performance specifications and dimensions of the device.
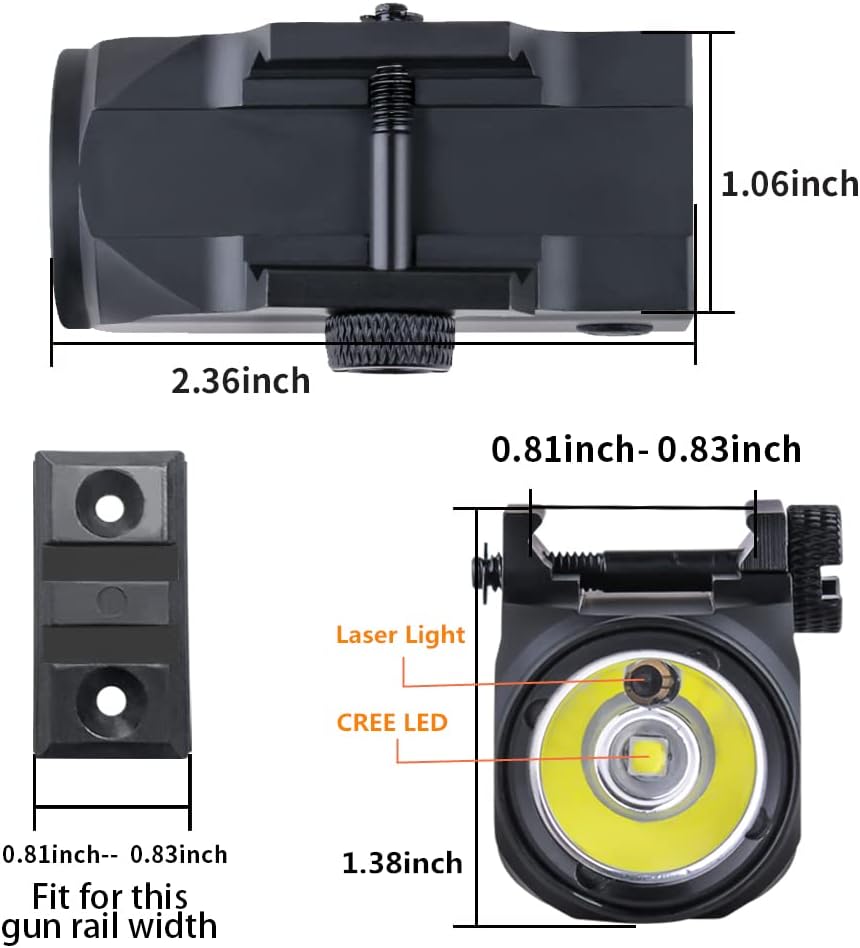
Figure 8.2: Detailed dimensions including length, height, and rail width.
| Funkce | Specifikace |
|---|---|
| Číslo modelu | MGL-033SR |
| Light Output (Flashlight) | 900 lumenů (max.) |
| Typ světelného zdroje | LED (XML2-U3) |
| Typ laseru | Red Laser, Class IIIA, <5mW, 650nm |
| Vzdálenost paprsku | Až 500 metrů |
| Doba běhu | Approximately 1 hour 30 minutes (90 minutes) |
| Zdroj napájení | Built-in Rechargeable Lithium Manganese Dioxide Battery |
| Způsob nabíjení | Magnetické nabíjení přes USB |
| Materiál | Eloxovaný letecký hliník |
| Typ montáže | Picatinny Mount |
| Kompatibilita | Picatinny rails with slot to guard space < 1.18 inches |
| Hmotnost | 0.19 lb (including batteries) |
| Délka | 2.36 palců |
| Průměr hlavy | 1.06 palců |
9. Záruka a podpora
For warranty information or technical support, please contact COSMOING customer service through the retailer where the product was purchased or visit the official COSMOING website. Please have your model number (MGL-033SR) and purchase details available when contacting support.