
Zavedení
This document provides comprehensive instructions for assembling and operating your DAOKAI 4-Bit Digital Electronic Clock DIY Kit. This kit is designed for electronics enthusiasts and those looking to practice soldering skills while building a functional digital clock. Please read all instructions carefully before beginning assembly.
Důležitá poznámka: This product is a DIY kit and requires manual assembly, including soldering. Basic electronic knowledge and practical skills are necessary. If you plan to use the clock for extended periods, a DC power supply is recommended over standard AA batteries due to faster power consumption with batteries.
Vlastnosti produktu
- Zobrazení času: Shows hours and minutes.
- Nastavitelný čas: Hours and minutes can be set independently.
- Časová korekce: Includes a seconds correction function.
- Clock Speed Fine-tuning: Adjustable in 0-9 gears, with a default setting of 5.
- Duální budík: Two independent alarm settings with individual on/off switches.
- Hourly Chime: Function can be enabled or disabled.
- Odpočítávadlo: Up to 99 minutes countdown with an alarm upon completion.
- Funkce stopek: Features pause and clear options.
- Funkce čítače: Records key presses or external pulses.
- Zobrazit: Utilizes a 0.44-inch dedicated red digital tube.
- Přesnost: Error range of approximately 3 seconds per month.
- PCB Quality: Made from 1.6mm thick FR-4 sheet with clearly mapped and labeled connections.
Obsah sady
Your DAOKAI 4-Bit Digital Electronic Clock DIY Kit includes all necessary components for assembly. The kit consists of a high-quality PCB and various electronic parts that need to be soldered onto the board.
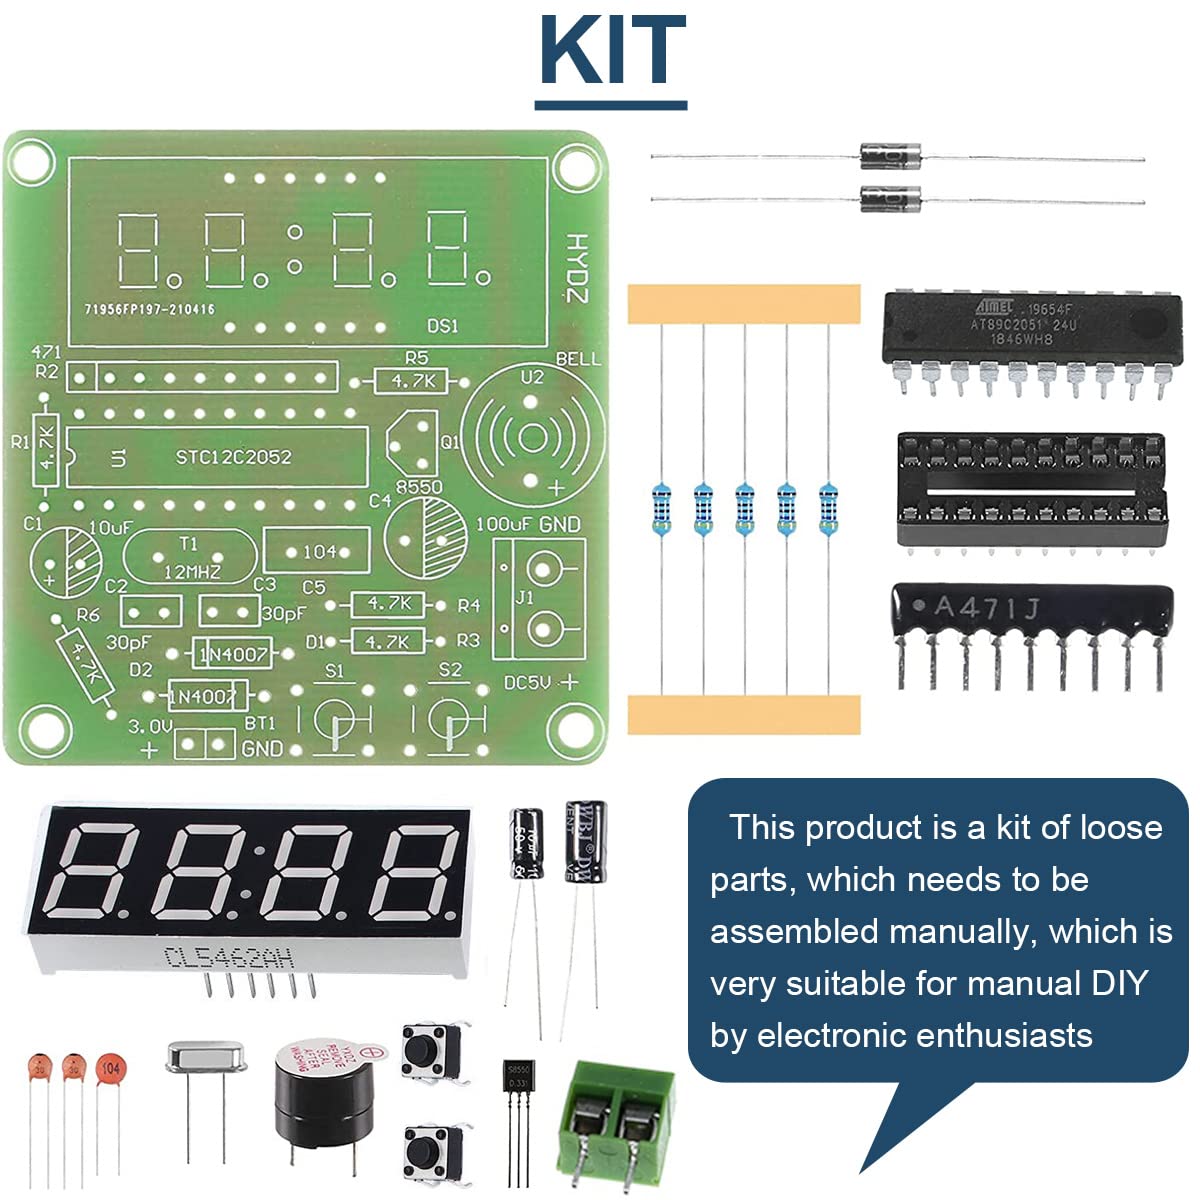
Popis: This image displays the complete set of components provided in the kit, including the main PCB, integrated circuits, resistors, capacitors, buttons, a buzzer, the 4-digit display, and other small parts. These components are designed for manual assembly and soldering.
The PCB dimensions are approximately 54 x 51 mm (2.12 x 2.01 inches).
Návod k montáži (Instalace)
Assembly of this kit requires basic soldering skills. Follow the circuit diagram and component labels on the PCB for correct placement and soldering.
1. Identifikace součásti
Before starting, familiarize yourself with all the components provided in the kit. Refer to the 'KIT' image in the previous section to identify each part.
2. Circuit Diagram Reference
The circuit diagram is essential for correct component placement and understanding the connections. Ensure you match each component to its designated spot on the PCB.
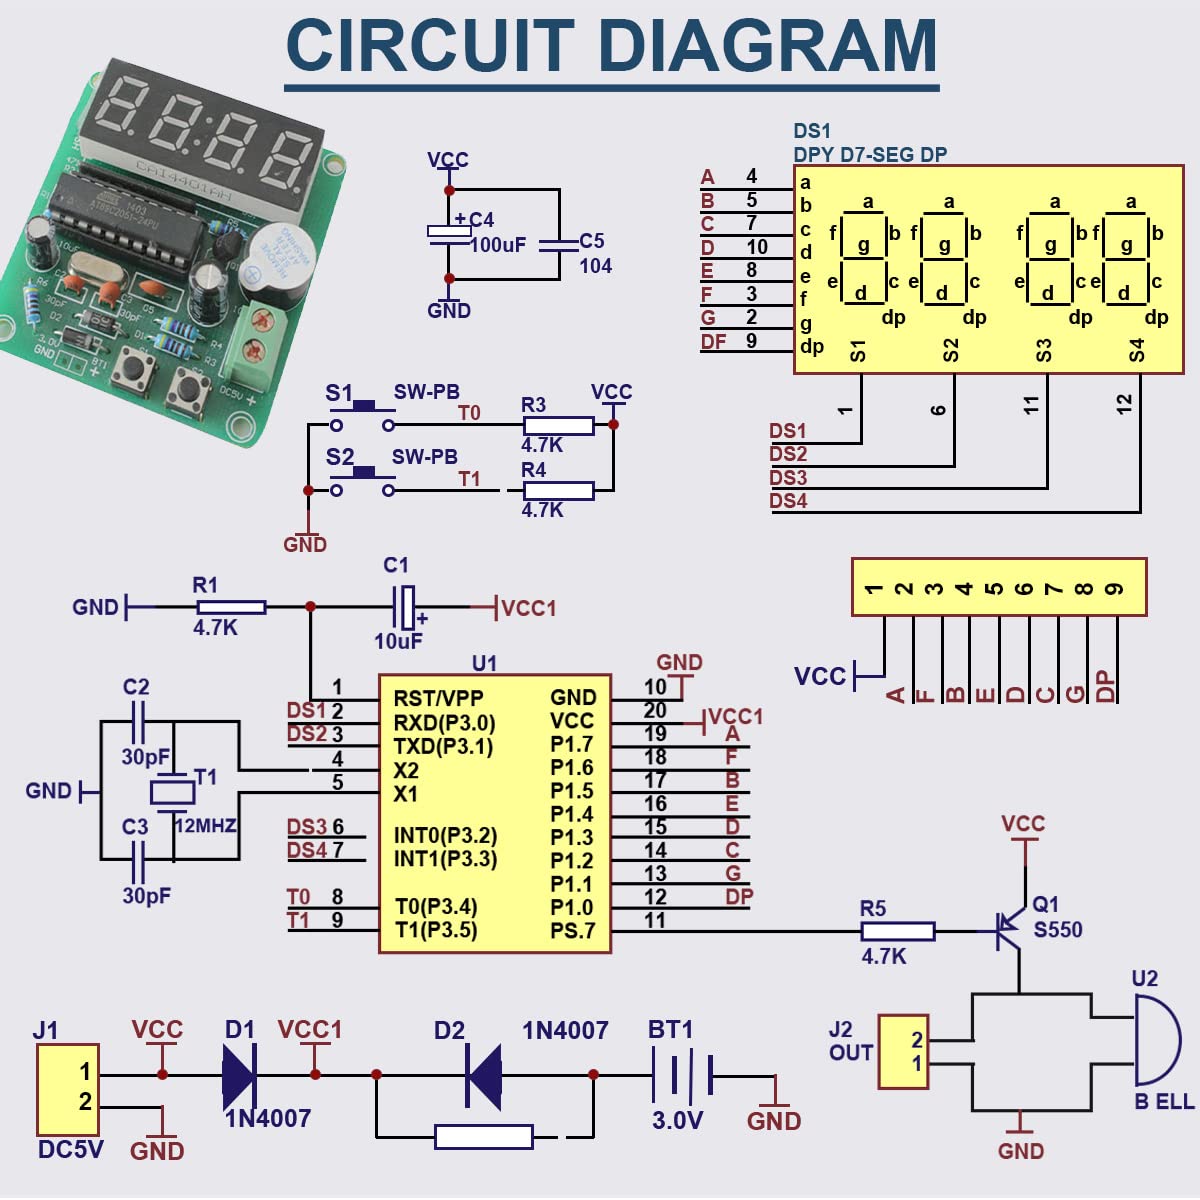
Popis: This image presents the detailed circuit diagram, illustrating how each electronic component connects to form the functional clock circuit. It includes pin assignments for the microcontroller (U1), connections for the 7-segment display (DS1), and other passive and active components.
3. Proces pájení
- Start with smaller components like resistors and diodes, then move to capacitors, IC sockets (if provided, or directly solder ICs), and finally larger components like the display and buttons.
- Ensure correct polarity for diodes, electrolytic capacitors, and integrated circuits. The PCB is clearly labeled to assist with this.
- Solder each component securely, ensuring good solder joints without bridges between pads.
4. Připojení napájecího zdroje
The clock operates with a supply voltage of DC 3.7V-5.5V. Connect your power source to the designated terminals on the PCB. There is also a battery memory data backup interface for a 3.0V battery (BT1).

Popis: This image highlights the power input terminals (Power DC 3.3V-5V) and the battery memory data backup interface (3.0V) on the assembled PCB. It also shows the 4-digit display and control buttons.
Návod k obsluze
Once assembled and powered, your digital clock is ready for operation. The kit typically includes two buttons (S1 and S2) for control.
1. Nastavení času
- Press a specific button (e.g., S1) to enter time setting mode. The hour digits may start flashing.
- Use another button (e.g., S2) to increment the hour.
- Press S1 again to switch to minute setting mode, then use S2 to increment minutes.
- Press S1 a third time to exit time setting mode.
2. Adjusting Clock Speed (Fine-tuning)
The clock's speed can be fine-tuned from 0 to 9 gears. Consult the specific button combination or sequence in the kit's detailed instructions (if provided) to access and adjust this setting. The default is typically gear 5.
3. Nastavení alarmů
The clock supports two independent alarms. The process is similar to setting the time, but you will enter alarm setting mode first. Look for a button press that cycles through time, alarm 1, and alarm 2 settings. Each alarm can be independently enabled or disabled.
4. Using Countdown Timer
Activate the countdown function, set the desired time (up to 99 minutes), and start the countdown. An alarm will sound when the timer reaches zero.
5. Using Stopwatch
The stopwatch function allows you to measure elapsed time. It typically includes controls to start, pause, and clear the stopwatch.
6. Using Counter
The counter function can record key presses or external pulses. Refer to the kit's specific documentation for details on how to connect an external pulse source if applicable.
Údržba
- Napájení: For long-term use, it is highly recommended to use a stable DC power supply (3.7V-5.5V) instead of 3 AA batteries, as batteries will drain quickly.
- Čištění: Keep the PCB and components clean and free from dust. Use a soft, dry cloth for cleaning. Avoid using liquids.
- Prostředí: Store and operate the clock in a dry environment, away from extreme temperatures and humidity, to prevent damage to electronic components.
- Zacházení: Handle the assembled board with care to avoid bending the PCB or damaging soldered connections.
Odstraňování problémů
- Clock Does Not Power On:
- Zkontrolujte připojení napájení a ujistěte se, že je správná hlasitosttage (DC 3.7V-5.5V).
- Verify polarity of power connections.
- Inspect all solder joints for cold joints or bridges.
- Nesprávné zobrazení času:
- Ensure the crystal oscillator (e.g., 12MHz) is correctly soldered and functional.
- Check connections to the 7-segment display.
- Recalibrate the clock speed if necessary.
- Tlačítka nereagují:
- Check solder joints for the buttons.
- Ujistěte se, že tlačítka nejsou zaseknutá.
- Přerušovaný provoz:
- Review all solder joints for any loose connections.
- Ensure power supply is stable.
Specifikace
| Výrobce | DAOKAI |
| Číslo modelu | WE-DA-059 |
| Napájení | DC 3.7V-5.5V |
| Rozměry PCB | 54 x 51 mm (2.12 x 2.01 palců) |
| Tloušťka PCB | 1.6mm (FR-4 material) |
| Přesnost času | Approximately 3 seconds per month |
| Komponenty v ceně | 1 x 4 Bits Digital Electronic Clock DIY Kit (unassembled components) |
| Jsou vyžadovány baterie | No (for main operation, DC recommended; optional 3.0V for memory backup) |

Popis: This image clearly illustrates the physical dimensions of the PCB, indicating its length and width as 54mm (2.12in) and 51mm (2.01in) respectively.
Záruka a podpora
Information regarding specific warranty terms for this DIY kit is not provided. As this is a self-assembly product, successful operation largely depends on the user's assembly skills. For any product-related inquiries or technical assistance, please contact the manufacturer, DAOKAI, through their official support channels.