
1. Úvod
Děkuji za nákupasing the TECHMADE DVB-T2 HD Decoder Stick. This compact device allows you to receive digital terrestrial television broadcasts (DVB-T2/HEVC) on any television with an HDMI input. Its discreet design allows it to be hidden behind your TV, providing a clean setup. This manual provides detailed instructions for setup, operation, and troubleshooting to ensure optimal performance.
2. Obsah balení
- TECHMADE DVB-T2 HD Decoder Stick
- 2-in-1 Remote Control (batteries not included)
- Napájecí adaptér
- HDMI kabel
- Infrared (IR) Receiver Cable
- Uživatelská příručka (tento dokument)

Image: The TECHMADE DVB-T2 HD Decoder Stick, its 2-in-1 remote control, and the product packaging, illustrating the typical contents of the box.
3. Vlastnosti
- DVB-T2/T/C Digital Terrestrial Receiver
- Supports HD MEPG-2, MPEG-4, H.264, H.265 (HEVC Main 10)
- HDR 10Bit support
- Full HD 1080p resolution output
- HDMI Audio/Video output
- USB 2.0 port for multimedia playback (H.265, H.264, AVI, MKV, MP3, MP4, JPG)
- USB recording (PVR) functionality
- 2-in-1 Remote Control for both decoder and TV
- Compact and discreet design, ideal for hiding behind the TV

Obrázek: Podrobný view of the decoder stick, highlighting its various ports including RF IN, IR, USB, DC IN, AV OUT, and HD OUT.
4. Průvodce nastavením
Follow these steps to set up your DVB-T2 HD Decoder Stick:
- Připojení k televizi: Insert the HDMI end of the decoder stick directly into an available HDMI port on your television.
- Connect IR Receiver: Plug the IR receiver cable into the 'IR' port on the decoder stick. Position the IR receiver in a location where it has a clear line of sight to your remote control.
- Připojení antény: Connect your terrestrial antenna cable to the 'RF IN' port on the decoder stick.
- Připojte napájení: Plug the power adapter into the 'DC IN' port on the decoder stick, then plug the adapter into a wall outlet.
- Počáteční skenování: Turn on your TV and select the correct HDMI input. The decoder will typically guide you through an initial channel scan. Follow the on-screen prompts to scan for available digital channels.

Image: A visual guide illustrating the connection points: antenna cable to RF IN, power adapter to DC IN, IR receiver to IR port, and the decoder stick's HDMI output to the TV's HDMI input.

Image: The compact decoder stick discreetly connected to the back of a television, demonstrating its minimal footprint.
5. Návod k obsluze
5.1 Funkce dálkového ovládání
The included 2-in-1 remote control can operate both the decoder and your television. Before use, you may need to program the remote to control your TV's basic functions (Power, Volume, Input).
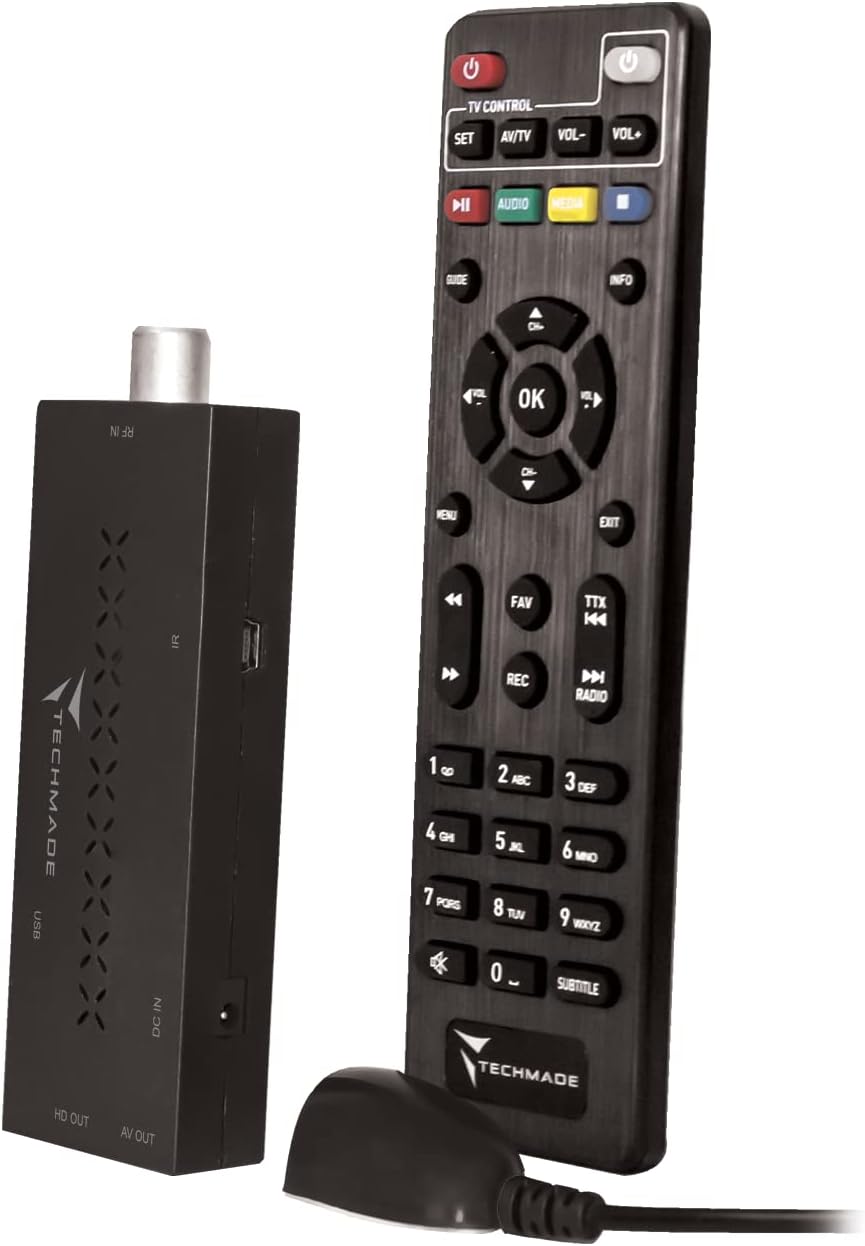
Image: The DVB-T2 HD Decoder Stick shown alongside its multi-functional remote control.
Programming the 2-in-1 Remote:
- Stiskněte a podržte SOUBOR button on the decoder remote until the red LED light stays on.
- Press the button on the decoder remote that you wish to program (e.g., Power, Volume+, Volume-, AV/TV). The red LED will blink slowly.
- Point your TV's original remote control directly at the decoder remote (infrared diodes facing each other, typically 1-3 cm apart).
- Press and hold the corresponding button on your TV's original remote (e.g., TV Power button). The red LED on the decoder remote will blink three times and then stay on, indicating successful programming.
- Opakujte pro další tlačítka, která chcete naprogramovat.
- Stiskněte tlačítko SOUBOR znovu stiskněte tlačítko pro ukončení programovacího režimu. Červená LED dioda zhasne.

Image: A graphic emphasizing the convenience of using a single remote control for both the television and the DVB-T2 decoder.
5.2 Základní obsluha
- Zapnutí/vypnutí: Stiskněte tlačítko MOC tlačítko na dálkovém ovladači.
- Navigace kanálu: Použijte CH + / CH- tlačítky nebo numerickou klávesnicí pro změnu kanálů.
- Ovládání hlasitosti: Použijte VOL + / VOL- tlačítka.
- Menu: Stiskněte tlačítko MENU button to access the main menu for settings, channel management, and other features.
- OK: Potvrďte výběry v nabídce.
- Výstup: Ukončete aktuální nabídku nebo funkci.
- EPG (elektronický programový průvodce): Stiskněte tlačítko EPG tlačítko na view rozvrhy programů.

Image: A close-up of the remote control, highlighting key buttons and their functions for both TV and decoder operation.
5.3 Přehrávání multimédií
The decoder stick supports multimedia playback from a USB storage device.
- Insert a USB flash drive or external hard drive into the USB port on the decoder stick.
- Navigate to the 'Multimedia' or 'USB' section in the decoder's main menu.
- Select the type of media you wish to play (e.g., Video, Music, Photo).
- Procházejte si files and select the desired content to play.
5.4 Nahrávání na USB (PVR)
You can record TV programs to a connected USB storage device.
- Ujistěte se, že je připojeno paměťové zařízení USB s dostatečným volným místem.
- Během sledování programu stiskněte tlačítko REC button on the remote to start recording immediately. Press ZASTÁVKA pro ukončení nahrávání.
- Alternatively, use the EPG to schedule recordings for future programs.
6. Údržba
- Čištění: K čištění zařízení používejte měkký, suchý hadřík. Nepoužívejte tekuté čisticí prostředky ani aerosoly.
- Větrání: Ensure the device has adequate ventilation. Do not cover ventilation openings.
- Skladování: Pokud zařízení delší dobu nepoužíváte, odpojte napájecí adaptér a uložte jej na chladném a suchém místě.
- Aktualizace firmwaru: Pravidelně kontrolujte informace od výrobce website for firmware updates. Updates can improve performance and add new features.
7. Řešení problémů
| Problém | Možná příčina | Řešení |
|---|---|---|
| Žádný obraz/žádný signál | Incorrect HDMI input selected on TV; Loose cable connections; No antenna signal. | Ensure TV is on correct HDMI input. Check all cable connections (HDMI, antenna, power). Perform a channel scan. Check antenna connection and signal strength. |
| Dálkové ovládání nefunguje | Batteries are dead or inserted incorrectly; IR receiver is blocked or not connected. | Replace batteries (AAA). Ensure batteries are inserted with correct polarity. Check IR receiver cable connection and ensure it has a clear line of sight to the remote. |
| Cannot program 2-in-1 remote | Incorrect programming steps; Remotes not aligned properly. | Review the programming steps in section 5.1. Ensure the IR diodes of both remotes are facing each other and are very close (1-3 cm). |
| Poor picture quality/Freezing | Weak antenna signal; Interference. | Adjust antenna position. Check antenna cable for damage. Rescan channels. |
| Problémy s přehráváním z USB | Nepodporováno file format; USB device not recognized. | Zajistit file format is supported (H.265, H.264, AVI, MKV, MP3, MP4, JPG). Try a different USB device. Ensure USB device is formatted correctly (FAT32/NTFS). |
8. Specifikace
| Funkce | Detail |
|---|---|
| Značka | TECHMADE |
| Model | TM-DVB-T2-STICK |
| Rozměry (D x Š x V) | 105mm x 37mm x 17mm (approx. 16.9 x 10.8 x 5.4 cm packaged) |
| Hmotnost | 260 g |
| Kompatibilní zařízení | Televize |
| Dekódování videa | HEVC Main 10, H.265, H.264, MPEG-4, MPEG-2 |
| Podporovaná rozlišení | 720p, 1080i, 1080p (Full HD) |
| Režim zvukového výstupu | Stereo |
| Konfigurace prostorového zvuku | 5.1 |
| Výstupní výkon | 5 Wattů |
| Konektory | HDMI (1 port), USB (1 port), RF In, IR, AV, DC Input |
| Zdroj napájení | Napájecí adaptér (součástí balení) |
| Baterie dálkového ovládání | 2 x AAA (nejsou součástí balení) |
| Barva | Černý |
9. Záruka a podpora
TECHMADE products are designed and manufactured to the highest quality standards. For information regarding warranty coverage, technical support, or service, please refer to the warranty card included with your product or visit the official TECHMADE webUschovejte si účtenku jako doklad o koupi pro případ reklamace.