
1. Úvod
Welcome to the user manual for your new Cheerlux C50 Projector. This guide provides essential information on setting up, operating, maintaining, and troubleshooting your device. Please read this manual thoroughly before using the projector to ensure optimal performance and safety. Keep this manual for future reference.
2. Bezpečnostní pokyny
Abyste předešli požáru, úrazu elektrickým proudem nebo zranění, dodržujte prosím následující bezpečnostní opatření:
- Neblokujte větrací otvory. Zajistěte dostatečný prostor kolem projektoru pro správné proudění vzduchu.
- Do not expose the projector to rain or moisture. Avoid placing objects filled with liquids, such as vases, on the projector.
- Neotevírejte projektor casing. Veškerý servis svěřte kvalifikovanému servisnímu personálu.
- Používejte pouze napájecí adaptér dodaný s projektorem.
- Nedívejte se přímo do objektivu projektoru, když je lamp je zapnutý, protože jasné světlo může poškodit váš zrak.
- Umístěte projektor na stabilní a rovný povrch, aby nedošlo k jeho pádu.
- Během bouřek nebo pokud jej delší dobu nepoužíváte, odpojte projektor ze zásuvky.
3. Obsah balení
Zkontrolujte prosím, zda jsou všechny položky přítomny a v dobrém stavu:
- Projektor Cheerlux C50
- Dálkové ovládání
- Napájecí kabel
- HDMI kabel
- AV kabel
- Uživatelská příručka
4. Konec produktuview
Familiarize yourself with the components and ports of your Cheerlux C50 Projector.

This image displays the Cheerlux C50 Projector from a front-top angle, highlighting its lens, focus ring, and control panel buttons on the top surface. The projector features a white and grey casing.
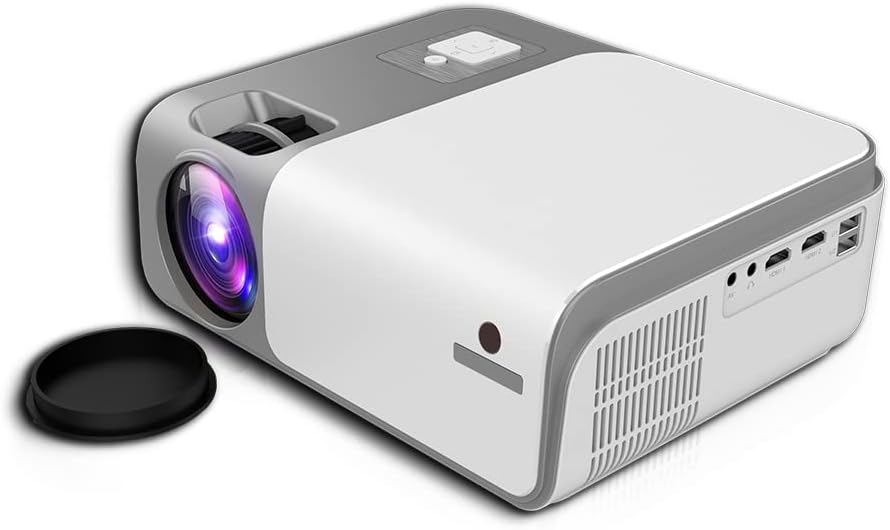
This image shows the rear and side of the Cheerlux C50 Projector, revealing various input/output ports such as HDMI, USB, and AV, along with ventilation grilles. A lens cap is visible next to the lens.
4.1. Přední panel
- Projekční čočka: Vysílá obraz.
- Zaostřovací kroužek: Upravuje ostrost obrazu.
4.2. Horní panel
- Ovládací tlačítka: Power, Menu, Source, Navigation (Up/Down/Left/Right), OK.
4.3. Zadní panel
- Příkon: Připojuje se k napájecímu kabelu.
- HDMI porty (x2): Connect to HDMI-enabled devices (laptops, gaming consoles, Blu-ray players).
- USB porty (x2): Připojte USB disky pro přehrávání médií.
- AV port: Připojte se ke starším zařízením pomocí AV kabelu.
- Audio výstup (3.5 mm): Připojte externí reproduktory nebo sluchátka.
- IR přijímač: Pro signály dálkového ovládání.
5. Nastavení
5.1. Připojení napájení
- Připojte napájecí kabel ke vstupnímu portu projektoru.
- Zapojte druhý konec napájecího kabelu do zásuvky ve zdi.
- Kontrolka napájení na projektoru se rozsvítí.
5.2. Umístění
Position the projector on a stable, flat surface. The ideal projection distance for the Cheerlux C50 is between 1.5 to 6 meters, depending on the desired screen size. Ensure the projector is centered with your projection screen or wall.
5.3. Zaostření a korekce lichoběžníkového zkreslení
- Nastavení zaostření: Turn the focus ring on the front of the projector until the projected image appears sharp and clear.
- Keystone Correction (4P): If the projected image appears trapezoidal (wider at the top or bottom), use the 4P keystone correction function. This can typically be accessed via the projector's menu or dedicated buttons on the remote control. Adjust each of the four corners independently to achieve a perfectly rectangular image.
6. Provoz
6.1. Zapnutí/vypnutí
- Zapnutí: Press the power button on the projector or the remote control. The projector will start up, and the lamp se rozsvítí.
- Vypnout: Press the power button again. Confirm shutdown if prompted. Allow the projector to cool down before unplugging it.
6.2. Vstupní zdroje
Connect your desired device to the projector using the appropriate cable (HDMI, AV, USB). Then, press the 'Source' button on the projector or remote control to select the corresponding input source.
- HDMI: For high-definition video and audio from laptops, game consoles, etc.
- USB: Pro přehrávání médií files (photos, videos, music) directly from a USB flash drive.
- AV: For standard definition video and audio from older devices like DVD players.
6.3. Bezdrátové připojení (WiFi a Bluetooth)
The Cheerlux C50 Projector features built-in WiFi and Bluetooth for enhanced connectivity.
- WiFi připojení: Navigate to the 'Settings' menu, select 'Network' or 'WiFi Settings'. Choose your desired WiFi network from the list and enter the password.
- Připojení Bluetooth: In the 'Settings' menu, select 'Bluetooth'. Turn on Bluetooth and pair with your Bluetooth-enabled speakers or headphones.
6.4. Screen Mirroring
The projector supports wireless screen mirroring from compatible smartphones and tablets.

This image illustrates the Cheerlux C50 Projector wirelessly connected to a smartphone. The phone's screen, displaying a movie scene, is being mirrored to the projector, indicated by a Wi-Fi signal icon between the devices.
- Ensure both your projector and mobile device are connected to the same WiFi network.
- On the projector, select the 'Screen Mirroring' or 'Wireless Display' option from the main menu.
- On your mobile device, activate its screen mirroring feature (e.g., 'Smart View' for Samsung, 'Screen Mirroring' for Android, 'AirPlay' for iOS).
- Select the projector's name from the list of available devices on your phone.
- The mobile device's screen content will now be projected.
6.5. Navigace v menu
Use the navigation buttons (Up, Down, Left, Right) and 'OK' button on the projector or remote control to browse through the on-screen menu. The 'Menu' button typically opens the main settings, and the 'Return' or 'Exit' button closes menus.
7. Údržba
7.1. Čištění
- Čočka: Používejte měkký hadřík bez žmolků, speciálně určený pro optické čočky. Nepoužívejte abrazivní čisticí prostředky.
- Casing: Otřete vnější povrch projektoru měkkým, suchým hadříkem. V případě odolných nečistot lehceampa hadřík s vodou.
- Větrací otvory: Periodically clean the vents with a soft brush or compressed air to prevent dust buildup, which can affect cooling.
7.2. Skladování
When not in use for extended periods, store the projector in a cool, dry place, away from direct sunlight and extreme temperatures. Cover the lens with its cap to protect it from dust and scratches.
8. Řešení problémů
Pokud se s projektorem setkáte s problémy, podívejte se na následující běžné problémy a jejich řešení:
| Problém | Možná příčina | Řešení |
|---|---|---|
| Žádný promítaný obraz | Power cable loose, incorrect input source, device not connected. | Check power connection, select correct input source, ensure source device is on and connected. |
| Obraz je rozmazaný | Není nastavené zaostření, projektor je příliš blízko/daleko. | Adjust the focus ring. Reposition the projector within the recommended distance. |
| Obrázek je lichoběžníkový | Projektor není kolmý k promítací ploše. | Use the 4P keystone correction function in the menu. |
| Žádný zvuk | Volume too low, external speakers not connected, source device muted. | Increase projector volume, check external speaker connection, unmute source device. |
| Dálkové ovládání nefunguje | Batteries dead, obstruction, not pointing at IR receiver. | Replace batteries, remove obstructions, point remote directly at the projector's IR receiver. |
9. Specifikace
Technical specifications for the Cheerlux C50 Projector:
| Funkce | Specifikace |
|---|---|
| Název značky | Generic (Cheerlux C50) |
| Technologie připojení | Wi-Fi, Bluetooth |
| Nativní rozlišení | 1920 x 1080 |
| Jas | 4000 lumenů |
| Form Factor | Přenosný |
| Typ montáže | Stolní držák |
| Typ ovladače | Dálkové ovládání |
| Maximální vrhací vzdálenost | 6 metrů |
| Wattage | 3 wattů |
| Speciální funkce | Built In Wi Fi, Portable, Wireless, 4P Keystone Correction |
10. Záruka a podpora
The Cheerlux C50 Projector comes with a standard manufacturer's warranty. Please refer to the warranty card included in your package for specific terms and conditions, including warranty period and coverage details. For technical support, service, or further inquiries, please contact your retailer or the manufacturer's customer service department.
Uschovejte si účtenku jako doklad o koupi pro případ reklamace.