
Hobbynox HN003-00
Hobbynox Tara Top Feed Airbrush Set Instruction Manual
Model: HN003-00
1. Úvod
The Hobbynox Tara Top Feed Airbrush Set is a comprehensive dual-action airbrush system designed for detailed painting tasks. It features a trigger-start function and Micro Pressure Control (MPC) directly on the airbrush nose, allowing for precise airflow adjustment. This airbrush is ideal for use with non-toxic, water-based paints of finer viscosity, such as Hobbynox, Createx, or Faskolor airbrush paints. It is suitable for small to medium models and intricate airbrush work.
The Tara airbrush is equipped with a nozzle/tip construction optimized for detail work, ensuring superior atomization of thinner paints. This kit is ready for immediate use and connects easily to Hobbynox airbrush compressors or other compressors with a G1/8 BSP male thread coupler.
2. Bezpečnostní informace
Please read and understand all safety instructions before operating the airbrush.
- Používejte výrobek pouze k určenému účelu.
- Avoid contact with eyes and skin. In case of inhalation or ingestion, seek immediate medical attention.
- Clean the airbrush thoroughly after each use and allow it to dry completely.
- Do not expose the airbrush or its components to heat sources or sparks.
- Do not use the airbrush if any part is damaged.
- Dispose of the product and packaging properly after use, following local regulations for chemical waste disposal.
3. Obsah balení
The Hobbynox Tara Airbrush Kit (HN003-00) includes the following components:
- Hobbynox Tara Dual-Action Airbrush
- Needle and Nozzle Sets: 0.2 mm (pre-installed), 0.3 mm, and 0.5 mm
- Color Cups: 2 cc capacity
- Nozzle Wrench Tool
- Braided Air Hose: 1.8 meters long, with G1/8 internal threads on both ends
- Compressor Adapter: G1/8 male to G1/4 female
- Printed Manual (Note: The printed manual incorrectly states the standard needle set is 0.3mm; the factory-installed set is 0.2mm.)

Image: All components of the Hobbynox Tara Airbrush Kit, including the airbrush, multiple needle and nozzle sets, color cups, wrench, and braided hose, neatly arranged in their packaging.
4. Nastavení
- Rozbalte komponenty: Opatrně vyjměte všechny položky z obalu. Zkontrolujte, zda nejsou poškozené.
- Select Nozzle/Needle: The 0.2 mm needle and nozzle set is pre-installed. For different spray patterns or paint viscosities, you may choose to install the 0.3 mm or 0.5 mm set. Use the provided nozzle wrench for changing nozzles.
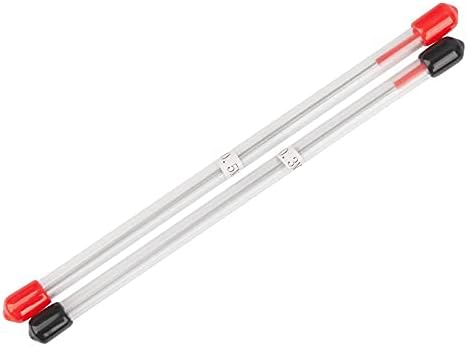
Image: Close-up of the 0.3mm and 0.5mm airbrush needles, each housed in a clear protective tube with colored caps.

Image: Close-up of the 0.3mm and 0.5mm airbrush nozzles, each secured in a small clear plastic container.
- Připojení vzduchové hadice: Attach one end of the 1.8-meter braided air hose to the air inlet of the airbrush. Ensure a secure, hand-tight connection.
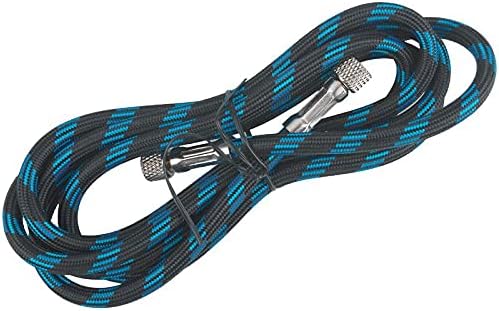
Image: The 1.8-meter braided air hose, featuring blue and black weaving, with metal connectors on both ends.
- Connect to Compressor:
- If your compressor has a G1/8 male thread, connect the other end of the braided hose directly.
- If your compressor has a G1/4 male thread, first attach the G1/8 male to G1/4 female adapter to the compressor, then connect the braided hose to the adapter.
- Připravte barvu: Thin your chosen water-based paint to the appropriate viscosity for airbrushing. Refer to the paint manufacturer's instructions for thinning ratios. Pour the thinned paint into the 2 cc color cup on top of the airbrush.
5. Návod k obsluze
The Hobbynox Tara airbrush features a dual-action mechanism and Micro Pressure Control (MPC) for precise operation.
- Zapnutí kompresoru: Turn on your air compressor and set it to the desired operating pressure.
- Airflow Control (Dual-Action):
- Pressing down on the trigger releases air.
- Pulling back on the trigger controls the amount of paint released.
- Practice this motion to achieve smooth transitions between air and paint flow.
- Micro Pressure Control (MPC): The knob at the front of the airbrush (near the nozzle) allows for fine-tuning of the air pressure directly at the airbrush. Turn clockwise to decrease airflow, counter-clockwise to increase. This provides immediate control over spray characteristics without adjusting the compressor.
- Technika stříkání:
- Always start air flow before paint flow, and stop paint flow before air flow. This prevents paint from drying on the needle tip.
- Maintain a consistent distance from your work surface.
- Move your hand in smooth, even strokes.
- Testování: Before applying paint to your final project, test the spray pattern and paint consistency on a scrap piece of material.
6. Údržba a čištění
Správné čištění a údržba jsou klíčové pro dlouhou životnost a výkon vašeho airbrushe.
- After Each Use (Quick Clean):
- Empty any remaining paint from the color cup.
- Add a few drops of appropriate airbrush cleaner or water (for water-based paints) to the cup.
- Back-flush: Cover the nozzle with your finger or a cap and press the trigger to release air. This will bubble the cleaner back into the cup, helping to dislodge paint.
- Spray the cleaner through the airbrush until it runs clear. Repeat if necessary.
- Wipe the cup clean with a soft cloth or cotton swab.
- Regular Deep Clean: Periodically, or when changing paint types, a more thorough cleaning is recommended.
- Disassemble the airbrush carefully, following the manufacturer's instructions for your specific model. Pay attention to the order of parts.
- Clean all components (needle, nozzle, air cap, body) with airbrush cleaner and appropriate cleaning brushes.
- Ensure the nozzle is free of any dried paint. Use the nozzle wrench to remove it if needed. Be extremely gentle with the nozzle as it is delicate.
- Rinse all parts with clean water and allow them to dry completely.
- Reassemble the airbrush. Apply a tiny amount of airbrush lubricant (if recommended by manufacturer) to the needle and trigger mechanism.
- Skladování: Store the airbrush in its protective case or a clean, dry environment to prevent damage and dust accumulation.
7. Řešení problémů
| Problém | Možná příčina | Řešení |
|---|---|---|
| Žádné proudění vzduchu | Compressor off; hose disconnected; air valve clogged. | Check compressor power; ensure hose connections are tight; clean airbrush air passages. |
| No paint flow / Spluttering | Paint too thick; nozzle clogged; needle bent; air cap dirty. | Thin paint properly; perform deep clean of nozzle and needle; inspect needle for damage; clean air cap. |
| Nerovnoměrný vzor stříkání | Dirty air cap; damaged nozzle; paint consistency issues. | Clean air cap thoroughly; inspect nozzle for damage (replace if necessary); adjust paint thinning. |
| Air bubbles in paint cup | Loose nozzle; cracked nozzle; dirty air cap. | Tighten nozzle gently; inspect nozzle for cracks (replace if necessary); clean air cap. |
| Trigger sticky or stiff | Dried paint in mechanism; lack of lubrication. | Disassemble and clean trigger mechanism; apply airbrush lubricant. |
If you encounter persistent issues not covered here, please contact Hobbynox customer support.
8. Specifikace
- Číslo modelu: HN003-00
- Typ: Dual-Action, Top Feed Airbrush
- Nozzle/Needle Sizes: 0.2 mm (installed), 0.3 mm, 0.5 mm
- Color Cup Capacity: 2 ccm
- Délka hadice: 1.8 metru (pletené)
- Připojení hadic: G1/8 internal thread (both ends)
- Compressor Adapter: G1/8 male to G1/4 female
- Vlastnosti: Trigger-start, Micro Pressure Control (MPC)
- Doporučené použití: Detailed airbrush work, small to medium models, non-toxic water-based paints.
- Materiál: Plastic (components), Metal (airbrush body)
- Barva: Stříbro
9. Záruka a podpora
Specific warranty information is not provided in the product details. For warranty claims, technical support, or replacement parts, please contact your retailer or the official Hobbynox customer service. Keep your purchase receipt as proof of purchase.
For further assistance, you may visit the Hobbynox webwebu nebo se přímo obraťte na jejich kanály podpory.
Ask a question about this manual
Ask about setup, troubleshooting, compatibility, parts, safety, or missing instructions. Manuals+ will review the question and use this page’s manual context to help answer it.