
1. Konec produktuview
Thank you for choosing the Arlux Lighting Onyx R2 Round Recessed LED Spot Light. This product is designed for indoor use, providing efficient and modern illumination. This manual provides essential information for the safe installation, operation, and maintenance of your new LED spot light.
Bezpečnostní informace
- Před instalací a použitím si pečlivě přečtěte všechny pokyny.
- Instalaci musí provést kvalifikovaný elektrikář v souladu s místními elektrotechnickými předpisy a předpisy.
- Před instalací, údržbou nebo čištěním se ujistěte, že je hlavní jistič odpojen od napájení.
- Produkt žádným způsobem neupravujte. Neoprávněné úpravy mohou vést ke ztrátě záruky a představovat bezpečnostní riziko.
- Tento výrobek je určen pouze pro použití v interiéru. Nevystavujte vlhkost ani extrémním teplotám.
- Nedívejte se přímo do LED světelného zdroje, když je rozsvícený, mohlo by to způsobit namáhání očí nebo jejich poškození.
- Obalové materiály uchovávejte mimo dosah dětí.
2. Obsah balení
Před zahájením instalace ověřte, zda jsou všechny komponenty přítomny a nepoškozené.
- 1 x Arlux Lighting Onyx R2 Round Recessed LED Spot Light
- 1 x LED Driver (Power Supply)
- Montážní hardware

Image 2.1: The Arlux Lighting Onyx R2 Recessed LED Spot Light shown with its separate LED driver (power supply) and connecting cable.
3. Specifikace
| Značka | Arlux Lighting |
| Model | Onyx R2 |
| Typ | Recessed LED Spot Light |
| Tvar | Kolo |
| Spotřeba energie | 18 wattů |
| Světelný tok | 1550 XNUMX lumenů |
| Teplota barev | 4000 Kelvinů (neutrální bílá) |
| Materiál | Hliník |
| Barva | Bílý |
| Hmotnost položky | 390 gramů |
| Typ instalace | Stropní montáž (zapuštěná) |
| Zdroj napájení | Elektrický kabel |
| Specifická použití | Ceiling illumination for indoor spaces |
4. Nastavení a instalace
4.1 Kontrolní seznam před instalací
- Požadované nástroje: Drill, hole saw (appropriate diameter for recess), wire strippers, screwdriver, voltage tester.
- Napájení: Ensure the electrical circuit is compatible with the spot light's power requirements (18W).
- Ceiling Space: Verify sufficient clearance above the ceiling for the fixture and driver.
- Bezpečnost především: Před zahájením jakýchkoli elektrických prací vždy vypněte hlavní napájení jističem.
4.2 kroky instalace
- Připravte si strop: Using an appropriate hole saw, cut a circular opening in the ceiling at the desired installation location. Refer to the product specifications for the exact cutout diameter (typically around Ø200-210mm for a Ø225mm fixture).
- Připojení ovladače: Connect the AC input wires from your household electrical supply to the input terminals of the LED driver. Ensure correct polarity (Live, Neutral, Earth) as indicated on the driver. Secure connections firmly.
- Connect the Spot Light: Plug the DC output cable from the LED driver into the corresponding input port on the back of the Onyx R2 spot light. This connection is typically a simple plug-and-play connector.
- Insert the Spot Light: Gently push the spring clips on the sides of the spot light upwards and insert the fixture into the prepared ceiling opening. The spring clips will hold the light securely in place.
- Závěrečná kontrola: Ensure the spot light is flush with the ceiling surface and securely mounted.
- Obnovit napájení: Znovu zapněte hlavní napájení jističem.
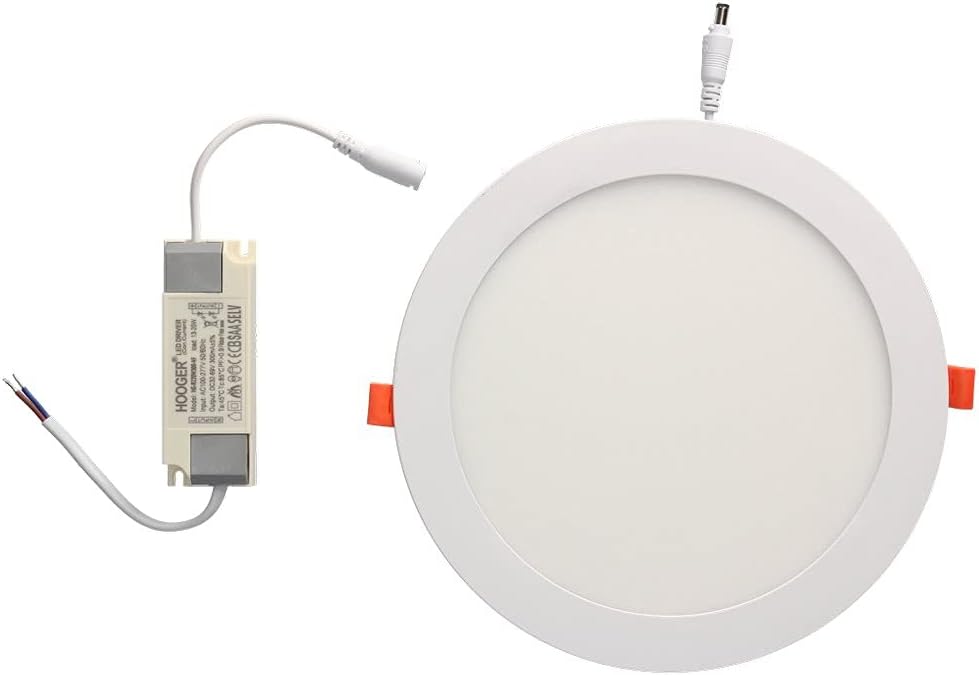
Image 4.1: The Arlux Lighting Onyx R2 Recessed LED Spot Light shown installed flush within a ceiling, providing ambient lighting.
5. Návod k obsluze
The Arlux Lighting Onyx R2 Recessed LED Spot Light operates immediately upon receiving power. It is typically controlled by a standard wall switch connected to the electrical circuit.
- Zapnutí/vypnutí: Pro zapnutí nebo vypnutí světla použijte nástěnný vypínač připojený ke svítidlu.
- Stmívání: This model is not specified as dimmable. Attempting to use it with a non-compatible dimmer switch may cause damage or malfunction.
6. Údržba
The Arlux Lighting Onyx R2 LED Spot Light requires minimal maintenance.
- Čištění: Před čištěním se ujistěte, že je napájení vypnuté. Povrch světla otřete měkkým, suchým nebo lehce vlhkým hadříkem.amp hadříkem. Nepoužívejte abrazivní čisticí prostředky, rozpouštědla ani agresivní chemikálie, protože by mohly poškodit povrchovou úpravu nebo elektrické součástky.
- Životnost LED diod: LED lights have a long lifespan and do not require bulb replacement. If the light stops functioning, refer to the troubleshooting section.
7. Řešení problémů
If you encounter issues with your Arlux Lighting Onyx R2 LED Spot Light, please consult the following table before contacting support.
| Problém | Možná příčina | Řešení |
|---|---|---|
| Světlo se nerozsvítí | Žádné napájení Uvolněné připojení kabeláže Vadný ovladač LED Faulty light fixture | Zkontrolujte jistič a nástěnný vypínač. Verify all wiring connections are secure (power off first). Test the driver if possible, or replace it. If driver is functional, the fixture may be faulty; contact support. |
| Světlo bliká | Nestabilní napájení Uvolněné vedení Incompatible dimmer switch (if used) | Ensure stable power. Check for loose connections. Remove dimmer switch if not compatible, or replace with a compatible LED dimmer. |
| Světlo je slabé | Nesprávné napájení svtage pokles | Ensure the correct LED driver is used. Consult an electrician to check for voltage issues in your electrical system. |
8. Záruka a podpora
Information regarding specific warranty terms for the Arlux Lighting Onyx R2 Round Recessed LED Spot Light is not available in the provided product details. For warranty inquiries or technical support, please contact your retailer or the manufacturer directly.
Spare parts availability information is also not available. Please contact your point of purchase for assistance with replacement components.