
PowMr ML2440
Uživatelská příručka k solárnímu regulátoru nabíjení PowMr 40A MPPT
Model: ML2440
1. Úvod
This manual provides essential information for the safe and efficient operation of your PowMr 40A MPPT Solar Charge Controller, model ML2440. Please read this manual thoroughly before installation and use to ensure optimal performance and longevity of the product.
2. Bezpečnostní pokyny
- Ensure all wiring is correctly connected and secured to prevent short circuits or damage.
- Vždy nejprve připojte baterii k regulátoru nabíjení, poté k solárním panelům a nakonec k zátěži. Odpojení provádějte v opačném pořadí.
- Do not attempt to repair or modify the controller yourself. Contact qualified personnel for service.
- Regulátor instalujte v dobře větraném prostoru, mimo dosah hořlavých materiálů a přímého slunečního záření.
- Při práci s elektrickými systémy používejte vhodné osobní ochranné prostředky (OOP).
- Zajistěte, aby systém voltage matches the controller's specifications (12V/24V auto-detection).
3. Konec produktuview
The PowMr 40A MPPT Solar Charge Controller is designed to efficiently manage power from your solar panels to charge various battery types, including Lithium, Sealed, Gel, and Flooded batteries. It features Maximum Power Point Tracking (MPPT) technology for optimized solar energy harvesting, automatic 12V/24V system voltage detection, and a clear LCD display for monitoring system status.
Obrázek 3.1: Přední view of the PowMr 40A MPPT Solar Charge Controller.
This image shows the main unit of the PowMr 40A MPPT Solar Charge Controller, highlighting its compact design and integrated LCD screen.
The controller supports a maximum solar input voltage of 100V and a maximum input power of 1100W for a 24V system (550W for 12V). It also includes temperature compensation for accurate charging across varying environmental conditions.

Obrázek 3.2: Temperature compensation feature.
This image illustrates the temperature compensation capability of the controller, ensuring optimal battery charging performance in both hot and cold environments.
4. Instalace a zapojení
Proper installation is crucial for the safe and efficient operation of your solar charge controller. Follow these steps carefully.
4.1 Schéma zapojení

Obrázek 4.1: Wiring diagram for the PowMr MPPT Solar Charge Controller.
This diagram illustrates the correct connection order for the battery, solar panels, DC load, and optional inverter. A temperature sensor is also shown.
4.2 Kroky připojení
- Nejprve připojte baterii: Connect the battery to the charge controller's battery terminals. Ensure correct polarity. The controller will auto-detect 12V or 24V system voltage.
- Připojení solárních panelů: Connect the solar panels to the PV input terminals. Ensure correct polarity. The controller will begin charging if sufficient sunlight is available.
- Connect DC Load (Optional): If using a DC load directly from the controller, connect it to the load terminals.
- Connect Inverter (Optional): If using an inverter, connect it to the battery terminals (not directly to the load terminals of the controller).
- Připojení teplotního senzoru: For accurate temperature compensation, connect the provided temperature sensor to the designated port on the controller and place the sensor near the battery.
Příkaz k odpojení: To disconnect the system, always follow the reverse order: Disconnect load, then solar panels, then battery.
5. Návod k obsluze
This section details how to monitor and configure your charge controller using its integrated LCD display and the optional Bluetooth mobile application.
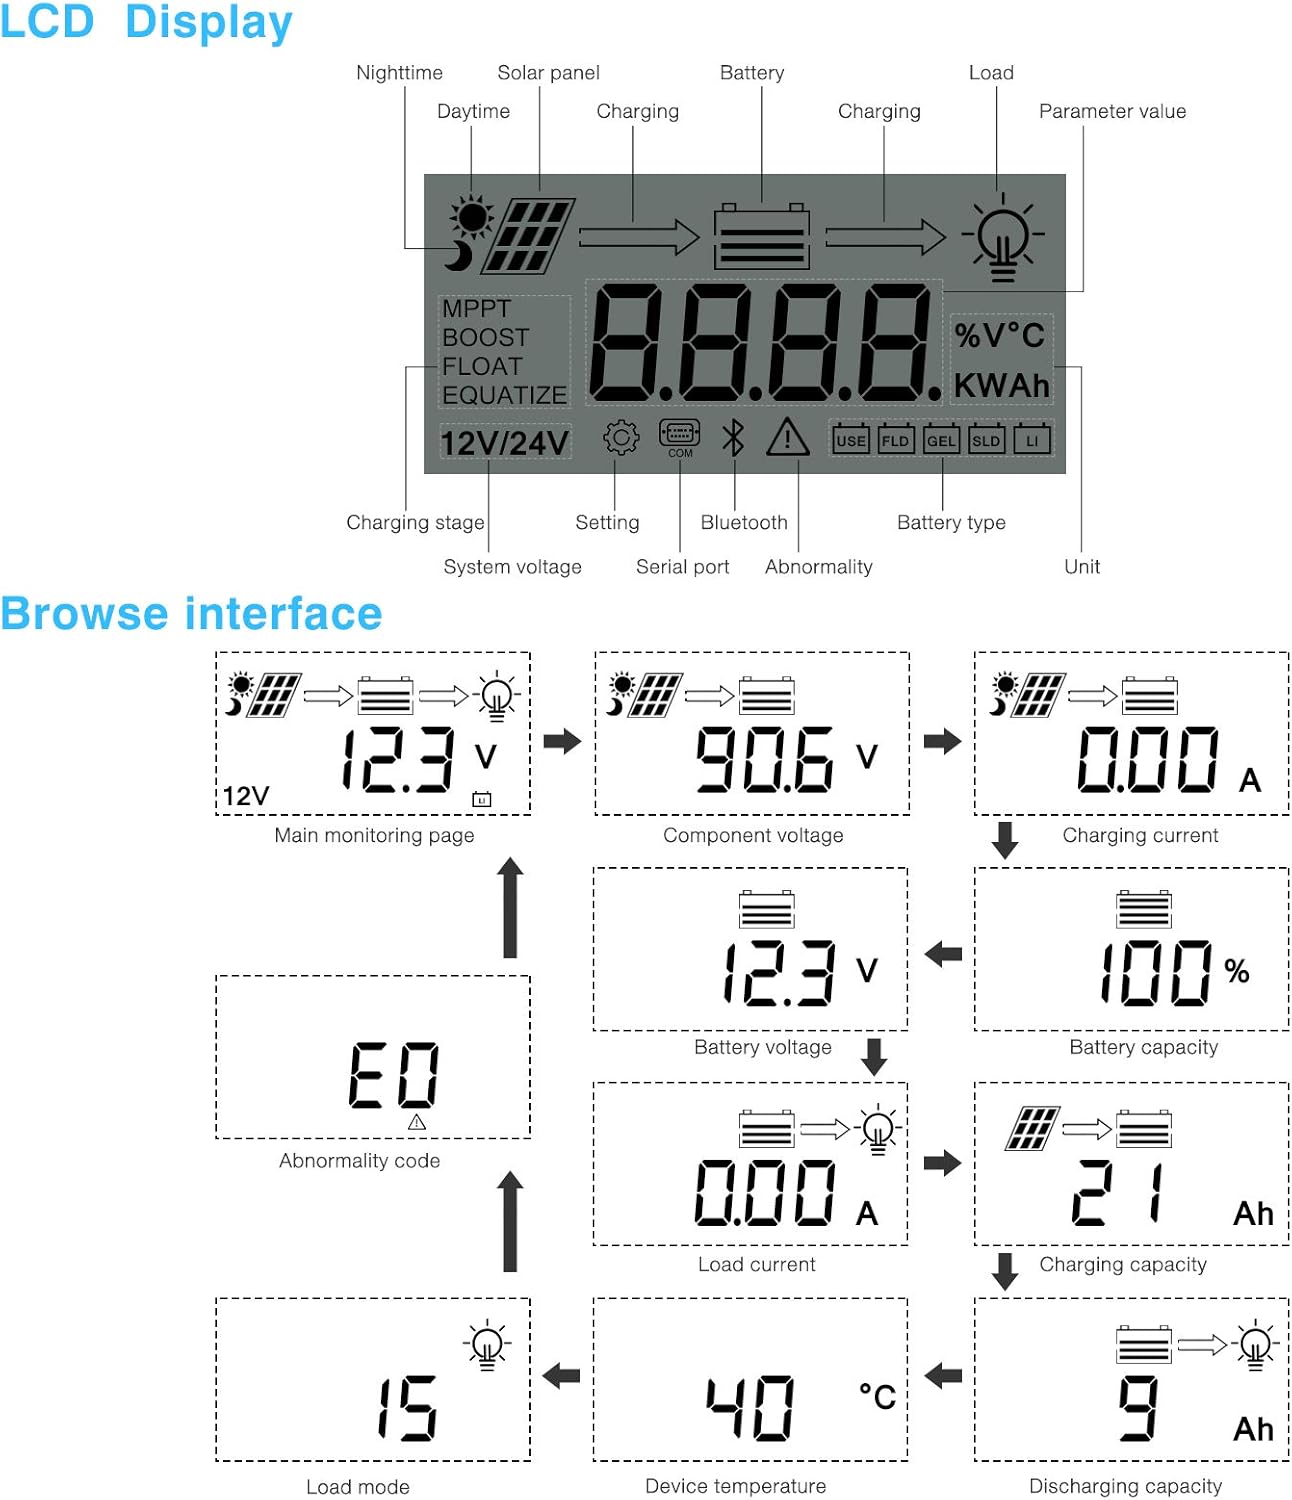
5.1 LCD displej Overview

Obrázek 5.1: LCD Display and Browse Interface.
This image shows the various icons and parameters displayed on the LCD screen, along with the navigation flow through different monitoring pages.
LCD displej poskytuje informace o vašem solárním systému v reálném čase. Mezi klíčové ukazatele patří:
- Nabíjení Stage: MPPT, Boost, Float, Equalize.
- System Voltage: 12V/24V auto-detected.
- Typ baterie: Icons for Lithium (Li), Sealed (SLD), Gel (GEL), Flooded (FLD).
- Indikátory stavu: Solar panel activity, battery charging, load status, abnormality.
- Hodnota parametru: Zobrazuje svtage, current, capacity, temperature, etc.
Use the buttons below the LCD to navigate through different screens to view parameters such as main monitoring page, component voltage, nabíjecí proud, objem baterietage, battery capacity, load current, charging capacity, device temperature, discharging capacity, abnormality codes, and load mode.
5.2 Bluetooth Mobile Application
The controller supports an optional Bluetooth module (BT-1) for remote monitoring and parameter adjustment via a mobile application (available for Apple iOS and Android devices). The Bluetooth module connects to the RS232 port on the controller.

Obrázek 5.2: Controller with optional Bluetooth module.
This image displays the PowMr MPPT Solar Charge Controller alongside its optional BT-1 Bluetooth communication module and connecting cable.

Obrázek 5.3: BT-1 Bluetooth module.
Detailní view of the BT-1 Bluetooth module, which enables wireless communication with the solar charge controller for remote monitoring and settings adjustments.

Obrázek 5.4: Bluetooth Mobile Interface Display.
This image shows various screens from the mobile application, including real-time monitoring, data records, energy records, and parameter settings.
The mobile application allows you to:
- Monitor real-time system data (voltage, current, power, temperature).
- View historical data and energy records.
- Adjust various charging parameters and battery settings.
- Obnovte výchozí tovární nastavení.
6. Údržba
Regular maintenance ensures the longevity and optimal performance of your charge controller.
- Čištění: Pravidelně čistěte vnější povrch ovladače suchým hadříkem, abyste odstranili prach a nečistoty. Ujistěte se, že jsou větrací otvory čisté.
- Spojení: Každoročně kontrolujte veškeré kabelové spoje, zda nejsou těsné a zda nejsou zkorodované. Volné spoje mohou způsobit přehřátí a špatný výkon.
- Prostředí: Ensure the installation environment remains within the specified operating temperature range and is free from excessive moisture or dust.
7. Řešení problémů
This section provides guidance for common issues. Refer to the LCD display for abnormality codes.
- Žádný displej/Žádné napájení:
- Zkontrolujte připojení baterie a ujistěte se, že je baterie dostatečně nabitá.tage je v provozním rozsahu.
- Verify that the battery fuse (if installed) is intact.
- Bez nabíjení:
- Ensure solar panels are connected correctly and receiving sufficient sunlight.
- Zkontrolujte solární panel objtage a aktuální.
- Verify that the battery is not fully charged or in a protection state.
- Načtení nefunguje:
- Zkontrolujte připojení zátěže a ujistěte se, že proud zátěže nepřekračuje jmenovitý proud regulátoru.
- Ověřte, že objem baterietage je nad nízkým objtagnastavení odpojení e (LVD).
- Check for any abnormality codes on the LCD related to load output.
- Abnormality Codes (e.g., "E0"):
- Refer to the specific abnormality code displayed on the LCD. Consult the full product manual or manufacturer's support for detailed explanations and solutions for each code.
8. Specifikace
Technical specifications for the PowMr 40A MPPT Solar Charge Controller (Model ML2440).

Obrázek 8.1: Product Specifications Table.
This table provides detailed technical parameters for the ML2420, ML2430, and ML2440 models. The ML2440 column is relevant for this 40A controller.
| Parametr | Hodnota (ML2440) |
|---|---|
| Model | ML2440 |
| Systém svtage | 12V / 24V Auto |
| Ztráta bez zatížení | 0.7 W až 1.2 W |
| Baterie voltage | 9 až 35V |
| Max. sluneční vstup voltage | 100 V (25 °C), 90 V (-25 °C) |
| Max. výkonový bod objtage rozsah | Baterie voltage +2V až 75V |
| Jmenovitý nabíjecí proud | 40A |
| Jmenovitý zatěžovací proud | 20A |
| Max. kapacitní zátěžová kapacita | 10000uF |
| Max. příkon fotovoltaického systému | 550 W / 12 V, 1100 W / 24 V |
| Účinnost konverze | ≤ 98 % |
| Účinnost sledování MPPT | > 99 % |
| Faktor teplotní kompenzace | -3.0 mV/ °C/ 2 V (výchozí) |
| Provozní teplota | -35°C až +45°C |
| Stupeň ochrany | IP32 |
| Hmotnost | 2 kg |
| Komunikační metoda | RS232 |
| Nadmořská výška | ≤ 3000 m |
| Rozměry produktu | 238*173*72.5 mm |
9. Záruka a podpora
For warranty information, please refer to the documentation included with your product packaging or visit the official PowMr website. If you encounter any issues not covered in this manual or require further assistance, please contact PowMr customer support.
PowMr Official Webmísto: Navštivte obchod PowMr na Amazonu
Ask a question about this manual
Ask about setup, troubleshooting, compatibility, parts, safety, or missing instructions. Manuals+ will review the question and use this page’s manual context to help answer it.