
Kadimendium V01A
Uživatelská příručka digitálního multimetru ANENG V01A
Model: V01A | Brand: Kadimendium
1. Úvod
This user manual provides detailed instructions for the safe and effective operation of the ANENG V01A Auto Range True RMS Digital Multimeter. This ultra-portable multi-tester is designed for measuring AC/DC current, voltage, resistance, and for continuity testing. Its intelligent measurement capabilities allow for automatic identification and display of measurement data, making it user-friendly for various electrical tasks.
2. Bezpečnostní informace
Please read all safety warnings and operating instructions carefully before using this multimeter. Failure to follow these instructions may result in electric shock, fire, or serious injury.
- Always ensure the multimeter is in the correct measurement mode before connecting test leads to a circuit.
- Nepřekračujte maximální vstupní hodnoty specifikované pro každý rozsah měření.
- Při práci s obj. dbejte zvýšené opatrnostitagnad 30 V AC RMS, 42 V peak nebo 60 V DC. Tyto objemytages představují nebezpečí úrazu elektrickým proudem.
- Inspect test leads for damage before each use. Do not use if insulation is damaged or if the metal is exposed.
- Nepoužívejte multimetr, pokud se jeví poškozený nebo nefunguje správně.
- Pro zajištění přesných údajů vyměňte baterie ihned po zobrazení indikátoru slabé baterie.
- Během testování mějte ruce a prsty za bariérami sondy.
- This device is designed for indoor use and should not be exposed to rain or moisture.

Image: A warning sign with multilingual text emphasizing the importance of reading product instructions carefully before use.
3. Obsah balení
Ověřte, zda jsou všechny níže uvedené položky součástí balení. Pokud některé položky chybí nebo jsou poškozené, kontaktujte zákaznickou podporu.
- 1 x ANENG V01A Digital Multimeter (Battery not included)
- 2 x testovací sondy (červená a černá)
- 1 x Uživatelská příručka

Image: The ANENG V01A Digital Multimeter, its test probes, and the user manual, displayed alongside its product packaging.
4. Konec produktuview
Familiarize yourself with the components of your ANENG V01A Digital Multimeter.

Obrázek: Jasná přední strana view of the ANENG V01A Digital Multimeter, showcasing its display, buttons, and input jacks, accompanied by its red and black test leads.

Obrázek: Přímá fronta view of the ANENG V01A Digital Multimeter, highlighting its display and control panel.

Image: The ANENG V01A Digital Multimeter shown with its integrated kickstand extended, allowing for angled viewing on a flat surface.
Klíčové komponenty:
- LCD displej: Zobrazuje naměřené hodnoty, jednotky a funkční indikátory.
- Funkční tlačítka:
- Tlačítko NCV: Aktivuje bezkontaktní hlasitosttage detekce.
- Tlačítko H/*: Data Hold function (short press) and Backlight/Flashlight activation (long press).
- Vypínač: Turns the multimeter On/Off.
- Vstupní konektory:
- COM konektor (černý): Společná svorka pro všechna měření. Sem připojte černý měřicí vodič.
- VΩmA Jack (Red): Vstup pro hlasitosttage, Resistance, and milliampere Current measurements. Connect the red test lead here.
- 10A Fused Jack (Red): Input for high current (up to 10A) measurements. Connect the red test lead here for 10A measurements.
- Test Probes: Red and black leads for connecting to circuits.
5. Nastavení
5.1 Instalace baterie
The ANENG V01A Multimeter requires 2 x AAA batteries (not included) for operation.
- Ujistěte se, že je multimetr vypnutý.
- Najděte kryt přihrádky na baterie na zadní straně multimetru.
- Pomocí šroubováku otevřete přihrádku na baterie.
- Vložte dvě baterie typu AAA a dodržujte správnou polaritu (+ a -) vyznačenou uvnitř přihrádky.
- Nasaďte kryt prostoru pro baterie a zajistěte jej šroubem.
5.2 Připojení měřicích kabelů
Always connect the black test lead to the COM jack. Connect the red test lead to the appropriate input jack based on the measurement you intend to perform.
- Pro svtage, Resistance, Continuity, and milliampere Current (mA) measurements: Connect the red test lead to the VΩmA zvedák.
- For high current (up to 10A) measurements: Connect the red test lead to the 10A Fused zvedák.

Image: The ANENG V01A Digital Multimeter with its red and black test leads properly connected to the input jacks, ready for use.
6. Návod k obsluze
6.1 Power On/Off and Auto Range
Stiskněte tlačítko Moc button to turn the multimeter on. The V01A features an auto-range function, meaning it automatically recognizes and displays the measurement data without requiring manual range selection. To turn off the multimeter, press the Moc button again. The device also has an Auto Power Off feature to conserve battery life.

Image: The ANENG V01A Digital Multimeter with its display showing a reading, emphasizing its auto-ranging capability for convenient measurement.
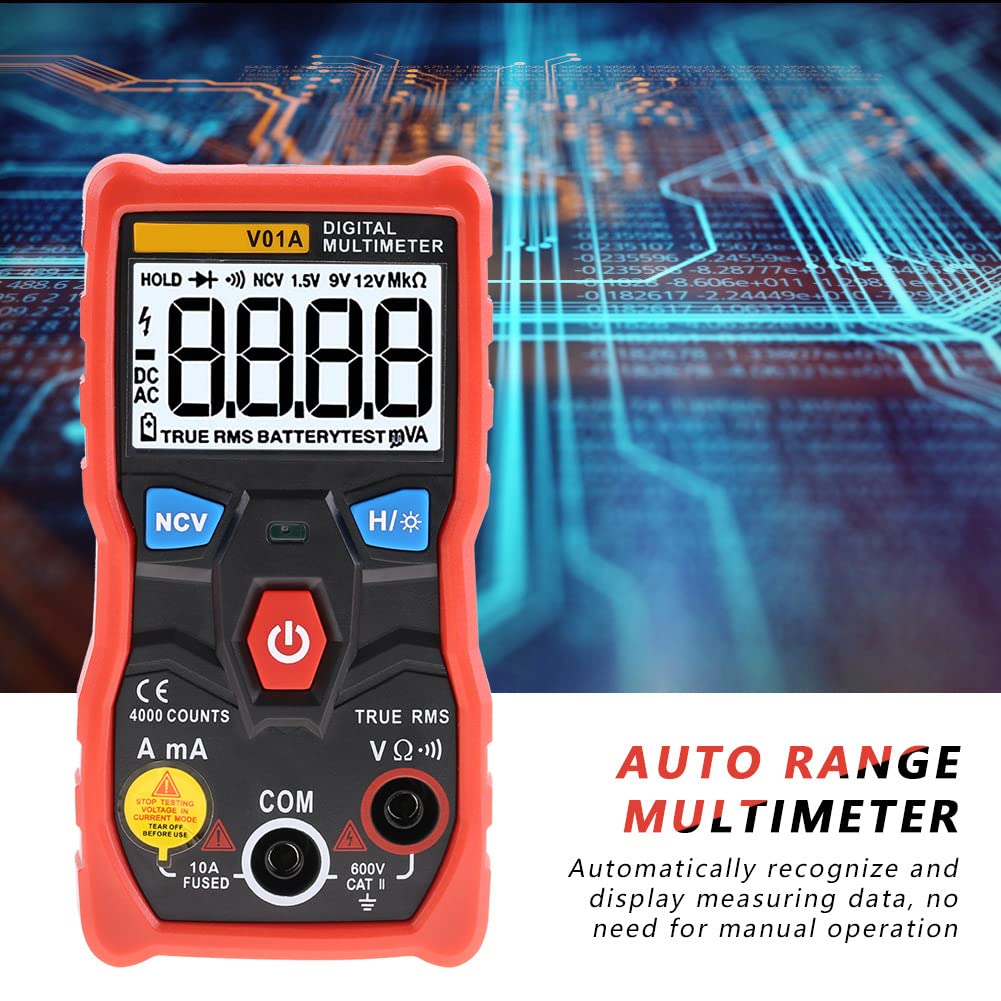
Obrázek: Detailní záběr view of the ANENG V01A Digital Multimeter's display, highlighting the "AUTO RANGE MULTIMETER" text and indicating its automatic measurement recognition.
6.2 Měřicí funkce
6.2.1 DC svtage Měření
Connect the red test lead to the VΩmA jack and the black test lead to the COM jack. Connect the probes across the DC voltagzdroj. Multimetr automaticky detekuje a zobrazí stejnosměrný proud.tage.

Image: A user's hands holding the multimeter probes to measure components on a circuit board, demonstrating a typical voltage or resistance measurement scenario.
6.2.2 AC svtage Měření
Connect the red test lead to the VΩmA jack and the black test lead to the COM jack. Connect the probes across the AC voltagzdroj. Multimetr automaticky detekuje a zobrazí hlasitost střídavého proudutage (True RMS).
6.2.3 DC/AC Current Measurement (mA/A)
Pozor: To measure current, the multimeter must be connected in series with the circuit. Never connect the multimeter in parallel with a voltage source when in current mode, as this can damage the device or blow the fuse.
- Pro miliampere (mA) current: Connect the red test lead to the VΩmA jack and the black test lead to the COM jack.
- Pro ampere (A) current (up to 10A): Connect the red test lead to the 10A Fused jack and the black test lead to the COM jack.
Break the circuit and connect the multimeter in series. The multimeter will automatically detect and display the current.
6.2.4 Měření odporu
Connect the red test lead to the VΩmA jack and the black test lead to the COM jack. Ensure the circuit or component is de-energized before measuring resistance. Connect the probes across the component. The multimeter will automatically detect and display the resistance in Ohms (Ω), kilo-Ohms (kΩ), or Mega-Ohms (MΩ).
6.2.5 Test kontinuity
Connect the red test lead to the VΩmA jack and the black test lead to the COM jack. Ensure the circuit is de-energized. Touch the probes to the two points you want to test for continuity. If there is continuity (low resistance), the multimeter will emit an audible beep.
6.2.6 Nekontaktní svtage (NCV) Detekce
Stiskněte tlačítko NCV button. Hold the top part of the multimeter near an AC voltage source (e.g., a live wire or outlet). The multimeter will indicate the presence of AC voltage through an audible beep and/or visual indicator on the display, without direct contact.
6.2.7 Test baterie (1.5 V, 9 V, 12 V)
The multimeter can test common battery voltages. Connect the red test lead to the VΩmA jack and the black test lead to the COM jack. Connect the probes to the positive and negative terminals of the battery. The multimeter will display the battery voltage.

Image: A user's hands holding the multimeter probes to test the voltage of a 9V battery, demonstrating the battery test function.
6.3 Speciální funkce
- Uchování dat (H): Krátce stiskněte H/* tlačítko pro zmrazení aktuální hodnoty na displeji. Dalším stisknutím tlačítko uvolníte.
- Backlight/Flashlight (*): Dlouze stiskněte H/* button to turn on the display backlight and the integrated flashlight. Long press again to turn them off. This is useful for working in dimly lit environments.
- Automatické vypnutí: The multimeter will automatically power off after a period of inactivity to save battery life.
- Indikace slabé baterie: A battery icon will appear on the display when the battery voltage is low, indicating that the batteries need to be replaced.
7. Údržba
7.1 Čištění
Otřete pouzdro reklamouamp hadříkem a jemným čisticím prostředkem. Nepoužívejte abrazivní prostředky ani rozpouštědla. Udržujte vstupní konektory bez prachu a nečistot.
7.2 Výměna baterie
When the low battery indicator appears on the display, replace the batteries as described in Section 5.1. Always use 2 x AAA batteries.
7.3 Skladování
If the multimeter is not used for a long period, remove the batteries to prevent leakage and damage to the device. Store the multimeter in a cool, dry place, away from direct sunlight and extreme temperatures.
8. Řešení problémů
If you encounter issues with your multimeter, refer to the table below for common problems and solutions.
| Problém | Možná příčina | Řešení |
|---|---|---|
| Multimetr se nezapne. | Vybité nebo nesprávně vložené baterie. | Zkontrolujte polaritu baterií nebo je vyměňte. |
| Žádný údaj ani zobrazení „OL“. | Open circuit, out of range, or incorrect function/lead connection. | Check circuit continuity, ensure measurement is within range, verify test lead connections for the selected function. |
| Nepřesné údaje. | Low battery, environmental interference, or damaged test leads. | Replace batteries, move away from strong electromagnetic fields, inspect and replace damaged test leads. |
| Test kontinuity nepípá. | Přerušený obvod nebo vysoký odpor. | Ensure good contact with the circuit; the circuit may not be continuous. |
9. Specifikace
| Parametr | Hodnota |
|---|---|
| Značka | ANENG (Kadimendium) |
| Model | V01A |
| Zobrazit | 4000 počítá |
| DC svtage Dosah | 4.000V, 40.00V, 400.0V, 600V |
| AC svtage Dosah | 4.000V, 40.00V, 400.0V, 600V (True RMS) |
| AC proudový rozsah | 999.9mA, 9.999A |
| Rozsah DC proudu | 999.9mA, 9.999A |
| Rozsah odporu | 4.000kΩ, 40.00kΩ, 400.0kΩ, 4.000MΩ, 40.00MΩ |
| Frekvenční odezva střídavého proudu | 40Hz-1kHz |
| Test kontinuity | Ano |
| NCV (bezkontaktní svtage) | Ano |
| Automatický rozsah | Ano |
| Skutečné RMS | Ano |
| Data Hold | Ano |
| Podsvícení | Ano |
| Svítilna | Ano |
| Automatické vypnutí | Ano |
| Indikace slabé baterie | Ano |
| Materiál | ABS, PVC |
| Sample Rate | 3 SPS |
| Provozní prostředí | 0~40℃, <75%RH |
| Skladovací prostředí | -20~60℃, <80%RH |
| Napájení | 2 x AAA baterie (nejsou součástí balení) |
| Rozměry | 12 x 6 x 2.8 cm / 4.7 x 2.4 x 1.1 palce |
| Hmotnost (přibližně) | 199 g / 7.0 oz |
10. Záruka a podpora
This product comes with a standard manufacturer's warranty. For specific warranty terms and conditions, please refer to the warranty card included with your purchase or contact the seller directly. If you have any questions, require technical assistance, or need to report an issue, please contact Kadimendium customer support through your purchase platform. We are committed to providing timely assistance and ensuring your satisfaction.
Ask a question about this manual
Ask about setup, troubleshooting, compatibility, parts, safety, or missing instructions. Manuals+ will review the question and use this page’s manual context to help answer it.