
Zavedení
Thank you for choosing the Hbada Ergonomic Gaming Chair. This manual provides essential information for the safe and efficient assembly, operation, and maintenance of your new chair. Please read these instructions carefully before use and retain them for future reference.

Image: The Hbada Ergonomic Gaming Chair in a modern gaming environment, showcasing its design and presence.
Bezpečnostní informace
- Před montáží se ujistěte, že jsou všechny součásti přítomny a nepoškozené. Nepoužívejte, pokud některé součásti chybí nebo jsou poškozené.
- Follow the assembly instructions precisely. Incorrect assembly can lead to instability and injury.
- Nestůjte na židli. Používejte ji pouze k sezení.
- Nepřekračujte maximální nosnost (viz specifikace).
- Během montáže držte děti a domácí zvířata v dostatečné vzdálenosti od židle.
- Nevystavujte židli přímému slunečnímu záření nebo extrémním teplotám, abyste zabránili degradaci materiálu.
Rozměry produktu
Understanding the dimensions of your chair is important for proper placement and comfortable use. Below are the key measurements:
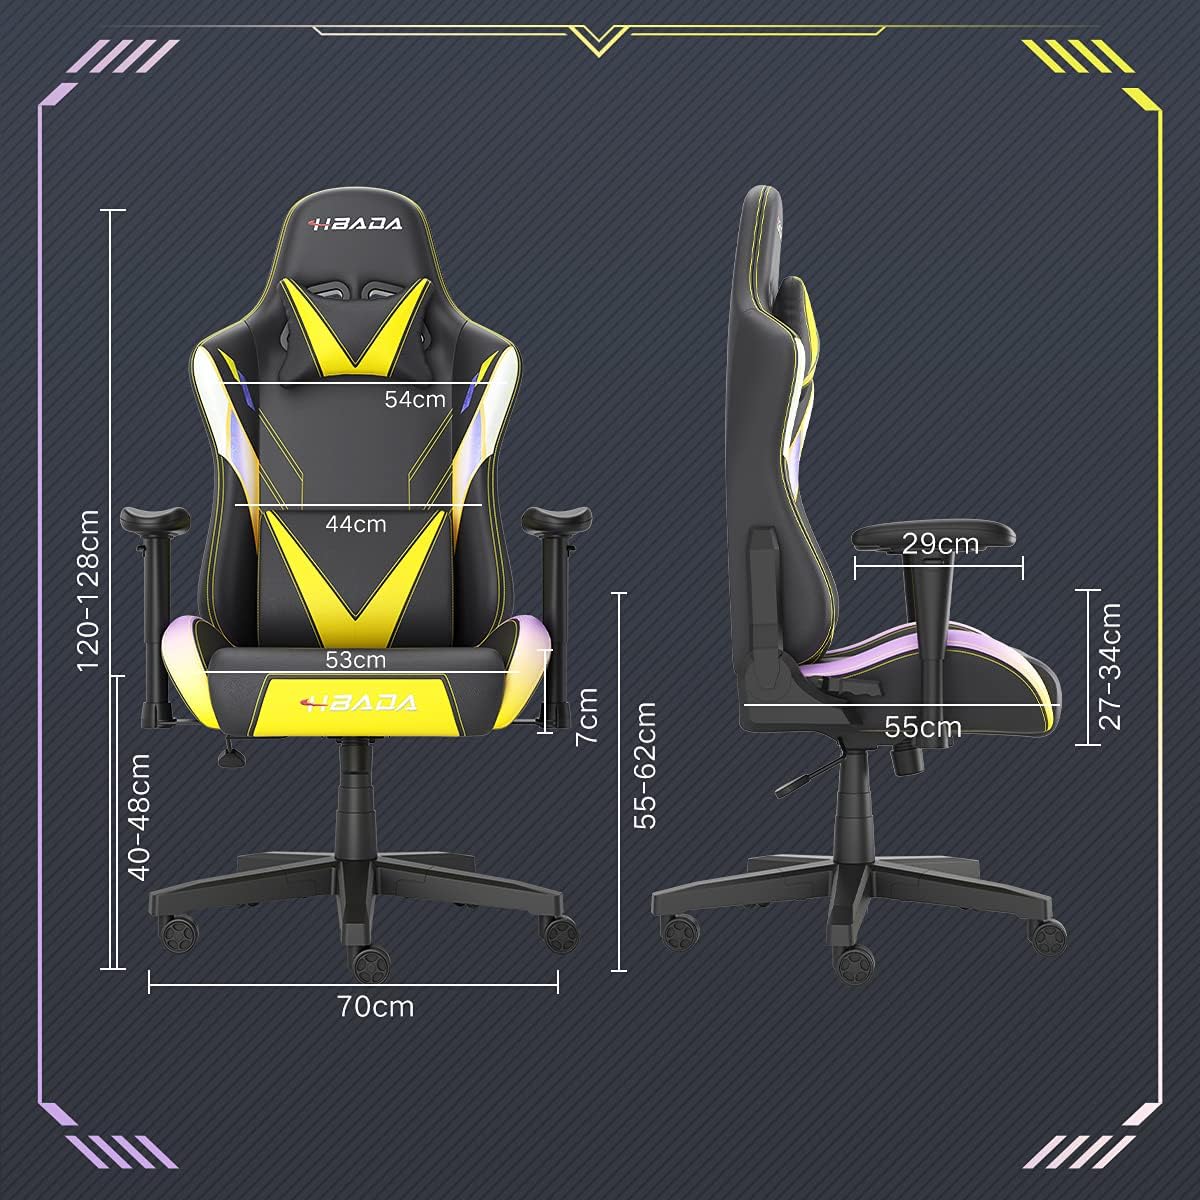
Image: A detailed diagram illustrating the various dimensions of the Hbada Gaming Chair, including height, width, and depth measurements.
- Celková výška: 120-128 cm (nastavitelné)
- Výška sedáku: 40-48 cm (nastavitelné)
- Šířka sedadla: 53 cm
- Hloubka sedadla: 55 cm
- Šířka opěradla: 54 cm (shoulder area), 44 cm (lumbar area)
- Výška loketní opěrky (od sedadla): 7 cm (adjustable)
- Průměr základny: 70 cm
Nastavení a montáž
Please follow these steps carefully to assemble your Hbada Gaming Chair. It is recommended to have a clear, spacious area for assembly.
Montážní kroky:
- Step 1: Assemble the Base and Wheels
Insert the five casters into the holes on the star base. Then, place the gas lift cylinder into the center hole of the base.

Image: Illustration of attaching the five casters to the chair's star-shaped base and inserting the gas lift cylinder.
- Step 2: Attach the Seat and Backrest
Connect the backrest to the seat using the provided screws and mounting plates. Ensure all screws are tightened securely.

Image: Diagram showing the process of securing the backrest to the seat cushion using screws and brackets.
- Krok 3: Instalace loketních opěrek
Attach the armrests to the sides of the seat using the designated screws. Make sure they are firmly attached.

Image: Visual guide for attaching the armrests to the chair's seat base.
- Step 4: Connect Seat to Base
Carefully place the assembled seat onto the gas lift cylinder, ensuring it is properly seated and stable.

Image: Depiction of lowering the assembled seat onto the gas lift cylinder, connecting the upper and lower parts of the chair.
- Step 5: Attach Headrest and Lumbar Pillow
Secure the detachable headrest and lumbar support pillow to the chair as desired for optimal comfort.

Image: Instructions for attaching the headrest and lumbar support pillows to the gaming chair.
Návod k obsluze
Your Hbada Gaming Chair is designed with several adjustable features to provide personalized comfort and support.
Key Adjustable Functions:
- Adjustable Sitting Height: Use the lever located under the seat on the right side to raise or lower the chair. Pull the lever up to adjust the height, then release it at your desired position. The seat has an 8 cm elevation range.
- Reclining Backrest (90° to 155°): The backrest can be reclined from 90 degrees (upright) to 155 degrees (nearly flat). Use the recline lever on the side of the chair to adjust the angle. Lean back to your preferred position and lock the lever.
- Nastavitelné područky: The armrests can be adjusted in height by 7 cm. Locate the button or lever on the side of each armrest to unlock, adjust, and then lock them into your desired height.
- 360° Free Swivel: The chair features a full 360-degree swivel function, allowing for easy movement and access to your surroundings without needing to move the entire chair.
- Detachable Headrest and Lumbar Support: The chair includes a removable headrest pillow and lumbar support cushion for enhanced ergonomic comfort. Adjust their positions or remove them based on your preference.

Obrázek: Overview of the chair's ergonomic systems, highlighting adjustable sitting height, armrests, 155° reclining, 360° swivel, cool racing casters, and durable base.

Image: The Hbada Gaming Chair demonstrated in its 155-degree reclined position, illustrating the recline controller.
Údržba
Regular maintenance will help prolong the life and appearance of your Hbada Gaming Chair.
- Čištění PU kůže: Otřete povrchy z umělé kůže měkkým hadříkemamp hadříkem. Na odolné skvrny použijte jemný mýdlový roztok a poté otřete čistým hadříkem.amp hadříkem. Nepoužívejte agresivní chemikálie nebo abrazivní čisticí prostředky, protože by mohly materiál poškodit.
- Péče o kolečka: Periodically check the casters for accumulated dust or hair. Clean them with a brush or vacuum cleaner to ensure smooth movement and prevent damage to your flooring.
- Rám a komponenty: Pravidelně kontrolujte všechny šrouby a vruty, zda jsou pevně utažené. V případě potřeby je dotáhněte pro zachování stability.
- Vyhněte se přímému slunečnímu záření: Prolonged exposure to direct sunlight can cause the PU leather to fade and crack. Position your chair away from direct sunlight when possible.
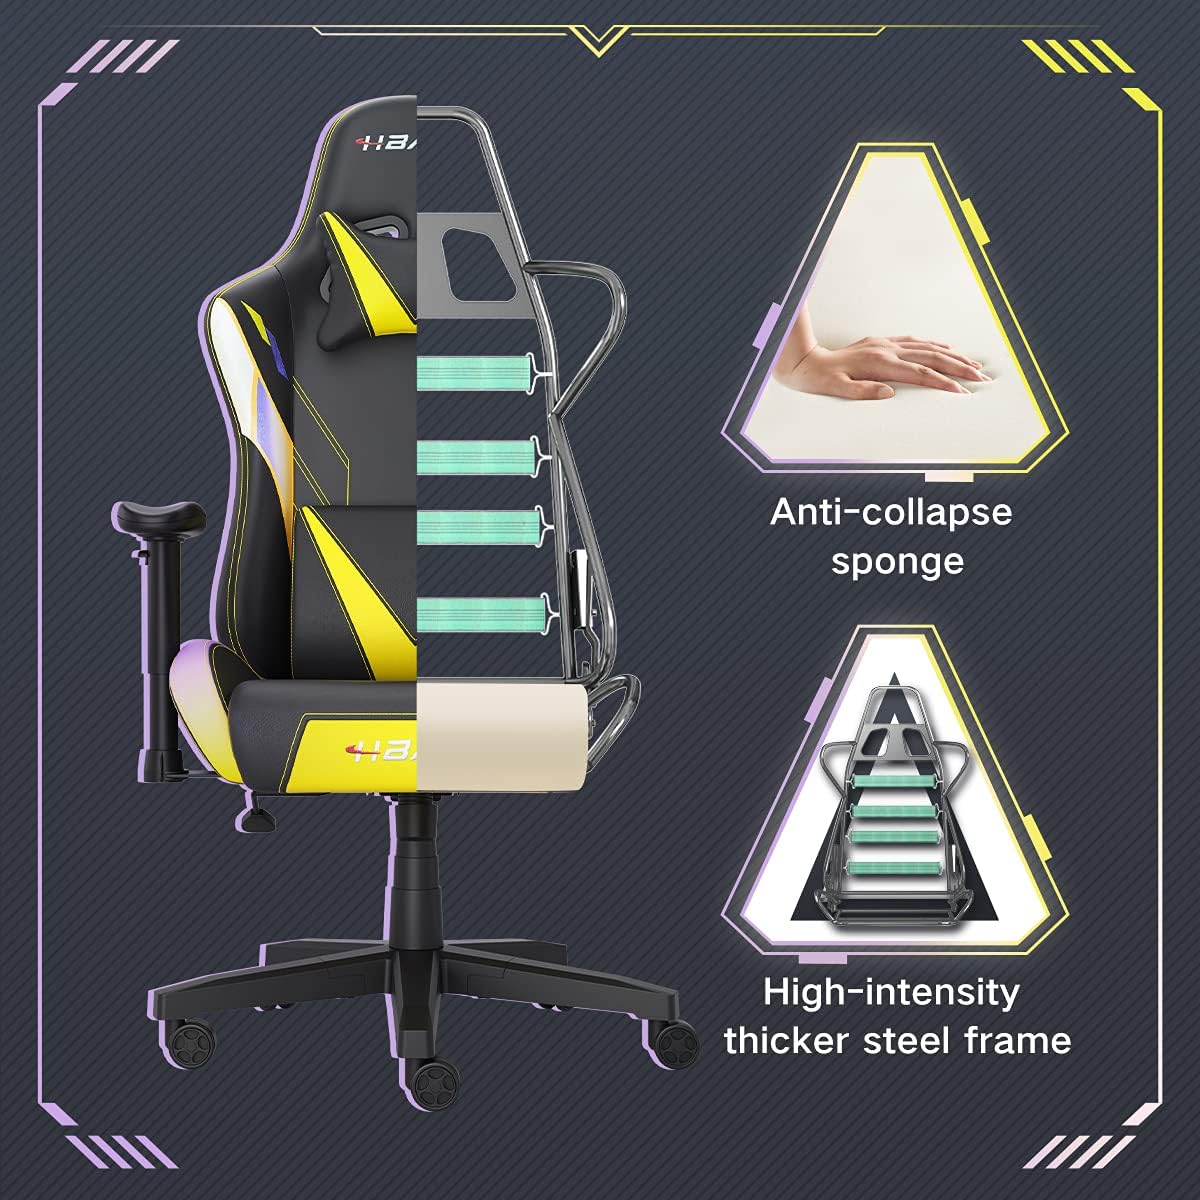
Obrázek: Výřez view of the chair's internal structure, highlighting the anti-collapse sponge padding and the high-intensity thicker steel frame, indicating durable construction.
Odstraňování problémů
If you encounter any issues with your Hbada Gaming Chair, refer to the following common problems and solutions:
| Problém | Možná příčina | Řešení |
|---|---|---|
| Židle se nedá nastavit na výšku | Porucha plynového zvedáku nebo není zasunutá páka. | Ujistěte se, že je páka pro nastavení výšky zcela zajištěna. Pokud problém přetrvává, může být nutné vyměnit plynový zvedák. Kontaktujte zákaznickou podporu. |
| Židle se kymácí nebo je nestabilní | Uvolněné šrouby nebo nesprávná montáž. | Check all assembly screws and bolts, and tighten them securely. Refer to the assembly instructions. |
| Kolečka se neotáčejí hladce | Nečistoty (vlasy, prach) zachycené v kolečkách. | Otočte židli a odstraňte veškeré nečistoty z koleček. |
| Opěradlo se nedá sklopit ani zablokovat | Sklápěcí mechanismus je zaseknutý nebo páčka není zajištěna. | Ensure the recline lever is fully engaged. Check for any obstructions around the mechanism. |
Specifikace
| Funkce | Detail |
|---|---|
| Značka | Hbada |
| Číslo modelu | W203YMA/EU |
| ASIN | B095PSFLKX |
| Barva | Žluť |
| Materiál | PU Leather, Metal Frame |
| Rozměry produktu | 70 x 70 x 128 cm (délka x šířka x výška) |
| Hmotnost produktu | 22 kg |
| Speciální funkce | Ergonomic, Swivel, Casters, Headrest Support, Adjustable Recline (90°-155°), Adjustable Seat Height (8cm range), Adjustable Armrests (7cm range) |
| Počet jednotek | 1.0 Počet |
Záruka a podpora
Your Hbada Gaming Chair comes with a jednoletá záruka od data nákupu. Tato záruka se vztahuje na výrobní vady a vady materiálu vzniklé při běžném používání.
If you experience any issues during use, including problems with installation, damage, or missing parts, please do not hesitate to contact Hbada customer service. We are committed to providing reliable service and can offer free exchanges for covered issues.
For support, please visit the official Hbada webnebo kontaktujte svého prodejce.