
TRONXY XY-2 PRO 2E

TRONXY XY-2 PRO 2E Upgraded 3D Printer
Návod k použití
1. Konec produktuview
The TRONXY XY-2 PRO 2E is an advanced 3D printer featuring a dual-extruder system for two-color printing. Designed for both beginners and experienced users, it offers a semi-assembled setup for quick installation and incorporates silent mainboards for quiet operation. Its robust build volume of 255 x 255 x 245mm allows for a wide range of printing projects.

Figure 1.1: Fully assembled TRONXY XY-2 PRO 2E 3D Printer with dual filament spools.
Klíčové vlastnosti:
- Dual-Extruder System: Enables two-color printing with automatic switching of filaments through a single nozzle.
- Semi-Assembled Design: Facilitates quick and easy setup, typically within 5 steps.
- Silent Mainboards: Equipped with TMC mute driver chips for significantly reduced operational noise.
- Auto Leveling TR Sensor: Enhances bed leveling accuracy for consistent first layers.
- Filament Detection Sensor: Automatically pauses printing when filament runs out, preventing failed prints.
- Resume from Power Failure: Allows printing to continue from the last known position after a power interruption.
- Fast Heating Hot Bed: Reaches 120°C quickly, reducing pre-print waiting times.
2. Nastavení a montáž
The TRONXY XY-2 PRO 2E is designed for straightforward assembly. Follow these steps to set up your printer.

Figure 2.1: Visual guide for the semi-assembled components of the 3D printer.
Montážní kroky:
- Rozbalte komponenty: Opatrně vyjměte všechny díly z obalu a zkontrolujte je podle dodacího listu.
- Attach Gantry to Base: Secure the Z-axis gantry to the printer base using the provided screws. Ensure all connections are firm.
- Install Filament Holders: Mount the two filament spool holders onto the top frame of the gantry.
- Připojení kabeláže: Connect all necessary cables, including the 30-pin wire, to their respective ports. Refer to the included wiring diagram for precise connections.
- Install Extruders: Attach the dual extruders and ensure they are properly seated.
Identifikace součásti:
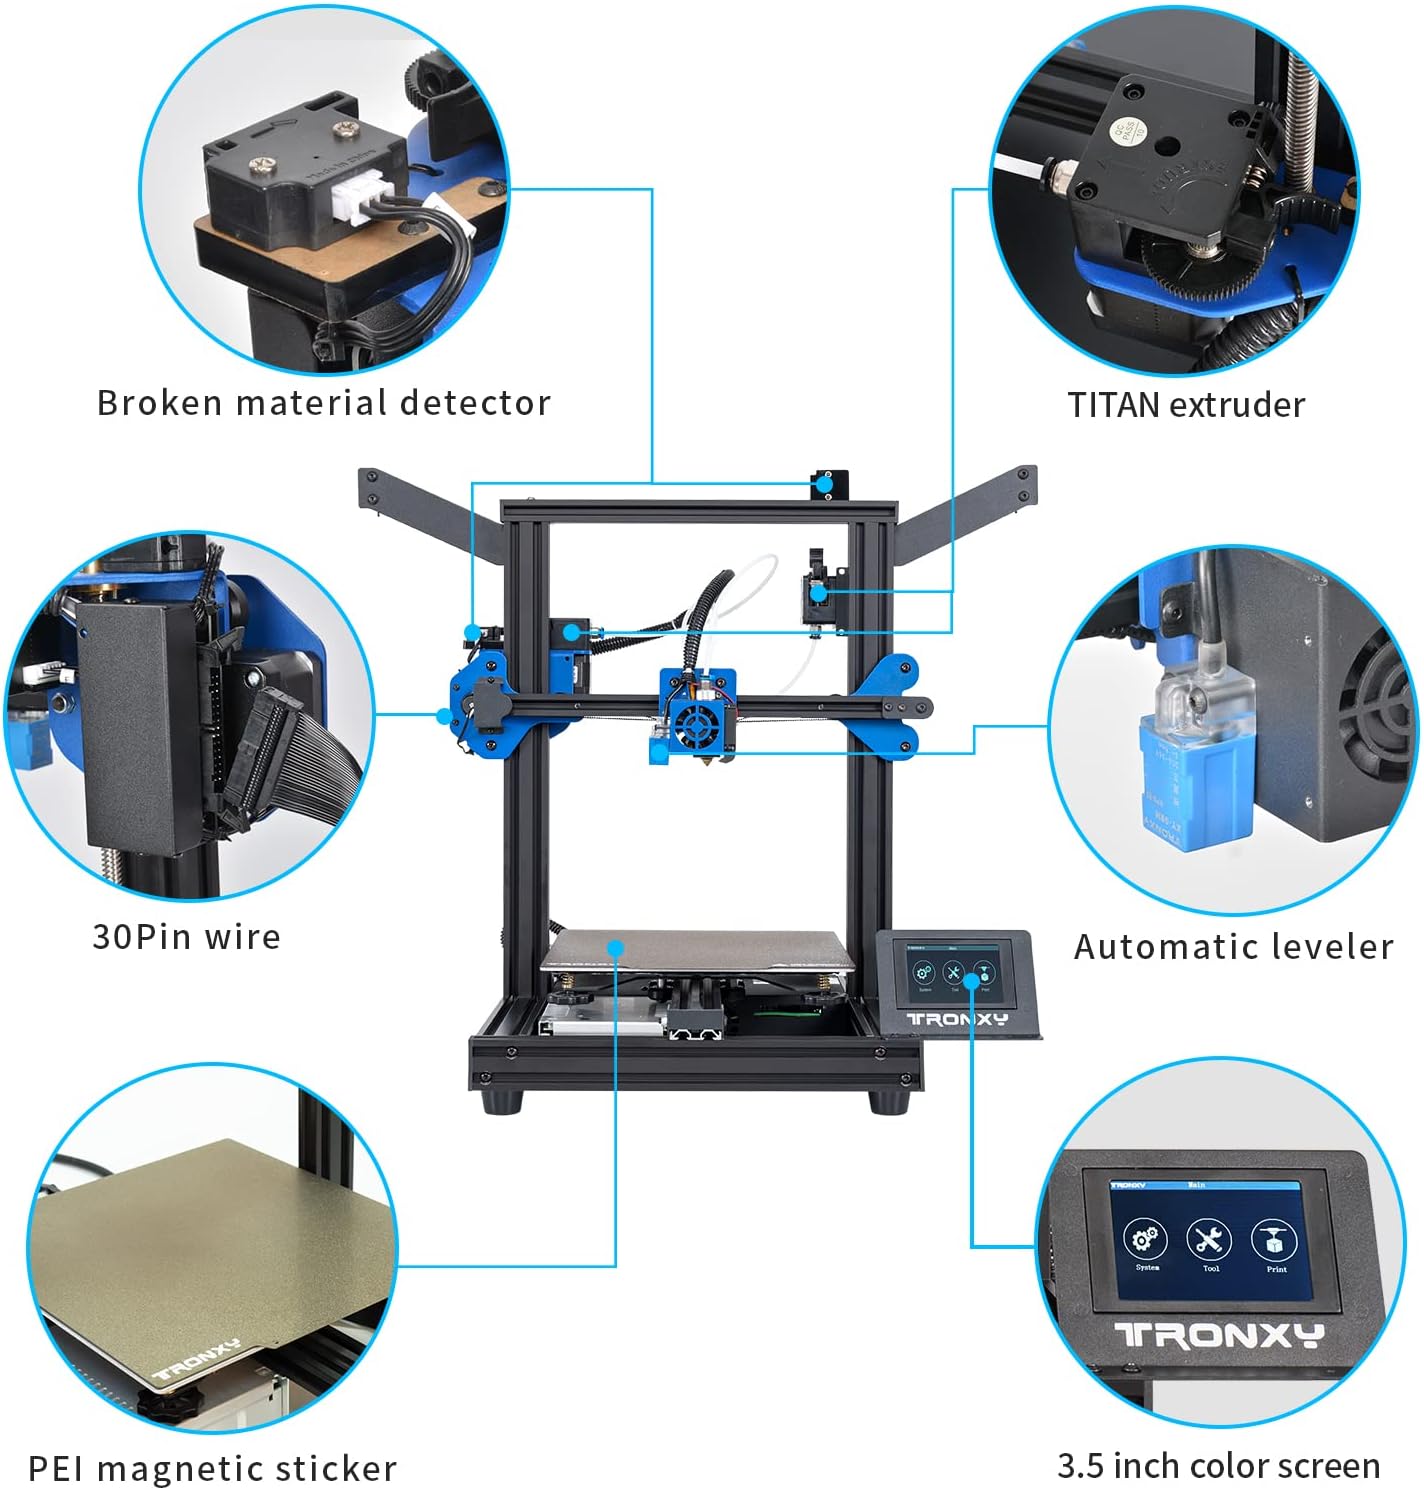
Obrázek 2.2: Detailní view of key components including the TITAN extruder, automatic leveler, and 3.5-inch color screen.
- Broken Material Detector: Sensor to detect filament breakage or run-out.
- TITAN Extruder: High-performance extruder for precise filament feeding.
- 30Pin Wire: Main data and power cable connecting the gantry to the base.
- Automatic Leveler: Sensor for automated bed leveling.
- PEI Magnetic Sticker: Flexible print surface for easy print removal.
- 3.5 inch Color Screen: User interface for printer control.
3. Návod k obsluze
This section guides you through the basic operation of your TRONXY XY-2 PRO 2E 3D printer.
3.1 Zapnutí a počáteční nastavení
- Připojte napájení: Plug the power cord into the printer and a suitable power outlet.
- Vypínač: Flip the power switch located on the printer's base to the 'ON' position. The screen will illuminate.
- Výběr jazyka: If prompted, select your preferred language on the touchscreen.
3.2 Vkládání filamentu

Figure 3.1: Illustration of the dual filament input and single nozzle output system.
- Prepare Filament: Place your two filament spools onto the respective holders.
- Insert Filament 1: Gently feed filament 1 into its designated input hole until it reaches the bottom.
- Insert Filament 2: Feed filament 2 into its input hole, ensuring it is approximately 3 cm away from the pneumatic connector.
- Předehřívací tryska: On the touchscreen, navigate to the preheat settings and select the appropriate temperature for your filament type (e.g., PLA, ABS).
- Extrudované vlákno: Once the nozzle reaches temperature, use the 'Extrude' function on the screen to feed the filament through the nozzle until it flows smoothly.
3.3 Vyrovnání postele
The TRONXY XY-2 PRO 2E features an Auto Leveling TR Sensor to assist with bed leveling. For optimal print quality, ensure the print bed is properly leveled.
- Automatické vyrovnání: From the main menu, select the 'Auto Level' option. The printer will automatically probe multiple points on the print bed to adjust for unevenness.
- Ruční nastavení (pokud je potřeba): After auto-leveling, if you observe issues with the first layer adhesion, fine-tune the bed height using the adjustment knobs located under the print bed. Ensure the nozzle is at the correct distance from the bed (typically the thickness of a piece of paper).
3.4 Zahájení tisku
- Prepare G-code: Slice your 3D model using a compatible slicing software (e.g., Cura, Simplify3D) and save the G-code file na TF kartu.
- Vložení TF karty: Insert the TF card into the designated slot on the printer.
- Vybrat File: Na dotykové obrazovce přejděte do nabídky „Tisk“ a vyberte požadovaný G-kód. file z karty TF.
- Zahájit tisk: Confirm your selection to begin the printing process. The printer will preheat the nozzle and bed, then start printing.
4. Údržba
Pravidelná údržba zajišťuje dlouhou životnost a optimální výkon vaší 3D tiskárny.
4.1 Obecné čištění
- Čistá tisková podložka: After each print, allow the print bed to cool and remove any residual filament or debris. Use isopropyl alcohol to clean the PEI magnetic sticker periodically.
- Clear Nozzle: Before and after prints, check the nozzle for any clogs or filament buildup. Use a brass brush or a needle to clear it if necessary.
- Odstranění prachu: Regularly wipe down the printer's frame and components with a dry, lint-free cloth to remove dust and filament particles.
4.2 Mazání
- Vodicí šrouby: Apply a small amount of lithium grease or silicone lubricant to the Z-axis lead screws every few months or if you notice any grinding sounds.
- Smooth Rods: Wipe the smooth rods clean and apply a thin layer of lubricant to ensure smooth movement of the print head and bed.
5. Řešení problémů
Tato část se zabývá běžnými problémy, se kterými se můžete setkat, a nabízí řešení.
| Problém | Možná příčina | Řešení |
|---|---|---|
| Vlákno se nevytlačuje | Ucpaná tryska, zamotaný filament, nesprávná teplota. | Clean the nozzle, untangle filament, verify and adjust print temperature. |
| Výtisky se nelepí na podložku | Bed not leveled, bed too cold, dirty print surface. | Re-level the bed (auto or manual), increase bed temperature, clean print surface with isopropyl alcohol. |
| Posouvání vrstev | Uvolněné řemeny, problémy s motorem, příliš vysoká rychlost tisku. | Check and tighten belts, inspect motor connections, reduce print speed. |
| Printer making loud noises | Loose components, worn bearings, fan issues. | Inspect for loose screws, lubricate moving parts, check cooling fans for obstructions or damage. |
| Tiskárna se nezapíná | Faulty power cord, power supply issue. | Ensure power cord is fully inserted and functional. Try a different power cord if available. Contact support if issue persists. |
6. Specifikace
Detailed technical specifications for the TRONXY XY-2 PRO 2E 3D Printer.
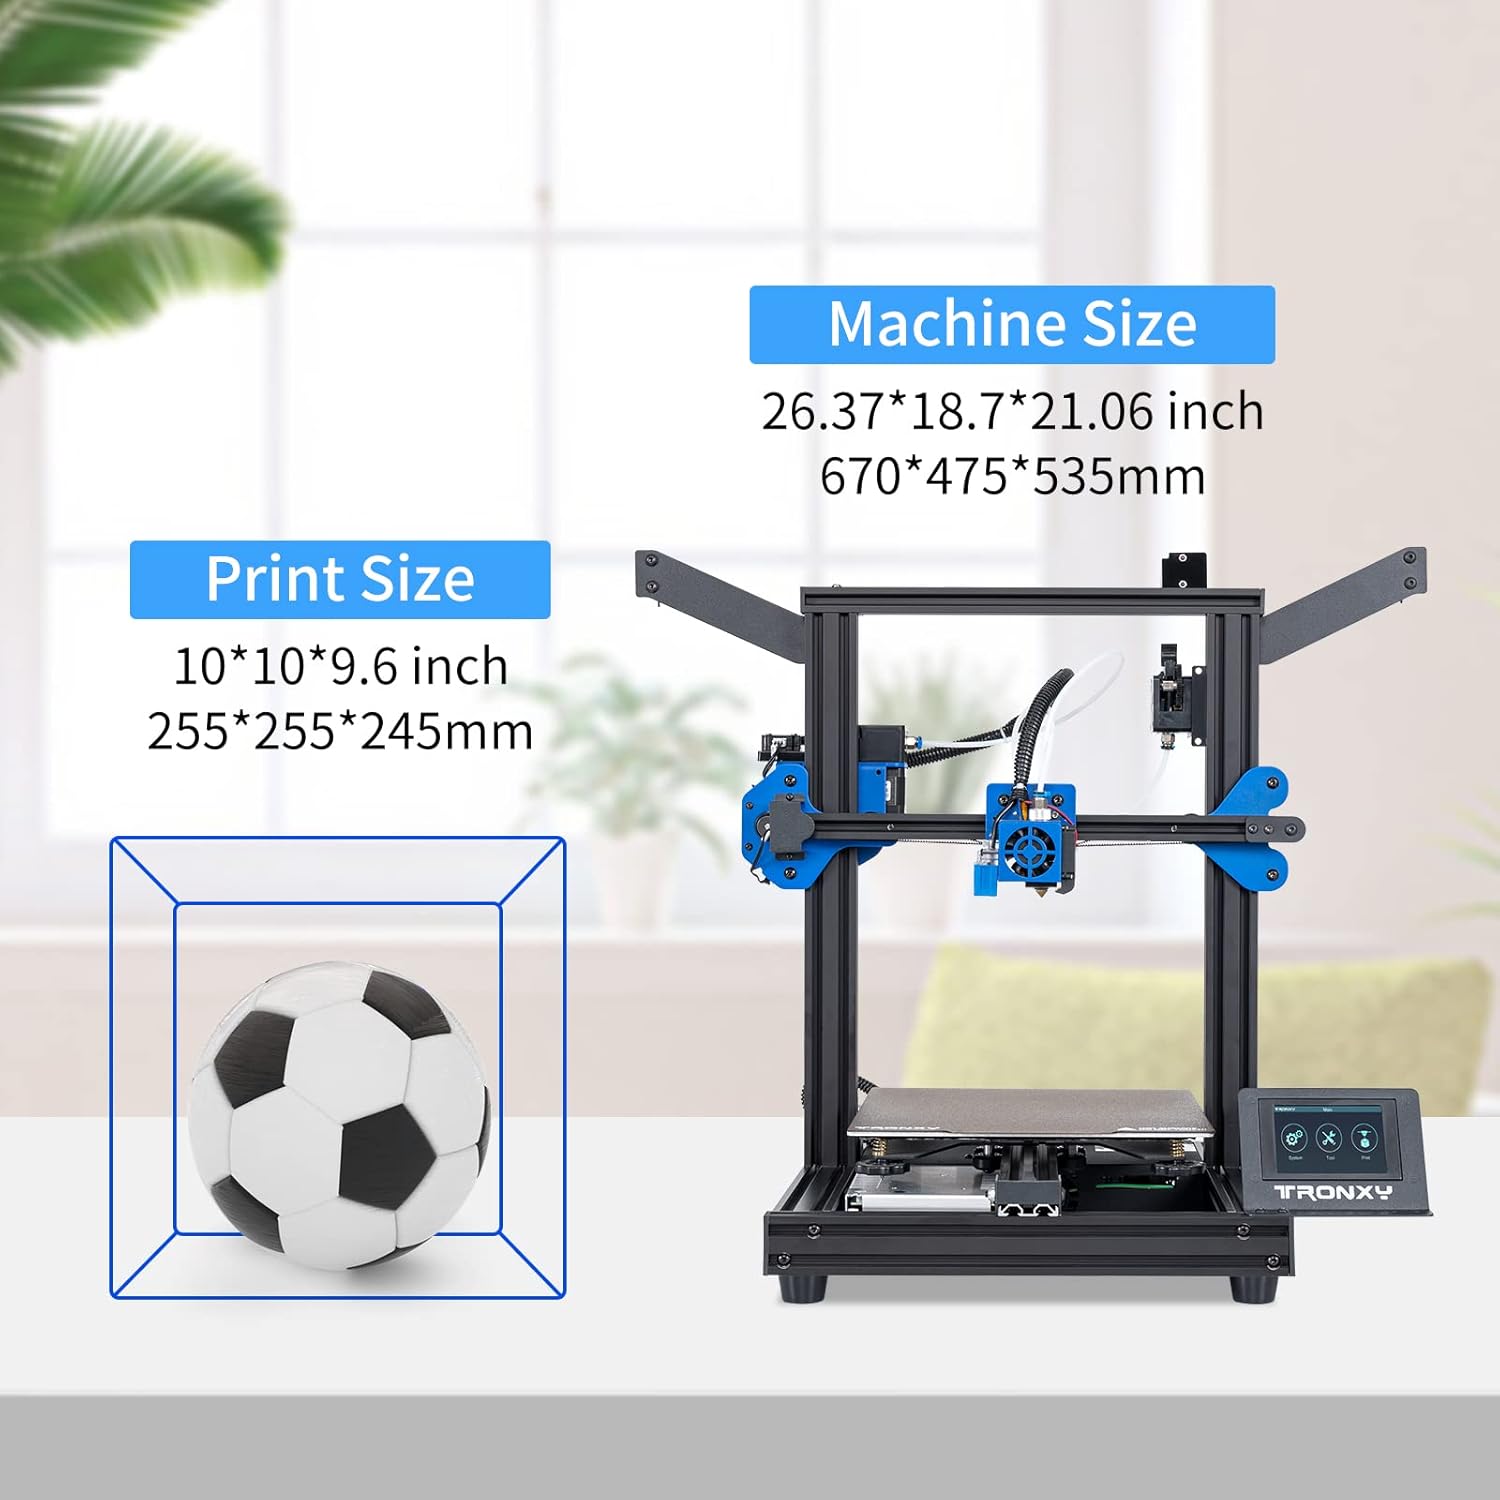
Figure 6.1: Machine and print size dimensions of the TRONXY XY-2 PRO 2E.
| Specifikace | Hodnota |
|---|---|
| Rozměry produktu | 10.04 x 10.04 x 9.65 palce (255 x 255 x 245 mm) |
| Hmotnost položky | 26.4 libry |
| Velikost tisku (objem tisku) | 255 x 255 x 245 mm |
| Značka | TRONXY |
| Model | XY-2 PRO 2E |
| Podporováno File Formát | STEP (G-code for printing) |
| Kompatibilita operačního systému | Linux (and other common OS via slicing software) |
| Teplota horkého lůžka | Do 120°C |
| Typ extrudéru | Dual Extruder (Titan) |
| Základní deska | Silent Mainboards with TMC mute driver chip |
7. Záruka a podpora
TRONXY is committed to providing excellent customer service and support for its products.
7.1 Technická podpora
TRONXY offers lifetime professional technical support for the XY-2 PRO 2E 3D printer. If you encounter any issues or have questions, please contact our support team.
- Kontaktní metoda: For support, please find your order and click 'Contact Seller' on the platform where you purchased the product.
- Doba odezvy: We aim to provide a satisfactory answer within 24 hours.
- E-mailová podpora: You may also reach out via email at lisa@tronxy.com for direct assistance.
7.2 Informace o záruce
Specific warranty terms and conditions may vary by region and retailer. Please refer to your purchase documentation or contact customer support for detailed warranty information.
Ask a question about this manual
Ask about setup, troubleshooting, compatibility, parts, safety, or missing instructions. Manuals+ will review the question and use this page’s manual context to help answer it.