1. Úvod
This manual provides essential information for the safe and efficient operation of your HP Pro Laminator 600 A4. Please read these instructions thoroughly before using the device and retain them for future reference. Proper use ensures optimal performance and extends the lifespan of your laminator.
2. Bezpečnostní pokyny
- Laminátor vždy připojujte k uzemněné elektrické zásuvce.
- Neobsluhujte zařízení mokrýma rukama ani v blízkosti vody.
- Ensure adequate ventilation around the laminator during operation.
- Udržujte děti a domácí zvířata mimo dosah zařízení.
- Do not insert objects other than lamination pouches into the feed slot.
- Odpojte laminátor, když jej nepoužíváte nebo před čištěním.
- Během používání a bezprostředně po něm se nedotýkejte horkých částí laminátoru.
- Pokud je napájecí kabel poškozen, musí jej vyměnit výrobce, jeho servisní zástupce nebo podobně kvalifikovaná osoba, aby se předešlo nebezpečí.
3. Obsah balení
Ověřte, zda jsou v balení přítomny všechny položky:
- HP Pro Laminator 600 A4
- Napájecí kabel
- Návod k použití
- Starter set of lamination pouches (quantity may vary)
4. Konec produktuview
Familiarize yourself with the components of your HP Pro Laminator 600 A4.

Obrázek 4.1: Přední úhel view of the HP Pro Laminator 600 A4, showcasinjeho elegantní design a ovládací panel.
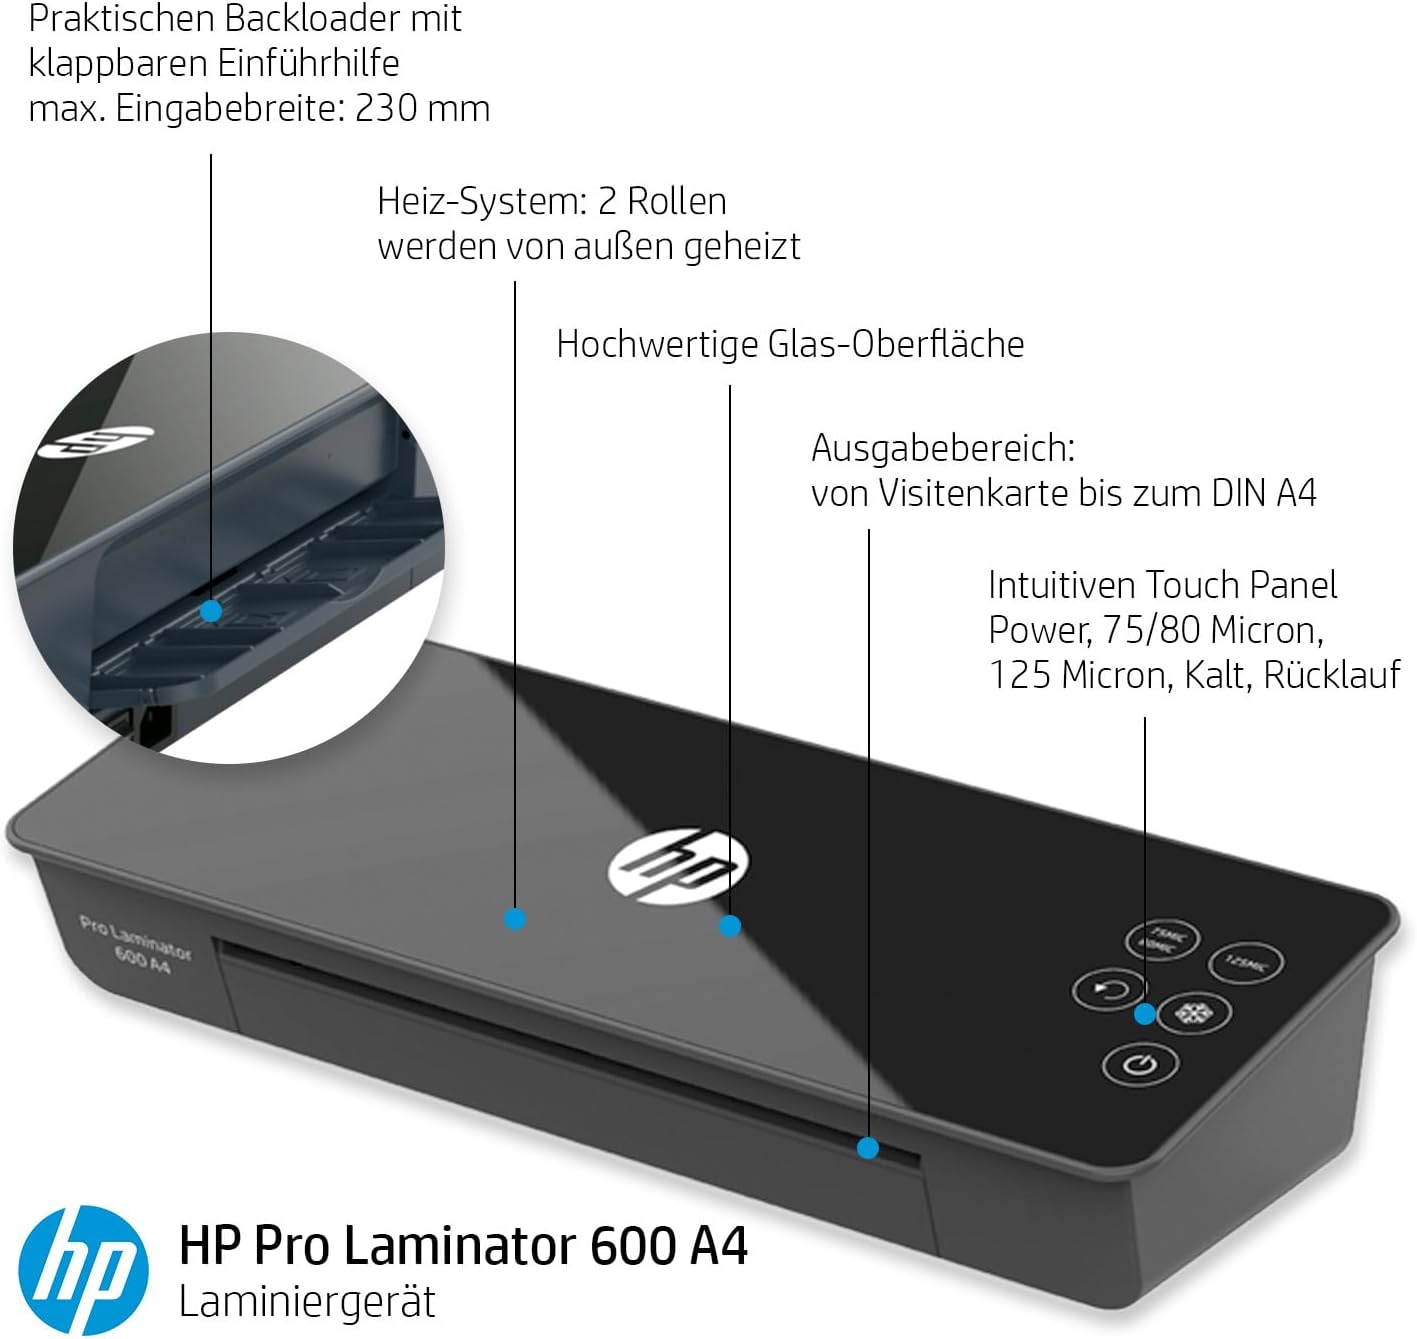
Figure 4.2: Detailed diagram highlighting key features including the practical backloader with foldable feed aid, max input width of 230mm, 2-roller heating system, high-quality glass surface, output area for business cards up to DIN A4, and the intuitive touch panel for power, 75/80 micron, 125 micron, cold lamination, and reverse functions.

Obrázek 4.3: Detail view of the touch control panel, showing buttons for 75/80 micron, 125 micron, reverse (ABS), cold lamination (snowflake icon), and power.
Klíčové komponenty:
- Feed Slot: Where documents with lamination pouches are inserted.
- Výstupní zásobník: Where laminated documents exit.
- Ovládací panel: Touch-sensitive buttons for power, temperature settings, and jam release.
- Vypínač: Located at the rear of the device.
- Napájecí vstup: Pro připojení napájecího kabelu.
5. Nastavení
- Rozbalit: Laminovač opatrně vyjměte z obalu. Obal si uschovejte pro skladování nebo přepravu.
- Umístění: Place the laminator on a stable, flat, and heat-resistant surface. Ensure there is sufficient space around the device for proper ventilation and for documents to exit freely.
- Připojení napájení: Connect the power cord to the power inlet at the rear of the laminator, then plug the other end into a suitable grounded electrical outlet.
- Zapnutí: Flip the main power switch located at the rear of the device to the 'ON' position.
6. Návod k obsluze
6.1 Zapnutí a zahřátí
- After connecting the power and turning on the rear switch, press the power button on the touch control panel.
- The laminator will begin its warm-up cycle. The warm-up time is approximately 60 seconds.
- Once the laminator is ready, the indicator light for the selected lamination mode will illuminate steadily.
6.2 Selecting Lamination Mode
The HP Pro Laminator 600 A4 supports both hot and cold lamination, with different settings for pouch thickness.
- 75/80 Micron: For standard hot lamination pouches. Press the '75MIC/80MIC' button.
- 125 Micron: For thicker hot lamination pouches. Press the '125MIC' button.
- Laminace za studena: For self-adhesive cold lamination pouches. Press the 'snowflake' icon button. No heat is applied in this mode.

Figure 6.1: The control panel indicating the lamination temperature range of 130-160°C for hot lamination modes.
6.3 Lamination Process (Hot Lamination)
- Select the appropriate hot lamination mode (75/80 micron or 125 micron) based on your pouch thickness. Wait for the laminator to reach operating temperature.
- Place your document centrally into the lamination pouch, ensuring it is straight and there is an even border around the document.
- Insert the sealed edge of the lamination pouch into the feed slot. The laminator will automatically draw the pouch through.
- Support the laminated document as it exits the output tray to prevent bending.
- Allow the laminated document to cool on a flat surface before handling or trimming.
6.4 Lamination Process (Cold Lamination)
- Select the 'Cold Lamination' mode (snowflake icon).
- Prepare your document with a cold lamination pouch according to the pouch manufacturer's instructions.
- Insert the sealed edge of the cold lamination pouch into the feed slot.
- Retrieve the laminated document from the output tray.
6.5 Jam Release (ABS Function)
In the event of a paper jam or misfeed:
- Press and hold the 'ABS' (reverse) button on the control panel.
- The laminator rollers will reverse, allowing you to carefully pull the pouch out of the feed slot.
- Once the jammed pouch is removed, release the ABS button.
- Inspect the pouch and document for damage. If reusable, re-align and attempt lamination again.
7. Údržba
Pravidelná údržba zajistí dlouhou životnost a optimální výkon vašeho laminátoru.
- Čištění: Před čištěním se ujistěte, že je laminátor odpojený od sítě a zcela vychladlý. K otření vnějšího povrchu použijte měkký, suchý hadřík. V případě odolných skvrn použijte lehceamp Lze použít hadřík a poté suchý hadřík.
- Čištění válců: Occasionally, run a laminator cleaning sheet (available separately) through the machine to remove adhesive residue from the rollers.
- Skladování: Pokud laminátor nepoužíváte, skladujte jej na čistém a suchém místě, mimo dosah přímého slunečního záření a extrémních teplot.
8. Řešení problémů
Běžné problémy a jejich řešení naleznete v následující tabulce.
| Problém | Možná příčina | Řešení |
|---|---|---|
| Laminátor se nezapne. | Žádné napájení. | Check power cord connection and wall outlet. Ensure rear power switch is ON and front power button is pressed. |
| Pouch jams in the laminator. | Sáček je nesprávně vložený, zmačkaný nebo příliš silný. | Press and hold the ABS (reverse) button to release the pouch. Ensure pouch is flat and inserted sealed-edge first. Use correct pouch thickness for selected mode. |
| Zalaminovaný dokument je zakalený nebo bublající. | Incorrect temperature setting or low-quality pouch. | Ensure correct temperature setting for pouch thickness. Use high-quality lamination pouches. |
| Laminated document is not sealed properly. | Temperature too low or laminator not fully warmed up. | Wait for the laminator to fully warm up. Ensure correct temperature setting is selected. |
9. Specifikace
Technical specifications for the HP Pro Laminator 600 A4.
| Funkce | Specifikace |
|---|---|
| Značka | HP |
| Číslo modelu | 3163 |
| Rozměry (D x Š x V) | 50 x 50 x 28 cm (approximate product dimensions) |
| Hmotnost | 2.24 kg |
| Barva | Černý |
| Velikost listu | A4 (max. 230 mm input width) |
| Doba zahřívání | 60 sekund |
| Počet válečků | 2 |
| Lamination Temperature | 130-160°C (for hot lamination) |
| Pouch Thickness Support | 75/80 micron, 125 micron |
| Rychlost laminace | Až 36 000 mm/min |
| Speciální funkce | ABS (Anti-Blocking System) for jam release, Cold Lamination function |
| Výrobce | 'GO Europe |
10. Záruka a podpora
The HP Pro Laminator 600 A4 comes with a manufacturer's warranty. Based on available information, spare parts availability is indicated for 1 year. For specific warranty terms and conditions, please refer to the warranty card included with your product or contact HP customer support.
For technical assistance, troubleshooting beyond this manual, or to inquire about spare parts, please visit the official HP support website or contact their customer service department in your region. Keep your purchase receipt and product model number (3163) handy when contacting support.