
1. Úvod
This manual provides essential information for the safe and efficient operation of your Tronxy X5SA-400 Pro 3D Printer. Please read this manual thoroughly before operating the printer and keep it for future reference. The Tronxy X5SA-400 Pro is a DIY FDM 3D printer designed for users with some experience, featuring a large build volume of 400x400x400mm, TR auto-leveling sensor, and a grid glass print platform.
2. Bezpečnostní pokyny
- Tiskárnu vždy používejte v dobře větraném prostoru.
- Uchovávejte tiskárnu mimo dosah hořlavých materiálů, zdrojů tepla a vody.
- Do not touch the nozzle or heated bed during operation or immediately after, as they can reach high temperatures and cause burns.
- Zajistěte řádné uzemnění zdroje napájení.
- Během provozu držte děti a domácí zvířata v dostatečné vzdálenosti od tiskárny.
- Nepokoušejte se upravovat elektrické součásti tiskárny.
- Před prováděním údržby nebo čištění vždy odpojte napájení.
3. Konec produktuview
The Tronxy X5SA-400 Pro is a robust 3D printer designed for precision and large-scale printing. Key features include:
- Velký objem sestavení: 400 x 400 x 400 mm (15.75 x 15.75 x 15.75 inches).
- TR Auto-Leveling Sensor: An upgraded sensor that can detect opaque objects, ensuring accurate bed leveling.
- Grid Glass Print Platform: Allows for easy removal of printed objects and simplifies cleaning.
- XY Structure Design: Features a full belt drive for stability and printing precision, along with a dual Z-axis design to enhance heated bed support and reduce printing errors.
- Titan Extruder: Supports printing with flexible filaments such as TPU, as well as PLA, PETG, ABS, and PA.
- Filamentový senzor: Automatically detects filament breakage, pauses printing, and sounds an alarm, allowing for filament replacement and continued printing.
- OSG External Dual Axis Guide: Provides industrial-grade high precision.
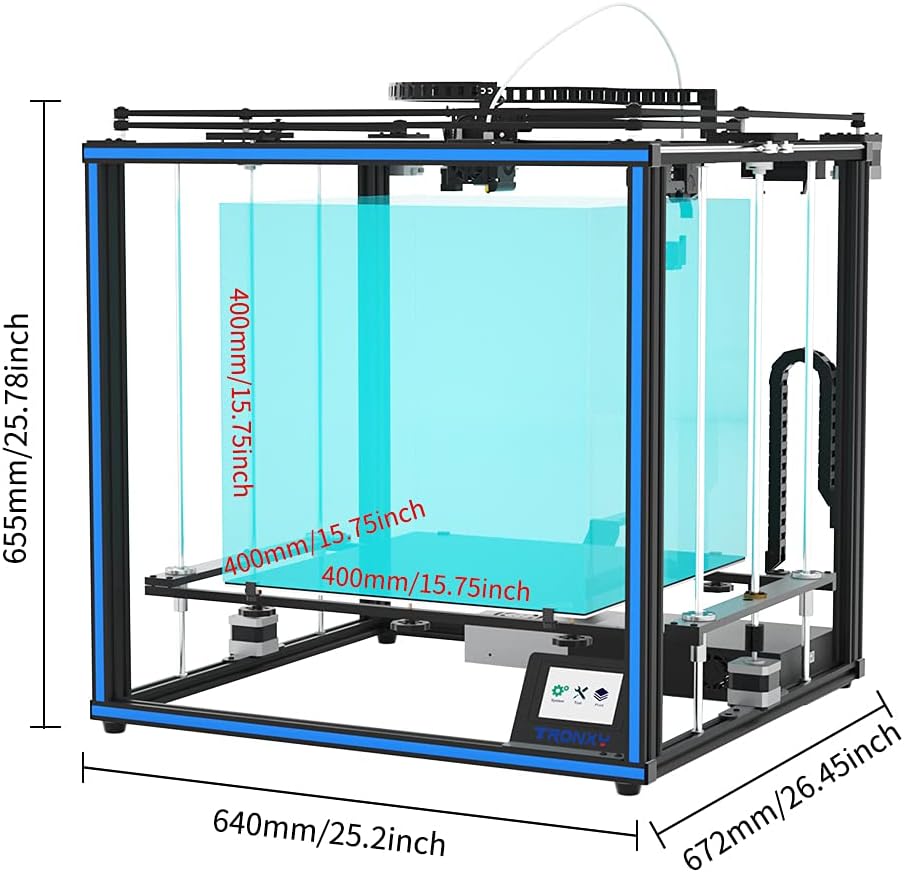
Figure 3.1: Overall dimensions of the Tronxy X5SA-400 Pro 3D Printer. The printer measures approximately 640mm (25.2in) wide, 672mm (26.45in) deep, and 655mm (25.78in) high. The build volume is 400mm x 400mm x 400mm.

Figure 3.2: Tronxy X5SA-400 Pro 3D Printer showcasing its large build volume with example printed models.
4. Nastavení a montáž
The Tronxy X5SA-400 Pro is a DIY kit that requires assembly. This process involves connecting various components and debugging. It is recommended for experienced users. Please refer to the official assembly guide provided with your printer (paper manual or electronic version) and any available installation videos for detailed step-by-step instructions.
4.1 Klíčové komponenty sestavy
- Sestava rámu: Připojte hliníkový profesionálfiles to form the printer's structure.
- Pohybový systém: Install the XY gantry, belts, and dual Z-axis components.
- tisková hlava: Mount the Titan Extruder and hotend assembly.
- Vyhřívaná postel: Install the grid glass print platform and connect its wiring.
- Elektronika: Connect the control board, power supply, TR auto-leveling sensor, and filament sensor.
- Dotykový displej: Mount and connect the user interface.
4.2 Initial Leveling (TR Auto-Leveling Sensor)
The TR auto-leveling sensor simplifies bed leveling. After assembly, perform the initial auto-leveling procedure as described in the detailed assembly guide. This sensor is designed to accurately detect the print surface, including lattice glass, PC board, PVC stickers, and metal materials.

Figure 4.1: Comparison of TR Sensor capabilities. The TR Sensor (right) can detect lattice glass, PC board, PVC stickers, metal material, and magnetic stickers, offering broader compatibility than older blue sensors (left).

Figure 4.2: The upgraded lattice glass platform allows for easy removal of printed models by hand, unlike PVC sticker platforms which often require a shovel.
5. Návod k obsluze
5.1 Vkládání filamentu
- Ensure the hotend is preheated to the appropriate temperature for your filament type (e.g., 200-220°C for PLA).
- Insert the filament into the filament sensor.
- Feed the filament through the Titan Extruder and into the hotend until molten filament extrudes from the nozzle.

Figure 5.1: The Titan Extruder is designed to handle various filament types, including flexible materials like TPU, as well as PETG, PLA, ABS, and PA.

Figure 5.2: The filament sensor detects when the filament runs out or breaks, pausing the print and alerting the user to allow for filament replacement.
5.2 Zahájení tisku
- Prepare your 3D model using a slicing software (e.g., Cura, Simplify3D) to generate G-code.
- Přeneste G-kód file to the printer via USB or SD card.
- Vyberte file z dotykového rozhraní tiskárny.
- Initiate the print. The printer will automatically preheat and perform any necessary auto-leveling before starting.
6. Údržba
Pravidelná údržba zajišťuje optimální výkon a dlouhou životnost vaší 3D tiskárny.
- Vyčistěte tiskovou platformu: After each print, clean the grid glass platform with isopropyl alcohol to ensure good adhesion for subsequent prints.
- Čištění trysek: Periodically clean the nozzle to prevent clogs. Use a brass brush or needle to remove any accumulated filament.
- Namažte pohyblivé části: Apply a small amount of lithium grease or similar lubricant to the lead screws and smooth rods every few months.
- Zkontrolujte řemeny: Ensure the XY belts are properly tensioned. They should be taut but not overly tight.
- Zkontrolujte kabeláž: Pravidelně kontrolujte všechna elektrická připojení, zda nevykazují známky opotřebení nebo uvolnění.

Figure 6.1: The OSG External Dual Axis Guide system, featuring full belt drive and dual Z-axis, requires occasional inspection for smooth operation and belt tension.
7. Řešení problémů
| Problém | Možná příčina | Řešení |
|---|---|---|
| First layer not sticking | Bed not level, nozzle too far from bed, dirty print surface, incorrect bed temperature. | Perform auto-leveling, adjust Z-offset, clean print surface with isopropyl alcohol, verify bed temperature settings. |
| Vlákno se nevytlačuje | Nozzle clog, tangled filament, incorrect hotend temperature, extruder gear slip. | Clear nozzle clog, untangle filament, check hotend temperature, clean extruder gear. |
| Špatná kvalita tisku (posun vrstev, strunování) | Loose belts, incorrect print speed, retraction settings, worn nozzle. | Check and tension belts, adjust print speed and retraction settings in slicer, replace nozzle if worn. |
| Filament sensor alarm | Filament run out or broken. | Replace filament and resume print. |
8. Technické specifikace
| Funkce | Detail |
|---|---|
| Značka | TRONXY |
| Model | X5SA-400 Pro |
| Build Volume | 400 x 400 x 400 mm |
| Rozměry tiskárny (Š x H x V) | 640 x 672 x 655 mm (přibližně) |
| Hmotnost položky | 15 kg |
| Barva | Blue accents |
| Konektivita | USB |
| Kompatibilní zařízení | Laptop / Computer |
| Podporováno File Formát | G-code (from slicer software) |
| Nivelace | TR Auto-Leveling Sensor |
| Tisková platforma | Grid Glass Plate |
| Typ extrudéru | Titan Extruder |
| Detekce vlákna | Ano |
| UPC | 791809181556 |
9. Záruka a podpora
TRONXY provides comprehensive customer support for the X5SA-400 Pro 3D Printer.
- Technická podpora: Lifetime technical support is offered by TRONXY.
- Doba odezvy: Expect a response within 24 hours for support inquiries.
- Kontaktování podpory: For assistance, please contact TRONXY customer service through your Amazon account: Go to "Your Account" > "Your Orders" > Find your order and click "Contact Seller".