Sorand AC 230V Floor Heating Thermostat
Sorand AC 230V Digital Programmable Floor Heating Thermostat User Manual
Model: AC 230V Floor Heating Thermostat
Zavedení
This manual provides comprehensive instructions for the installation, operation, and maintenance of your Sorand AC 230V Digital Programmable Floor Heating Thermostat. Please read this manual carefully before installation and use to ensure proper function and safety.
The thermostat is designed for electronic floor heating systems and other electrical heating elements. It features a large LCD with backlight, programmable temperature settings, and internal/external temperature sensing capabilities.
Bezpečnostní informace
- Instalaci musí provést kvalifikovaný elektrikář.
- Před instalací nebo údržbou se ujistěte, že je odpojeno napájení.
- Nevystavujte termostat vodě ani nadměrné vlhkosti.
- Pracujte v rámci stanoveného objtage a aktuální limity.
Obsah balení
Ověřte, zda jsou v balení přítomny všechny položky:
- 1 x Sorand AC 230V Digital Programmable Floor Heating Thermostat
- 1 x External Temperature Sensor Cable (approx. 3 meters)
- 2 x montážní šrouby
- 1 x Uživatelská příručka (tento dokument)

Image: Contents of the Sorand thermostat package, showing the main unit, external sensor cable, mounting screws, and the instruction manual.
Nastavení a instalace
Důležité: Installation should only be carried out by a qualified electrician. Ensure the main power supply is turned off before commencing any wiring work.
Schéma zapojení
Refer to the wiring diagram on the back of the thermostat unit for correct connections. The terminals are typically labeled as follows:
- L1, N1: Power input (AC 230V)
- LOAD (1, 2): Connection to the heating element
- NTC (5, 6): Connection for the external floor temperature sensor

Obrázek: Zadní view of the Sorand thermostat, displaying the wiring terminals and a simplified diagram for electrical connections.
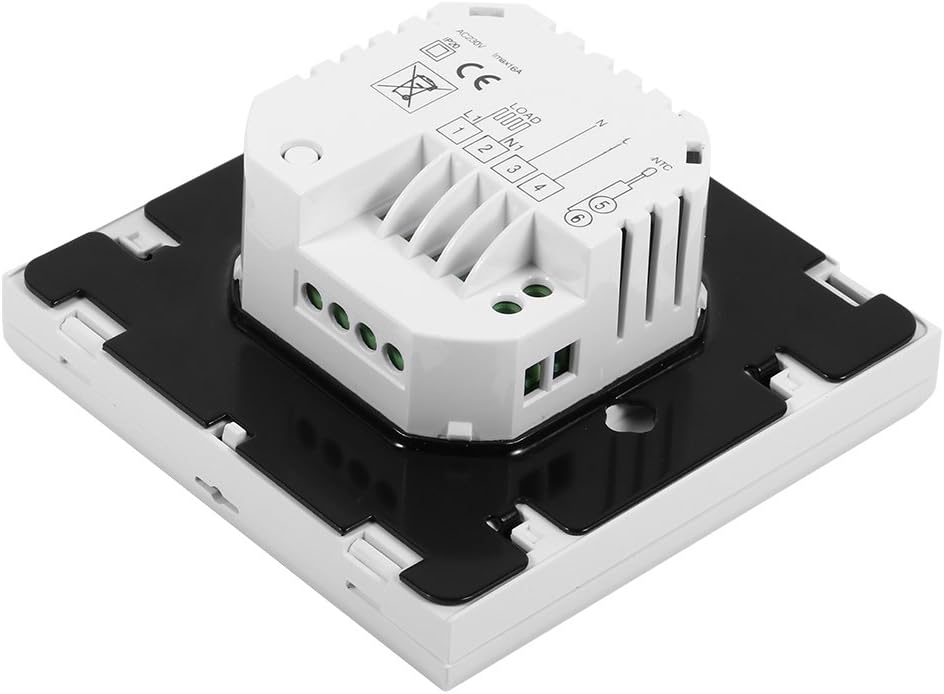
Obrázek: Boční view of the Sorand thermostat, illustrating the internal components and ports for wiring connections.
Montáž
- Prepare a standard electrical wall box (86x86mm recommended).
- Connect the power supply, heating load, and external sensor wires according to the wiring diagram.
- Carefully push the wired thermostat into the wall box.
- Připevněte termostat k nástěnné krabici pomocí dodaných šroubů.
- Attach the front panel of the thermostat.
Návod k obsluze
The thermostat features a large LCD and touch-sensitive buttons for easy operation.
Funkce tlačítek
- ⏻ (Napájení): Zapíná/vypíná termostat.
- ↻ (Mode/Cycle): Přepíná mezi manuálním a programovatelným režimem.
- ⏱ (Clock/Time): Sets the time and enters programming mode.
- ▲ (Šipka nahoru): Increases temperature setting or adjusts values.
- ▼ (Šipka dolů): Decreases temperature setting or adjusts values.

Obrázek: Přední strana view of the Sorand thermostat, highlighting the LCD screen and the five touch-sensitive control buttons below it.
Nastavení času a dne
- Stiskněte a podržte ⏱ tlačítko na 3 sekundy pro vstup do režimu nastavení času.
- Použijte ▲ a ▼ tlačítka pro nastavení hodiny a poté stiskněte ⏱ pro potvrzení a přechod na minuty, poté na den v týdnu.
- Stiskněte ⏱ again to exit, or wait for 10 seconds for automatic exit.
Provoz v ručním režimu
V manuálním režimu termostat udržuje konstantní teplotu nastavenou uživatelem.
- Stiskněte tlačítko ↻ button to switch to manual mode (indicated by a hand icon or similar on the display).
- Použijte ▲ a ▼ tlačítky nastavte požadovanou teplotu.
- Termostat nyní bude tuto teplotu udržovat.
Programmable Mode Operation (6 Periods)
The thermostat allows for 6 programmable periods per day, enabling different temperature settings at different times.
- Stiskněte tlačítko ↻ button to switch to programmable mode (indicated by a clock icon or similar).
- Stiskněte a podržte ⏱ button for 3 seconds to enter programming mode.
- The display will show the first period (e.g., "Period 1"). Use ▲ a ▼ to set the start time and desired temperature for this period.
- Stiskněte ⏱ to move to the next period and repeat the process for all 6 periods.
- After setting all periods, press ⏱ again or wait for automatic exit to save settings.
Termostat bude automaticky dodržovat naprogramovaný časový harmonogram.
Sensor Selection (Internal/External)
The thermostat can use its internal sensor or the external floor sensor. The selection method is typically found in advanced settings or by a specific button combination. Refer to the on-screen indicators for the active sensor.
Údržba
- Clean the thermostat's display and casinměkkým, suchým hadříkem. Nepoužívejte abrazivní čisticí prostředky ani rozpouštědla.
- Pro zajištění optimálního výkonu se ujistěte, že termostat není prachový a bez nečistot.
- Uvnitř nejsou žádné součásti, které by mohl uživatel opravit. Nepokoušejte se jednotku otevírat ani opravovat.
Odstraňování problémů
| Problém | Možná příčina | Řešení |
|---|---|---|
| Termostat se nezapíná. | Chybí napájení; nesprávné zapojení. | Check circuit breaker. Verify wiring connections (consult a qualified electrician). |
| Topení se nezapíná/nevypíná. | Incorrect temperature setting; thermostat in OFF mode; wiring issue. | Adjust set temperature. Ensure thermostat is ON. Check heating element wiring. |
| Nepřesný údaj o teplotě. | Sensor malfunction; incorrect sensor selected. | Verify sensor connection. Check if internal or external sensor is active. |
| Displej je prázdný nebo bliká. | Kolísání napájení; vnitřní závada. | Reset power to the thermostat. If issue persists, contact support. |
Specifikace
| Funkce | Detail |
|---|---|
| Značka | Sorand |
| Model | AC 230V Floor Heating Thermostat |
| Pracovní svtage | AC 230V, 50/60Hz |
| Zatěžovací proud | 12/16A (Electric Heating) |
| Přesnost | ±0.5℃ |
| Set-point Temperature Range | 5℃ - 35℃ |
| Mezní teplotní rozsah | 5℃ - 99℃ |
| Spotřeba energie | <0.3W |
| Snímač teploty | NTC (Internal and External) |
| Velikost povrchu | Přibližně 86 x 86 x 40 mm (3.4 x 3.4 x 1.6 palce) |
| External Sensor Cable Length | Přibližně 3 metrů (9.8 stop) |
| Materiál | PC + ABS |
| Typ zobrazení | Digitální LCD s podsvícením |
| Kontrolní metoda | Ovládání touchpadem |
Záruka a podpora
This product is covered by the manufacturer's standard warranty. Please refer to the product packaging or your point of purchase for specific warranty terms and conditions.
Pro technickou podporu, pomoc s řešením problémů nebo reklamaci se prosím obraťte přímo na svého prodejce nebo výrobce. Uschovejte si účtenku jako doklad o koupi.
Ask a question about this manual
Ask about setup, troubleshooting, compatibility, parts, safety, or missing instructions. Manuals+ will review the question and use this page’s manual context to help answer it.