
1. Úvod
Děkuji za nákupasing the CCYLEZ A4300 Pro Video Projector. This manual provides essential information for setting up, operating, and maintaining your projector. Please read it thoroughly before use to ensure optimal performance and safety.
The A4300 Pro is a versatile portable projector featuring native 720P resolution with 4K decoding support, 3D playback compatibility, Wi-Fi display for wireless screen mirroring, and Bluetooth 4.0 connectivity. It runs on Android 6.01 OS X, offering a comprehensive home theater experience.
2. Důležité bezpečnostní pokyny
- Nedívejte se přímo do objektivu projektoru, když je zapnutýamp je zapnuto.
- Zajistěte dostatečné větrání kolem projektoru, abyste zabránili přehřátí. Neblokujte větrací otvory.
- Používejte pouze napájecí adaptér dodaný s projektorem.
- Chraňte projektor před vodou, vlhkostí a hořlavými materiály.
- Neumisťujte projektor na nestabilní povrchy.
- Nepokoušejte se projektor rozebírat ani opravovat sami. Veškerý servis svěřte kvalifikovanému personálu.
- Keep the remote control batteries out of reach of children.
3. Obsah balení
Ověřte, zda jsou v balení obsaženy všechny níže uvedené položky:
- 1 x CCYLEZ A4300 Pro Projector
- 1 x Dálkové ovládání
- 1 x napájecí kabel
- Kabel 1 x AV
- 1 x HDMI kabel
- 1 x hadřík na čištění čoček
- 1 x krytka objektivu
- 1 x Uživatelská příručka (tento dokument)

Obrázek 3.1: Included accessories: remote control, AV cable, HDMI cable, and lens cleaning cloth.
4. Konec produktuview
4.1 Přední View
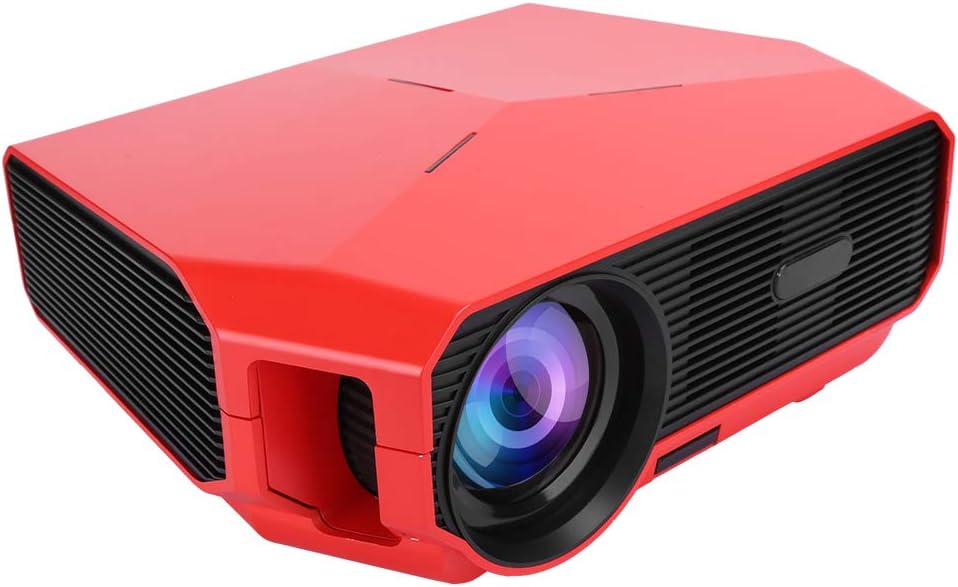
Obrázek 4.1: Přední view of the CCYLEZ A4300 Pro projector, showcasing the lens and front ventilation.
4.2 Zadní View a porty

Obrázek 4.2: Projector rear view showing various input ports: IR receiver, AV input, Audio Out, two USB ports, VGA input, and power input.
4.3 Strana Views

Obrázek 4.3: Detailní záběr view of one side of the projector, highlighting ventilation grilles.

Obrázek 4.4: Další detailní záběr view of the projector's side, showing ventilation and part of the lens housing.
5. Nastavení
5.1 Umístění
Position the projector on a stable, flat surface. Ensure there is adequate space around the projector for ventilation. The optimal projection distance ranges from 1.38 to 5.7 meters (4.5 to 18.7 feet), supporting screen sizes from 45 to 200 inches. A recommended screen size is between 60-100 inches for the best viewzkušenosti.

Obrázek 5.1: Projection distances and screen size examples.
5.2 Připojení napájení
- Připojte napájecí kabel ke vstupnímu portu projektoru.
- Zapojte druhý konec napájecího kabelu do vhodné elektrické zásuvky.
5.3 Počáteční zapnutí
- Stisknutím tlačítka napájení na projektoru nebo na dálkovém ovladači zapněte zařízení.
- The projector will boot up and display the home screen.
5.4 Zaostření a korekce lichoběžníkového zkreslení
- Nastavení zaostření: Otáčejte zaostřovacím kroužkem na objektivu projektoru, dokud nebude promítaný obraz jasný a ostrý.
- Korekce lichoběžníkového zkreslení: If the image appears trapezoidal, use the manual keystone correction dial (usually located near the lens) to adjust the vertical angle until the image is rectangular. The projector supports ±15° vertical keystone correction.
6. Návod k obsluze
6.1 Základní navigace
Use the provided remote control to navigate the projector's interface. The arrow keys allow movement, and the 'OK' button confirms selections. The 'Back' button returns to the previous screen, and the 'Home' button takes you to the main menu.
6.2 Výběr vstupního zdroje
To switch between different input sources (HDMI, USB, AV, VGA), press the 'Source' button on the remote control and select your desired input from the on-screen menu.
6.3 Wireless Screen Mirroring (Wi-Fi Display)
The projector supports wireless screen mirroring, allowing you to display content from your mobile phone or tablet without data cables. This feature can enlarge your mobile screen up to 100 times.
- Ujistěte se, že je projektor a mobilní zařízení připojeno ke stejné síti Wi-Fi.
- On the projector's home screen, select the 'Wi-Fi Display' or 'Screen Mirroring' application.
- On your mobile device, activate its screen mirroring function (e.g., 'Smart View' for Samsung, 'Screen Mirroring' for Android, 'AirPlay' for iOS).
- Select the projector's name from the list of available devices on your mobile phone.
- The mobile device's screen will now be mirrored on the projector.
Obrázek 6.1: Wireless screen mirroring from mobile phone to projector.
6.4 Připojení zvuku přes Bluetooth
Pro vylepšený zvukový zážitek připojte externí Bluetooth reproduktory nebo sluchátka.
- Přejděte do nabídky nastavení projektoru a vyberte možnost „Bluetooth“.
- Enable Bluetooth and put your external audio device into pairing mode.
- Select your audio device from the list of available devices on the projector to pair.
6.5 Přehrávání 3D
The A4300 Pro supports 3D playback, offering a lifelike three-dimensional effect when paired with compatible 3D glasses. Enjoy an IMAX-like cinema experience at home.

Obrázek 6.2: Immersive 3D playback experience.
6.6 Přehrávání médií (USB/SD)
Insert a USB drive or SD card into the corresponding port on the projector. The projector's media player will allow you to browse and play supported video, audio, and image files.
7. Údržba
7.1 Čištění objektivu
Use the provided lens cleaning cloth or a soft, lint-free cloth specifically designed for optical lenses. Gently wipe the lens in a circular motion. Avoid using abrasive cleaners or excessive force.
7.2 Čištění těla projektoru
Otřete vnější povrch projektoru měkkým, suchým hadříkem. V případě odolných nečistot použijte lehceamp Lze použít hadřík a poté suchý hadřík. Nepoužívejte agresivní chemikálie ani rozpouštědla.
7.3 Skladování
Pokud projektor delší dobu nepoužíváte, skladujte jej na chladném a suchém místě mimo dosah přímého slunečního záření a extrémních teplot. Krytku objektivu chraňte před prachem a poškrábáním.
8. Řešení problémů
- Bez napájení: Ujistěte se, že je napájecí kabel bezpečně připojen k projektoru i k elektrické zásuvce. Zkontrolujte, zda je elektrická zásuvka funkční.
- Bez obrázku: Verify that the correct input source is selected. Check all cable connections (HDMI, AV, VGA). Ensure the lens cap is removed.
- Rozmazaný obrázek: Adjust the focus ring on the lens. Ensure the projection distance is within the recommended range.
- Trapezoidal Image: Use the manual keystone correction to adjust the image shape.
- Žádný zvuk: Check the volume settings on both the projector and the connected source device. If using external speakers, ensure they are properly connected or paired via Bluetooth.
- Dálkové ovládání nefunguje: Ensure the remote control batteries are correctly inserted and not depleted. Point the remote directly at the projector's IR receiver.
- Wi-Fi Display Issues: Ujistěte se, že obě zařízení jsou ve stejné síti Wi-Fi. Restartujte projektor i mobilní zařízení.
9. Specifikace
| Funkce | Specifikace |
|---|---|
| Model | A4300 Pro |
| Image Technology | BOE4.3 LTPS LCD |
| Nativní rozlišení | 1280 x 720 |
| Max Supported Resolution (Decoding) | 4K (3840 x 2160) |
| Jas | 4600 ANSI Lumens |
| Kontrastní poměr | 4000:1 |
| Jednotnost světla | 95 % |
| Poměr stran | 4:3 / 16:9 |
| Rozsah velikosti projekce | 45-200 palců |
| Projection Distance Range | 1.38 ~ 5.7 meters (4.5 ~ 18.7 feet) |
| Doporučená velikost obrazovky | 60-100 palců |
| Korekce lichoběžníkového zkreslení | ±15° Vertical (Manual) |
| Korekce objektivu | Manuální ostření |
| Režim projekce | Přední, zadní, stropní přední, stropní zadní |
| CPU | Mstar6A358 (ARM A35 4-core 64-bit) |
| Operační systém | Android 6.01 OS X |
| Paměť | 1GB DDR3 SDRAM, 8GB Flash Memory |
| Wi-Fi | High-speed 2.4G Dual-band Wi-Fi |
| Bluetooth | Bluetooth 4.0 |
| Dekódování zvuku | Dolby Surround 7.1 |
| Provozní svtage | Vstup DC 250V |
| Konektivita | HDMI, USB (x2), AV, VGA, Audio Out |
| Baterie dálkového ovládání | 2x AAA (není součástí balení) |
| Výrobce | Ccylez |
| Číslo modelu | Ccylezzu42e9dkti-12 |
10. Záruka a podpora
The CCYLEZ A4300 Pro Video Projector comes with a standard manufacturer's warranty. Please refer to the warranty card included in your package or contact your retailer for specific warranty terms and conditions.
For technical support, troubleshooting assistance, or inquiries about your product, please contact CCYLEZ customer service through the contact information provided on the product packaging or the official CCYLEZ webmísto.


