
1. Úvod
The Focusrite Scarlett 2i2 Studio 3rd Gen Recording Bundle provides a comprehensive solution for home studio recording. This bundle includes the Scarlett 2i2 3rd Gen USB audio interface, Mackie CR3-X studio monitors, a large-diaphragm condenser microphone, closed-back headphones, and essential accessories. This manual will guide you through the setup, operation, and maintenance of your recording equipment.
2. Co je v krabici
Upon opening your Focusrite Scarlett 2i2 Studio 3rd Gen Recording Bundle, verify that all the following components are present:
- USB audio rozhraní Focusrite Scarlett 2i2 3. generace
- Pair of Mackie CR3-X 3" Powered Studio Monitors
- Scarlett Large-Diaphragm Condenser Microphone
- Closed-Back Recording Headphones
- Adjustable Boom Microphone Stand
- Studio Pop Filter
- XLR Microphone Cables
- Monitor Connection Cables
- USB Cable for Scarlett 2i2 (USB-C to USB-A)
- Music Production DAW & Plug-In Software Bundle (download codes/licenses)
3. Scarlett 2i2 3rd Gen USB Audio Interface
The Scarlett 2i2 3rd Gen is a 2-input, 2-output USB audio interface designed for high-quality recording. It features two upgraded Scarlett mic/line/instrument preamps, 24-bit/192 kHz converters, a wide 56 dB gain range, and the renowned 'Air' mode for brighter vocal and acoustic instrument tones. Independent monitor and headphone level controls, along with balanced TRS outputs, make it suitable for various recording environments.

Figure 3.1: Front panel of the Scarlett 2i2 3rd Gen interface, showing two combo XLR/TRS inputs, gain knobs, 'Air' buttons, 48V phantom power, direct monitor control, monitor output knob, and headphone output with volume control.
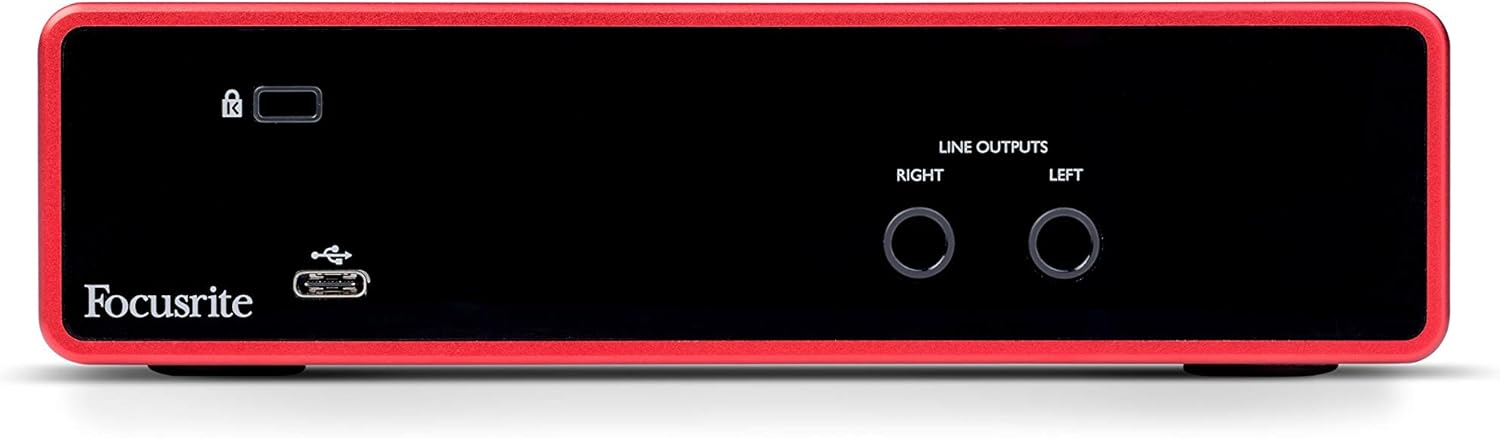
Figure 3.2: Rear panel of the Scarlett 2i2 3rd Gen interface, featuring the USB-C port for computer connection and power, and two balanced TRS line outputs for connecting to studio monitors.
4. Mackie CR3-X Studio Monitors
The Mackie CR3-X Creative Reference 3" multimedia monitors provide accurate sound reproduction for mixing and playback. Each speaker features a 3" polypropylene woofer and a 0.75" silk-dome tweeter, driven by 50 W of amplification. They offer clear, balanced sound across the frequency spectrum. Front-panel volume control and a headphone output provide convenient access, while rear-panel TRS/RCA inputs ensure flexible connectivity.

Figure 4.1: Rear panel of the Mackie CR3-X powered monitor, showing TRS and RCA inputs, power switch, and output to the passive speaker.
5. Scarlett Microphone & Headphones
5.1. Scarlett Large-Diaphragm Condenser Microphone
The included Scarlett large-diaphragm condenser microphone is designed to capture vocals and instruments with detailed clarity. Its cardioid polar pattern focuses on the sound source directly in front of the microphone, effectively reducing unwanted room noise and reflections. This makes it ideal for recording vocals, spoken word, and acoustic instruments in various environments.
5.2. Closed-Back Recording Headphones
The closed-back studio headphones provide full-range sound and excellent isolation. This design helps prevent microphone bleed during recording and allows for accurate monitoring of your takes and mixes without external distractions.
6. Vocal Recording Accessories & Cabling
This bundle includes essential accessories to complete your recording setup:
- Adjustable Boom Microphone Stand: Allows for precise positioning of the microphone for optimal sound capture.
- Studio Pop Filter: Reduces plosive sounds (harsh 'p' and 'b' sounds) and breath noise, improving vocal clarity.
- XLR Microphone Cables: Connect the microphone to the Scarlett 2i2 interface.
- Monitor Connection Cables: Connect the Scarlett 2i2 interface to the Mackie CR3-X monitors.
7. Softwarový balíček
The bundle includes a comprehensive software package to facilitate music production, mixing, and collaboration. This suite typically includes:
- DAW Recording Software: Such as Avid Pro Tools | First and Ableton Live Lite, providing platforms for recording, editing, and mixing audio.
- Virtuální nástroje: Including XLN Audio Addictive Keys, offering a range of keyboard sounds.
- Effects and Plug-ins: Such as Softube Time and Tone Bundle and Focusrite Red 2 & 3 Plug-in Suite, for enhancing and shaping your audio.
- Sample Content: A library of sounds and loops to inspire and augment your productions.

Obrázek 7.1: Přamples of included Digital Audio Workstation (DAW) software: Pro Tools | First and Ableton Live Lite.

Figure 7.2: The Softube Time and Tone Bundle, featuring various audio effects plugins.

Figure 7.3: The Focusrite Red 2 & 3 Plug-in Suite, offering classic Focusrite sound processing.

Obrázek 7.4: Přamples of XLN Addictive Keys virtual instruments, providing various piano and keyboard sounds.
8. Nastavení
Follow these steps to set up your Focusrite Scarlett 2i2 Studio 3rd Gen Recording Bundle:
- Rozbalte komponenty: Carefully remove all items from the packaging and ensure everything listed in Section 2 is present.
- Nainstalujte ovladače: Before connecting the Scarlett 2i2, visit the official Focusrite webweb (focusrite.com/downloads) to download and install the latest drivers for your operating system (Windows or macOS).
- Connect Scarlett 2i2: Use the provided USB cable to connect the Scarlett 2i2 interface to an available USB port on your computer. The interface is bus-powered, so no external power supply is needed.
- Připojení mikrofonu: Attach the pop filter to the boom microphone stand. Mount the Scarlett condenser microphone onto the stand. Use an XLR microphone cable to connect the microphone to one of the XLR inputs on the front of the Scarlett 2i2. If using a condenser microphone, ensure 48V phantom power is enabled on the interface (press the '48V' button).
- Připojení nástrojů: If recording an instrument (e.g., guitar, bass), connect it directly to one of the 1/4" TRS inputs on the front of the Scarlett 2i2 using an instrument cable. Press the 'INST' button for the corresponding input.
- Připojení monitorů: Use the monitor connection cables to connect the 'LINE OUTPUTS' (Left and Right) on the rear of the Scarlett 2i2 to the TRS or RCA inputs on the rear of the Mackie CR3-X powered monitor. Connect the passive monitor to the powered monitor using the speaker wire. Ensure the powered monitor is connected to a power outlet.
- Připojení sluchátek: Plug the closed-back recording headphones into the 1/4" headphone jack on the front of the Scarlett 2i2.
- Instalace softwaru: Follow the instructions provided with your software bundle to download, install, and authorize the included DAW software, virtual instruments, and plug-ins.
9. Provoz
Once your system is set up, you can begin recording and monitoring:
- Ziskytaging: Adjust the 'GAIN' knob for each input until the corresponding halo indicator around the knob glows green during performance. If it turns red, the signal is clipping, and you should reduce the gain. Aim for a strong signal without clipping.
- Přímé sledování: To hear your input signal directly through your headphones or monitors with zero latency, ensure the 'DIRECT MONITOR' button is engaged (green light). This bypasses your computer's processing, preventing delay.
- Using 'Air' Mode: Press the 'AIR' button for an input to activate the 'Air' mode, which emulates the sound of Focusrite's classic ISA preamps, adding a subtle high-frequency boost for a brighter, more open sound, particularly beneficial for vocals and acoustic guitars.
- Monitor and Headphone Levels: Use the large 'MONITOR' knob to control the overall output volume to your studio monitors. Use the dedicated 'HEADPHONE' knob to adjust the volume for your headphones.
- Recording in DAW: Open your chosen DAW software (e.g., Pro Tools | First, Ableton Live Lite). Create a new audio track and select the appropriate input (e.g., 'Input 1' for your microphone). Arm the track for recording and begin capturing your performance.
10. Údržba
Proper maintenance ensures the longevity and optimal performance of your recording bundle:
- Čištění: Use a soft, dry cloth to clean the surfaces of the interface, monitors, microphone, and headphones. Avoid abrasive cleaners or solvents. For the microphone, a slightly damp cloth can be used on the body, but avoid moisture near the capsule.
- Skladování: When not in use, store components in a clean, dry environment, away from extreme temperatures, humidity, and direct sunlight. Protect the microphone with its case or a dust cover.
- Správa kabelů: Keep cables organized and avoid sharp bends or kinks to prevent damage.
- Aktualizace softwaru: Regularly check the Focusrite and software developer websites for driver and software updates to ensure compatibility and access to the latest features and bug fixes.
11. Řešení problémů
Pokud narazíte na problémy, postupujte podle následujících běžných kroků pro řešení potíží:
- No Sound from Monitors/Headphones:
- Check all cable connections (USB, monitor cables, headphone).
- Ensure the Scarlett 2i2 is powered on (indicated by the green USB light).
- Verify that the 'MONITOR' and 'HEADPHONE' volume knobs on the Scarlett 2i2 are turned up.
- Check the volume on your Mackie CR3-X monitors and ensure they are powered on.
- Confirm that the Scarlett 2i2 is selected as the audio output device in your computer's sound settings and your DAW.
- No Input Signal (Microphone/Instrument):
- Ensure the microphone/instrument is correctly connected to the Scarlett 2i2 input.
- Adjust the 'GAIN' knob for the corresponding input.
- Pokud používáte kondenzátorový mikrofon, ujistěte se, že je zapnuto fantomové napájení 48 V.
- If using an instrument, ensure the 'INST' button is engaged for that input.
- Check that the input is selected and armed for recording in your DAW.
- Crackling or Distorted Audio:
- Reduce the 'GAIN' on the Scarlett 2i2 if the input halo is red.
- Check your DAW's buffer size settings. A lower buffer size can reduce latency but may cause crackling if your computer's CPU is overloaded. Try increasing to.
- Ensure you have the latest drivers installed for the Scarlett 2i2.
- Zkuste jiný port USB nebo kabel.
- Software nerozpoznává rozhraní:
- Reinstall the Focusrite drivers.
- Restart your computer and the Scarlett 2i2.
- Check your DAW's audio device settings to ensure the Scarlett 2i2 is selected.
- Verify operating system compatibility for the interface and software.
For further assistance, refer to the Focusrite support webnebo kontaktujte jejich zákaznický servis.
12. Specifikace
Key technical specifications for the Focusrite Scarlett 2i2 3rd Gen Recording Bundle:
- Audio rozhraní: Focusrite Scarlett 2i2 3. gen
- Konektivita: USB-C
- Počet kanálů: 2 vstupů, 2 výstupy
- A/D D/A Converters: 24 bitů / 192 kHz
- Předamps: 2 x Scarlett mic/line/instrument preamps with 'Air' mode
- Fantomová síla: +48V (přepínatelné)
- Přímé sledování: Ano
- Monitory: Mackie CR3-X 3" Powered Studio Monitors
- Monitor Power Output: 50 W
- Mikrofon: Scarlett Large-Diaphragm Condenser Microphone (Cardioid)
- Sluchátka: Closed-Back Recording Headphones
- Kompatibilní zařízení: Osobní počítač
- Podpora operačního systému: Windows, macOS (check Focusrite website for specific versions)
- Podporovaný software: Avid Pro Tools | First, Ableton Live Lite, Splice Sounds, Softube Time and Tone Bundle, Focusrite Red 2 & 3 Plug-in Suite, XLN Audio Addictive Keys
- Hmotnost položky: Approximately 20.2 pounds (entire bundle)
- Rozměry produktu: Approximately 34.9 x 19.3 x 12.4 inches (packaging/bundle size)
13. Záruka a podpora
For warranty information, product registration, and technical support, please visit the official Focusrite website. You will find comprehensive FAQs, driver downloads, and contact details for their support team. Registering your product ensures you receive updates and support efficiently.
Podpora Focusrite Webmísto: focusrite.com/support