
1. Konec produktuview
The Jansite Motorcycle TPMS (Tire Pressure Monitoring System) M2 is designed to enhance riding safety by providing real-time monitoring of your motorcycle's tire pressure and temperature. This system features an LCD display, external sensors, and multiple alarm functions to alert you to potential tire issues.
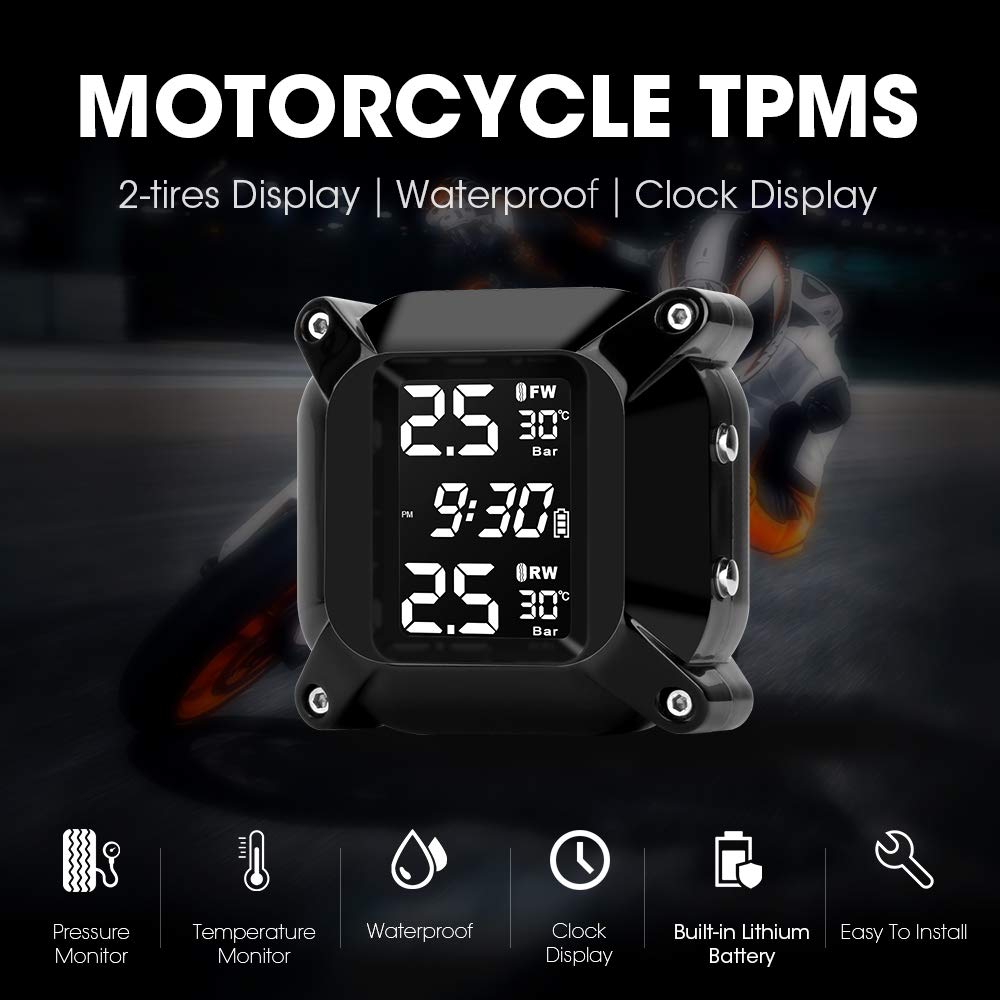
Image 1.1: Jansite Motorcycle TPMS M2 display unit and key features.
Klíčové vlastnosti:
- Monitorování v reálném čase: Displays tire pressure and temperature simultaneously.
- Digitální LCD displej: Clear and compact screen for easy readability.
- Adjustable Alarm Values: Customizable pressure alarm thresholds for various motorcycle models.
- Více režimů alarmu: Includes alarms for air leakage, low/high pressure, high temperature, sensor low battery, no signal, and receiver low battery.
- Magnetické USB nabíjení: Convenient charging for the display unit.
- Waterproof and Dustproof Sensors: Designed for use in all weather conditions.
- Design proti krádeži: External sensors include an anti-theft nut.
- Přepínatelné jednotky: Pressure units (Psi/Bar) and temperature units (°C/°F) are switchable.
2. Obsah balení
Před instalací se prosím ujistěte, že balení obsahuje všechny komponenty:

Image 2.1: Jansite Motorcycle TPMS M2 package contents.
- 1 x TPMS Display Unit
- 2 x externí senzory (přední kolo „FW“ a zadní kolo „RW“)
- 1 x montážní držák
- 1 x USB nabíjecí kabel
- 2 x matice proti krádeži
- 1 x klíč
3. Nastavení a instalace
3.1 Display Unit Installation
- Attach the mounting bracket to your motorcycle's handlebar or a suitable location using the provided hardware.
- Secure the TPMS display unit onto the mounting bracket.
- Ensure the display unit is positioned for clear visibility during riding.
3.2 Instalace externího senzoru
Follow these steps to install the external sensors on your motorcycle tires:

Image 3.1: Schematic diagram of external sensor installation.
- Sejměte víčko ventilu: Odšroubujte původní krytku ventilku z ventilku pneumatiky.
- Install Anti-theft Nut: Screw the hexagonal anti-theft nut onto the valve stem. Do not tighten it yet.
- Install Sensor: Screw the corresponding sensor (FW for front, RW for rear) onto the valve stem. Ensure it is hand-tight.
- Secure Sensor: Use the provided wrench to tighten the anti-theft nut against the sensor. This secures the sensor and prevents theft.
- Zkontrolujte netěsnosti: Apply soapy water around the valve stem and sensor connection to check for any air leaks. If bubbles appear, re-tighten the sensor and nut.
Poznámka: Ensure the correct sensor (FW/RW) is installed on the corresponding tire. Incorrect placement may lead to inaccurate readings.
4. Návod k obsluze
4.1 Zapnutí/vypnutí
- Press and hold the "Power/Selec" button (usually the top button on the side) to turn the display unit on or off.
4.2 Zobrazení informací

Image 4.1: Real-time monitoring display of the TPMS unit.
Na LCD obrazovce se zobrazují následující informace:
- Front Wheel (FW) Pressure and Temperature
- Rear Wheel (RW) Pressure and Temperature
- Aktuální čas
- Battery Level Indicator for the display unit
4.3 Setting Parameters (Pressure/Temperature Units, Alarm Values)
Use the "Menu" button (usually the bottom button on the side) to enter the settings menu. Use the "Power/Selec" button to navigate through options and adjust values.
- Vstup do nabídky: Press and hold the "Menu" button until the settings interface appears.
- Možnosti navigace: Short press the "Menu" button to cycle through different settings (e.g., pressure unit, temperature unit, high pressure alarm, low pressure alarm, high temperature alarm).
- Upravit hodnoty: When an option is selected, short press the "Power/Selec" button to change the value.
- Uložit a odejít: Press and hold the "Menu" button again to save your settings and exit the menu.
Default Alarm Values: Refer to your motorcycle's manual for recommended tire pressures. Adjust the alarm thresholds accordingly.
4.4 Funkce alarmu
The system provides visual and audible alerts for the following conditions:
- Alarm úniku vzduchu: Rapid pressure drop.
- Alarm nízkého tlaku: Tire pressure falls below the set low threshold.
- Alarm vysokého tlaku: Tire pressure exceeds the set high threshold.
- Alarm vysoké teploty: Tire temperature exceeds the set high threshold.
- Alarm slabé baterie senzoru: Indicates a low battery in one of the external sensors.
- No Signal Alarm: Loss of communication with a sensor.
- Receiver Low Battery Alarm: Indicates a low battery in the display unit.
When an alarm is triggered, the display will flash the affected parameter, and an audible alert will sound. Address the issue promptly.
5. Údržba
5.1 Charging the Display Unit
- The display unit has a built-in lithium battery. When the receiver low battery alarm activates or the battery indicator is low, connect the unit to a USB power source using the provided magnetic USB charging cable.
- Plné nabití obvykle trvá několik hodin.
5.2 Výměna baterie senzoru
The external sensors use replaceable batteries. When a sensor low battery alarm occurs, replace the battery as follows:
Image 5.1: External sensor battery replacement diagram.
- Odebrat senzor: Use the wrench to loosen the anti-theft nut, then unscrew the sensor from the valve stem.
- Open Sensor Casing: Opatrně otevřete senzor casing. Some models may require a small tool or the provided wrench to pry open.
- Remove Gasket: Remove the waterproofing gasket.
- Vyměnit baterii: Remove the old battery and insert a new CR1632 lithium coin cell battery, ensuring correct polarity.
- Znovu sestavit: Place the waterproofing gasket back correctly, then close the sensor casing.
- Reinstall Sensor: Reinstall the sensor onto the tire valve stem, following the installation steps in Section 3.2.
Poznámka: Ensure the waterproofing gasket is properly seated to maintain the sensor's waterproof integrity.
5.3 Čištění
- Otřete displej a senzory měkkým hadříkemamp tkanina. Nepoužívejte abrazivní čisticí prostředky nebo rozpouštědla.
- Před nabíjením se ujistěte, že je nabíjecí port čistý a suchý.
6. Řešení problémů
| Problém | Možná příčina | Řešení |
|---|---|---|
| Display unit does not power on. | Slabá nebo vybitá baterie. | Charge the display unit using the USB cable. |
| No signal from sensor / Inaccurate readings. |
|
|
| Air leakage alarm. |
|
|
| Displej zobrazuje nesprávný čas. | Time not set or reset. | Adjust the time through the settings menu (refer to Section 4.3). |
7. Specifikace
| Parametr | Hodnota |
|---|---|
| Značka | Jansite |
| Číslo modelu | M2 |
| Typ zobrazení | LCD digitální |
| Tlakové jednotky | Psi, Bar |
| Jednotky teploty | °C, °F |
| Typ snímače | Externí |
| Typ baterie senzoru | CR1632 Lithium Coin Cell (replaceable) |
| Baterie zobrazovací jednotky | Built-in Lithium-ion (rechargeable via USB) |
| Hodnocení voděodolnosti | Sensors are waterproof and dustproof. |
| Rozměry balení | 13.8 x 13.5 x 5.2 cm |
| Hmotnost produktu | 220 gramů |
| UPC | 759337624907 |

Image 7.1: Dimensions and display layout of the TPMS unit.
8. Záruka a podpora
8.1 Informace o záruce
This Jansite TPMS M2 product comes with a 1-letá záruka od data nákupu. Tato záruka se vztahuje na výrobní vady a poruchy při běžném používání.
Záruka se nevztahuje na poškození způsobené:
- Nesprávná instalace nebo použití.
- Náhodné poškození, zneužití nebo zneužití.
- Neoprávněné opravy nebo úpravy.
- Přírodní katastrofy nebo vnější příčiny.
8.2 Zákaznická podpora
For any questions, technical assistance, or warranty claims, please contact Jansite customer support. Refer to your purchase documentation or the seller's contact information for the most up-to-date support channels.
When contacting support, please have your product model (M2) and purchase details ready.