
1. Úvod
This manual provides detailed instructions for the installation, operation, and maintenance of the Fafeicy TM626 DIN Rail Mount AC220V Power Timer Switch. This digital timer is designed for precise time control of electrical appliances and systems, offering programmable on/off cycles for various applications.
The TM626 is suitable for controlling street lights, factory equipment, advertising signs, production machinery, radio and television equipment, stage lighting, and other power equipment that requires regular automated switching.
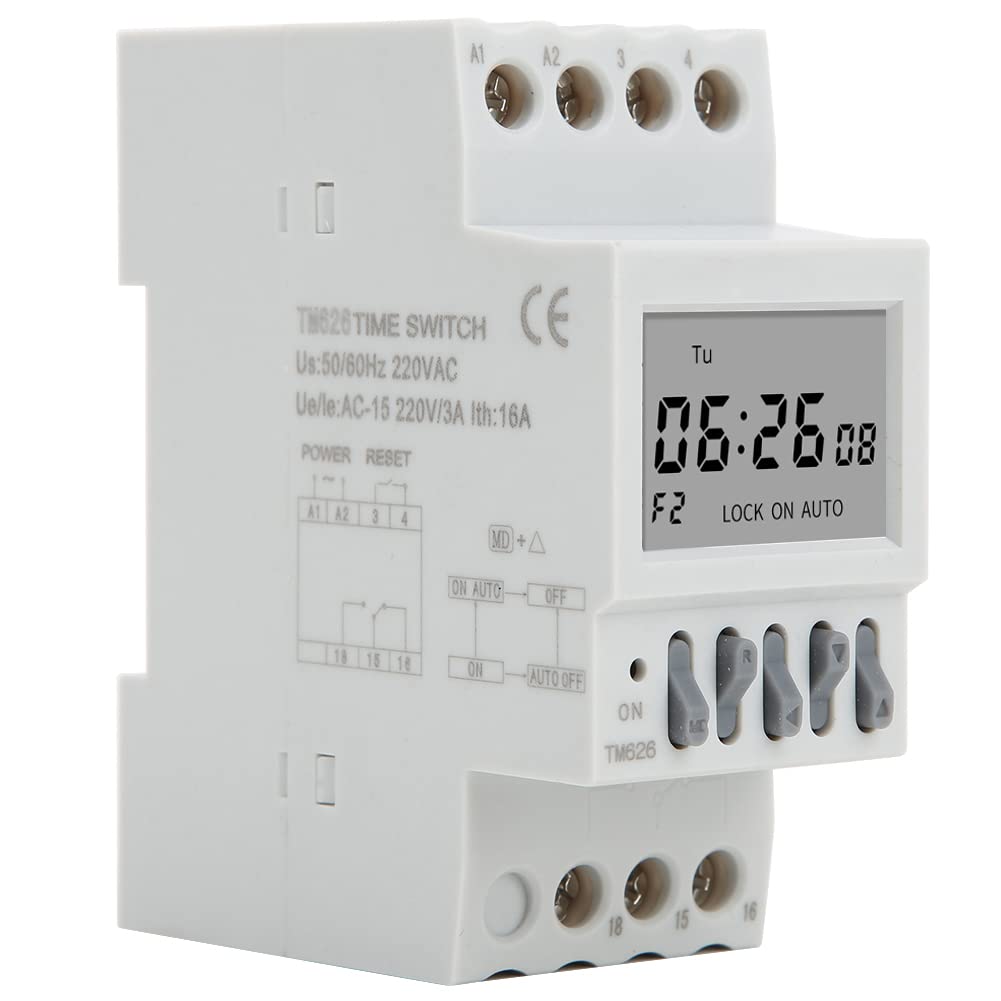
Obrázek 1.1: Úhlové view of the Fafeicy TM626 Power Timer Switch, showing the display and terminal connections.

Image 1.2: The TM626 timer switch is ideal for automating various applications, including street lighting, industrial equipment, and advertising displays.
2. Bezpečnostní informace
Před instalací nebo provozem tohoto zařízení si prosím přečtěte a pochopte všechny bezpečnostní pokyny. Nedodržení těchto pokynů může vést k úrazu elektrickým proudem, požáru nebo vážnému zranění.
- Před jakoukoli instalací nebo údržbou se ujistěte, že je odpojeno napájení.
- Instalaci by měl provádět pouze kvalifikovaný elektrikář.
- Nepřekračujte stanovený objemtage (AC220V) and current (16A) ratings.
- Uchovávejte zařízení mimo dosah vody a prostředí s vysokou vlhkostí.
- Nepokoušejte se zařízení sami otevírat ani opravovat. Pro servis se obraťte na kvalifikovaný personál.
3. Konec produktuview
The Fafeicy TM626 is a compact digital timer switch designed for DIN rail mounting. It features a clear LCD display for time and program settings, along with intuitive control buttons.
3.1 Komponenty
- LCD displej: Zobrazuje aktuální čas, den a stav programování.
- Ovládací tlačítka: Used for setting time, programming, and manual override.
- Svorkovnice: For connecting power input and load output.
- DIN Rail Clips: Pro bezpečnou montáž na standardní DIN lištu.

Obrázek 3.1: Přední strana view of the TM626 timer switch, highlighting the LCD display and control buttons.

Obrázek 3.2: Boční strana view of the TM626, illustrating the integrated DIN rail mounting clips.
4. Specifikace
| Funkce | Specifikace |
|---|---|
| Značka | Fafeicy |
| Číslo modelu | TM626 (Fafeicy txusog0m3i) |
| Provozní svtage | AC220V (50/60Hz) |
| Jmenovitý proud | 16A |
| Velikost obrazovky | 1.6 palce |
| Mechanický život | ≥ 30,000krát |
| Elektrická životnost | ≥ 10,000krát |
| Rozměry (přibližně) | Width: 35mm (1.4in), Height: 82mm (3.2in), Depth: 68mm (2.7in) |
| Montáž | DIN lišta |
| Země původu | Čína |

Image 4.1: Dimensional drawing of the TM626 timer switch, showing key measurements.

Image 4.2: The TM626 timer switch, illustrating its robust design for long mechanical and electrical life.
5. Nastavení a instalace
Follow these steps for proper installation and initial setup of your TM626 timer switch.
5.1 Montáž
- Ensure the main power supply is OFF before mounting.
- Locate a standard 35mm DIN rail within your electrical panel.
- Align the DIN rail clips on the back of the TM626 with the DIN rail.
- Press the timer firmly onto the rail until it clicks into place.
5.2 Zapojení
Refer to the wiring diagram on the device and below for correct connections. Incorrect wiring can damage the device or cause electrical hazards.

Obrázek 5.1: Boční strana view of the TM626 showing the wiring terminals and a simplified internal diagram. Terminals A1 and A2 are for power input (AC220V). Terminals 15, 16, 18 are for load output (15: Common, 16: Normally Closed, 18: Normally Open).
- Connect the AC220V power supply to terminals A1 a A2.
- Connect the common wire of your load to terminal 15.
- For normally open operation (load turns ON when timer activates), connect the load's live wire to terminal 18.
- For normally closed operation (load turns OFF when timer activates), connect the load's live wire to terminal 16.
- Ujistěte se, že všechny spoje jsou bezpečné a izolované.
5.3 Počáteční zapnutí
After wiring, restore power. The display should light up. If the display is blank, check power connections. The timer may require an initial charge if it has been stored for a long time; allow it to be powered for a few minutes.
6. Návod k obsluze
The TM626 timer switch allows you to set the current time and program multiple on/off cycles.
6.1 Nastavení aktuálního času a dne
- Stiskněte tlačítko HODINY button (if available, or a similar button for time setting).
- Použijte D+ (Day), H+ (Hour), and M+ (Minute) buttons to adjust the current day, hour, and minute.
- Stiskněte HODINY znovu uložte a ukončete.
6.2 Programování cyklů zapnutí/vypnutí
The TM626 typically supports multiple ON/OFF programs. The exact number may vary, but common models support 8-16 programs.
- Stiskněte tlačítko PROG tlačítko. Na displeji se zobrazí „1 ZAP“.
- Použití D+ to select the day(s) for this ON event (e.g., Mon-Fri, Sat-Sun, every day, specific days).
- Použití H+ a M+ pro nastavení požadovaného času zapnutí.
- Stiskněte PROG znovu. Na displeji se zobrazí „1 VYP“.
- Použití D+, H+a M+ to set the desired OFF time for the first program.
- Repeat steps 1-5 for additional ON/OFF programs (e.g., "2 ON", "2 OFF", etc.).
- Po nastavení všech požadovaných programů stiskněte tlačítko HODINY button to exit programming mode and save settings.
6.3 Ruční ovládání
The MANUÁL or ON/AUTO/OFF button allows you to manually override the programmed settings.
- Pressing this button cycles through modes: ON (always on), AUTO (follows programs), VYPNUTO (always off).
- Vybrat AUTO for the timer to execute its programmed schedules.
6.4 Funkce reset
To clear all settings and return the timer to its factory default state, locate the small RESETOVAT button (often recessed) and press it using a pointed object (e.g., a pen tip). This will erase all time and program settings.
7. Údržba
The Fafeicy TM626 timer switch requires minimal maintenance to ensure long-term reliable operation.
- Čištění: Use a soft, dry cloth to wipe the exterior of the device. Do not use abrasive cleaners or solvents.
- Inspekce: Pravidelně kontrolujte, zda jsou kabelové spoje pevné a zda nejeví známky opotřebení nebo poškození.
- Bateriová záloha: The device typically includes an internal battery for retaining settings during power outages. This battery is usually non-replaceable by the user and recharges when the device is powered.
8. Řešení problémů
If you encounter issues with your TM626 timer switch, refer to the following common problems and solutions:
| Problém | Možná příčina | Řešení |
|---|---|---|
| Displej je prázdný. | Žádné napájení; interní baterie je vybitá. | Check power connections to A1/A2. Allow device to be powered for several minutes to charge the internal battery. |
| Zátěž se nezapíná/nevypíná podle naprogramování. | Incorrect programming; timer in manual ON/OFF mode; incorrect wiring; faulty load. | Verify program settings. Ensure the timer is in AUTO mode. Check wiring connections (15, 16, 18). Test the load independently. |
| Čas je nesprávný. | Time not set correctly; power interruption (though internal battery should prevent this). | Reset and re-set the current time and day. Ensure the internal battery is charged. |
| Tlačítka nereagují. | Porucha zařízení; dočasná softwarová závada. | Perform a full reset using the recessed RESET button. If the issue persists, contact support. |
9. Záruka a podpora
For warranty information or technical support, please refer to the documentation provided with your purchase or contact Fafeicy customer service through their official channels. Keep your purchase receipt as proof of purchase.
S obecnými dotazy můžete navštívit Fafeicy Brand Store.