
1. Úvod
Děkuji za nákupasing the CHEREEKI Digital LED Alarm Clock Model 8808. This manual provides detailed instructions for the proper use, setup, and maintenance of your new alarm clock. Please read this manual thoroughly before use and retain it for future reference.
2. Bezpečnostní informace
- Keep the clock away from heat sources and high humidity environments.
- Use only a 5V/1A or 5V/2A adapter for charging via the USB port.
- Nepokoušejte se zařízení rozebírat ani opravovat sami. Pro servis se obraťte na kvalifikovaný personál.
- Ensure the power switch is OFF when the clock is not in use for extended periods.
3. Obsah balení
- 1 x CHEREEKI Digital LED Alarm Clock
- 1 x USB Charging Cable (adapter not included)
- 1 x Uživatelská příručka
4. Konec produktuview
The CHEREEKI Digital LED Alarm Clock Model 8808 features a large LED display, dual alarms, temperature display, adjustable brightness, sound activation, and a USB charging port. It is designed for clear visibility and ease of use.

Obrázek 4.1: Přední strana view of the CHEREEKI Digital LED Alarm Clock highlighting its key features and dimensions.
Klíčové vlastnosti:
- Dva budíky s funkcí odložení: Set two separate alarms with a 5-minute snooze function.
- USB Charging & Built-in Battery: Powered via USB cable (adapter not included) with an integrated rechargeable battery for settings backup during power outages.
- Temperature Display & Adjustable Brightness: Displays temperature in Celsius. Features automatic 3-level brightness adjustment and manual adjustment.
- Sound Activated Display: The LED screen activates with sound (e.g., clap, tap) or by pressing the SNOOZE/LIGHT button, turning off automatically after 6 seconds when not connected to power.
- 10 Music Options & 4 Volume Levels: Choose from 10 different ringtones and adjust the alarm volume.
- 12/24hodinový formát: Supports both 12-hour and 24-hour time display.
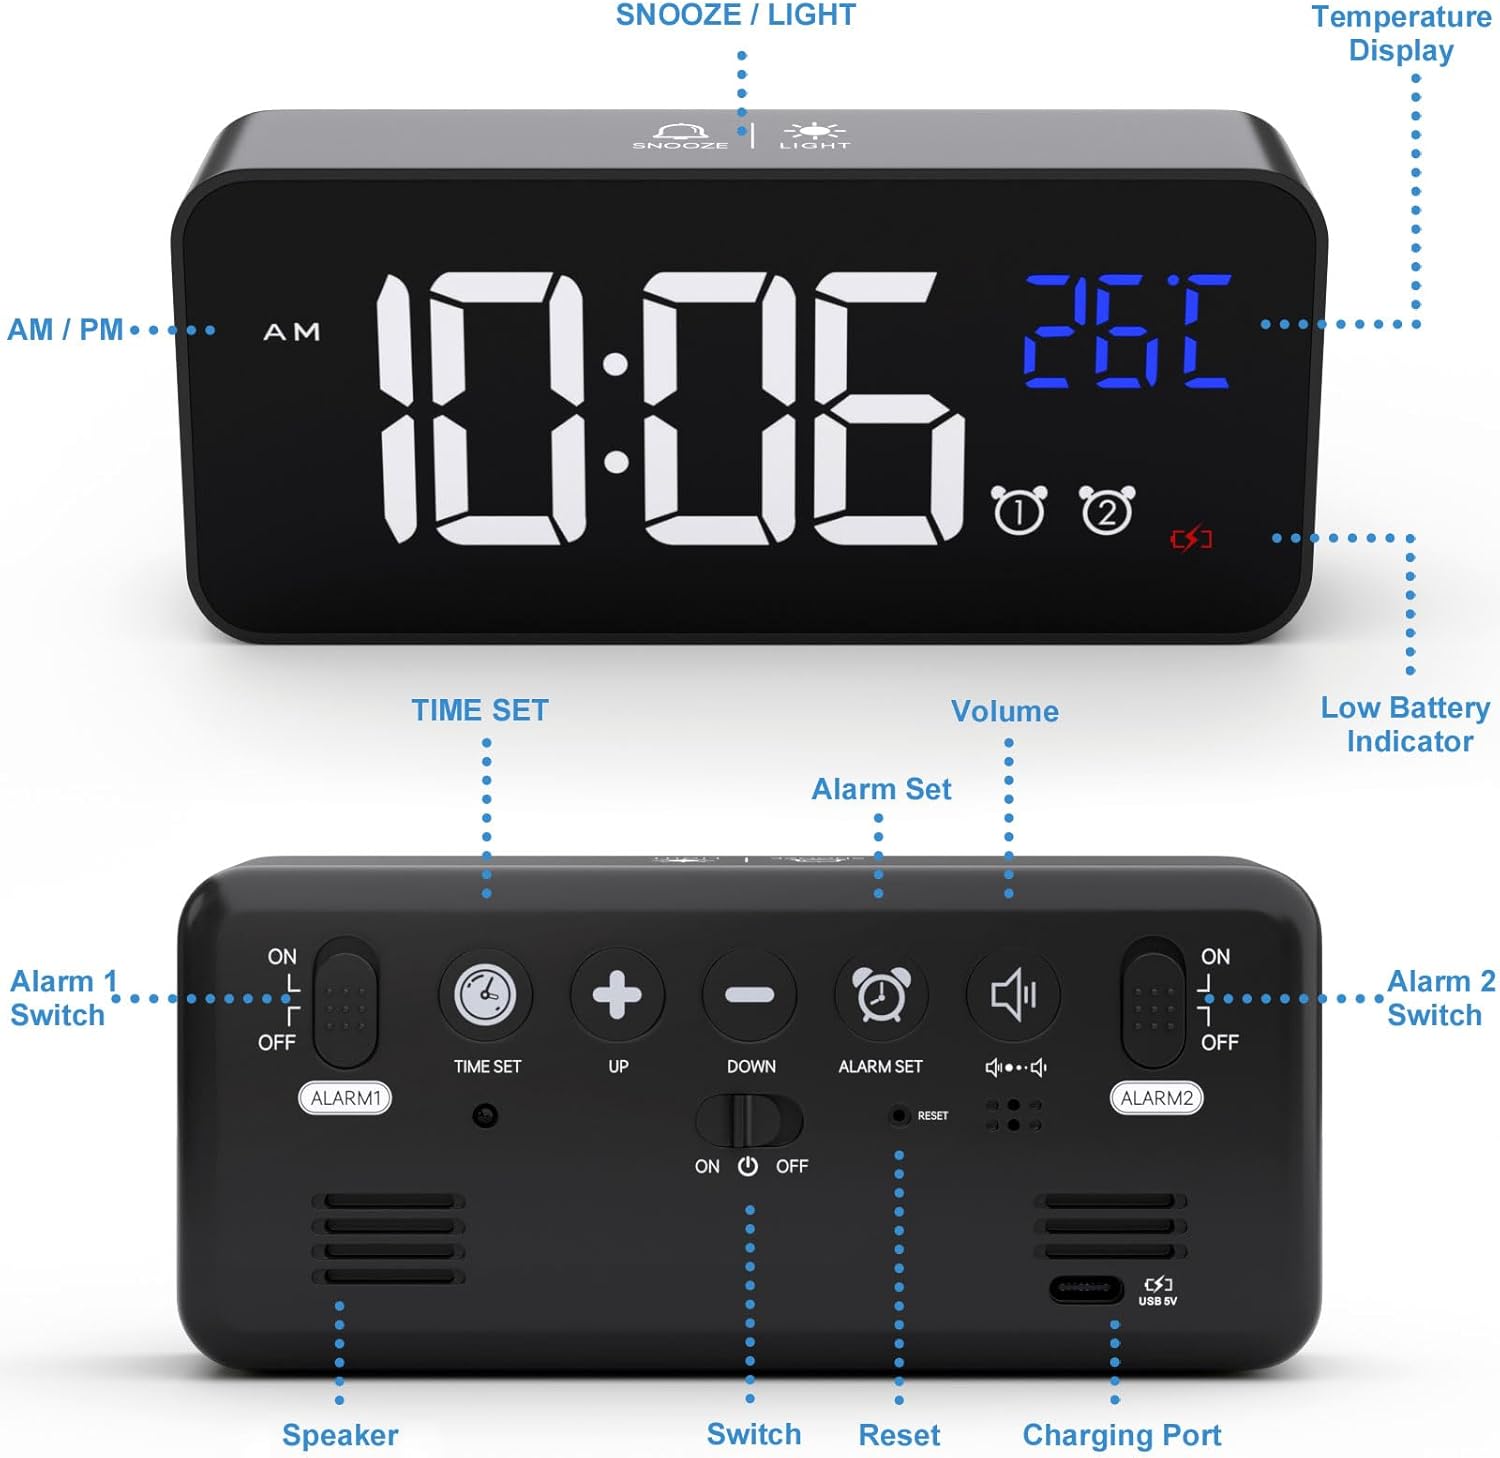
Figure 4.2: Rear panel controls and ports of the alarm clock.
5. Nastavení
5.1 Napájení hodin
Connect the provided USB charging cable to the clock's charging port and to a 5V/1A or 5V/2A USB adapter (not included) or a USB port. The clock has a built-in rechargeable battery that saves your settings during power outages.

Figure 5.1: Powering the alarm clock via USB.
Poznámka: When powered by USB, the display remains continuously on. When running on battery power, the display will turn off after 6 seconds to conserve energy. It can be reactivated by sound or by pressing any button.
5.2 Initial Setup (Removing Protective Film)
For optimal display clarity, please remove the protective film from the screen when using the clock for the first time.
6. Provoz
6.1 Nastavení času
- Stiskněte a podržte NASTAVENÍ ČASU tlačítko na zadní straně hodin. Číslice hodin začnou blikat.
- Použijte UP a DOLŮ tlačítka pro nastavení hodiny.
- Stiskněte NASTAVENÍ ČASU again to switch to minute adjustment. The minute digits will flash.
- Použijte UP a DOLŮ tlačítka pro nastavení minut.
- Stiskněte NASTAVENÍ ČASU ještě jednou pro potvrzení a ukončení režimu nastavení času.
Video 6.1: Demonstration of how to set the time on the alarm clock (0:00-0:18 in video).
6.2 Nastavení alarmů (Alarm 1 a Alarm 2)
The clock supports two independent alarms. Use the ALARM 1 ZAP/VYP a ALARM 2 ZAP/VYP switches on the back to enable or disable each alarm.
- To set Alarm 1, slide the ALARM 1 ZAP/VYP přepněte na „ZAPNUTO“.
- Stiskněte a podržte NASTAVENÍ ALARMU tlačítko. Číslice hodin budíku budou blikat.
- Použijte UP a DOLŮ tlačítka pro nastavení hodiny budíku.
- Stiskněte NASTAVENÍ ALARMU again to switch to minute adjustment. The alarm minute digits will flash.
- Použijte UP a DOLŮ tlačítka pro nastavení minut budíku.
- Stiskněte NASTAVENÍ ALARMU ještě jednou pro potvrzení a ukončení režimu nastavení budíku.
- Repeat the process for Alarm 2 using the ALARM 2 ZAP/VYP přepínač.
Video 6.2: Demonstration of how to set the alarms on the clock (0:19-1:04 in video).
6.3 Adjusting Alarm Volume and Ringtones
The clock offers 10 different ringtones and 4 adjustable volume levels.
- While in alarm setting mode (after setting the time for an alarm), press the NASTAVENÍ ALARMU button to cycle through the 10 ringtones.
- Chcete-li upravit hlasitost, stiskněte tlačítko OBJEM button repeatedly until the desired volume level (L01-L04) is displayed.

Figure 6.3: Available ringtones and volume levels.
Video 6.3: Demonstration of how to adjust the alarm volume (1:05-1:19 in video).
6.4 Snooze Function and Stopping Alarms
Když zazvoní budík, můžete aktivovat funkci odložení buzení pro dalších 5 minut spánku.
- To activate snooze: Press the SNOOZE / SVĚTLO button on the top of the clock. The alarm will pause and sound again after 5 minutes.
- To stop the alarm: Press any other button on the clock (except SNOOZE / SVĚTLO) to turn off the alarm for the day.

Figure 6.4: Dual alarms and snooze function in use.
Video 6.4: Demonstration of snooze and stopping alarms (1:20-1:37 in video).
6.5 Nastavení jasu displeje
The clock features both automatic and manual brightness adjustment.
6.5.1 Automatické nastavení jasu
When connected to power, the LED display automatically adjusts its brightness:
- 7:00 - 6:59: High brightness.
- 7:00 - 11:59: Medium brightness.
- 12:00 - 6:59: Low brightness.
Video 6.5: Demonstration of automatic brightness adjustment throughout the day (2:07-2:38 in video).
6.5.2 Manual Brightness Adjustment
You can manually adjust the brightness to your preference:
- Stiskněte tlačítko SNOOZE / SVĚTLO button on the top of the clock to cycle through 4 levels of brightness.
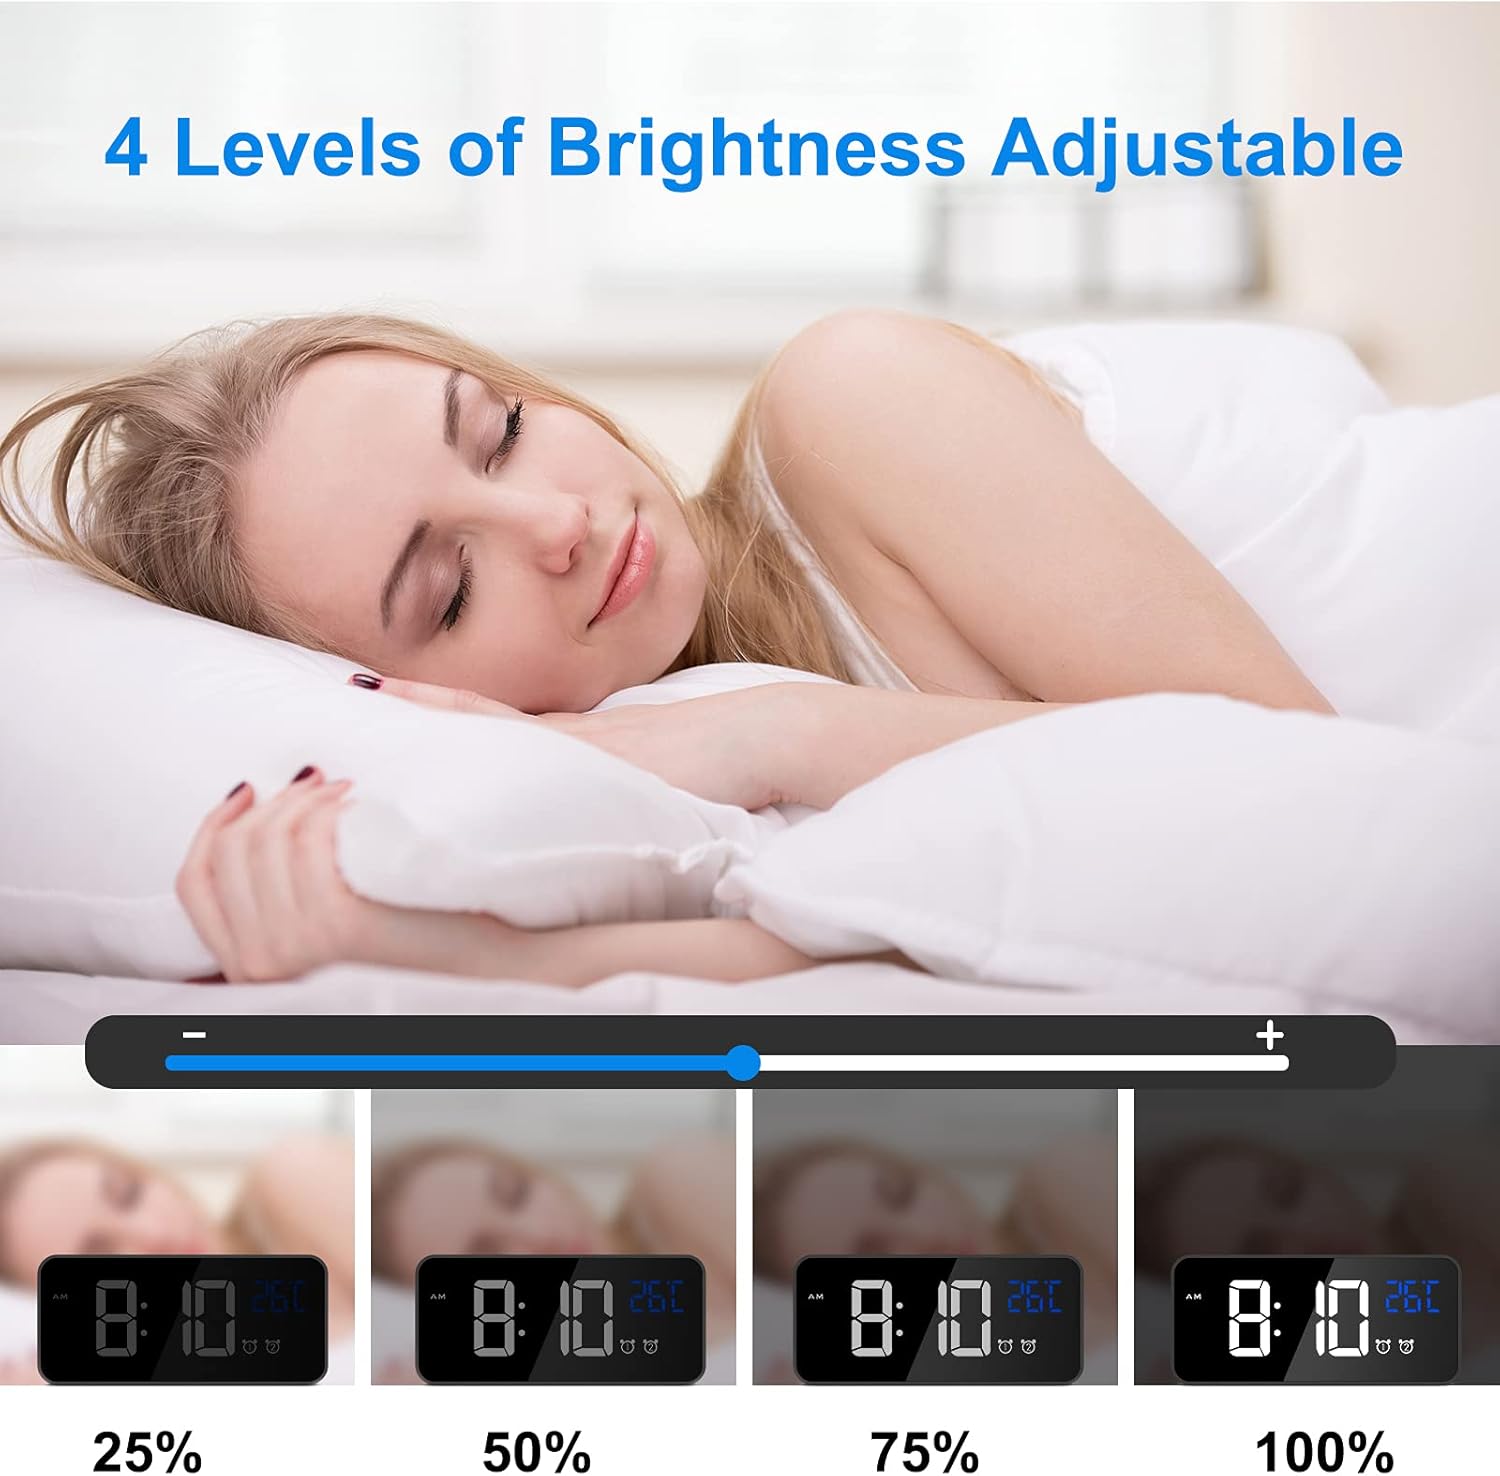
Figure 6.5: Manual brightness adjustment levels.
Video 6.6: Demonstration of manual brightness adjustment (1:38-2:06 in video).
6.6 Sound Activated Display (Battery Mode)
When the clock is running on battery power (not connected to USB), the display will turn off after 6 seconds to save energy. You can activate the display by making a sound (e.g., clapping, tapping the table) louder than 90dB, or by pressing the SNOOZE / SVĚTLO tlačítko.

Figure 6.6: Sound activated display feature.
6.7 12/24hodinový formát
Chcete-li přepnout mezi 12hodinovým a 24hodinovým formátem času, stiskněte tlačítko 12/24 hod tlačítko na zadní straně hodin.

Figure 6.7: Switching between 12-hour and 24-hour display formats.
6.8 Zobrazení teploty
The clock automatically displays the ambient temperature in Celsius.

Figure 6.8: Temperature display feature.
7. Údržba
- Hodiny čistěte měkkým, suchým hadříkem. Nepoužívejte abrazivní čisticí prostředky ani rozpouštědla.
- Nevystavujte hodiny přímému slunečnímu záření nebo extrémním teplotám.
- If the clock will not be used for a long period, turn off the main power switch to preserve battery life.
8. Řešení problémů
| Problém | Řešení |
|---|---|
| Display shows disordered code or incorrect information. | Use a pin to press the RESETOVAT button on the back of the clock. This will restore the clock to its normal operating state. |
| Display turns off quickly when not connected to power. | This is normal behavior to conserve battery. The display is sound-activated or can be turned on by pressing any button. For a continuously lit display, keep the clock connected to a USB power source. |
| Alarm se nespustí. | Ensure the corresponding alarm switch (ALARM 1 ZAP/VYP or ALARM 2 ZAP/VYP) is set to 'ON'. Check that the alarm time is correctly set. |
| Clock not charging or holding charge. | Verify that the USB cable is securely connected and that the power adapter is 5V/1A or 5V/2A. Ensure the main power switch is 'ON' for charging. |
9. Specifikace
- Značka: CHEREEKI
- Číslo modelu: 8808
- Barva: Černý
- Typ displeje: Digitální LED
- Zdroj napájení: Battery Powered (rechargeable Lithium-polymer) / USB 5V
- Speciální vlastnosti: Temperature Display, Dual Alarms, Snooze, Adjustable Brightness, Sound Activated, 12/24 Hour Format, 10 Ringtones
- Rozměry produktu: 14.5 cm (D) x 6.5 cm (V)
- Hmotnost položky: 290 gramů
- Materiál: ABS (akrylonitril-butadien-styren) plast
- Typ montáže: Stolní deska
10. Záruka a podpora
This product comes with a lifetime warranty. For any questions, issues, or support needs, please contact CHEREEKI customer service. Please refer to your purchase documentation for specific contact details.