
1. Konec produktuview
The Yoidesu Mini-ITX Computer Case is a compact and robust enclosure designed for Mini-ITX motherboards. Constructed from high-quality aluminum alloy, it offers excellent heat dissipation and a sleek, minimalist design. This case is ideal for building small form factor PCs, including gaming systems and Home Theater Personal Computers (HTPCs).

Image: The Yoidesu Mini-ITX Computer Case displayed on a desk next to a computer monitor, illustrating its compact size in a typical setup.
Klíčové vlastnosti:
- Vysoce kvalitní konstrukce: Made of durable aluminum alloy with a super-thick sheet (up to 3.5MM) for enhanced structural integrity.
- Elegantní povrchová úprava: Features a frosting treatment for a premium aesthetic and feel.
- Kompaktní design: Small footprint with dimensions of 197mm x 197mm x 65mm (approximately 7.76"D x 7.76"W x 2.56"H), perfect for space-constrained setups.
- Integrated Heat Dissipation: The all-aluminum alloy frame is designed to integrate and optimize heat dissipation for efficient cooling.
- Mini-ITX Motherboard Compatibility: Specifically designed for ITX motherboards measuring 170mm x 170mm.
2. Nastavení a instalace
Follow these steps to install your components into the Yoidesu Mini-ITX Computer Case.
2.1 Příprava případu
Before installing any components, ensure the case is placed on a stable, flat surface. Remove any side panels or covers as instructed to access the interior. The case includes necessary mounting hardware.

Image: The Yoidesu Mini-ITX Computer Case shown with included mounting screws and cable ties, indicating readiness for component installation.
2.2 Instalace základní desky
- Carefully align your Mini-ITX motherboard (170x170mm) with the standoffs inside the case.
- Secure the motherboard using the appropriate screws provided with the case or your motherboard.

Image: Diagram illustrating the correct placement of a Mini-ITX motherboard (17x17cm) within the case for installation.

Image: The Yoidesu Mini-ITX Computer Case with a transparent overlay showing a Mini-ITX motherboard, highlighting its compatibility and intended fit.
2.3 Instalace paměťového zařízení
The case supports 3.5-inch and 2.5-inch hard disks. Locate the internal bays and secure your storage devices using the provided screws.
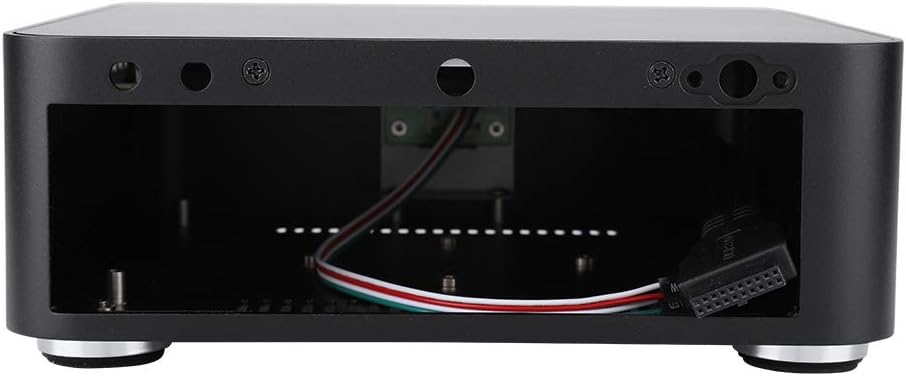
Obrázek: Interní view of the Yoidesu Mini-ITX Computer Case, revealing the metal frame and various mounting points for components like hard drives.
2.4 Instalace jednotky napájecího zdroje (PSU)
The case supports bottom-mounted or top-mounted power supply units. Install your PSU according to its design and the available mounting options within the case.
2.5 Připojení I/O na předním panelu
Connect the front panel cables (USB 2.0, USB 3.0, power button, power LED, HDD LED) to the corresponding headers on your motherboard. Refer to your motherboard's manual for specific header locations.

Obrázek: Boční view of the Yoidesu Mini-ITX Computer Case, highlighting the front panel USB 3.0 ports and side ventilation grilles.
3. Provoz a chlazení
The Yoidesu Mini-ITX Computer Case is designed for efficient thermal management, especially for Mini-ITX systems.
3.1 Passive Cooling
For low-power CPUs, the all-aluminum construction and integrated design facilitate passive cooling. Heat is dissipated through the bottom, left, and right sides of the case without the need for additional fans.

Image: Cooling diagram showing airflow for both passive cooling (top) and active cooling with an optional fan (bottom) within the case, demonstrating how heat is managed.
3.2 Active Cooling (Optional)
For high-performance CPUs or systems requiring enhanced cooling, a fan can be installed on the right side of the case. This active cooling, combined with the existing ventilation holes on the left and right sides, provides improved thermal performance.
4. Údržba
Pravidelná údržba pomáhá zajistit dlouhou životnost a optimální výkon vaší počítačové skříně.
- Čištění: Periodically clean the exterior of the case with a soft, dry cloth. For stubborn marks, a slightly damp Lze použít hadřík a poté jej osušit. Nepoužívejte abrazivní čisticí prostředky ani rozpouštědla.
- Odstranění prachu: Over time, dust can accumulate inside the case, potentially affecting component cooling. Use compressed air to gently clear dust from internal components and ventilation openings. Ensure the system is powered off and unplugged before performing internal cleaning.
- Větrání: Ensure that the case's ventilation openings are not obstructed to allow for proper airflow and heat dissipation.
5. Řešení problémů
This section addresses common issues you might encounter with your computer case.
- Přehřátí systému:
- Ensure all internal components are properly seated and connected.
- Verify that ventilation openings are clear and not obstructed.
- If using a high-performance CPU, consider installing an optional cooling fan as described in Section 3.2.
- Check that CPU cooler is correctly installed and making good contact with the CPU.
- Porty na předním panelu nefungují:
- Confirm that the front panel USB and audio cables are securely connected to the correct headers on your motherboard.
- Refer to your motherboard manual for correct header pinouts.
- Tlačítko napájení nereaguje:
- Ujistěte se, že je kabel tlačítka napájení ze skříně správně připojen k konektoru na předním panelu základní desky.
- Verify that the power supply unit is functioning and properly connected to the motherboard and wall outlet.
6. Specifikace
Detailed technical specifications for the Yoidesu Mini-ITX Computer Case.
| Funkce | Specifikace |
|---|---|
| Značka | Yoidesu |
| Číslo modelu | Yoidesua8mpt1k3c6-03 |
| Kompatibilita základní desky | Mini ITX (170x170mm) |
| Typ pouzdra | Integrovaný |
| Doporučená použití | Gaming, HTPC, Small Form Factor PC |
| Barva | Černý |
| Materiál | Hliníková slitina |
| Rozměry produktu (D x Š x V) | 6.5" × 7.76" × 2.56" (197 mm × 197 mm × 65 mm) |
| Typ montáže napájecího zdroje | Bottom-mounted or Top-mounted |
| Způsob chlazení | Passive (heat-dissipation-through-aluminum), Optional Active Fan Cooling |
| Number of Expansion Slots | 2 |
| Total USB 2.0 Ports | 2 |
| Total USB 3.0 Ports | 2 |
| Hard Disk Form Factor Support | 3.5 palce, 2.5 palce |
| Internal Bays Quantity | 1 (for 3.5" or 2.5" drive) |
| Kompatibilní zařízení | Mini-ITX motherboard, 3.5-inch hard disk, 2.5-inch hard disk, network card, PSU, cooling systems within case dimensions. |
7. Záruka a podpora
For warranty information and technical support, please refer to the official Yoidesu webnebo se obraťte na prodejce. Uschovejte si účtenku jako doklad o koupi.
Můžete navštívit Yoidesu Store on Amazon pro více informací o produktu a zdroje podpory.