1. Úvod
The ANENG V01B is a battery-powered, true-RMS, auto-ranging digital multimeter designed for accurate electrical measurements. It features a 4000-count LCD display with backlight and a built-in flashlight for enhanced visibility in various working conditions.
This manual provides essential information for the safe and effective use of your ANENG V01B multimeter, including setup, operation, maintenance, and troubleshooting.

Obrázek 1: ANENG V01B Digital Multimeter with display dimensions (44.5mm / 1.75in width, 27mm / 1.06in height) and test leads (790mm / 31.1in length).
2. Bezpečnostní informace
VAROVÁNÍ: To avoid electric shock or personal injury, read and understand all safety information before using this product.
- Nezadávejte voltage when the multimeter is set to Current Mode, Resistance Mode, Diode Mode, Continuity Mode, or Temperature Mode.
- Nezadávejte voltage exceeding 36V DC or 25V AC when measuring current.
- Always ensure the test leads are properly connected and the function dial is set to the correct measurement range before testing.
- Před každým použitím zkontrolujte měřicí kabely, zda nejsou poškozené. Nepoužívejte, pokud je izolace poškozená nebo je odkrytý holý kov.
- Nepoužívejte měřič, pokud se jeví poškozený nebo pokud nefunguje správně.
- Dodržujte místní a národní bezpečnostní předpisy.
3. Nastavení
3.1 Instalace baterie
The ANENG V01B multimeter requires batteries for operation. Follow these steps to install or replace the batteries:
- Ujistěte se, že je multimetr VYPNUTÝ.
- Locate the battery slot on the back of the product.
- Otevřete kryt baterie.
- Vložte požadované baterie a dbejte na správnou polaritu (+ a -).
- Pevně zavřete kryt baterie.

Obrázek 2: Battery slot and product back shell with retractable bracket and flashlight.
3.2 Připojení měřicích kabelů
Správné připojení měřicích kabelů je zásadní pro přesné a bezpečné měření.
- Zasuňte černý měřicí vodič do vstupní zdířky „COM“ (Common).
- Pro většinu objemůtage, resistance, capacitance, frequency, and diode measurements, insert the red test lead into the "VΩHz" input jack.
- For current measurements up to 400mA, insert the red test lead into the "mA" input jack.
- For current measurements up to 10A, insert the red test lead into the "10A" input jack.

Obrázek 3: Test lead input interfaces: COM, VΩHz, mA, and 10A.
4. Návod k obsluze
4.1 Úvod do funkce panelu
Familiarize yourself with the multimeter's controls and display elements:

Obrázek 4: Multimeter panel with labeled functions.
- Otočný volič: Selects the primary measurement function (e.g., V for voltage, Ω pro odpor, A pro proud).
- Tlačítko SEL: Used for function conversion (e.g., switching between AC/DC voltage, or different sub-functions within a dial setting).
- AUTOMATICKÉ VYPNUTÍ: Označuje funkci automatického vypnutí.
- Tlačítko HOLD/*: Data retention (freezes the current reading on the display) and activates/deactivates the backlight.
- NCV: Bezkontaktní svtage detekce.
- LCD displej: Zobrazuje naměřené hodnoty, jednotky a různé indikátory.
- Zapnutí/vypnutí: Integrated into the rotary dial (OFF position).
4.2 Základní měřicí funkce
The ANENG V01B offers various measurement capabilities:
- DC svtage Měření: Turn the rotary dial to the 'V' position. Connect the red test lead to the positive terminal and the black test lead to the negative terminal of the circuit or component. The display will show the DC voltage čtení.

Obrázek 5: Example of measuring DC voltage from a 9V battery.
- AC svtage Měření: Turn the rotary dial to the 'V' position. Press the 'SEL' button to switch to AC voltage mode if necessary. Connect the test leads across the AC voltage zdroj.
- Měření odporu (Ω): Turn the rotary dial to the 'Ω' position. Ensure the circuit is de-energized before measuring resistance. Connect the test leads across the component.
- Měření kapacity: Turn the rotary dial to the capacitance symbol. Ensure the capacitor is discharged before measurement.
- Current Measurement (A/mA): Select the appropriate 'A' or 'mA' range on the rotary dial. Connect the multimeter in series with the circuit. Observe safety warnings regarding maximum input voltage.
- Frequency (Hz) and Duty Cycle: Vyberte pozici „Hz“.
- Test diod a kontrola kontinuity: Select the diode/continuity position. Use 'SEL' to switch between modes.
- Bezkontaktní svtage (nulová tepelná hodnota): Select the 'NCV' position. Bring the top of the multimeter near an AC voltage source to detect its presence without direct contact.
4.3 Speciální funkce
- Podsvícení/Svítilna: Press and hold the 'HOLD/*' button to activate the backlight. The flashlight is located on the back of the unit and can be used in low-light conditions.

Obrázek 6: Back of the product showing the high brightness flashlight and NCV sensing point.
- Automatické nastavení rozsahu: The multimeter automatically selects the appropriate measurement range, simplifying operation.
- Pozastavení dat: Press the 'HOLD/*' button briefly to freeze the current reading on the display. Press again to release.
5. Údržba
5.1 Čištění
Otřete pouzdro reklamouamp hadříkem a jemným čisticím prostředkem. Nepoužívejte abrazivní prostředky ani rozpouštědla. Udržujte vstupní svorky bez nečistot a vlhkosti.
5.2 Výměna baterie
Když se na displeji zobrazí indikátor baterie, vyměňte baterie podle pokynů v části 3.1. Vždy používejte předepsaný typ baterie.
5.3 Výměna pojistky
Pokud funkce měření proudu přestane fungovat, může být nutné vyměnit pojistku. Správný typ a jmenovité hodnoty pojistky naleznete ve specifikacích. Výměnu pojistky by měl provádět pouze kvalifikovaný personál.
6. Řešení problémů
6.1 Millivolt Value Jump
It is a normal phenomenon for the millivolt (mV) range of the multimeter to show a non-zero reading when the test leads are not connected to a circuit. This can be caused by:
- Nadměrné změny okolní teploty a vlhkosti.
- Silné rušení elektrickým nebo magnetickým polem.
To verify if the meter returns to zero, dial the multimeter to the mV range, insert the corresponding input hole into the red and black pen line, and short-circuit the red and black test leads. The display should then show zero or a very small, stable value.
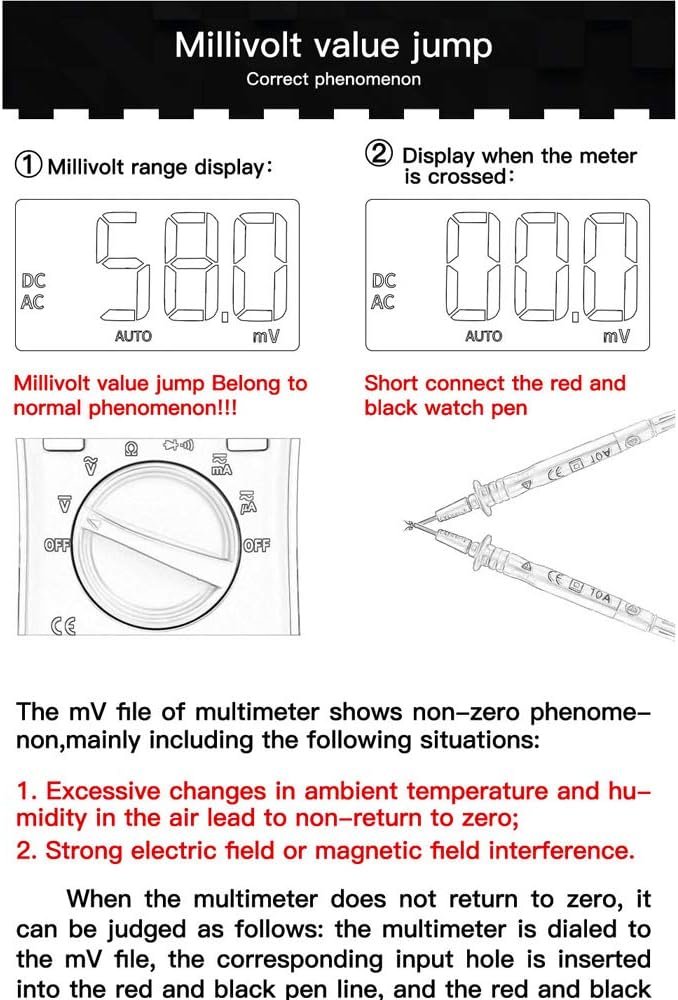
Obrázek 7: Millivolt range display and method to check for zero return by shorting test leads.
6.2 Obecné otázky
- Bez displeje: Zkontrolujte instalaci baterií a jejich stav nabití. V případě potřeby baterie vyměňte.
- Nesprávné čtení: Ensure test leads are correctly connected to the appropriate input jacks. Verify the rotary dial is set to the correct measurement function and range.
- Žádná odpověď: Turn the multimeter off and then on again. If the issue persists, replace batteries.
7. Specifikace
| Funkce | Specifikace |
|---|---|
| Model | ANENG V01B |
| Zobrazit | LCD displej s 4000 číslicemi |
| Typ měření | Digital Multimeter (True-RMS, Auto-Ranging) |
| DC svtage | Ano |
| AC svtage | Ano |
| Stejnosměrný proud | Ano |
| AC proud | Ano |
| Odpor | Ano |
| Kapacita | Ano |
| Frekvence | Ano |
| Test diod | Ano |
| Test kontinuity | Ano |
| NCV (bezkontaktní svtage) | Ano |
| Podsvícení | Ano |
| Svítilna | Ano |
| Zdroj napájení | Na baterie |
| Barva | Modrý |
| UPC | 630282728851 |
| ASIN | B0831BWKWL |
8. Záruka a podpora
Specific warranty information and customer support details are not provided in the available product data. Please refer to the product packaging, the manufacturer's official website, or contact your retailer for warranty terms and technical support inquiries.