1. Konec produktuview
The 10L0L #70 Series Solenoid Relay is a 36 Volt, 4-terminal, SPNO (Single Pole Normally Open) continuous duty component designed for EZGO TXT, Medalist, and Marathon electric golf carts manufactured between 1971 and 2010. This heavy-duty solenoid acts as the conduit between the golf cart battery and the starter motor, providing the electrical energy necessary to activate the vehicle's ignition system.
It is a direct replacement for OEM part numbers including 70-120224, 11761GA, 11761-G1, 27855-G01, 27855G01, 27805-G02, 27805G02, 31680-G1, 31680G1, 3016, and Cole Hersee 24080. It is also compatible with Columbia Par Car 71468-85, Melex 300668, Legend 7-3668, Pargo 318 3016 8427, Karrior 704-00, Otis A-11004, and Shuttlecraft 95-0079.

Image: The 10L0L #70 Series Solenoid Relay installed in an EZGO golf cart, highlighting its robust design and key features.
2. Vlastnosti produktu
- Těžká konstrukce: Designed for continuous duty in 36 Volt EZGO electric golf carts.
- 4-Terminal SPNO: Features four terminals for reliable electrical connection.
- OEM kompatibilita: Replaces numerous OEM part numbers for wide compatibility.
- Ignition System Activation: Essential component for activating the golf cart's starter motor.
- Odolné materiály: Constructed with robust 5/16"-24 studs to withstand high current shocks.
- Dust-Resistant Case: Enclosed in a dustproof, splash-proof, corrosion-resistant, and wear-resistant case for longevity.
- Stable Copper Coil: Features a high-quality copper coil for low resistance, high current carrying capacity, and reduced heat generation.
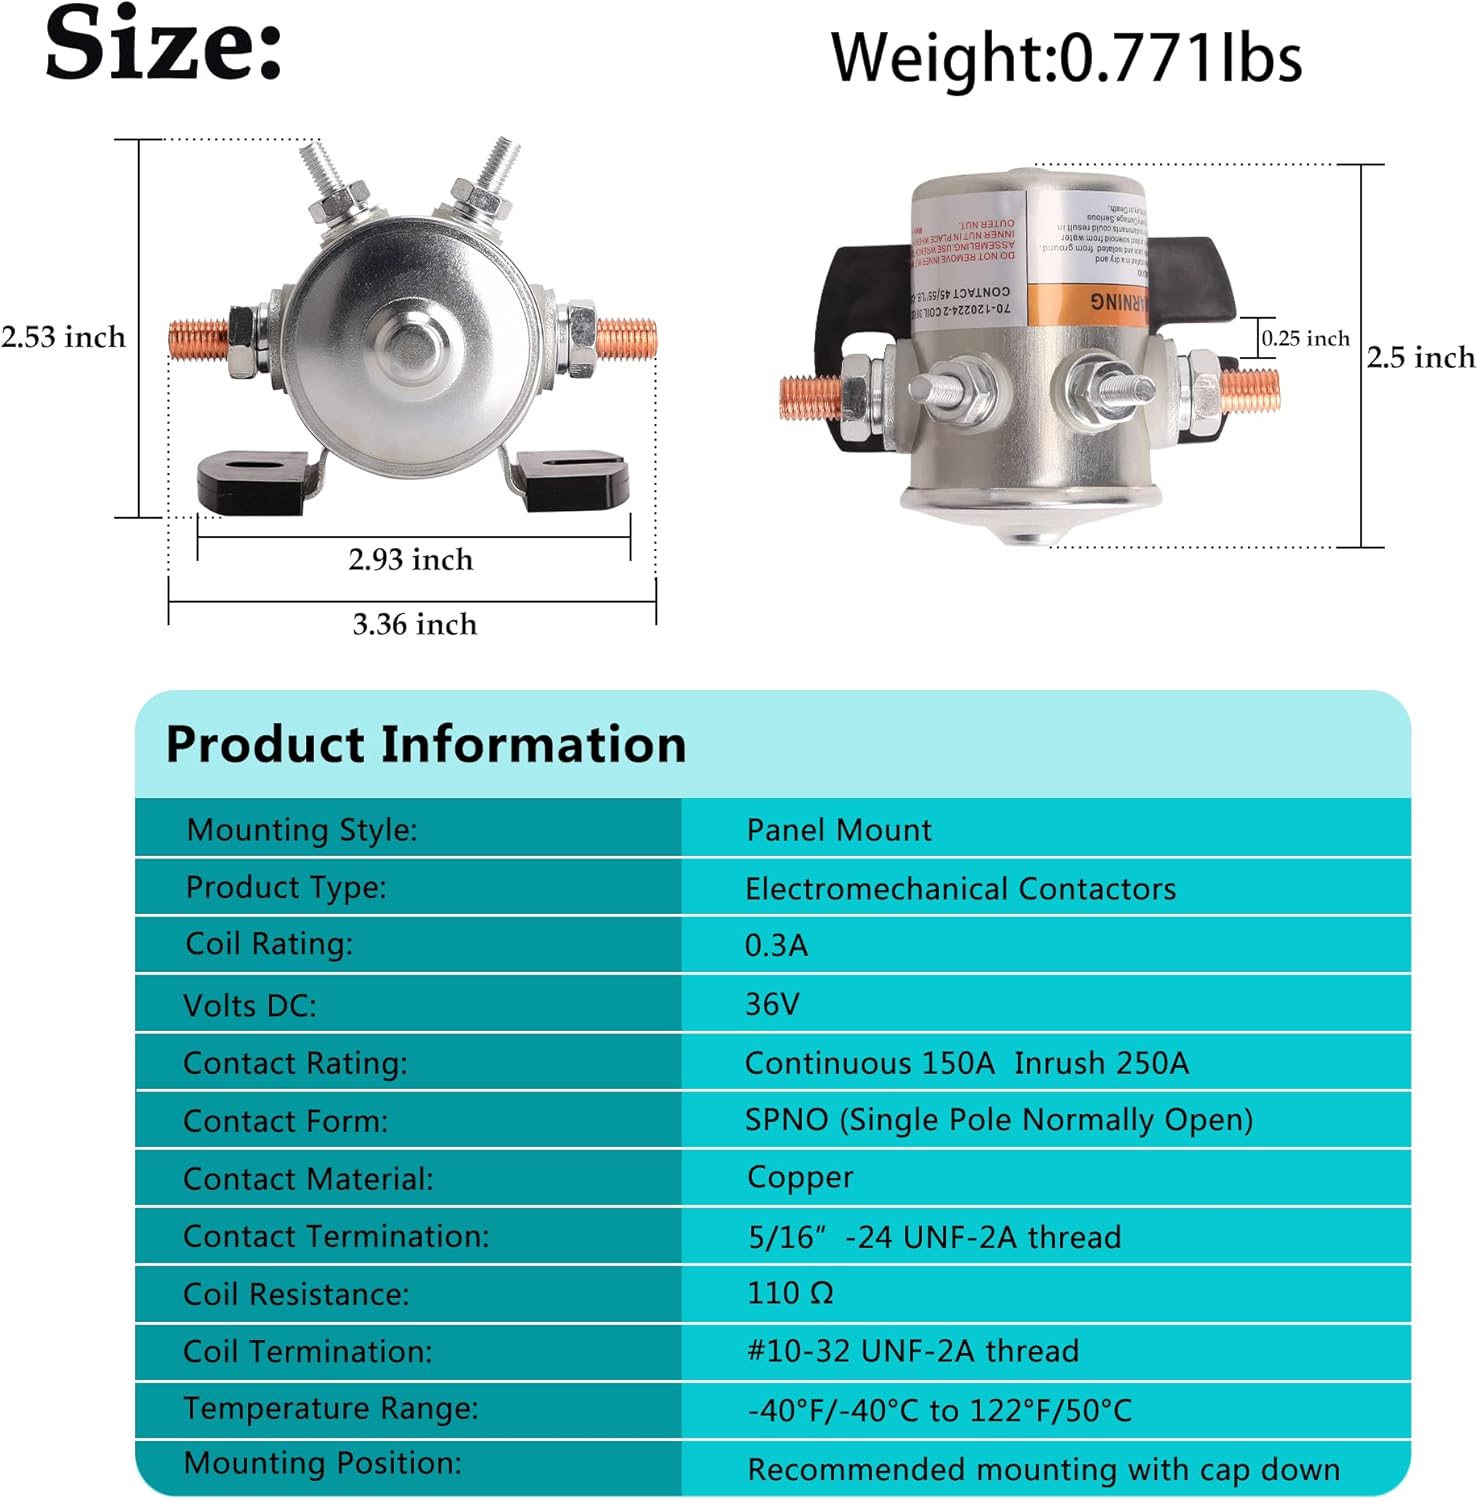
Image: The solenoid relay shown with water splashing, illustrating its dust-resistant and splash-proof enclosure.
Obrázek: Podrobný view of the solenoid relay, highlighting the stable copper coil responsible for efficient current flow.
3. Specifikace
| Specifikace | Hodnota |
|---|---|
| Značka | 10 l 0 l |
| Typ produktu | Electromechanical Contactors |
| Coil Voltage | 36 V DC |
| Hodnocení cívky | 0.3A |
| Odpor cívky | 110 Ω |
| Hodnocení kontaktu | Continuous 150A, Inrush 250A |
| Kontaktní formulář | SPNO (Single Pole Normally Open) |
| Kontaktní materiál | Měď |
| Contact Termination | 5/16" -24 UNF-2A thread |
| Coil Termination | #10-32 závit UNF-2A |
| Styl montáže | Montáž na panel |
| Typ montáže | Šroubová montáž |
| Doporučená montážní poloha | With cap down |
| Rozsah provozních teplot | -40 °F/-40 °C až 122 °F/50 °C |
| Hmotnost | 0.771 liber |
| Rozměry (cca) | 2.53 inch (height) x 3.36 inch (width) |
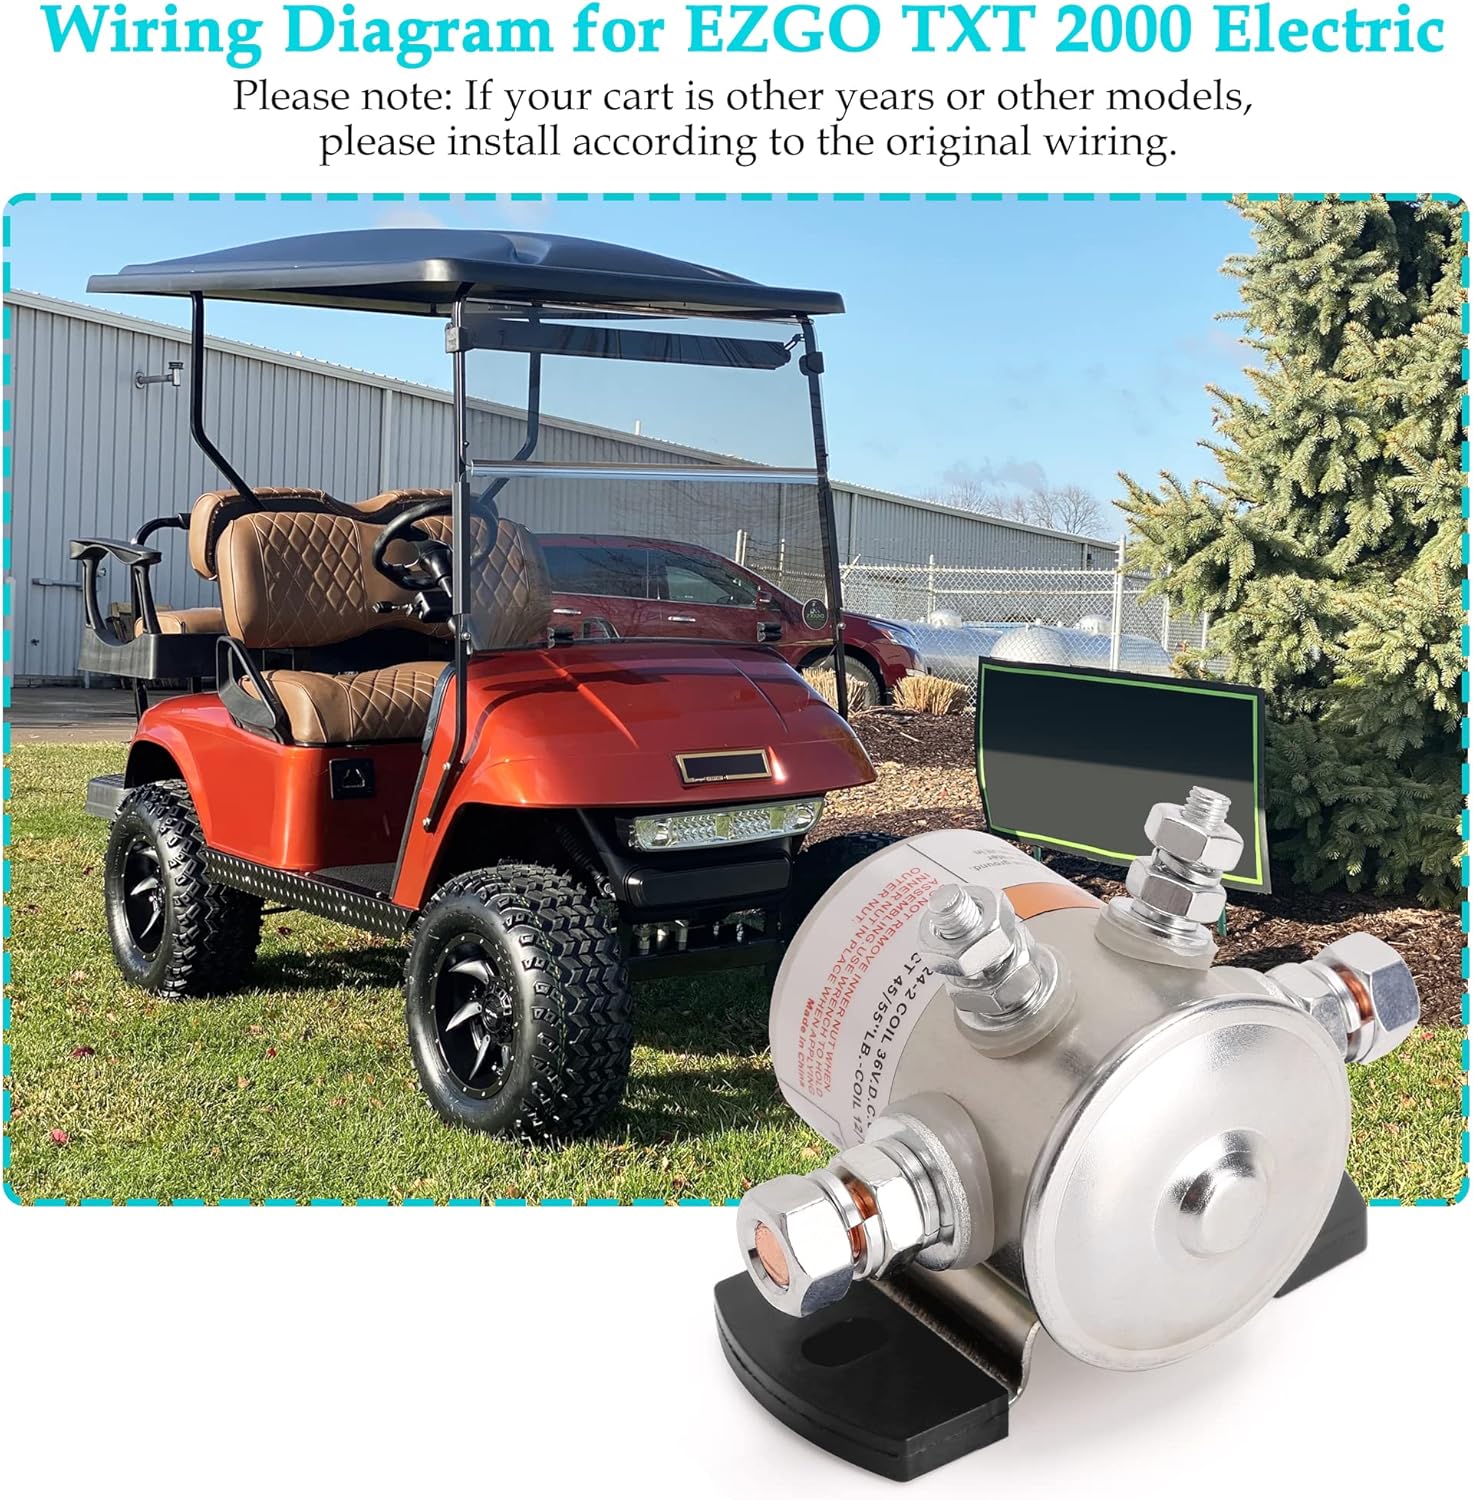
Image: A visual representation of the solenoid relay's dimensions and a table summarizing its key product specifications.
4. Pokyny k instalaci
Bezpečnost především: Before beginning any installation, ensure the golf cart is turned off, the key is removed, and the parking brake is engaged. For electrical work, it is crucial to disconnect the positive battery lead from the battery. Remove any watches, rings, or jewelry to prevent accidental electrical contact.
- Prepare the Cart: Turn the key to the "OFF" position and remove it from the switch. Ensure the parking brake is set.
- Odpojit baterii: Remove the negative battery wire by removing the screw on the negative battery terminal with a socket. Then, remove the seat bottom to access the solenoid.
- Access Solenoid: Remove the four bolts of the heatsink and remove the cover to expose the solenoid.
- Odpojení vodičů: Remove the bolts and lock nuts on the electronic speed controller with a wrench. Take photos or make notes of all connected wires before disconnecting them, as wiring can vary by year or model of cart.
- Demontáž starého solenoidu: Carefully remove all connected wires from the old solenoid.
- Instalace nového solenoidu: Install the new solenoid in the reverse order of removal. When clamping the ends of the wires between the inner and outer nuts, ensure the small diode is in the correct direction with the line pointing to the positive side.

Image: A step-by-step visual guide detailing the installation process of the solenoid relay in a golf cart.
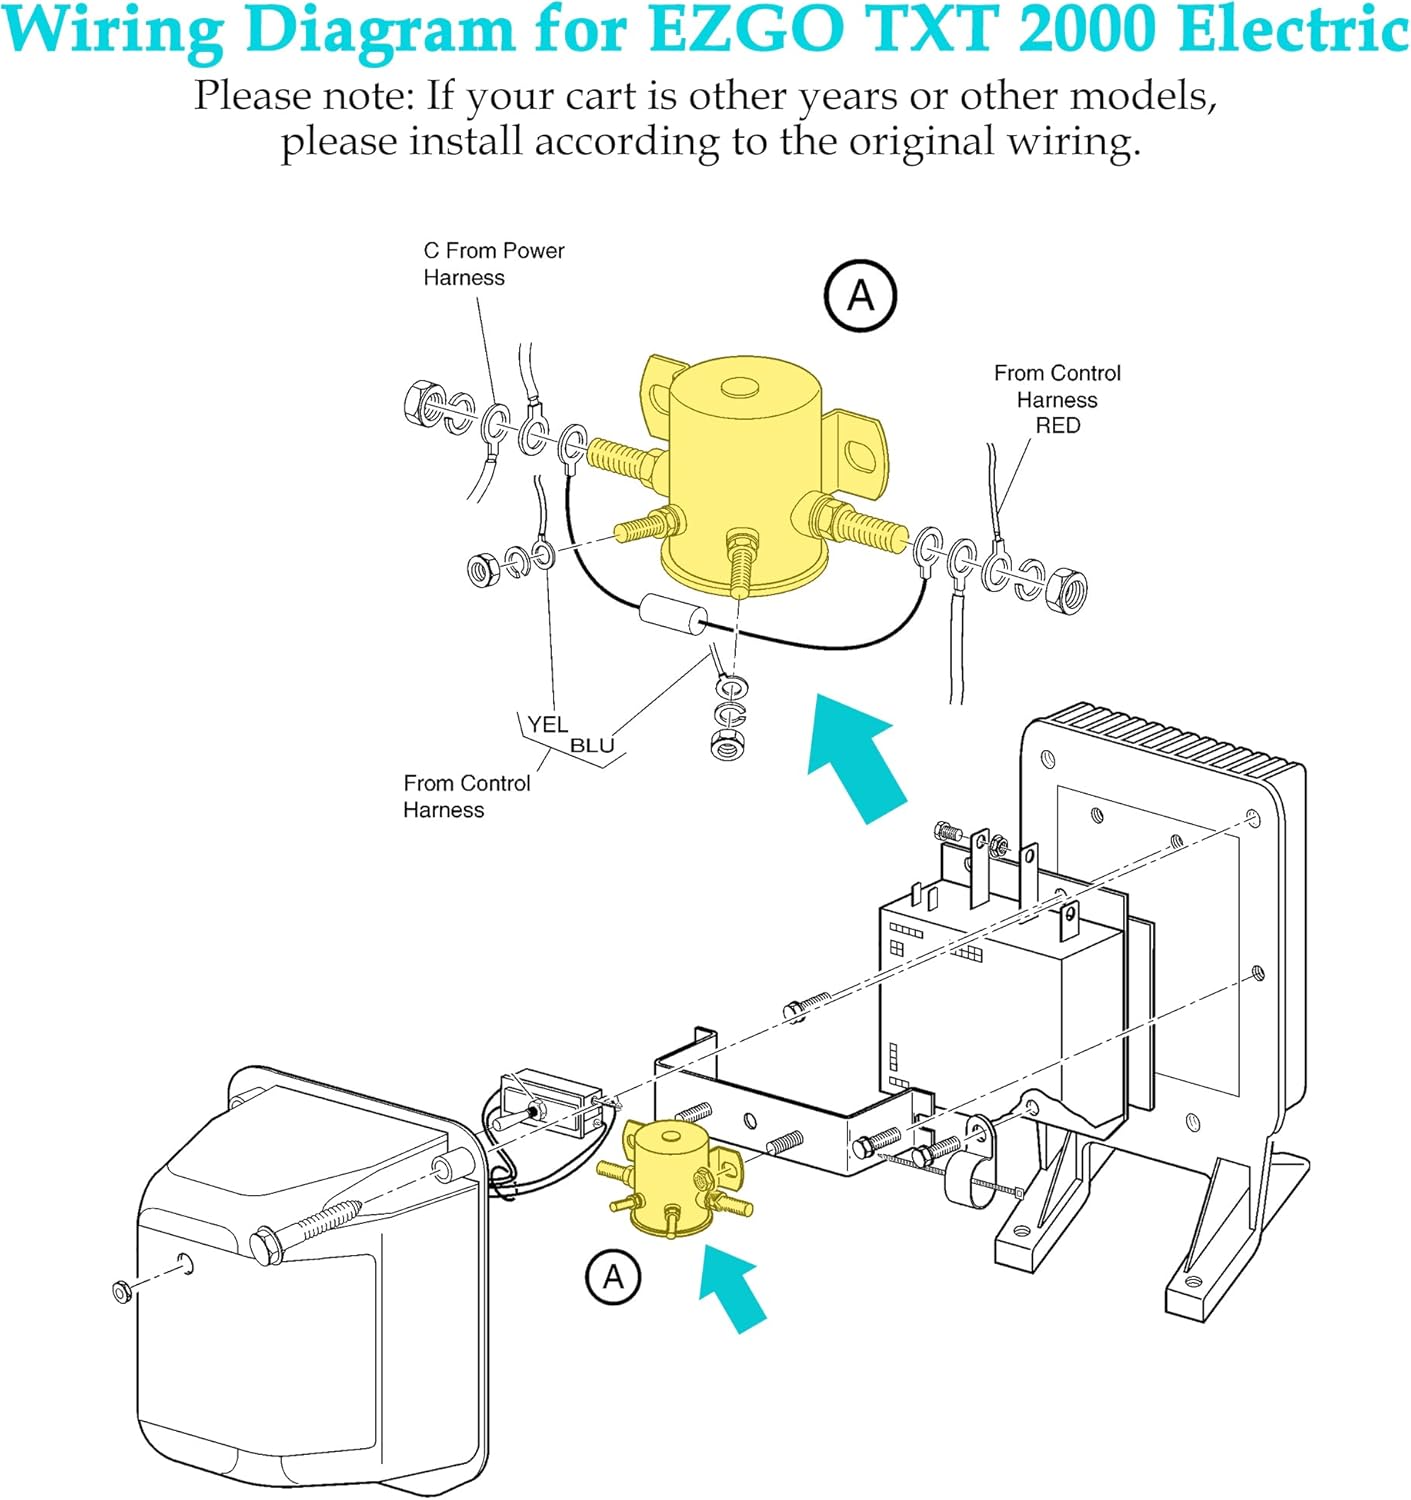
Wiring Diagram (EZGO TXT 2000 Electric)
The following diagram illustrates the wiring for an EZGO TXT 2000 Electric golf cart. If your cart is a different year or model, please consult your original wiring diagram for accurate installation.
Image: A detailed wiring diagram specifically for the EZGO TXT 2000 Electric model, showing connections for the solenoid.
Instalační video průvodce
Video: An official installation guide for the #70 Series Solenoid Relay for EZGO 36 Volt Golf Cart, demonstrating the process.
5. Návod k obsluze
The solenoid relay operates automatically as part of your golf cart's electrical system. When the ignition key is turned to the 'ON' position and the accelerator pedal is pressed, the solenoid receives a signal to close its internal contacts. This action completes the high-current circuit, allowing power to flow from the battery to the starter motor, which then engages the drive system of the golf cart.
Ensure all connections are secure and free from corrosion for optimal performance. A properly functioning solenoid will engage smoothly, providing consistent power to the starter motor.
6. Údržba
- Pravidelná kontrola: Periodically inspect the solenoid and its connections for any signs of corrosion, loose wires, or physical damage.
- Čisté terminály: If corrosion is present on the terminals, disconnect the battery and clean the terminals using a wire brush and a baking soda solution. Ensure they are dry before reconnecting.
- Utáhněte spoje: Verify that all nuts and bolts securing the wires to the solenoid terminals are tight. Loose connections can lead to intermittent operation or overheating.
- Kontrola diod: Ensure the small diode remains correctly oriented with the line pointing towards the positive side.
- Ochrana životního prostředí: While the solenoid has a dust-resistant case, avoid prolonged exposure to excessive moisture or harsh chemicals.
7. Řešení problémů
If your golf cart is not starting or experiencing intermittent power issues, the solenoid relay may be a contributing factor. Here are some common troubleshooting steps:
- Žádný zvuk kliknutí: If you turn the key and press the accelerator but hear no click from the solenoid, it could indicate a faulty solenoid, a problem with the ignition switch, or a low battery voltage not sufficient to activate the coil.
- Click but No Start: If you hear a click but the cart does not move, the solenoid might be engaging but failing to pass high current. This could be due to pitted contacts inside the solenoid or loose/corroded main power connections.
- Přerušovaný provoz: This often points to loose or corroded connections. Re-check all wiring, especially the small control wires and the main battery cables connected to the solenoid. The video provided in the installation section highlights how loose connections can cause issues.
- Overheating Solenoid: An overheating solenoid can indicate excessive current draw, a short circuit, or internal resistance. Disconnect power immediately and inspect for shorts or incorrect wiring.
- Kontrola baterie: Ensure your golf cart batteries are fully charged and in good condition. A weak battery can prevent the solenoid from engaging properly.
If troubleshooting steps do not resolve the issue, it is recommended to consult a qualified golf cart technician.
8. Záruka a podpora
Specific warranty information for this product is not provided in the available data. For warranty details, technical support, or further assistance, please contact 10L0L customer service directly or visit their official brand store.
10L0L Brand Store: Visit the 10L0L Store on Amazon