
Zavedení
This manual provides essential instructions for the safe and efficient use of your BLACK+DECKER EM044KJN-P2 1.6-Cu. Ft. Over-the-Range Microwave. Please read all instructions carefully before installation and operation, and retain this manual for future reference.

Obrázek 1: Přední strana view of the BLACK+DECKER EM044KJN-P2 Over-the-Range Microwave with the door open, revealing the interior cavity and glass turntable.
Důležité bezpečnostní informace
Abyste snížili riziko požáru, úrazu elektrickým proudem, zranění osob nebo vystavení nadměrnému množství mikrovlnné energie při používání spotřebiče, dodržujte základní bezpečnostní opatření, včetně následujících:
- Před použitím spotřebiče si přečtěte všechny pokyny.
- Do not operate the microwave if it is damaged or malfunctioning.
- Ensure proper grounding to avoid electrical shock hazards.
- Nezahřívejte uzavřené nádoby, mohly by explodovat.
- Nikdy troubu neprovozujte prázdnou.
- Vždy dohlížejte na děti, když jsou v blízkosti spotřebiče.
- Používejte pouze nádobí vhodné do mikrovlnné trouby.
Obsah balení
Po vybalení ověřte, zda jsou všechny součásti přítomny a nepoškozené:
- BLACK+DECKER EM044KJN-P2 Over-the-Range Microwave Unit
- Skleněný gramofon
- Installation Hardware (mounting bracket, screws, template)
- Uživatelská příručka
Nastavení a instalace
Installation of an over-the-range microwave requires careful planning and may necessitate two people due to the unit's weight and size. The microwave weighs approximately 55.1 pounds and measures 15 x 29.9 x 16.4 inches.

Figure 2: Product dimensions for the BLACK+DECKER EM044KJN-P2 microwave, indicating height, depth, and width.
Kroky před instalací:
- Remove Old Microwave: If replacing an existing unit, carefully remove it. Note the location of existing screws and the power cord.
- Vyčistit instalační oblast: For easier installation, consider temporarily removing the stove from beneath the cabinet.
- Najděte hřebíky: Use a stud finder to identify suitable locations for the two lag bolts that secure the back brace.
- Drilling Considerations: If drilling through ceramic tile on the backsplash, use an appropriate masonry drill bit.
- Ventilation Configuration: The microwave supports both rear exhaust and top exhaust (recirculating) options. Ensure the vent blower is configured correctly for your chosen setup. If using top exhaust, verify the vent cut-out in the cabinet allows for proper clearance. If replacing a non-like model, a new flange transition to your existing ducting may be required.
Mounting the Microwave:
- Montážní nástěnný držák: Use the provided template to accurately position and mount the wall bracket on the back wall.
- Secure Top Screws: The microwave is typically secured with three screws from the top cabinet. Ensure these holes are pre-drilled according to the template.
- Správa napájecího kabelu: A hole in the cabinet floor is required for the power cord to pass through and plug into a receptacle located inside the upper cabinet.
- Zvedání a polohování: With assistance, lift the microwave onto the wall bracket. The unit will hinge onto this bracket.
- Konečné zajištění: Once hinged, secure the microwave by inserting the screws from the top cabinet into the designated mounting points on the microwave. Additionally, ensure the back brace is perfectly installed, utilizing the lag screws and any spring-loaded fasteners as directed.

Obrázek 3: Zadní view of the microwave, highlighting the power cord and potential mounting locations.
Návod k obsluze
Your BLACK+DECKER EM044KJN-P2 microwave features 1000 watts of cooking power and 10 different power levels for versatile cooking. The control panel is designed for ease of use.
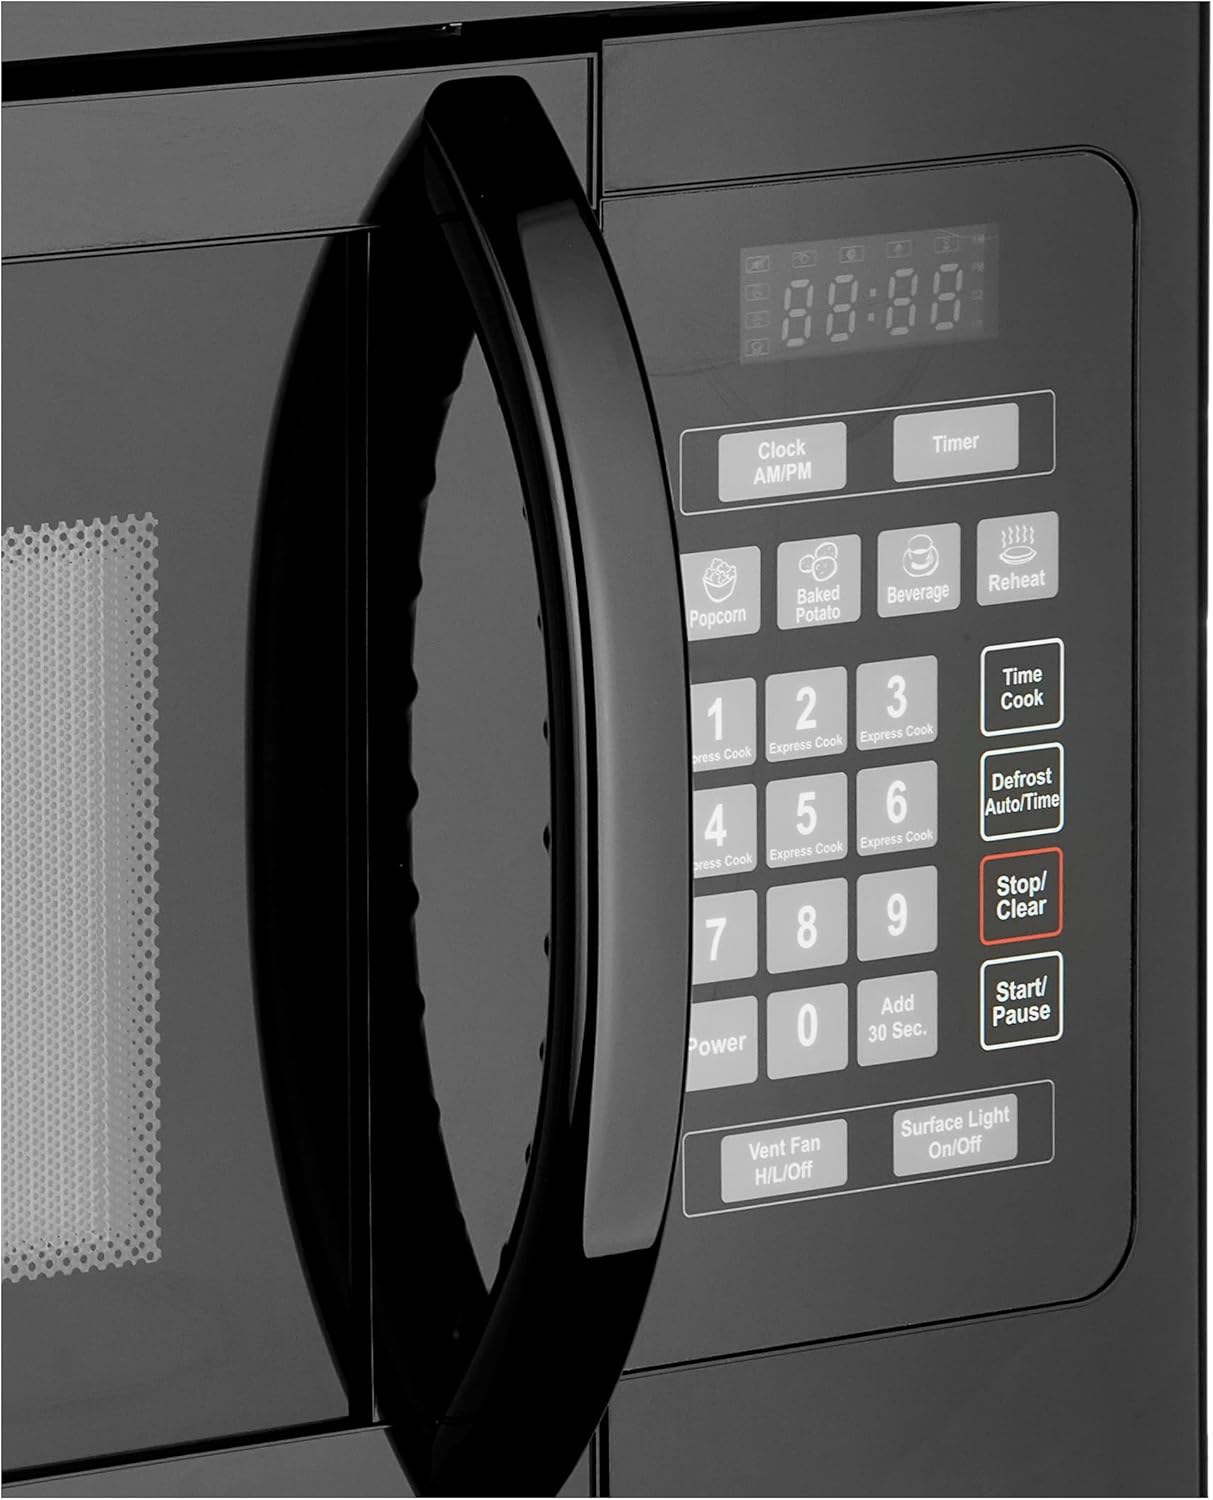
Obrázek 4: Detailní view of the microwave's control panel.
Základní provoz:
- Čas nastavení: Use the 'Clock AM/PM' button to set the current time.
- Rychlý start: For quick cooking, press the 'Add 30 Sec.' button to start cooking for 30 seconds at full power. You can press it repeatedly to add more time. The 1-6 minute quick start buttons also allow for immediate cooking.
- Time Cook: Press 'Time Cook', enter the desired cooking time using the number pad, then press 'Start/Pause'.
- Výkonová úroveň: After entering cooking time, press 'Power' and then a number (1-10) to select a power level. (10 is 100% power).
- Vaření jedním dotykem: Utilize the 'Press N' Go' programs for common foods like Popcorn, Baked Potato, Beverage, and Reheat. Simply press the corresponding button.
- Odmrazování: Use the 'Defrost Auto/Time' button to defrost food by weight or time.
- Zastavit/vymazat: Press 'Stop/Clear' to cancel a program or clear the display.
Speciální vlastnosti:
- Dětská pojistka: Lock the control panel to prevent accidental use or access by children. Refer to the manual for specific instructions on activating and deactivating the child lock.
- Ventilátor: Control the vent fan with the 'Vent Fan H/L/Off' button to exhaust smoke, steam, and odors from your cooktop.
- Surface Light: The 'Surface Light On/Off' button controls the incandescent lighting above the range, illuminating your cooking space.
Údržba
Regular maintenance ensures the longevity and optimal performance of your microwave.
Čištění:
- Interiér: Clean the interior cavity with a mild detergent and a soft cloth. The glass turntable is removable and can be washed with warm, soapy water.
- Vnější: Vnější povrchy otřete měkkým, damp tkanina. Vyhněte se abrazivním čisticím prostředkům.
- Ovládací panel: Gently wipe the control panel with a damp hadříkem. Nestříkejte čisticí prostředky přímo na panel.
Výměna filtru:
The microwave is equipped with a vent system that may include grease filters and a charcoal filter (for recirculating models). These filters should be cleaned or replaced periodically.

Figure 5: Underside of the microwave, showing the location of the grease filters and surface lights.
- Tukové filtry: Located on the underside of the microwave, these filters should be removed and cleaned regularly (e.g., monthly) with warm, soapy water. Ensure they are completely dry before re-installing.
- Uhlíkový filtr (pokud je k dispozici): If your microwave is set up for recirculating ventilation, it will have a charcoal filter to remove odors. This filter is typically located behind the vent grille and should be replaced every 6-12 months, depending on usage. Refer to the full installation guide for specific replacement instructions.
Výměna žárovky:
The incandescent surface lights on the underside of the microwave can be replaced when they burn out. Ensure the appliance is unplugged before attempting to replace bulbs.
Odstraňování problémů
If you encounter issues with your microwave, consult the following table for common problems and solutions.
| Problém | Možná příčina | Řešení |
|---|---|---|
| Mikrovlnná trouba se nespustí | Door not closed properly; Power cord unplugged; Blown fuse/tripped circuit breaker; Child lock activated. | Ensure door is securely latched; Check power connection; Reset circuit breaker; Deactivate child lock. |
| No heat during cooking | Incorrect power level set; Door not closed properly. | Verify power level setting; Ensure door is securely latched. |
| Gramofon se neotáčí | Turntable not seated correctly; Debris under turntable; Motor malfunction. | Reposition turntable; Clean area under turntable; Contact customer support if issue persists. |
| Světlo v troubě nefunguje | Žárovka vyhořela. | Replace bulb (ensure microwave is unplugged). |
| Timer cannot be used while cooking | This model's design limitation. | The microwave timer function is independent and cannot run concurrently with a cooking cycle. |
Specifikace
| Funkce | Detail |
|---|---|
| Značka | ČERNÁ+DECKER |
| Číslo modelu | EM044KJN-P2 |
| Kapacita | 1.6 kubických stop |
| Typ instalace | Přesahující rozsah |
| Wattage | 1000 wattů |
| svtage | 120 voltů (AC) |
| Hmotnost položky | 55.1 libry |
| Rozměry produktu (D x Š x V) | 15 x 29.9 x 16.4 palce |
| Barva | Černý |
| Typ materiálu | Sklo |
| Speciální funkce | Child Safety Lock, Quick Defrost |
| Zahrnuté komponenty | Točna |
Záruka a podpora
For warranty information, product registration, or technical support, please refer to the warranty card included with your product or visit the official BLACK+DECKER webUschovejte si účtenku jako doklad o koupi pro případné reklamace.
Online podpora: www.blackanddecker.com/support
Služby zákazníkům: Regionální kontaktní čísla naleznete v dokumentaci k produktu.