Walfront 3-in-1 Endoscope Borescope Snake Camera (B07Z8YD7SH)
Walfront 3-in-1 Endoscope Borescope Snake Camera User Manual
Model: B07Z8YD7SH
1. Úvod
Thank you for choosing the Walfront 3-in-1 Endoscope Borescope Snake Camera. This device is designed for visual inspection in hard-to-reach areas, offering high-definition imaging and broad compatibility. Please read this manual thoroughly before use to ensure proper operation and maintenance.
2. Bezpečnostní informace
- Do not use this device for medical purposes or internal human/animal examination.
- Udržujte zařízení mimo dosah dětí.
- Ensure the device is disconnected from power sources when not in use or during cleaning.
- Avoid bending the camera cable excessively to prevent damage.
- The camera head is IP67 waterproof, but the USB connector is not. Do not immerse the connector in water.
- Nepokoušejte se zařízení rozebírat ani upravovat. Ztratíte tak záruku.
- The camera head may become warm during extended use. This is normal.
3. Obsah balení
Zkontrolujte prosím balení, zda neobsahuje následující položky:
- Walfront 3-in-1 Endoscope Borescope Snake Camera (with integrated USB, Micro USB, and Type-C connector)
- Uživatelská příručka (tento dokument)
- Note: Specific accessories may vary.

Image 3.1: Walfront 3-in-1 Endoscope Borescope Snake Camera with its integrated connectors and control box.
4. Vlastnosti produktu
- 3 v 1 připojení: Supports Android devices (Micro USB, Type-C) and Windows PCs (USB).
- Kamera s vysokým rozlišením: 1280x720 resolution for clear images and videos.
- Compact Lens: 3.9mm diameter lens for accessing narrow spaces.
- Nastavitelná LED světla: 6 integrated LEDs with adjustable brightness for optimal illumination in dark environments.
- Vodotěsný design: IP67 rated camera head, suitable for wet or submerged inspections (e.g., water sink pipes).
- Optimal Focusing Length: Designed for clear focus between 4-10cm from the object.

Image 4.1: Key features of the endoscope, including its 3-in-1 connector, 3.9mm lens, 6 adjustable LED lights, and IP67 waterproof rating.
5. Průvodce nastavením
5.1. Software Installation (Android)
- Stáhnout aplikaci: Hledat „USB kamera“, „OTG“ View", or similar endoscope applications on the Google Play Store. Ensure the app supports external USB cameras and OTG functionality.
- Nainstalovat aplikaci: Follow the on-screen instructions to install the chosen application.
- Udělení oprávnění: Allow necessary permissions (e.g., camera, storage) when prompted by the app.
5.2. Software Installation (Windows PC)
- Připojit zařízení: Zapojte konektor USB do volného portu USB na vašem počítači.
- Přístup k fotoaparátu:
- For Windows 10/11, open the built-in "Camera" application. The endoscope should be recognized as an external camera.
- Alternatively, download and install a third-party camera software that supports USB webvačky.
5.3. Připojení endoskopu
- Pro zařízení Android:
- Ujistěte se, že vaše zařízení se systémem Android podporuje funkci OTG (On-The-Go).
- Connect the appropriate connector (Micro USB or Type-C) to your phone's charging port.
- Open the installed endoscope application. The camera feed should appear.
- Pro Windows PC:
- Connect the standard USB connector to your computer's USB port.
- Otevřete aplikaci fotoaparátu.
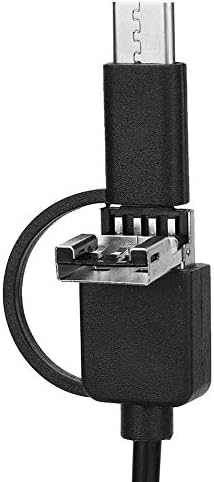
Image 5.1: Detail of the versatile 3-in-1 connector, allowing compatibility with various devices.
6. Návod k obsluze
6.1. Nastavení jasu LED diod
Locate the control wheel on the cable. Rotate the wheel to adjust the brightness of the 6 LED lights around the camera lens. This allows for optimal visibility in different lighting conditions.

Image 6.1: The control box on the cable features a wheel for adjusting the brightness of the camera's LED lights.
6.2. Pořizování obrázků a videí
Once the endoscope is connected and the application is running, you can use the software interface to:
- View Živý přenos: The application will display the real-time view from the endoscope camera.
- Fotit: Look for a camera icon or "Capture" button within the app to take still images.
- Nahrávat videa: Look for a video camera icon or "Record" button to start and stop video recording.
- Access Gallery: Saved photos and videos can typically be found in the app's gallery or your device's photo/video storage.
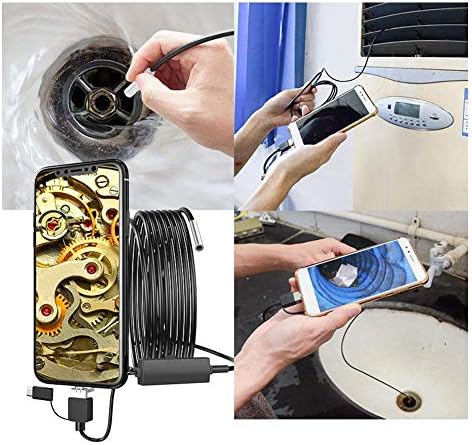
Image 6.2: The endoscope being used for inspecting a sink drain and behind an appliance, demonstrating its practical applications.
6.3. Optimální Viewing Vzdálenost
The endoscope is designed for an optimal focusing length of 4-10cm. For the clearest image, position the camera lens within this range of the object you are inspecting.
7. Údržba
- Čištění objektivu: Gently wipe the camera lens with a soft, dry cloth. For stubborn dirt, a slightly damp Lze použít hadřík a poté osušit. Nepoužívejte abrazivní čisticí prostředky.
- Čištění kabelu: Wipe the cable with a damp hadříkem podle potřeby.
- Skladování: Store the endoscope in a clean, dry place, away from extreme temperatures and direct sunlight. Avoid tightly coiling the cable to prevent damage.
- Vystavení vodě: While the camera head is waterproof (IP67), ensure the USB connector and control box remain dry. If they get wet, dry them thoroughly before use.
8. Řešení problémů
| Problém | Možná příčina | Řešení |
|---|---|---|
| No image on screen / Device not recognized. |
|
|
| Obrázek je rozmazaný. |
|
|
| LED lights are not working or too dim/bright. |
|
|
| Camera head gets warm. |
|
|
9. Specifikace
| Funkce | Detail |
|---|---|
| Průměr čočky | 3.9 mm |
| Rezoluce | 1280x720, 640x480 |
| Snímková frekvence | 25 snímků za sekundu |
| Viewúhel | 70 stupňů |
| Focusing Length | 4-10 cm |
| Hodnocení voděodolnosti | IP67 (for camera head) |
| Světelný zdroj | 6pcs Adjustable LED Light |
| Možnosti délky kabelu | 1m/3.3ft, 3.5m/11.5ft, 5m/16.4ft (optional) |
| Systém podpory | Počítač s Androidem, Windows |
| Formát fotografie | PNG |
| Formát videa | MP4 |
| Hmotnost položky | Přibližně 4.6 unce |
10. Záruka a podpora
Walfront products are designed for reliability and performance. For specific warranty details, please refer to the warranty card included with your purchase or contact Walfront customer support directly. Keep your purchase receipt as proof of purchase.
For technical support, troubleshooting assistance, or inquiries about replacement parts, please visit the official Walfront webwebové stránky nebo kontaktujte jejich oddělení zákaznických služeb. Kontaktní informace obvykle naleznete na obalu produktu nebo na oficiálních webových stránkách značky.
Online podpora: Visit the Walfront Store on Amazon
Ask a question about this manual
Ask about setup, troubleshooting, compatibility, parts, safety, or missing instructions. Manuals+ will review the question and use this page’s manual context to help answer it.