
Tesvor Tesvor X500Pro
Uživatelská příručka k robotickému vysavači Tesvor
Model: Tesvor X500Pro
Značka: Tesvor
1. Úvod
This manual provides essential information for the safe and efficient operation of your Tesvor Robot Vacuum. The Tesvor X500Pro is a versatile 2-in-1 robotic vacuum and mop cleaner designed to provide thorough cleaning on various floor types, from hard floors to low-pile carpets. It features strong suction, smart navigation, and convenient control options via Wi-Fi, app, and voice commands.
Před použitím produktu si pečlivě přečtěte tento návod a uschovejte jej pro budoucí použití.
2. Bezpečnostní informace
To reduce the risk of injury or damage, read these safety instructions carefully and keep them at hand when setting up, using, and maintaining your robot vacuum.
- The robot vacuum is for indoor use only. Do not use it outdoors or on commercial surfaces.
- Do not use the robot vacuum in wet environments or on floors with standing water.
- Remove power cords, small objects, and fragile items from the floor before cleaning to prevent entanglement or damage.
- Udržujte vlasy, volné oblečení, prsty a všechny části těla v dostatečné vzdálenosti od otvorů a pohyblivých částí.
- Nepoužívejte robotický vysavač v blízkosti otevřeného ohně nebo hořlavých materiálů.
- Ensure the charging dock is placed against a wall on a level surface and is not easily moved.
- The robot vacuum is not suitable for high-pile carpets over 0.6 inches, dark-colored rugs, or carpets with black strips/edges, as these may interfere with sensors.
- Používejte pouze originální napájecí adaptér a nabíjecí stanici dodané výrobcem.
- Dohlížejte na děti a domácí zvířata, když je robotický vysavač v provozu.
3. Obsah balení
Ověřte, zda jsou všechny komponenty přítomny a v dobrém stavu:
- Tesvor Robot Vacuum Unit
- Nabíjecí dok
- Napájecí adaptér
- Boční kartáče (2 páry)
- Hlavní kartáč
- Popelnice
- Nádrž na vodu s mopem
- Nástroj na čištění
- Dálkové ovládání
4. Konec produktuview
Familiarize yourself with the main components of your Tesvor Robot Vacuum.

Image: The Tesvor Robot Vacuum main unit, showing its sleek white design, accompanied by its charging dock, a mop cloth, and the transparent water tank.

Obrázek: Štíhlý profesionálfile of the Tesvor Robot Vacuum, measuring 75mm in height, allowing it to easily clean under low-clearance furniture like sofas and cabinets.

Image: A close-up of the Tesvor Robot Vacuum's electronic water tank, highlighting its 350ml capacity and water distribution system for mopping.
5. Nastavení
5.1 Počáteční nabíjení
- Place the charging dock against a wall in an open, uncluttered area. Ensure there are no obstacles within 1 meter (3 feet) to the front and 0.5 meters (1.5 feet) to the sides of the dock.
- Připojte napájecí adaptér k nabíjecí stanici a druhý konec zapojte do zásuvky ve zdi.
- Umístěte robotický vysavač na nabíjecí stanici. Ujistěte se, že nabíjecí kontakty na robotu jsou zarovnány s kontakty na stanici. Kontrolka na robotu bude ukazovat stav nabíjení.
- Před prvním použitím robota plně nabijte (přibližně 4–5 hodin).
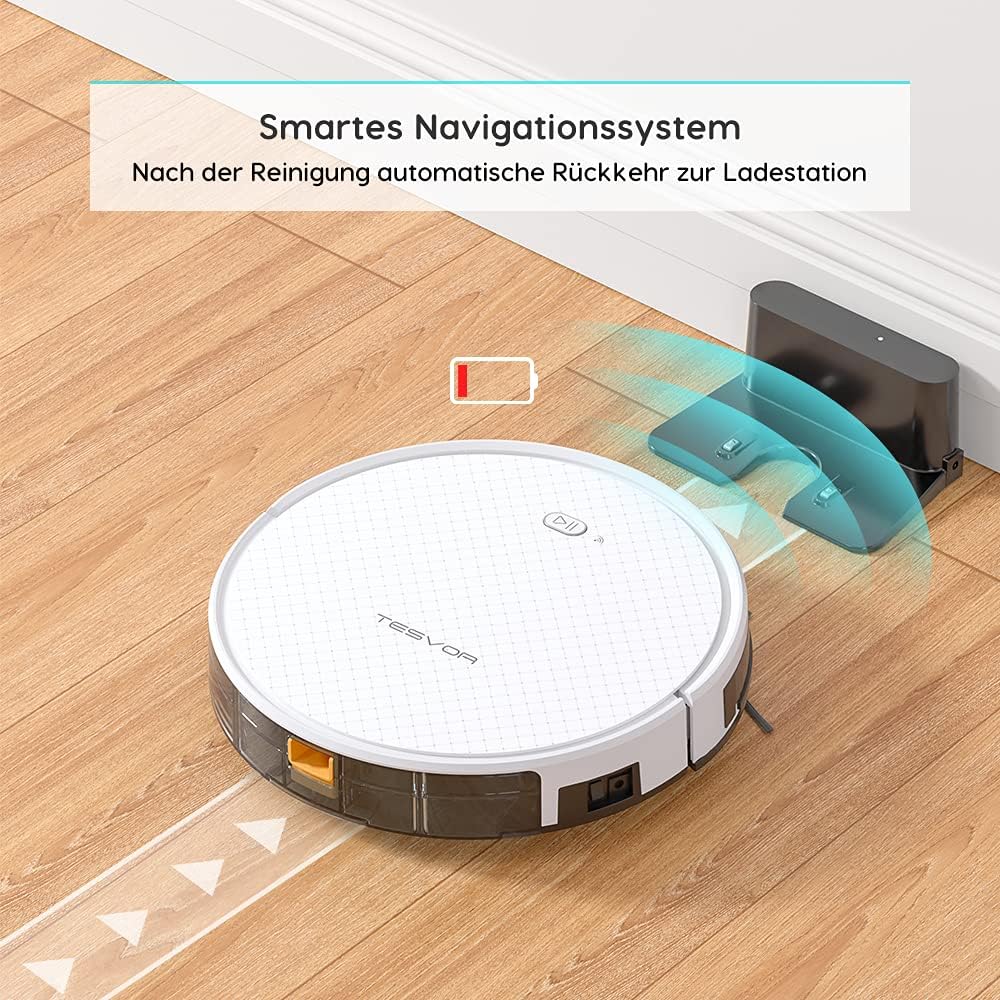
Image: The Tesvor Robot Vacuum intelligently navigating back to its charging station when its battery is low or cleaning is complete, indicated by a battery icon.
5.2 Installing Side Brushes and Dustbin/Water Tank
- Otočte robotický vysavač dnem vzhůru.
- Align the side brushes with the corresponding posts (L and R) and press them down until they click into place.
- For vacuuming, ensure the dustbin is securely inserted into the robot.
- For mopping, fill the water tank with clean water (and a small amount of cleaning fluid if desired, as per manufacturer's guidelines) and attach the mop cloth. Insert the water tank into the robot.
6. Návod k obsluze
6.1 Režimy čištění
The Tesvor X500Pro offers various cleaning modes:
- Automatické čištění: The robot intelligently navigates in an S-shape path to cover the entire area.
- Bodové čištění: Zaměřuje se na konkrétní znečištěnou oblast.
- Čištění hran: Čistí podél stěn a hran nábytku.
- Plánované čištění: Set a cleaning schedule via the app.

Image: The Tesvor Robot Vacuum demonstrating its systematic S-shaped cleaning path, ensuring comprehensive coverage of the floor area.
The robot provides intense 1800Pa suction, effective for dust, crumbs, and pet hair on hard floors and low-pile carpets.

Image: The Tesvor Robot Vacuum actively cleaning a wooden floor, demonstrating its strong suction power by collecting scattered debris.
6.2 Ovládání aplikací a hlasem
The Tesvor X500Pro can be controlled via the Tesvor Smart App or voice commands through Alexa and Google Assistant.
- Download the "Tesvor Smart" app from your mobile app store.
- Ensure your Wi-Fi network is set to 2.4GHz for connection.
- Follow the in-app instructions to connect your robot vacuum.
- Once connected, you can use the app for scheduling, changing cleaning modes, real-time monitoring of the cleaning path, and direction control.
- For voice control, enable the Tesvor skill in your Alexa or Google Home app and link your Tesvor account.

Image: A smartphone displaying the Tesvor app interface, showing a real-time map of the robot's cleaning progress and various control options, along with icons for 2.4G Wi-Fi, Amazon Alexa, and Google Home compatibility.
7. Údržba
Pravidelná údržba zajišťuje optimální výkon a prodlužuje životnost vašeho robotického vysavače.
7.1 Čištění nádoby na prach a filtru
- Stiskněte tlačítko pro uvolnění prachového koše a vytáhněte prachový koš.
- Otevřete víko popelnice a vysypte její obsah do odpadkového koše.
- Remove the HEPA filter and foam filter. Tap them gently to remove dust. Do not wash the HEPA filter with water.
- V případě potřeby opláchněte nádobu na prach vodou a před opětovným vložením se ujistěte, že je zcela suchá.
- Znovu sestavte filtry a nádobu na prach a poté je znovu vložte do robota.
7.2 Čištění hlavního kartáče a bočních kartáčů
- Otočte robotický vysavač dnem vzhůru.
- Sejměte kryt hlavního kartáče a vyjměte hlavní kartáč. Pomocí čisticího nástroje odstraňte vlasy a nečistoty.
- Pull the side brushes upwards to remove them. Clean any hair or debris wrapped around them.
- Reinstall the main brush and side brushes.
7.3 Čištění nádrže na vodu a mopu
- Vyjměte nádržku na vodu z robota.
- Vylijte veškerou zbývající vodu a důkladně propláchněte nádrž.
- Remove the mop cloth and wash it by hand or machine. Allow it to air dry completely.
- Ensure the water tank is dry before storing or refilling.
8. Řešení problémů
| Problém | Možná příčina | Řešení |
|---|---|---|
| Robot se nezapne. | Slabá baterie; Vypnuto. | Nabijte robota; Zapněte hlavní vypínač. |
| Robot se často zasekává. | Obstacles (cords, small objects); High-pile carpet. | Clear the area; Avoid using on unsuitable carpets. |
| Špatný čisticí výkon. | Plný koš na prach; Ucpaný filtr; Zamotané kartáče. | Vyprázdněte nádobu na prach; Vyčistěte/vyměňte filtr; Vyčistěte kartáče. |
| Nelze se připojit k Wi-Fi/aplikaci. | Incorrect Wi-Fi band (not 2.4GHz); Incorrect password. | Ensure 2.4GHz Wi-Fi; Re-enter password; Restart router/robot. |
| Robot se nevrátí do nabíjecí stanice. | Dokovací stanice je zablokovaná; Robot je příliš daleko od dokovací stanice. | Clear area around dock; Manually place robot closer to dock. |
9. Specifikace
| Funkce | Detail |
|---|---|
| Značka | Tesvor |
| Číslo modelu | Tesvor X500Pro |
| Sací výkon | 1800 Pa |
| Životnost baterie | Až 100 minut |
| Kapacita popelnice | 0.6 litrů |
| Kapacita vodní nádrže | 350 ml |
| Kontrolní metoda | Aplikace, hlas (Alexa, Google Assistant) |
| Rozměry produktu | 19.69 x 19.69 x 11.02 palce |
| Hmotnost položky | 11 libry |
| Speciální funkce | 2-in-1 Vacuum & Mop, Anti-Collision Sensors, Smart Navigation |
10. Záruka a podpora
For warranty information, technical support, or further assistance, please refer to the official Tesvor webwebu nebo se přímo obraťte na jejich zákaznický servis.
Můžete také navštívit Tesvor Brand Store on Amazon pro více informací o produktu a zdroje podpory.
Ask a question about this manual
Ask about setup, troubleshooting, compatibility, parts, safety, or missing instructions. Manuals+ will review the question and use this page’s manual context to help answer it.