1. Úvod
This manual provides detailed instructions for the installation, operation, and maintenance of the Walfront REX-C100 PID Temperature Controller Kit. This kit is designed for precise temperature control in various industrial and commercial applications, including industrial ovens, dryers, and other heating systems. It includes a REX-C100 digital PID controller, a 25A Solid State Relay (SSR), and a 1-meter M6 K-type thermocouple.
2. Bezpečnostní informace
- Před prováděním jakékoli elektroinstalace nebo údržby vždy odpojte napájení.
- Ensure all wiring connections are secure and correct to prevent electrical hazards or damage to the equipment.
- Toto zařízení pracuje s vysokou hlasitostítage. Installation should be performed by qualified personnel.
- Do not expose the controller to moisture, extreme temperatures, or corrosive environments.
- Ověřte svtage and current ratings of all components before connection.
3. Obsah balení
The Walfront REX-C100 PID Temperature Controller Kit typically includes the following components:
- 1 x REX-C100 PID Digital Temperature Controller
- 1 x 25A Solid State Relay (SSR)
- 1 x 1-meter M6 K-Type Thermocouple
- 1 x Controller Mounting Bracket

Obrázek 3.1: Konecview of the Walfront REX-C100 PID Temperature Controller Kit components, including the controller, SSR, and thermocouple.
4. Konec produktuview
4.1 REX-C100 PID Digital Temperature Controller
The REX-C100 is a high-precision digital temperature controller featuring a dual LED display for Process Value (PV) and Set Value (SV). It supports various input types and offers PID control with ON/OFF, step-type PID, and continuous PID functions.

Image 4.1: Front panel of the REX-C100 controller showing indicators and buttons.
- PV (procesní hodnota): Zobrazuje aktuální naměřenou teplotu.
- SV (Nastavená hodnota): Displays the target temperature set by the user.
- ALM1/ALM2: Alarm indicator lights.
- OUT1: Active output indicator light.
- NA: PID automatic calculation indicator light.
- SOUBOR: Button to enter/confirm settings.
- Displacement Key (<): Used to shift digits during setting.
- Down Key (v): Snižuje nastavenou hodnotu.
- Up Key (^): Zvyšuje nastavenou hodnotu.
4.2 25A Solid State Relay (SSR)
The BRM-25DA Solid State Relay is used to switch high-power loads based on the low-voltage control signal from the REX-C100 controller. It provides reliable and silent switching without mechanical contacts.

Image 4.2: The 25A Solid State Relay (SSR) and the REX-C100 controller.
4.3 K-Type Thermocouple
The included 1-meter M6 K-type thermocouple is a temperature sensor designed to measure temperatures up to 400°C. It provides the temperature feedback to the REX-C100 controller.

Image 4.3: The K-Type Thermocouple with its M6 threaded tip and connection wires.
5. Specifikace
| Funkce | Specifikace |
|---|---|
| Model | REX-C100 |
| Typ vstupu | Termočlánek typu K |
| Teplotní rozsah | 0-400 °C |
| Výstup | SSR Output (3-32VDC) |
| Kontrolní metoda | PID / ON-OFF |
| Zobrazit | Dual LED (PV & SV) |
| Napájení | 100-240VAC, 50/60Hz |
| Velikost panelu | 48 x 48 mm |
| Open Hole Size | 45 x 45 mm |
| SSR Load Current | 25A |
| SSR Load Voltage | 24-480VAC |
| Délka termočlánku | 1 metru |
| Thermocouple Thread | M6 |
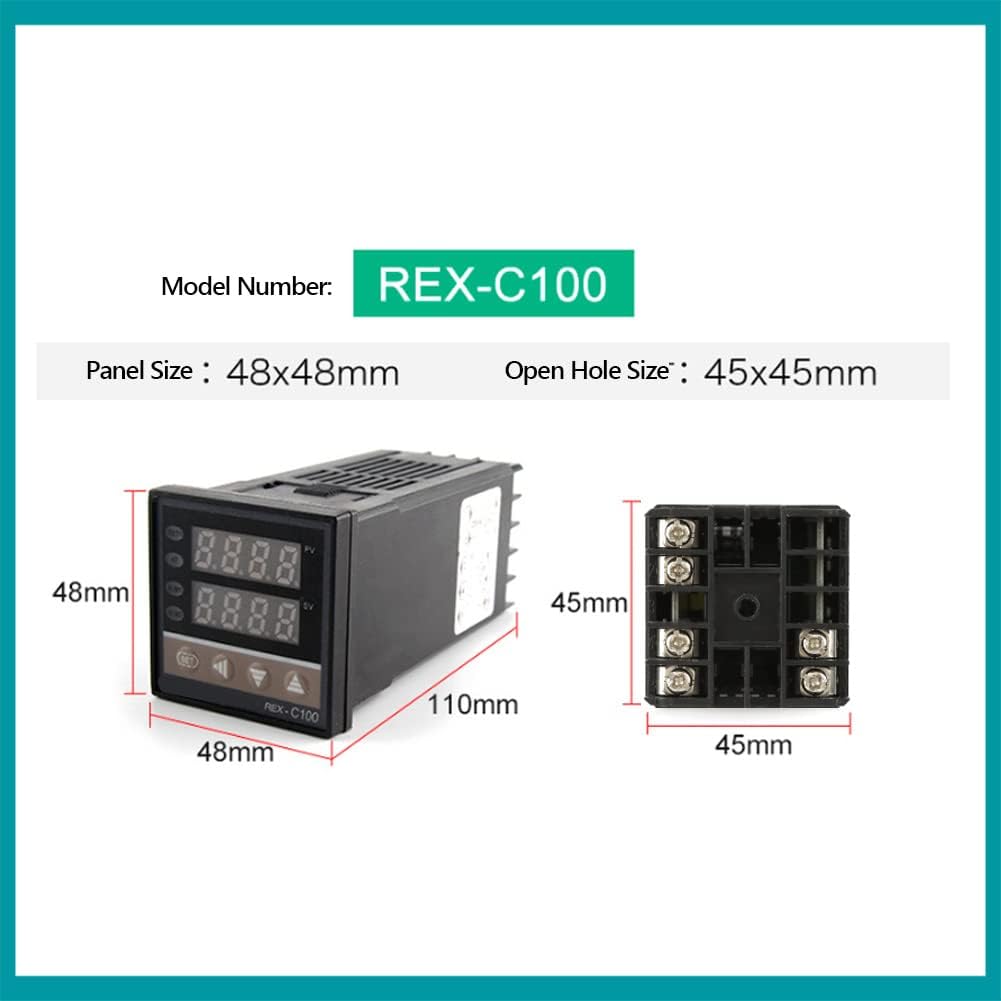
Image 5.1: Dimensional drawing of the REX-C100 temperature controller.
6. Nastavení a instalace
6.1 Schéma zapojení
Refer to the following wiring diagram for proper connection of the REX-C100 controller, SSR, and K-type thermocouple to your AC power supply and heating element.

Image 6.1: Detailed wiring diagram for connecting the REX-C100 controller, SSR, and K-type sensor to an AC power supply and heating element.
- Napájení (AC): Connect your AC power supply (100-240VAC) to terminals 1 and 2 of the REX-C100 controller.
- SSR Control Output: Connect the SSR control output from the REX-C100 (terminals 4 and 5) to the control input of the SSR (3-32VDC side). Ensure correct polarity (+ to + and - to -).
- Vstup termočlánku: Connect the K-type thermocouple to terminals 9 and 10 of the REX-C100. The red wire typically connects to the positive (+) terminal (9), and the blue wire to the negative (-) terminal (10).
- SSR Load Connections: Connect your heating element (load) to the output terminals of the SSR (24-480VAC side). Connect one line of your AC power supply to one input terminal of the SSR, and the other input terminal of the SSR to one side of your heating element. Connect the other side of your heating element directly to the other line of your AC power supply.
6.2 Fyzická instalace
- Mount the REX-C100 controller into a panel cutout of 45x45mm using the provided mounting bracket.
- Securely mount the SSR to a heat sink if the load current is significant, to dissipate heat and ensure longevity.
- Install the K-type thermocouple at the desired temperature measurement point within your system, ensuring good thermal contact.
7. Návod k obsluze
7.1 Základní obsluha
- Zapnutí: After completing all wiring, apply power to the controller. The PV display will show the current temperature, and the SV display will show the set temperature.
- Setting Temperature (SV):
- Stiskněte tlačítko SOUBOR button once. The SV display will begin to flash.
- Použijte Nahoru (^) a Dolů (v) keys to adjust the desired temperature. Use the Displacement Key (<) to move the cursor for faster adjustment.
- Stiskněte tlačítko SOUBOR button again to confirm the new set value. The SV display will stop flashing.
- The controller will now work to maintain the PV at the SV, activating the SSR output as needed.
7.2 PID Tuning
For optimal performance, especially in systems with varying loads or requiring high precision, PID auto-tuning may be necessary. Consult the full REX-C100 manual for detailed PID parameter settings and auto-tuning procedures. Generally, auto-tuning involves:
- Entering the parameter setting mode (usually by holding the SET button).
- Locating the auto-tune parameter (often labeled 'AT' or similar).
- Activating auto-tune, which will cause the controller to cycle the output to determine optimal PID values.
- Saving the new parameters after auto-tuning is complete.
8. Aplikace
The Walfront REX-C100 PID Temperature Controller Kit is suitable for a wide range of temperature control applications:
- Industrial Ovens and Furnaces
- Plastic Injection Molding Machines
- Dryers and Curing Ovens
- Greenhouse Temperature Control
- Incubation Systems
- Laboratory Heating Equipment

Obrázek 8.1: Příkladamples of industrial equipment where the REX-C100 temperature controller can be applied, such as injection molding machines, ovens, and dryers.
9. Údržba
- Pravidelně kontrolujte veškeré kabelové spoje, zda nejsou těsné a zda nevykazují známky opotřebení nebo koroze.
- Keep the controller and SSR free from dust and debris. Use a soft, dry cloth for cleaning.
- Ensure adequate ventilation around the SSR, especially if operating at high loads, to prevent overheating.
- Periodically check the thermocouple for physical damage or degradation, which can affect temperature readings.
10. Řešení problémů
| Problém | Možná příčina | Řešení |
|---|---|---|
| Ovladač se nezapne | Chybí napájení; nesprávné zapojení | Check power connections to terminals 1 and 2. Verify power source. |
| Displej PV zobrazuje „HHHH“ nebo „LLLL“ | Thermocouple open circuit or reverse connection | Check thermocouple wiring to terminals 9 and 10. Ensure correct polarity (red to +, blue to -). Replace thermocouple if damaged. |
| Temperature not reaching SV | Heating element issue; SSR not switching; incorrect PID parameters | Check heating element functionality. Verify SSR control signal and load connections. Perform PID auto-tuning. |
| Temperature overshoots/undershoots SV | PID parameters not optimized | Perform PID auto-tuning to find optimal parameters for your system. |
| SSR not activating load | No control signal from REX-C100; faulty SSR; incorrect load wiring | Check REX-C100 output (terminals 4 & 5). Test SSR with a known good control signal. Verify load wiring. |
11. Záruka a podpora
Walfront products are designed for reliability and performance. For warranty information, technical support, or service inquiries, please refer to the contact information provided with your purchase or visit the official Walfront website. Please have your product model number (REX-C100) and purchase details ready when contacting support.