
Ving B07PB9N7R7
Uživatelská příručka k sítotiskovému tiskovému stroji Ving Big Platen
Model: B07PB9N7R7
Značka: Ving
1. Úvod
This manual provides comprehensive instructions for the setup, operation, maintenance, and troubleshooting of the Ving Big Platen Screen Printing Press. This micro-adjustable screen press features a large printing platen, designed for various screen printing applications, including signboard and spa signage printing.
Mezi klíčové vlastnosti patří:
- Specially designed sliding-adjustable disc gravity and gravity hole devices for accommodating extra heavy frames.
- Equipped with larger platens (24"x20" / 62x52cm) suitable for larger printing areas.
- Platens are constructed from high-density melamine materials, offering anti-distortion, waterproofing, corrosion resistance, and ease of cleaning.
- Extendibility feature allows for changing to a bigger platen by removing several bolts, if a larger printing area is required.
- Advanced electrostatic spraying and electroplating ensure durability, easy cleaning, and rust resistance.

Obrázek 1.1: Přesview of the Ving Big Platen Screen Printing Press.
2. Nastavení a montáž
Pečlivě vybalte všechny součásti a zkontrolujte je podle dodacího listu. Před zahájením montáže se ujistěte, že jsou všechny součásti přítomny a nepoškozené.
2.1 Vybalení
Remove the machine from its packaging. The package dimensions are approximately 32"x24"x5.5" (83x62x14cm) and the gross weight is 46Lb (21kg). Retain packaging for future transport or storage.
2.2 Identifikace součásti
Identify the main base frame, the platen, screen clamps, and various adjustment knobs and bolts.
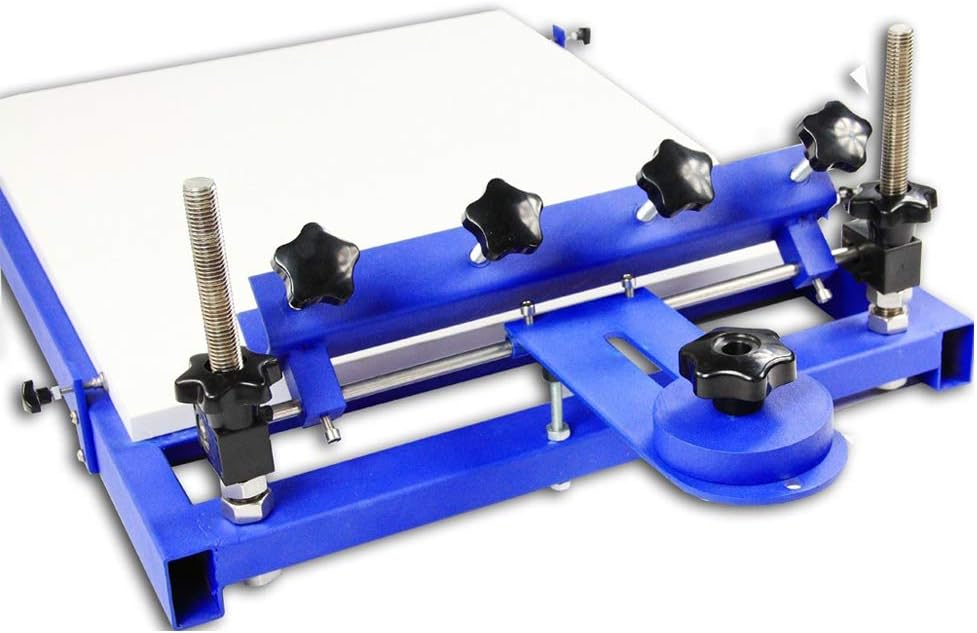
Obrázek 2.1: Strana view illustrating the adjustment mechanisms for the screen clamps and platen.
2.3 Montážní kroky
- Zajistěte základnu: Place the main base frame on a stable, level surface.
- Attach the Platen: The platen (printing board) is typically attached to the main frame using bolts. Ensure it is securely fastened and level. The platen size is 24"x20" (62x52cm).
- Install Screen Clamps: Mount the screen clamps onto the designated positions on the frame. The length of the screen clamps is 14.5" (37cm). These clamps hold the screen frame in place.
- Úpravy:
- Nastavení výšky: Utilize the up-and-down screw bar to set the height of the screen chucks. The adjustable range is 4.3" (11cm), allowing for different substrate thicknesses.
- Platen Position: The platen can be adjusted right and left, and back and forth, for precise registration.
- Disc Gravity Device: Adjust the sliding-adjustable disc gravity and gravity hole devices to properly balance and support extra heavy screen frames.

Obrázek 2.2: Detailní view of the rear adjustment points, including the disc gravity device.
3. Návod k obsluze
This section outlines the basic steps for operating your Ving Screen Printing Press to achieve optimal printing results.
3.1 Příprava k tisku
- Prepare Screen: Ensure your screen frame is properly prepared with emulsion, exposed, washed out, and dried.
- Montážní obrazovka: Place the screen frame into the screen clamps. Utáhněte třamps securely to hold the screen firmly in place.
- Adjust Screen Height: Use the height adjustment screws to set the off-contact distance between the screen and the platen. A small off-contact (typically 1/8 inch or 3mm) is crucial for clean prints.
- Umístění substrátu: Place your printing substrate (e.g., signboard, fabric) onto the platen.
- Align Image: Lower the screen onto the substrate. Adjust the platen's left/right and back/forth positions until the image on the screen is perfectly aligned with your desired printing area on the substrate.

Obrázek 3.1: Přední strana view showing the platen and screen clamps ready for operation.
3.2 Proces tisku
- Naneste inkoust: Pour a bead of screen printing ink across the top of your screen, above the image area.
- Flood the Screen: Using a squeegee, gently pull the ink across the image area to flood the mesh, without applying pressure to push ink through. This prepares the screen for printing.
- Print Stroke: Position the squeegee at the top of the image. Apply firm, even pressure and pull the squeegee across the image area in a single, smooth stroke. This pushes the ink through the mesh onto the substrate.
- Zvedací obrazovka: Carefully lift the screen. The printed image should now be on your substrate.
- Vytvrzovací inkoust: Remove the printed substrate and cure the ink according to the ink manufacturer's instructions (e.g., heat press, flash dryer, air dry).
- Opakovat: Place a new substrate on the platen and repeat the process for subsequent prints.

Obrázek 3.2: Shora dolů view of the large platen, ideal for various substrate sizes.
4. Údržba
Regular maintenance ensures the longevity and optimal performance of your screen printing press.
4.1 Čištění
- Platen Cleaning: The melamine platen is waterproof and corrosion-resistant. After each use, clean any ink residue from the platen using appropriate screen printing cleaning solutions. Wipe dry.
- Screen Clamps: Clean any ink or debris from the screen clamps to ensure they maintain a secure grip on the screen frame.
- General Machine Cleaning: Wipe down the metal frame and components with a damp cloth to remove dust and ink splashes. The advanced electrostatic spraying and electroplating make the machine easy to clear and resistant to rust.
4.2 Mazání
Periodically apply a small amount of lubricant to moving parts, such as the adjustment screws and sliding mechanisms, to ensure smooth operation.
4.3 Skladování
When not in use, store the press in a clean, dry environment to prevent dust accumulation and potential damage.
5. Řešení problémů
Tato část se zabývá běžnými problémy, se kterými se můžete setkat během provozu.
| Problém | Možná příčina | Řešení |
|---|---|---|
| Ink smudging or blurry prints | Insufficient off-contact; uneven squeegee pressure; screen movement. | Adjust screen height for proper off-contact (approx. 1/8 inch); apply consistent squeegee pressure; ensure screen clampjsou těsní. |
| Incomplete ink transfer | Clogged screen mesh; insufficient ink; too little squeegee pressure. | Clean screen mesh thoroughly; add more ink; increase squeegee pressure. |
| Difficulty with registration (aligning multiple colors) | Platen or screen not securely fixed; imprecise adjustments. | Zajistěte všechny šrouby a třamps are tightened; use the micro-adjustment features of the platen for fine-tuning. |
| Machine components stiff or difficult to adjust | Lack of lubrication; accumulated dirt. | Clean components and apply a small amount of lubricant to moving parts. |
6. Specifikace
Technical specifications for the Ving Big Platen Screen Printing Press:
- Platen Sizes: 24"x20" (62x52cm)
- Length of Screen Clamps: 14.5" (37 cm)
- Adjustable Range of Up-and-Down Screw Bar: 4.3" (11 cm)
- Čistá hmotnost: 40Lb (18kg)
- Gross Weight (with packaging): 46Lb (21kg)
- Rozměry stroje: 30"x22"x10" (76x56x26cm)
- Rozměry balení: 32"x24"x5.5" (83x62x14cm)
- Značka: Ving
- Výrobce: Sign-in-China
- Technologie tisku: Thermal (Note: This classification may be generic; this is a screen printing press.)
- Tiskový výstup: Barva
7. Záruka a podpora
For warranty information, technical support, or replacement parts, please contact the seller or manufacturer directly. Refer to your purchase documentation for specific warranty terms and contact details.
Prodejcem tohoto produktu je signagewholesales. You can typically find their contact information through your purchase platform or invoice.
Ask a question about this manual
Ask about setup, troubleshooting, compatibility, parts, safety, or missing instructions. Manuals+ will review the question and use this page’s manual context to help answer it.