
1. Úvod
Thank you for choosing the Protmex PT2800U Weather Station. This device provides accurate indoor and outdoor temperature and humidity readings, barometric pressure, and a weather forecast. It features a colorful LCD display for easy readability. Please read this manual carefully before operating the device to ensure proper use and to maximize its lifespan.
2. Obsah balení
- Protmex PT2800U Main Unit (Receiver)
- Bezdrátový venkovní senzor (vysílač)
- Napájecí adaptér (DC 5V)
- Uživatelská příručka
3. Konec produktuview
3.1 Main Unit and Wireless Sensor
The Protmex PT2800U Weather Station consists of a main display unit and a wireless outdoor sensor. The main unit displays all weather data, time, and forecast, while the sensor collects outdoor temperature and humidity data and transmits it wirelessly to the main unit.
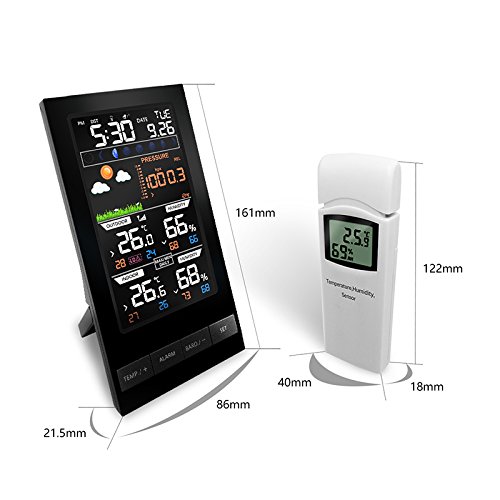
Obrázek 1: Protmex PT2800U Weather Station main unit and wireless sensor with dimensions. The main unit measures approximately 161mm in height and 86mm in width. The sensor measures approximately 122mm in height and 40mm in width.
3.2 Main Unit Features (Rear View)
The rear of the main unit includes essential ports and features for operation and placement.
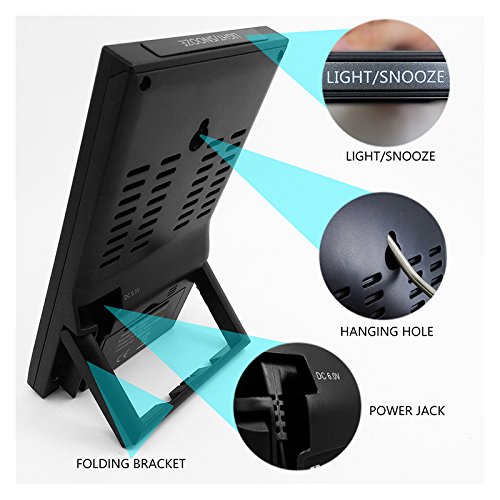
Obrázek 2: Zadní view of the main unit. Key features include the DC 5V power jack, a folding bracket for tabletop placement, and the LIGHT/SNOOZE button located on the top edge. A hanging hole is also visible for wall mounting.
3.3 Battery Compartments and Hanging Holes
Both the main unit and the wireless sensor require batteries for operation and feature hanging holes for flexible placement.
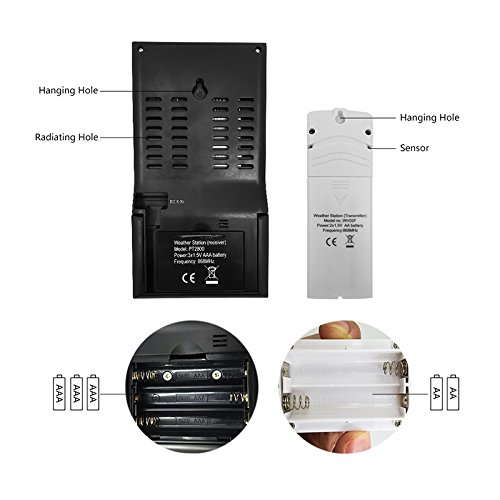
Obrázek 3: Zadní view of the main unit and wireless sensor. The main unit requires 3x AAA batteries, and the sensor requires 2x AA batteries. Both units have hanging holes for wall mounting.
3.4 LCD Display Layout
The colorful LCD display provides a comprehensive overview všech meteorologických údajů a časových informací.
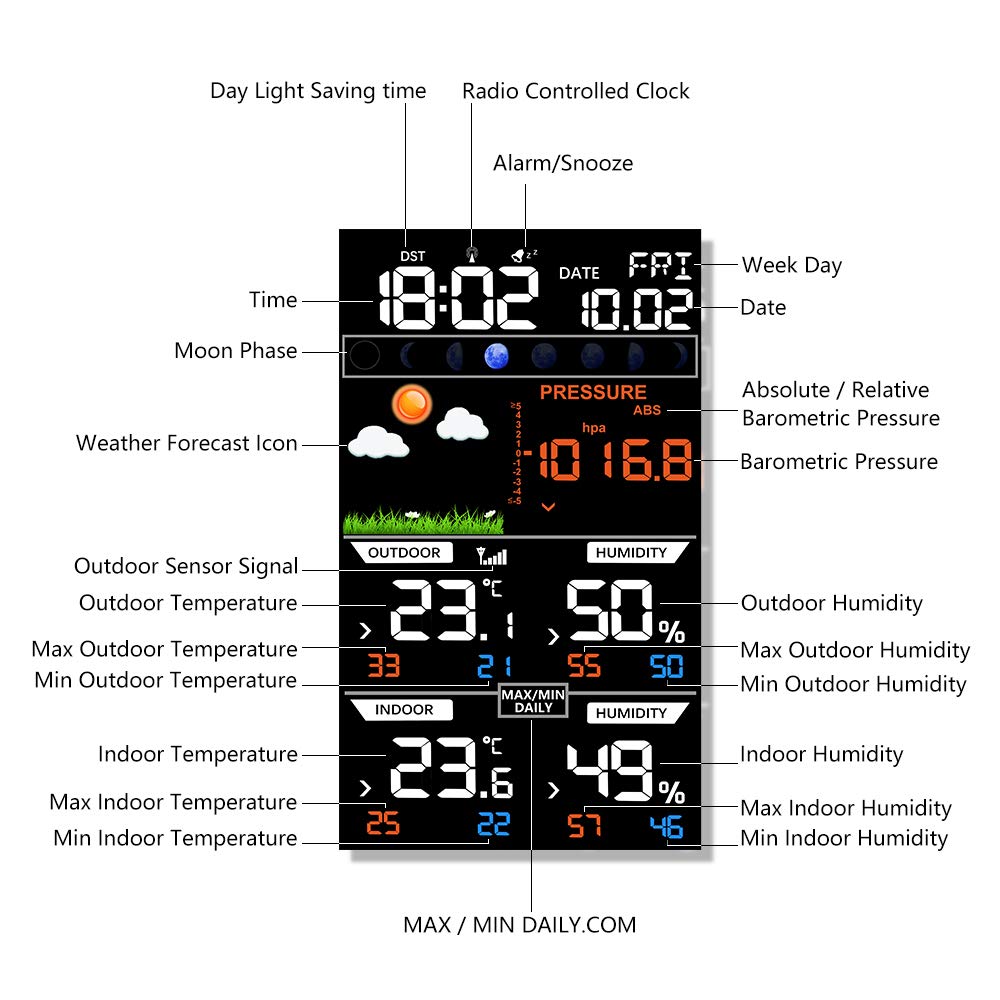
Obrázek 4: Detailed LCD display layout. Sections include Day Light Saving time (DST), Radio Controlled Clock (RCC), Time, Moon Phase, Weather Forecast Icon, Absolute/Relative Barometric Pressure, Barometric Pressure value, Outdoor Sensor Signal, Outdoor Temperature, Max/Min Outdoor Temperature, Outdoor Humidity, Max/Min Outdoor Humidity, Indoor Temperature, Max/Min Indoor Temperature, Indoor Humidity, Max/Min Indoor Humidity, Alarm/Snooze indicator, Date, and Week Day.
4. Nastavení
4.1 Napájení jednotek
- Bezdrátový venkovní senzor: Open the battery compartment on the back of the sensor. Insert 2x AA batteries, observing the correct polarity (+/-). Close the compartment.
- Hlavní jednotka: Open the battery compartment on the back of the main unit. Insert 3x AAA batteries, observing the correct polarity (+/-). Close the compartment. For continuous display and backlight, connect the provided DC 5V power adapter to the power jack on the back of the main unit and plug it into a wall outlet.
4.2 Umístění snímače
Place the wireless outdoor sensor in a shaded, dry location away from direct sunlight and precipitation to ensure accurate readings. Ensure it is within the transmission range of the main unit (typically up to 60 meters in open air). Avoid placing it near large metal objects or electronic devices that could interfere with the signal.
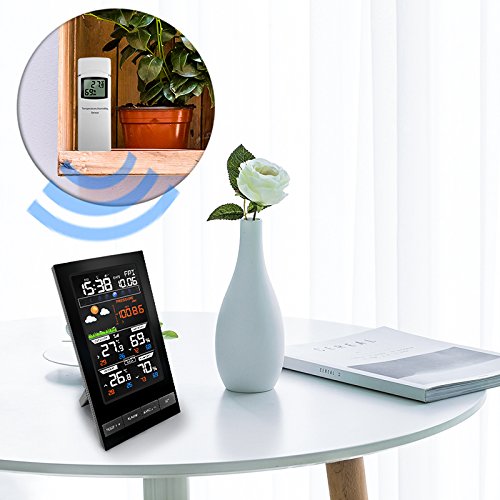
Obrázek 5: Example placement of the main unit indoors and the wireless sensor outdoors (or in a suitable location like a balcony or window sill) to ensure optimal signal reception.
4.3 Počáteční synchronizace
Once both units are powered on, the main unit will automatically search for and connect to the outdoor sensor. This may take a few minutes. The outdoor temperature and humidity readings will appear on the main unit's display once connected. If synchronization fails, ensure both units are within range and try re-inserting batteries in both units.
4.4 Nastavení času a data
Refer to the 'Operating Instructions' section for details on how to manually set the time, date, and other preferences using the control buttons.
5. Návod k obsluze
The main unit features several buttons for configuration and display adjustments:
- TEMP/+ Button: Used to switch between Celsius (°C) and Fahrenheit (°F) temperature units. In setting mode, it increases values.
- Tlačítko ALARM: Zvyklý view nebo nastavte čas budíku.
- BAND/- Button: Used to switch between absolute and relative barometric pressure. In setting mode, it decreases values.
- Tlačítko SET: Used to enter and confirm settings for time, date, and other parameters.
- LIGHT/SNOOZE Button: Activates the backlight temporarily. When an alarm sounds, press to activate snooze function.
5.1 Nastavení času a data
- Stiskněte a podržte SOUBOR po dobu 3 sekund pro vstup do režimu nastavení času. Číslice hodin bude blikat.
- Použijte TEMP/+ or BAND/- tlačítka pro nastavení hodiny.
- Stiskněte SOUBOR to confirm and move to the next setting (minute, year, month, day, 12/24 hour format, DST, RCC).
- Repeat steps 2 and 3 until all settings are configured. Press SOUBOR pro ukončení režimu nastavení.
5.2 Nastavení alarmu
- Stiskněte tlačítko POPLACH jedním stisknutím tlačítka view čas budíku.
- Stiskněte a podržte POPLACH po dobu 3 sekund pro vstup do režimu nastavení budíku. Číslice hodin bude blikat.
- Použijte TEMP/+ or BAND/- tlačítky pro nastavení hodin a minut.
- Stiskněte POPLACH pro potvrzení a ukončení.
- Chcete-li aktivovat/deaktivovat budík, stiskněte tlačítko POPLACH button repeatedly until the alarm icon appears/disappears on the display.
5.3 Zobrazení teploty a vlhkosti
- The display shows current indoor and outdoor temperature and humidity.
- Stiskněte tlačítko TEMP/+ tlačítko pro přepínání mezi stupni Celsia (°C) a Fahrenheita (°F).
- The display also shows maximum and minimum recorded values for indoor and outdoor temperature and humidity. These values typically reset daily.
5.4 Barometric Pressure and Weather Forecast
- The weather station displays current barometric pressure.
- Stiskněte tlačítko BAND/- button to switch between absolute and relative barometric pressure.
- The weather forecast icons (e.g., sunny, cloudy, rainy) are based on changes in barometric pressure over time. These are predictions and may not always perfectly match actual weather conditions.
6. Údržba
- Výměna baterie: Replace batteries in both the main unit and the sensor when the low battery indicator appears on the display. Always replace all batteries at the same time.
- Čištění: Očistěte povrch displeje a jednotky měkkým hadříkemamp tkanina. Nepoužívejte abrazivní čisticí prostředky nebo rozpouštědla.
- Péče o senzor: Ensure the outdoor sensor remains protected from extreme weather conditions. Regularly check for any obstructions around the sensor that might affect readings.
- Skladování: Pokud zařízení skladujete delší dobu, vyjměte všechny baterie, abyste zabránili jejich vytečení.
7. Řešení problémů
| Problém | Možná příčina | Řešení |
|---|---|---|
| Žádný displej na hlavní jednotce | Batteries are dead or incorrectly inserted; Power adapter not connected or faulty. | Check battery polarity and replace if necessary. Ensure power adapter is securely connected and functional. |
| Venkovní teplota/vlhkost se nezobrazuje nebo je nepřesná | Sensor out of range; Low sensor battery; Interference; Sensor exposed to direct elements. | Move sensor closer to the main unit. Replace sensor batteries. Relocate sensor away from electronic interference. Place sensor in a shaded, dry area. |
| Předpověď počasí nepřesná | Forecast is a prediction based on barometric pressure changes, not real-time observation. | Understand that the forecast is an estimation. Allow 24-48 hours for the station to calibrate after initial setup. |
| Nesprávný čas/datum | Manual setting error; RCC signal not received. | Manually set time and date as per instructions. Ensure the unit is placed where it can receive RCC signal (if applicable). |
8. Specifikace
- Značka: Protmex
- Model: PT2800U
- Typ displeje: Digital, Colorful LCD
- Zdroj napájení (hlavní jednotka): DC 5V Power Adapter (included) or 3x AAA Batteries (not included)
- Zdroj energie (senzor): 2x baterie AA (nejsou součástí balení)
- Styl: Moderní
- Tvar: Obdélníkový
- Funkce: Indoor/Outdoor Temperature, Indoor/Outdoor Humidity, Barometric Pressure, Weather Forecast, Time, Date, Alarm, Snooze, Moon Phase, DST, RCC.
9. Záruka a podpora
Protmex products are designed for reliability and performance. This product comes with a standard manufacturer's warranty against defects in materials and workmanship. For specific warranty details, please refer to the warranty card included in your package or contact Protmex customer support.
If you encounter any issues or have questions regarding the operation of your PT2800U Weather Station, please contact Protmex customer support through the retailer where the product was purchased or visit the official Protmex webmísto pro pomoc.